
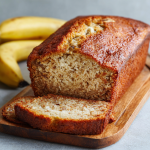
The Unbeatable Joy of a Perfectly Moist Banana Bread
Hey there, friend! Beau here, welcoming you back to my kitchen at Feastical. Let’s talk about a universal kitchen truth: those sad, speckled bananas on your counter aren’t a failure—they’re a prophecy. A prophecy of something warm, sweet, and incredibly comforting headed your way. I’m talking about the holy grail of home baking: a loaf of moist banana bread with a crust that shatters like a golden sunrise. You know the one. The kind that makes your entire house smell like a hug, the kind that’s equally perfect at 7 AM with a strong cup of coffee as it is at 10 PM standing in front of the fridge (we’ve all been there, no judgment here).
This isn’t just another recipe. This is my best-ever, go-to, never-fail masterpiece. It’s the loaf I’ve baked a hundred times, the one my friends text me for, the one that turns “baking novice” into “kitchen hero” in about an hour. We’re keeping it soulful and simple, because that’s how the best memories are made. No fancy techniques, no mysterious ingredients—just honest, feel-good food that brings people together. So, if you’re ready to turn those forgotten bananas into a legendary treat, grab your bowl and your favorite spatula. Let’s bake some magic.
My Grandmother’s Countertop and the Birth of a Baker
My love affair with banana bread started not in a culinary school, but on a wobbly step-stool at my Grandma Eleanor’s laminate countertop. She was a woman who believed waste was a sin, especially when it came to food. I’d point at the browning bananas in her fruit bowl with a wrinkled nose, and she’d just smile, her eyes twinkling. “Beau, honey,” she’d say, pulling down her speckled mixing bowl, “that’s not ugly. That’s flavor waiting to happen.”
She’d let me mash the bananas with an old wooden fork until they were a smooth, fragrant pulp. She taught me to listen for the specific thwump-thwump sound of the batter when it was just right—not overmixed, but perfectly combined. The wait for it to bake was agony, but the reward… oh, the reward. That first slice, still warm enough to melt the pat of butter she’d slather on it, was a lesson in alchemy. She showed me how something seemingly past its prime could be transformed into pure, unadulterated joy. Every time I bake this loaf, I’m back on that stool, covered in flour, learning that the best things in life and in the kitchen are often the simplest. This recipe is my tribute to her.
Gathering Your Flavor Arsenal
Here’s everything you’ll need to create this masterpiece. Remember, baking is part science, part soul. Quality ingredients make a difference, but don’t stress—I’ve got swaps for you!
- 3 ripe (very ripe!) bananas, mashed – This is the STAR. We’re talking black-speckled, super-soft bananas. The darker, the sweeter and more flavorful your bread will be. No ripe bananas? Bake unripe ones at 300°F for 15-20 minutes until the skins blacken!
- ½ cup (113g) unsalted butter, melted – Melted butter gives us an incredibly tender crumb and that rich, comforting flavor. For a dairy-free version, an equal amount of melted coconut oil works wonders and adds a lovely subtle note.
- ¾ cup (150g) brown sugar – I prefer brown sugar over white for its deep molasses flavor and moisture. It’s the secret to that moist texture. Light or dark brown works—dark will give a slightly deeper, almost caramel tone.
- 2 large eggs – They bind our loaf and add structure. Make sure they’re at room temperature to blend seamlessly into the batter. In a pinch, you can warm cold eggs in a bowl of hot water for 5 minutes.
- 1 teaspoon pure vanilla extract – The flavor booster. It rounds out all the other sweetness. Don’t skip it!
- 1 ½ cups (190g) all-purpose flour – The foundation. For a slightly denser, nuttier loaf, you can swap up to half for whole wheat flour.
- 1 teaspoon baking soda – Our leavening agent. It reacts with the acidic bananas to give the bread its perfect rise. Make sure it’s fresh for best results.
- ½ teaspoon salt – Crucial! Salt balances the sweetness and makes all the flavors pop. I use fine sea salt.
- Optional Flavor Boosters:
- ½ teaspoon ground cinnamon – My personal must-add. It whispers “cozy” into every bite.
- ½ cup chopped walnuts or pecans – For a delightful crunch and toasty flavor.
- ½ cup chocolate chips (semi-sweet or dark) – Because sometimes, chocolate is the answer.
Let’s Get Baking: Your Step-by-Step Roadmap to Bliss
Follow these steps, throw in a little love, and watch the magic happen. I’m talking you through each one with my favorite chef hacks.
Step 1: Prep Your Oven & Pan. First things first: preheat your oven to 350°F (175°C). This isn’t just a suggestion—a properly preheated oven is key to that initial rise and perfect crust. While it’s warming up, grab your 9×5-inch loaf pan. Grease it generously with butter or non-stick spray, or for the ultimate easy release, line it with parchment paper so it hangs over the sides. Think of it as a sling for your beautiful loaf!
Step 2: The Wet Mix – Where the Magic Begins. In a large mixing bowl, take your mashed bananas. I like to leave them a little bit chunky for tiny pockets of pure banana flavor. Add the melted (and slightly cooled) butter, brown sugar, eggs, and vanilla. Now, grab your whisk or a sturdy fork and mix until you have a smooth, homogenous, caramel-colored liquid. You’ll see the sugar has mostly dissolved. This is your flavor base. Chef’s Hack: If your brown sugar is lumpy, press it through your fingers or a sieve before adding it. No one wants a sugar lump surprise!
Step 3: Bringing It All Together – The Dry Ingredients. Here’s the most important tip in the whole recipe: DO NOT OVERMIX. Place a sieve over your bowl of wet ingredients and sift in the flour, baking soda, and salt (and cinnamon if using). This prevents lumps and aerates the flour. Now, put the whisk away. Grab a spatula or a wooden spoon and fold the dry ingredients into the wet. Use a gentle, sweeping motion from the bottom of the bowl up and over. Stop the moment you no longer see dry streaks of flour. A few small lumps are perfectly fine—they’re better than a tough, overmixed loaf!
Step 4: The Fun Part – Fold in Your Extras! Now’s the time to gently fold in those walnuts or chocolate chips, if you’re using them. Just a few turns to distribute them evenly.
Step 5: Bake to Golden-Brown Perfection. Pour the thick, glorious batter into your prepared loaf pan. Smooth the top with your spatula. Slide it into the middle of your preheated oven and set your timer for 50 minutes. The true test is the toothpick test: after 50 minutes, insert a toothpick or a thin skewer into the very center of the loaf. If it comes out with a few moist crumbs clinging to it, it’s perfect. If it’s wet with batter, give it another 5-10 minutes. Chef’s Hack: If the top is browning too quickly (a common issue!), loosely tent a piece of aluminum foil over the top for the last 15 minutes of baking. This lets it cook through without burning the crust.
Step 6: The Test of Patience – Cooling. This is the hardest part! When done, pull the loaf from the oven. Let it cool in the pan on a wire rack for 10 minutes exactly. This allows it to set so it doesn’t fall apart. Then, using the parchment paper sling or a knife around the edges, lift it out and let it cool completely on the rack. I know, I know… waiting is torture. But slicing into a warm loaf can make it gummy. For a clean slice, let it cool. For pure, buttery, melt-in-your-mouth joy, break the rules and have a warm piece. I won’t tell.
How to Serve Your Masterpiece
Presentation is part of the fun! For a classic, homey look, place the whole, cooled loaf on a wooden cutting board and slice it right at the table. The sound of the knife cutting through that crust is pure music.
A plain slice is a beautiful thing, but let’s gild the lily:
- The Classic: A thick slice, lightly toasted, slathered with good salted butter. Watch it melt into all the nooks and crannies.
- The Decadent: A schmear of creamy peanut butter or almond butter, topped with a drizzle of honey.
- The À La Mode: A warm slice with a scoop of vanilla bean ice cream melting over the top. This is dessert heaven.
- The Brunch Star: Slice it thick, griddle it in a little butter until caramelized, and serve alongside crispy bacon and a cup of strong coffee.
Make It Your Own: Delicious Twists & Swaps
The beauty of this recipe is its versatility. Once you’ve mastered the base, play with it! Here are some of my favorite riffs:
- Brown Butter Bliss: Take your melted butter to the next level. Cook it in a saucepan over medium heat until it foams, turns golden brown, and smells nutty. Let it cool before using. This adds an incredible depth of flavor.
- Double Chocolate Chunk: Fold in ½ cup chocolate chips AND replace ¼ cup of the flour with unsweetened cocoa powder for the ultimate chocolate lover’s banana bread.
- Gluten-Free & Fabulous: Swap the all-purpose flour for a 1:1 gluten-free baking blend. The recipe works like a charm!
- Tropical Escape: Fold in ½ cup shredded sweetened coconut and ¼ cup chopped macadamia nuts. It’s like a vacation in a loaf pan.
- Marble Magic: Divide your finished batter in half. Mix 2 tablespoons of cocoa powder and 1 tablespoon of milk into one half. Alternate spoonfuls of plain and chocolate batter into the pan, then swirl with a knife.
Beau’s Kitchen Notes & Stories
This recipe has been a living, breathing thing in my kitchen for years. I once, in a sleepy morning haze, accidentally used a whole cup of baking soda instead of one teaspoon. Let me tell you, the volcanic eruption that occurred in my oven and the resulting bitter, green-tinged “loaf” is a cautionary tale I’ll never forget! Always double-check your measurements, friends.
Over time, I’ve learned that the ripeness of the banana is non-negotiable for maximum flavor. I also started adding the cinnamon by default—it just feels right. The recipe is forgiving, but it rewards attention to those little details. It’s evolved from my grandma’s simple recipe into my own signature, but its soul—that magic of transformation—remains exactly the same.
Your Questions, Answered
Q: My banana bread is raw in the middle but dark on top! What happened?
A: This usually means your oven is too hot. Oven temperatures can be inaccurate! Invest in an inexpensive oven thermometer. If it’s browning too fast, tent it with foil earlier (at the 30-minute mark). Also, ensure you’re using the correct pan size; a smaller pan will cause the batter to be too deep and bake unevenly.
Q: Why is my bread dense and gummy?
A> The #1 culprit is overmixing the batter after adding the flour. You develop the gluten, which leads to a tough, dense texture. Mix just until combined! Also, make sure your baking soda is fresh and your bananas are adequately mashed.
Q: Can I make this into muffins?
A: Absolutely! This batter makes fantastic muffins. Divide it into a lined muffin tin, filling each cup about ⅔ full. Bake at the same temperature (350°F) for 18-22 minutes, or until a toothpick comes out clean.
Q: How do I store it to keep it moist?
A> Once completely cool, wrap the loaf tightly in plastic wrap or store it in an airtight container at room temperature for up to 3 days. For longer storage, wrap it well and freeze it for up to 3 months. Slice it before freezing for easy single servings!
Moist Banana Bread Recipe with a Golden Crust
Description
Got a few overripe bananas on the counter? Perfect — you’re halfway to one of the best homemade treats ever. This moist banana bread is simple, reliable, and packed with cozy flavor. It’s great for breakfast, snacks, or dessert, and it doesn’t require any fancy equipment — just a bowl, a spoon, and a loaf pan.
Ingredients
-
3 very ripe bananas, mashed
-
½ cup (113 g) unsalted butter, melted and cooled
-
¾ cup (150 g) brown sugar
-
2 large eggs, room temperature
-
1 tsp vanilla extract
-
1½ cups (190 g) all-purpose flour
-
1 tsp baking soda
-
½ tsp salt
-
½ tsp ground cinnamon (optional but recommended)
Optional add-ins (choose one or mix):
-
½ cup chocolate chips
-
½ cup chopped walnuts or pecans
-
¼ cup shredded coconut
Instructions
-
Preheat oven to 350°F (175°C). Grease or line a 9×5-inch loaf pan with parchment.
-
Mash bananas in a large bowl until mostly smooth (a few small lumps are fine).
-
Mix wet ingredients
Stir in melted butter, brown sugar, eggs, and vanilla until well combined. -
Add dry ingredients
Add flour, baking soda, salt, and cinnamon. Gently fold with a spatula just until no dry flour remains. Do not overmix. -
Fold in extras if using (chips or nuts).
-
Transfer to pan and smooth the top.
-
Bake 50–60 minutes, or until a toothpick inserted in the center comes out with a few moist crumbs.
-
Cool in the pan for 10 minutes, then remove and cool fully on a rack before slicing (if you can wait!).
Notes
-
Use very ripe bananas — dark spots mean more sweetness and stronger flavor.
-
If your bananas aren’t ripe, bake them (unpeeled) at 300°F / 150°C for about 15–20 minutes until dark. Cool, then use.
-
Don’t overmix after adding flour — this keeps the loaf tender, not dense.
-
If the top browns too fast, loosely cover with foil for the last 15 minutes.
-
For extra moisture, replace 2 tablespoons of butter with yogurt or sour cream.
Nutritional Information (A General Guide)
Hey, we’re all about balance here! This info is for the plain loaf, sliced into 10 servings. Adding chocolate chips or nuts will change these values. I’m not a nutritionist, but I believe in mindful eating. This bread is a treat, a comfort, and a way to use up food that might otherwise be wasted—that’s a win in my book.
- Calories: ~210 per slice
- Fat: 9g
- Carbohydrates: 30g
- Sugars: 15g (primarily from the natural bananas and brown sugar)
- Protein: 3g
Final Thoughts from My Kitchen to Yours
And there you have it, friend—my heart and soul baked into one simple loaf. This moist banana bread is more than a recipe; it’s a reminder that the simplest ingredients, a little patience, and a lot of love can create something truly extraordinary. It’s about the joy of sharing, the comfort of a familiar smell, and the satisfaction of creating something with your own two hands.
I hope this recipe finds a permanent spot in your own recipe box, gets stained with batter and butter, and becomes a story you tell. Now, go preheat that oven and rescue those bananas. And when you pull that golden, crackly-topped loaf out of the oven, think of me and my grandma, and know you’re part of a long, delicious tradition of turning simple ingredients into shared happiness. Happy baking, and as always, thanks for letting me share my table with you.
With a full heart and an empty mixing bowl,
Beau