Mini Chicken Pot Pies: Muffin-Tin Comfort Food You Can Hold
Hey friends, Beau here from Feastical! Let’s talk about one of life’s greatest, coziest inventions: the chicken pot pie. That glorious fusion of creamy filling, tender chicken, and a flaky, buttery crust that shatters at the touch of a fork. It’s a hug in a baking dish. But what if I told you we could take all that soul-warming goodness and make it portable? What if you could hold your comfort food in your hand, no plate required, perfect for game day, packed lunches, or just a super fun family dinner?
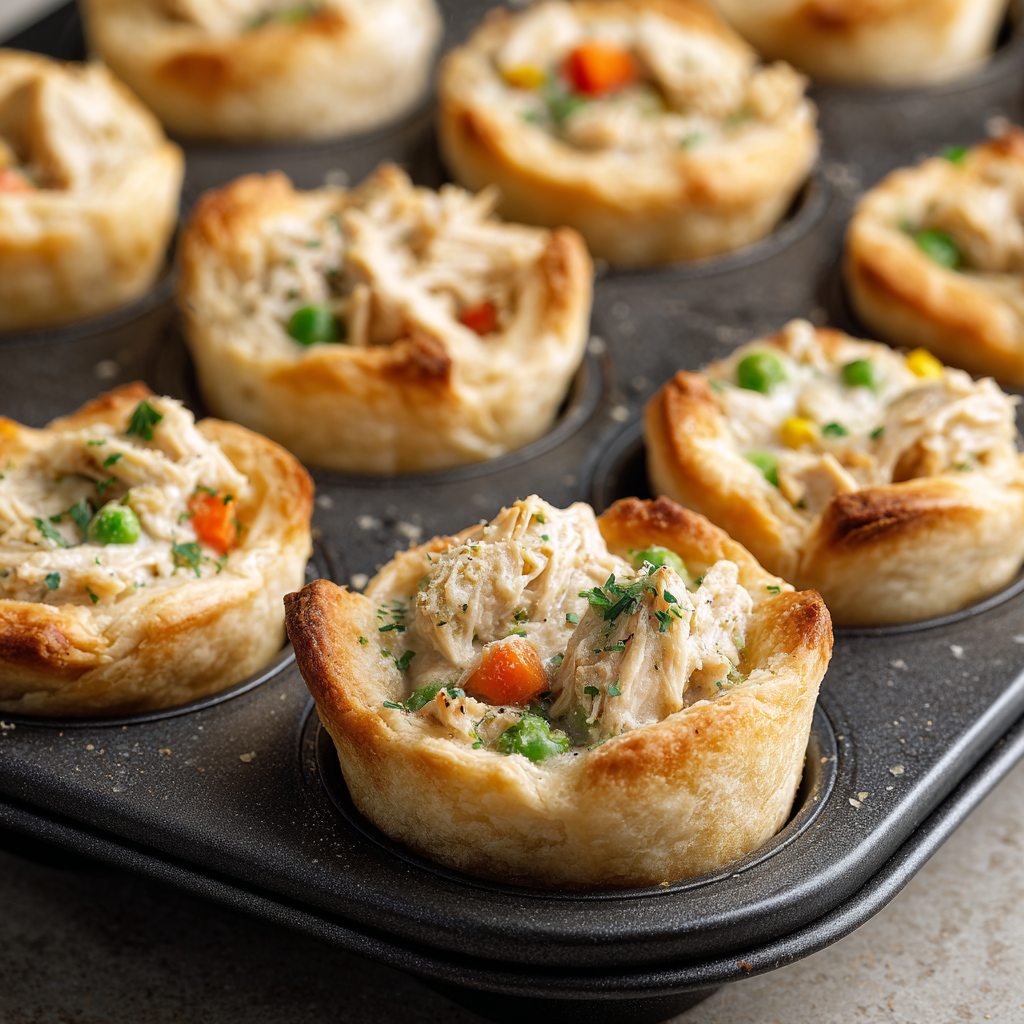
Well, stop dreaming, because these Mini Chicken Pot Pies are about to become your new favorite kitchen hack. We’re taking all the classic flavor and baking it right into a muffin tin, creating golden, flaky, handheld pockets of pure joy. They’re irresistibly cute, deceptively easy (thanks to a couple of smart shortcuts), and they disappear from the plate faster than you can say “seconds, please!” Whether you’re a seasoned pro or someone who considers “ordering takeout” a core culinary skill, this recipe is for you. So, tie on your apron, preheat that oven, and let’s turn classic comfort into a totally holdable feast.
The Pie That Built a Fort (And My Love for Comfort Food)
My obsession with pot pies started long before I ever ran a food blog. It goes back to rainy Saturday afternoons at my grandma’s house. The moment those tell-tale clouds would roll in, she’d wink, head to the kitchen, and pull out her deep, ceramic pie dish. To me, the magic wasn’t just in the eating (though that was phenomenal)—it was in the ceremony. The whole house would slowly fill with the scent of roasting chicken, thyme, and pastry. It was the signal that the world outside could do its worst; in here, we were safe, full, and together.
One particular stormy day, the power flickered out just as her pie was cooling. Undeterred, Grandma declared it a “fort night.” We dragged every blanket and pillow into the living room, built a massive fortress, and ate that entire chicken pot pie by flashlight, using our hands when the forks got lost in the pillow piles. It was messy, hilarious, and utterly perfect. That’s the spirit I wanted to capture with these mini pies: all the soul-soothing flavor of that memory, but in a form that’s ready for adventure, for sharing, for eating in a blanket fort (or just on the couch). It’s comfort food that fits in your hand, and honestly, isn’t that what we all need sometimes?
Gathering Your Cozy Ingredients
Here’s the beautiful part: we’re keeping it simple and stress-free. This is about maximizing flavor, not your time spent prepping. Here’s what you’ll need to make about 12 perfect little pies.
- 2 cups cooked, shredded chicken: This is your star! I love using the meat from a store-bought rotisserie chicken—it’s juicy, flavorful, and the ultimate timesaver. Leftover roasted or grilled chicken works wonderfully too. Chef’s Insight: For a deeper flavor, poach a couple of chicken breasts in broth with a bay leaf and some peppercorns.
- 1 cup frozen mixed vegetables (peas, carrots, corn): Don’t thaw them! The frozen veggies hold their shape and texture perfectly during the quick bake. This blend is the classic trifecta, but feel free to swap in your favorite frozen mix. Substitution Tip: Fresh diced carrots and peas are great too; just give them a quick 2-minute blanch in boiling water first.
- 1 can (10.5 oz) cream of chicken soup: Our creamy, savory glue. It creates the perfect saucy base without needing to make a roux from scratch. Chef’s Insight: For a richer, homemade vibe, you can substitute with 1 cup of a thick, seasoned béchamel or even a jarred chicken gravy in a pinch.
- 1 tube refrigerated biscuit dough (8 large biscuits): The game-changing shortcut! These become our flaky, golden crust. We’re going to stretch one tube to cover 12 muffin cups—trust me, it works like a charm. Substitution Tip: For a from-scratch option, use your favorite biscuit or even pie dough recipe, rolled thin.
- ½ teaspoon garlic powder: Adds a warm, savory backbone. Granulated garlic distributes evenly throughout the filling. Chef’s Insight: A teaspoon of fresh thyme or a pinch of poultry seasoning would be a fantastic addition here for an herby note.
- Salt and pepper, to taste: Always, always taste your filling before assembling! Season it well.
- Optional: chopped fresh parsley for garnish: A little green sprinkle makes everything look (and taste) more vibrant and finished.
Let’s Build Some Mini Masterpieces: Step-by-Step
Ready to see the magic happen? Follow these steps, and you’ll have a tray of golden cuties in no time. I’ve sprinkled in my favorite chef hacks to ensure your success.
- Preheat & Prep: Fire up your oven to 375°F (190°C). While it’s warming, grab a standard 12-cup muffin tin and give it a generous spritz of non-stick cooking spray. Chef Hack: For an extra guarantee of no sticking and a richer flavor, you can brush the cups with a little melted butter instead.
- Mix the Hearty Filling: In a large mixing bowl, combine your shredded chicken, frozen veggies, cream of chicken soup, garlic powder, and a good crack of black pepper. Give it a gentle but thorough mix until everything is evenly coated in that creamy sauce. This is your tasting moment! Dip a spoon in and try it. Does it need a pinch more salt? A little more pepper? Adjust it now—this is where you make it yours.
- The Biscuit Transformation: Open your tube of biscuits (that satisfying *pop* never gets old). Separate them onto a clean surface. Here’s the key trick: take each plump biscuit and carefully split it in half horizontally, like you’re opening a hamburger bun. You’ll end up with 16 thinner rounds of dough. Chef Hack: If the dough is sticky, dust your fingers and the knife with a tiny bit of flour. Don’t worry if they aren’t perfect circles; rustic is charming!
- Form the Crust Cups: Take 12 of your thinner biscuit rounds and press each one into the bottom and up the sides of a prepared muffin cup. Use your fingers to gently press and smooth the dough, ensuring it goes about halfway up the sides. It should look like a little dough cup waiting for treasure. The dough might seem thin, but it puffs up beautifully!
- Fill to the Brim: Evenly divide the chicken and veggie filling among your 12 dough cups. Spoon it right in, packing it gently. You want them nice and full—this is no time for shyness! If you have a little filling left over, just tuck it into the cups that look like they could handle it.
- Top It Off (Optional but Awesome): You have a few options here. You can leave them as open-faced pies. Or, you can take the 4 remaining biscuit rounds, stretch them slightly, and place them on top of some of the pies, pressing the edges to seal. You won’t have enough for all 12, so I like to make a few “lidded” ones for variety! For a classic look, cut a small slit in the top to let steam escape.
- Bake to Golden Perfection: Slide the muffin tin into your preheated oven and bake for 15-18 minutes. You’re looking for the biscuit dough to be fully cooked through and a gorgeous golden brown on top and around the edges. Your kitchen will smell absolutely incredible.
- The Grand Release: Once out of the oven, let the mini pies cool in the tin for 5-7 minutes. This is crucial—it lets the filling set slightly and makes them much easier to remove. Then, gently run a butter knife around the edges of each pie and carefully lift them out. They should pop right out!
How to Serve These Handheld Hugs
Presentation is part of the fun! Place these warm, golden mini pot pies on a big wooden board or a simple platter. Scatter that optional chopped parsley over the top for a fresh, colorful finish. These are the ultimate finger food for a crowd—just set them out and watch them vanish. For a family dinner, I love serving 2-3 per person alongside a bright, simple green salad with a tangy vinaigrette to cut through the richness. They’re also fantastic dipped into a little extra gravy or a side of cranberry sauce for a sweet-and-savory kick. And let’s not forget the lunchbox hero award: pack a couple in a container once cooled; they taste fantastic at room temperature, too!
Make It Your Own: Delicious Twists & Swaps
The beauty of this recipe is its versatility. Once you’ve mastered the basic formula, the world is your muffin tin! Here are a few of my favorite spins:
- The Thanksgiving Leftover Pie: Swap the chicken for diced leftover turkey, use cream of mushroom soup, and add a handful of dried cranberries to the filling. A sprinkle of sage in the mix is pure holiday magic.
- Vegetarian “Chick’n” Pot Pie: Use a plant-based chicken substitute or hearty chunks of sautéed mushrooms and potatoes. Cream of mushroom or celery soup keeps it creamy and delicious.
- Biscuit-Topped Casserole Style: Don’t feel like forming cups? Press the entire tube of biscuits (not split) into the bottom of a greased 9×13 baking dish. Spread the filling over top, then bake. You’ll get a fantastic pot pie casserole with a thick, fluffy biscuit base.
- The “Everything” Upgrade: Sauté a diced small onion and a rib of celery in butter before adding it to the filling. Stir in a big spoonful of sour cream or cream cheese for extra tang and richness.
- Puff Pastry Elegance: For a super flaky, French-inspired crust, use a thawed sheet of puff pastry instead of biscuits. Cut it into squares and press into the muffin cups. So fancy, so easy.
Beau’s Kitchen Notes & Stories
This recipe has become a Feastical staple, and it’s evolved in my kitchen more times than I can count. I once accidentally used a can of cheddar cheese soup instead of cream of chicken, and you know what? It was a delicious, cheesy accident my nephews still ask for! The lesson? Don’t fear improvisation. These mini pies are incredibly forgiving.
I also learned the hard way that letting them cool before removal is non-negotiable. In my early, over-eager days, I tried to pry one out immediately and ended up with a delicious but tragically deconstructed mess on my plate. Patience, young padawan. Let the magic set. Now, I use those 5 minutes to whip up a quick salad or pour the drinks. Every recipe has a rhythm; find yours and have fun with it.
Your Questions, Answered (Let’s Troubleshoot!)
Q: My biscuit cups came out soggy on the bottom. What happened?
A: This usually means the filling was a bit too wet or they needed a tad more bake time. Next time, make sure you’re not using any extra liquid from the chicken or soup can. Also, ensure your oven is fully preheated and try placing the muffin tin on a lower rack for the last few minutes to crisp the bottom.
Q: Can I make these ahead of time and reheat them?
A: Absolutely! They reheat beautifully. Let them cool completely, store in an airtight container in the fridge for up to 3 days. Reheat in a 350°F oven for 10-12 minutes, or in the air fryer for about 5 minutes, until hot and crisp. The microwave works in a pinch but will soften the crust.
Q: I’m gluten-free. Any swaps?
A> For sure! Use a gluten-free cream of chicken soup (or make a simple gluten-free gravy) and a tube of gluten-free biscuit dough. The method stays exactly the same.
Q: Can I freeze the unbaked or baked mini pies?
A> Yes! For unbaked, assemble them completely, then freeze the whole muffin tin until solid. Pop the frozen pies out and store in a freezer bag. Bake from frozen, adding 5-10 minutes to the bake time. Baked pies can also be frozen and reheated in the oven.
Mini Chicken Pot Pies : Muffin-Tin Comfort Food You Can Hold
Description
If classic chicken pot pie feels like a warm hug, these mini versions are little handheld cuddles. Creamy chicken and veggies tucked into flaky biscuit cups, baked right in a muffin tin—easy, fun, and perfect for family dinners, parties, or make-ahead lunches. Same cozy flavor, way more convenient.
Ingredients
-
2 cups cooked, shredded chicken (rotisserie works great)
-
1 cup frozen mixed vegetables (peas, carrots, corn – no need to thaw)
-
1 can (10.5 oz / 300 g) cream of chicken soup
-
½ teaspoon garlic powder
-
Salt and black pepper, to taste
-
1 tube refrigerated biscuit dough (8 large biscuits)
-
Optional garnish: chopped fresh parsley
Instructions
-
Preheat oven to 375°F (190°C). Grease a 12-cup muffin tin well.
-
Make the filling: In a bowl, mix chicken, frozen vegetables, cream of chicken soup, garlic powder, salt, and pepper. Taste and adjust seasoning.
-
Prep the biscuits: Separate biscuits and carefully split each one in half horizontally to make thinner rounds.
-
Form crusts: Press 12 biscuit halves into the muffin cups, covering the bottom and sides to form little dough cups.
-
Fill: Spoon the chicken mixture evenly into each cup.
-
Bake for 15–18 minutes, until biscuits are golden and cooked through.
-
Cool slightly (5–7 minutes), then gently remove from the tin. Garnish if desired and serve warm.
Notes
-
Use thick filling: Extra liquid can make the bottoms soggy.
-
Don’t overbake or biscuits may dry out—golden is perfect.
-
Make ahead: Store baked pies in the fridge up to 3 days.
-
Reheat smart: Oven or air fryer keeps them crisp; microwave softens the crust.
-
Freezer-friendly: Freeze baked pies up to 2 months. Reheat from frozen at 350°F (180°C) until hot
Nutritional Information (A Quick Note)
While I’m all about the flavor and the feeling first, I know many of you like to keep track. Here’s a rough estimate per mini pie, based on the ingredients listed. Remember, variations will change this!
- Calories: ~210
- Protein: ~10g (Great for keeping you full!)
- Carbohydrates: ~18g
- Fat: ~11g
- Sodium: This will vary based on your soup and chicken. Using low-sodium soup and seasoning to taste is a great way to control it.
These are satisfying little packages—two or three with a big salad makes for a perfectly balanced, utterly comforting meal.
Final Thoughts from My Kitchen to Yours
And there you have it, friends—your new secret weapon for delicious, crowd-pleasing, holdable comfort. These Mini Chicken Pot Pies are more than just a recipe; they’re a reminder that the best food is often the simplest, and that joy can literally fit in the palm of your hand. They bridge the gap between nostalgic weekend cooking and busy weekday reality, and that’s a gap I love to fill.
I hope you bake up a batch, share them with people you love, and maybe even start a new tradition of your own. If you do, I’d love to hear about it! Tag me @feastical or drop a comment on the blog. Now, go forth and bake. Your fork (or frankly, just your hands) is waiting.
With love and a full plate,
Beau