
Pita Pocket Stuffers: Your New Secret Weapon for Wholesome, Happy Lunches
Hey friends, Beau here! Let’s have a real talk for a second. How many times have you stood in front of the fridge at noon, door hanging open, staring at ingredients that refuse to become a meal? Or worse, spent a small fortune on a “meh” takeout salad that leaves you hungry by 3 PM? I’ve been there more times than I’d like to admit. It’s why I became obsessed with creating lunch solutions that are anything but boring—recipes that are fast, full of flavor, and actually make you look forward to your midday break.
Enter the humble hero we all need: the Pita Pocket Stuffer. This isn’t just a sandwich; it’s a customizable, packable, downright delightful little package of joy. Think of it as a mini edible treasure chest you get to fill with all your favorite things. Whether you’re team savory shredded chicken or all about that creamy, dreamy hummus, these pockets are your blank canvas. They’re perfect for work lunches, school boxes, post-gym fuel, or a light, no-fuss dinner. Best part? We’re talking 10 minutes of active time for a result that tastes like you fussed. So, let’s ditch the lunchtime rut together and build something delicious!
The Pita Promise: A Lunchbox Memory
My love affair with stuffed pitas started way before I ever picked up a chef’s knife. Picture a 10-year-old me, sitting at the Formica kitchen table, watching my grandma assemble what she called “pocket surprises” for my school lunch. She’d warm the pitas just enough on her old cast-iron griddle until they were soft and pliable, then she’d let me be the “sous-chef.” My job was to layer in the shredded roast chicken from last night’s dinner, then the crisp lettuce, and finally, the “confetti”—her name for finely diced red bell peppers and cucumbers.
She’d wrap each one in wax paper, twist the ends, and say, “There’s a little hug in there for lunchtime.” Opening that package later in the noisy cafeteria was my quiet moment of comfort. It was more than food; it was a connection. That’s the spirit I want to bring to Feastical: food that connects, comforts, and makes the ordinary moments a little more special. These pita pocket stuffers are my grown-up, fancied-up version of Grandma’s pocket surprise, and I’m so excited to share that feeling with you.
Gathering Your Flavor Crew: Ingredients & Insights
Here’s where the fun begins! This list is your launchpad, not a rigid rulebook. I’ll give you the blueprint and all my favorite chef-y notes to help you build your perfect pocket.
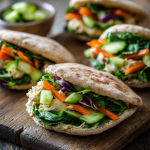
- 4 mini pita pockets (whole wheat or regular): The vessel! Mini pitas are the perfect single-serving size. Chef’s Tip: Look for ones that are “pocket-friendly” (no pre-cut tops). Gently warming them makes them supple and less likely to tear when you open them.
- ½ cup cooked, chopped chicken OR ½ cup hummus: The protein powerhouse! Use leftover rotisserie chicken, grilled chicken, or even canned chickpeas you smash yourself. For the hummus route, a classic garlic or roasted red pepper hummus works wonders.
- ½ cup shredded lettuce or spinach: The fresh, crisp base. Butter lettuce is tender, romaine adds crunch, and baby spinach packs a nutrient punch. Pat your greens dry to keep the pita from getting soggy!
- ¼ cup diced cucumber: The hydrating crunch. I prefer English cucumbers for their thin skin and fewer seeds. A quick dice is all you need.
- ¼ cup shredded carrots: A sweet pop of color and vitamins. Buy pre-shredded to save time, or run a whole carrot down your grater for ultra-fresh flavor.
- The “Make It Yours” Optional Extras: This is your playground! Crumbled feta or goat cheese for tang, sliced Kalamata olives for a briny kick, cherry tomatoes for juicy bursts, a drizzle of tzatziki or a spicy sriracha mayo, or even a sprinkle of za’atar or dill.
Building Your Flavor Masterpiece: Step-by-Step
Ready to assemble? Let’s do this. I’ll walk you through each step with all the little hacks I’ve learned to make this foolproof and fantastic.
- Wake Up Your Pitas. Don’t skip this! It’s the key to a tear-free stuffing experience. You can warm them for 15-20 seconds in the microwave, wrapped in a damp paper towel, or toast them lightly in a dry skillet over medium heat for about 30 seconds per side. You’re not looking for crisp, just soft and flexible. Chef’s Hack: If they’re being stubborn, pop them in the toaster on the lowest setting for a quick wake-up call.
- Perform a Careful “Pocket-otomy.” Using a small, sharp paring knife, carefully slice about 1-2 inches along the top curved edge of the pita. Gently work your fingers inside to open up the pocket. If there’s a stubborn bread wall in the middle, you can gently separate it, but don’t force it or you’ll blow out the side. Patience is a virtue here!
- Spread the Foundation. If using hummus, take a spoon and smear a generous layer along the inside of *both* walls of the pocket. This creates a delicious, creamy barrier that helps hold veggies in place. If using chicken, you can add it now, but consider mixing it with a little mayo, Greek yogurt, or even a spoonful of hummus to keep it moist and cohesive.
- Layer with Strategy. This is how you avoid the dreaded “all-the-falling-out” bite. Start with your heavier, chunkier items (chicken, tomatoes) at the bottom of the pocket. Then add your lighter, leafier greens (lettuce, spinach). Finish with your crunchy, smaller items (cucumber, carrots, olives) near the top. This creates a stable, flavorful structure in every bite.
- Drizzle, Dust, and Devour (or Pack!). Now’s the time for your final flourishes! A zigzag of tzatziki, a sprinkle of feta, a pinch of everything bagel seasoning. If eating immediately, dig in with joy! If packing for later, wrap snugly in parchment paper or foil, twisting the ends like a candy wrapper. Store upright in your lunchbox to keep everything in its happy place.
Plating Up & Partnering: How to Serve Your Pita Pockets
These little guys are seriously versatile. For a casual lunch at home, I love serving two on a bright plate with a big handful of kettle-cooked potato chips and some crisp pickle spears on the side—it’s the perfect contrast of textures. Turning it into a light dinner? Make it a “Mediterranean Mezze” night! Arrange your stuffed pitas on a big board alongside bowls of olives, marinated artichoke hearts, dolmas, and a big dollop of extra hummus for dipping. For kids (or kids at heart), cut the stuffed pita into “sushi rolls”—simply slice the filled pocket into 1-inch rounds. They’re fun, dippable, and less messy. No matter how you serve them, the goal is a smile on your face and delicious food in your belly.
Mix It Up! 5 Flavorful Twists on the Classic
Once you’ve mastered the basic blueprint, the world is your pita pocket! Here are a few of my favorite ways to riff on the theme:
- The Greek Goddess: Fill with hummus, chopped romaine, diced tomatoes, cucumber, red onion, Kalamata olives, and a big crumble of feta cheese. Drizzle with a little Greek vinaigrette.
- Buffalo Chicken Crunch: Toss chopped chicken in buffalo sauce mixed with a touch of ranch or blue cheese dressing. Stuff with the chicken, shredded romaine, diced celery, and a few extra blue cheese crumbles. Cool, spicy, and crunchy!
- Vegan Falafel Fiesta: Swap the chicken for crumbled baked falafel or store-bought ones. Add hummus, shredded cabbage, sliced radishes, and a generous drizzle of tahini sauce.
- Turkey Club Remix: Use sliced turkey, a smear of avocado mash (or guacamole), crispy bacon bits, lettuce, and tomato. It’s a classic lunch sandwich reimagined.
- Sweet & Savory Breakfast Pocket: Yes, for breakfast! Spread with almond butter or cream cheese, then fill with sliced strawberries, a sprinkle of cinnamon, and a few pieces of crumbled cooked bacon or turkey sausage. A surprisingly amazing combo!
Beau’s Kitchen Notes: The Evolution of the Pocket
This recipe has lived in my back pocket (pun intended) for years, evolving with every batch. My biggest “aha!” moment was realizing the power of the moisture barrier. I used to just chuck everything in, and by lunch, the pita would be sadly soggy. Now, whether it’s hummus, a smear of avocado, or a well-dressed protein, that initial layer is non-negotiable. Also, I once tried to use a giant pita for a “mega-stuff” and it was a hilarious, messy failure. The mini pitas are truly the ideal size for manageability and portion control. Remember, friends, cooking is about progress, not perfection. Every slightly overstuffed, slightly messy pocket is still a delicious victory.
Your Questions, Answered: FAQs & Fixes
Q: My pita always tears when I try to open it! Help!
A: This is usually a warmth issue. Make sure to warm it just enough so it’s soft and puffy. If it’s still stubborn, use kitchen scissors to snip a small opening, then gently work it open with your fingers. Don’t rush it!
Q: Can I meal prep these for the whole week?
A> You can absolutely prep the components for the week! Keep chopped veggies, cooked chicken, and hummus in separate airtight containers. Assemble your pockets the morning you plan to eat them (or the night before) to maintain the perfect texture. A fully assembled pocket will hold for about 24 hours in the fridge if wrapped tightly.
Q: It’s falling apart when I eat it. What am I doing wrong?
A> Two things: 1) You might be overstuffing. Show that pocket a little mercy! 2) Check your layering order. Heavier, wetter items on the bottom, lighter, drier items on top creates a more stable architecture.
Q: Any gluten-free or low-carb options?
A> Absolutely! For gluten-free, seek out GF pita brands (they’re becoming more common!). For low-carb, you can use large, sturdy lettuce leaves like romaine or butter lettuce as a wrap, or even halved and hollowed-out mini bell peppers as your “vessel.”
Pita Pocket Stuffers : Easy Mini Lunches with Chicken or Hummus
Description
Hey friends, Beau here! If lunch has been feeling boring, rushed, or straight-up uninspiring, these Pita Pocket Stuffers are about to change the game. They’re quick to make, endlessly customizable, and perfect for busy days when you still want something fresh, filling, and fun. Think of them as little edible pockets of happiness—ready in minutes and packed with flavor.
Ingredients
-
4 mini pita pockets (whole wheat or regular)
-
½ cup cooked, chopped chicken or ½ cup hummus (for vegetarian)
-
½ cup shredded lettuce or baby spinach
-
¼ cup diced cucumber
-
¼ cup shredded carrots
Optional Add-Ins (mix & match):
-
Crumbled feta or goat cheese
-
Cherry tomatoes, halved
-
Kalamata olives, sliced
-
Tzatziki or yogurt sauce
-
Avocado slices
-
A pinch of za’atar, dill, or black pepper
Instructions
-
Warm the pitas
Gently warm the pita pockets for about 15–20 seconds in the microwave or briefly in a dry pan. This makes them soft and easy to open. -
Open the pocket
Carefully cut a small slit along the top edge of each pita and gently open it to form a pocket. -
Add the base
Spread hummus inside the pita or add your chopped chicken. This acts as the flavor foundation. -
Layer the veggies
Add lettuce or spinach first, followed by cucumber and carrots. Sprinkle in any extras you love. -
Finish & serve
Add cheese or sauce if using. Serve right away or wrap tightly for lunch on the go.
Notes
-
Warm = flexible: Cold pitas tear easily, so don’t skip warming them.
-
Don’t overstuff: A slightly filled pita is easier (and neater!) to eat.
-
Meal-prep smart: Prep all fillings ahead of time, but assemble the pita the day you’ll eat it to avoid sogginess.
-
Kid-friendly hack: Slice filled pitas into bite-size rounds for easy lunches.
Nutritional Highlights (Per Serving: 2 Stuffed Mini Pitas)
Let’s talk fuel! This is a balanced, energy-sustaining meal. Using the chicken version as an example, two stuffed pitas come in around 280-320 calories, packing a satisfying 12-20g of protein to keep you full, along with a good mix of complex carbs and healthy fats. The veggie fillings deliver fiber, vitamins A and C (from the carrots and greens), and hydration (from the cucumber). Using whole wheat pitas adds extra fiber. Remember, these numbers are a guide—they’ll dance a little based on your specific ingredients and fabulous additions!
Prep Time: 10 mins | Cook Time: 0 mins | Total Time: 10 mins | Servings: 2
Final Thoughts: Your Lunch, Upgraded
And there you have it, friends—your ticket to leaving lackluster lunches in the dust. These Pita Pocket Stuffers are proof that eating well doesn’t require fancy skills or hours in the kitchen. It’s about smart, simple, soulful combinations that make you feel good. I hope this recipe becomes a trusted friend in your weekly routine, a canvas for your own culinary creativity, and maybe even a “pocket surprise” for someone you love. Now, I’d love to hear from you! What’s your ultimate pita pocket combo? Tag me on social with #FeasticalPockets so I can see your delicious creations. Until next time, keep your kitchen fun and your forks ready!
Hungry for more?