The Secret to Seriously Crispy Fried Chicken Wings (They’re a Hug in Food Form)
Hey friend, Beau here. Grab a stool and pull up to the counter. Let’s talk about one of life’s greatest, simplest pleasures: a perfectly fried chicken wing.
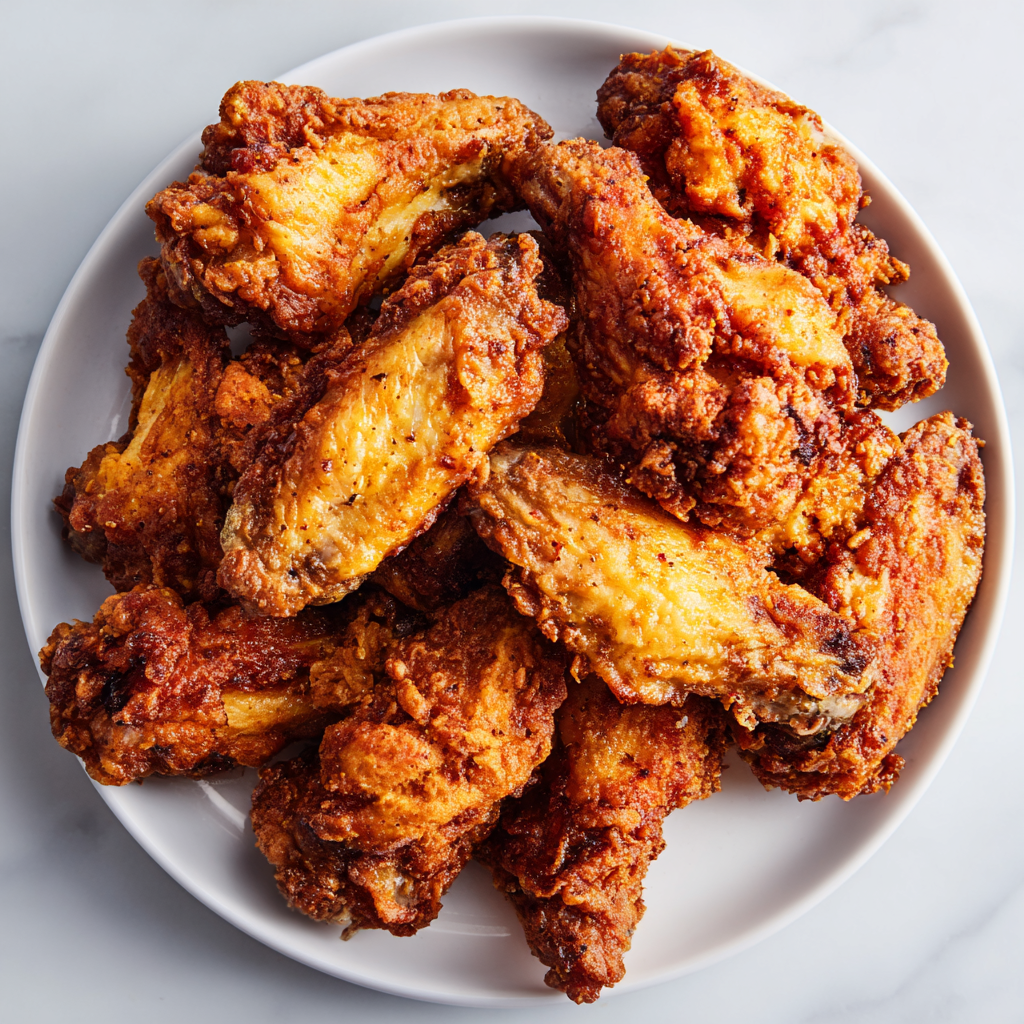
You know the one. It’s the star of every game day spread, the hero of late-night cravings, the unspoken MVP of any potluck. It’s got that shatteringly crisp, golden-brown exterior that gives way with an audible crunch, followed by the juicy, steaming, flavor-packed meat inside. It’s a masterpiece of contrasts, and honestly? It tastes like a celebration.
But if you’ve ever tried to make wings at home only to end up with something soggy, pale, or (heaven forbid) dry, I feel your pain. I’ve been there. The great wing quest can feel elusive. Maybe you’ve wondered, “How do they get them so crispy at the joint down the street?”
Well, today, we’re pulling back the curtain. We’re going to make the crispiest, juiciest, most crowd-approved fried chicken wings right in your own kitchen. And the best part? No fancy equipment or mysterious ingredients are required. We’re using simple pantry staples and a couple of chef-approved tricks that guarantee success every single time. This isn’t just a recipe; it’s your new go-to wing blueprint. So, tie on your apron, and let’s make some magic—and a glorious, delicious mess.
The Wing That Started It All
My love affair with wings didn’t start in a restaurant. It started in my grandma’s kitchen on a blustery Sunday afternoon. She wasn’t making them for the big game; she was making them for my grandpa, who’d had a long week. The house would fill with the scent of frying oil and paprika—a smell that, to this day, feels like home.
She’d fry them in her old, heavy cast-iron skillet, her movements calm and certain. There was no recipe card, just instinct. She’d pull one out, blow on it carefully, and hand it to me, saying, “Taste tester, do your job.” That first, hot, salty crunch was a revelation. It was more than food; it was connection, care, and a whole lot of flavor packed into one little two-bite package. That’s the spirit I want to bring to your kitchen today. We’re not just frying chicken; we’re creating a moment, a memory, a reason for everyone to gather ’round and say, “Wow, you made these?”
Gathering Your Wing Arsenal
Here’s everything you need. Read the notes beside each one—they’re your first step to wing mastery!
- 2 lbs chicken wings, split, tips removed – Look for “party wings” or “wingettes and drumettes” to save time. If they’re whole, use kitchen shears to snip through the joint and discard the pointy tip (or save it for stock!).
- 1 cup buttermilk – This is our tenderizing secret weapon! The acidity gently breaks down proteins for juicier meat. Chef’s Swap: No buttermilk? Mix 1 cup regular milk with 1 tablespoon white vinegar or lemon juice. Let it sit for 5 minutes until it curdles slightly.
- 1 cup all-purpose flour – The foundation of our crispy coating. It creates that classic, craggy texture we all love.
- 1/2 cup cornstarch – The CRISPY GAME-CHANGER! Mixing cornstarch with flour is the pro trick for an incredibly light, shatteringly crisp crust that stays crunchy longer.
- 1 tsp salt – Seasoning from the inside out. Don’t be shy here.
- 1/2 tsp black pepper – Freshly ground adds the best warmth.
- 1 tsp garlic powder – Adds a savory, umami depth to the crust.
- 1 tsp paprika – For color and a sweet, smoky hint. Smoked paprika is a fantastic upgrade here.
- Optional: 1/4 – 1/2 tsp cayenne pepper – Want a little heat in the crust itself? Start with 1/4 tsp and go from there.
- Oil for frying (vegetable, canola, or peanut oil) – You’ll need enough to come about 2-3 inches up the side of your pot. These oils have high smoke points and neutral flavors, perfect for frying.
Let’s Get Frying: Your Step-by-Step Wing Masterclass
Follow these steps, and you’re golden. Literally.
- The Tenderizing Soak: In a large bowl or resealable bag, combine the wings and buttermilk. Make sure each wing is fully submerged. Pop it in the fridge for at least 30 minutes, but if you can swing it, 4 hours or even overnight is IDEAL. This isn’t just busywork; this soak is building juicy flavor and ensuring every single bite is tender. I often do this in the morning for dinner that night.
- Heat Your Oil: Pour your oil into a heavy-bottomed Dutch oven, deep cast-iron skillet, or deep fryer. You want it to be about 2-3 inches deep. Attach a deep-fry or candy thermometer to the side. Gradually heat the oil over medium-high heat to 350°F (175°C). This is the sweet spot—hot enough to crisp quickly without burning, but not so hot the outside cooks before the inside. Chef’s Hack: No thermometer? Toss a small cube of bread into the oil. If it turns golden brown in about 60 seconds, you’re good to go!
- The Dredge Station: While the oil heats, mix your dry ingredients—flour, cornstarch, salt, pepper, garlic powder, paprika, and cayenne (if using)—in another shallow bowl or a large paper bag. Whisk it all together thoroughly. Now, take your wings directly from the buttermilk, letting the excess drip off, and drop them into the flour mixture. Here’s the key: PRESS the coating on. Don’t just toss them. Get your hands in there and really press the flour mixture into every nook and cranny. This creates those beautiful, craggy bits that equal maximum crunch. Shake off the loose flour and place the coated wings on a wire rack while you finish the batch.
- The Fry: Working in batches (do NOT overcrowd the pot—this drops the oil temp and leads to soggy wings), gently lower the wings into the hot oil using tongs. I do about 6-8 wings at a time. They should bubble actively. Fry for 8-10 minutes, turning them occasionally with tongs for even browning. You’re looking for a deep, glorious golden brown and an internal temperature of 165°F. The first batch is your test; adjust time as needed.
- The Drain (The Most Important Step You Might Skip): As each batch finishes, transfer them to a wire rack set over a baking sheet. DO NOT drain them on paper towels alone. Paper towels trap steam, making the bottom of your wings soggy. The wire rack allows air to circulate all around, keeping every millimeter crispy. Let them rest for a few minutes here—they’re still cooking a bit inside!
Serving Up Your Golden Glory
Now for the fun part: presentation and dipping! Pile those crispy wings high on a big platter or in a rustic basket lined with parchment paper. Scatter some celery sticks and carrot sticks around for that classic, cool crunch contrast.
For sauces, I like to serve them two ways: Leave half naked and glorious in their crispy state, and toss the other half in a bowl with your sauce of choice. For saucing, add the warm wings to a big bowl, pour in your sauce, pop a lid on it, and give it a few confident shakes to coat evenly. Here are my go-to sauce starters:
- Classic Buffalo: Melt 1/2 cup hot sauce (like Frank’s) with 1/3 cup unsalted butter and a splash of vinegar.
- Sticky Garlic Parmesan: Toss with melted butter, minced garlic, chopped parsley, and a heavy shower of grated Parmesan.
- Honey BBQ Glaze: Warm up your favorite BBQ sauce with a big drizzle of honey.
Don’t forget the dip! Blue cheese or ranch are non-negotiable for me. A big bowl in the center of the table lets everyone dive in.
Make It Your Own: Delicious Wing Variations
Once you’ve mastered the classic, the world is your wing oyster! Try these fun twists:
- Nashville Hot Style: After frying, brush the wings with a spicy paste made from 1/2 cup hot oil (carefully taken from the fryer), 2 tbsp cayenne pepper, 1 tsp brown sugar, 1/2 tsp paprika, and a pinch of salt.
- Lemon Pepper Dry Rub: Skip the sauce. Toss hot wings in a mix of melted butter, then in a homemade rub of lemon zest, cracked black pepper, and salt.
- Gluten-Free & Crispy: Swap the all-purpose flour for your favorite 1:1 gluten-free flour blend. The cornstarch is already GF, so you’re all set for a celiac-safe crunch.
- Air Fryer Adaptation: Want less oil? Pat soaked wings dry, toss in oil, then coat in the flour/cornstarch mix. Spray with oil and air fry at 400°F for 20-25 mins, flipping halfway. You still get great crispiness!
- Asian-Inspired Sticky Wings: Toss in a sauce of soy sauce, honey, ginger, garlic, and a dash of rice vinegar. Garnish with sesame seeds and sliced green onions.
Beau’s Kitchen Notes
This recipe has been my football Sunday staple for years, but it’s evolved. I used to be terrified of frying—the splatters! the thermometer!—until I realized it’s just about confidence and a good heavy pot. The cornstarch trick was a happy accident when I ran low on flour one day; now, I’ll never go back.
A funny story: I once tried to fry a huge batch for a party without letting the oil temperature recover between batches. Let’s just say the last batch was… pale and sad. I learned patience the delicious, slightly embarrassing way. Now I fry in small, disciplined batches, and it makes all the difference. Remember, your kitchen, your rules. Have fun with it!
Wing Troubleshooting: Your Questions, Answered
- Q: My coating fell off! What happened?
A: This usually means the oil wasn’t hot enough when you added the wings, or you didn’t press the coating on firmly. Make sure your oil is a steady 350°F and really pack that flour mixture on. Letting them rest on the rack for 5 minutes before frying can also help the coating set. - Q: Can I bake these instead of frying?
A: You can! For a baked version, toss the coated wings in a bit of oil, place them on a wire rack over a baking sheet, and bake at 425°F for 40-50 minutes, flipping halfway. They’ll be crispy, but it’s a different, drier crisp than the juicy fry. The air fryer method (above) is a great middle ground. - Q: How do I keep them warm for a party?
A: After draining on the rack, place the finished wings on a clean baking sheet and keep them in a 250°F oven. This low heat will keep them warm and crisp without continuing to cook them. Don’t cover them, or they’ll steam! - Q: What’s the best oil to use?
A: Oils with a high smoke point and neutral flavor are best. Peanut oil is fantastic (and gives a flavor many restaurants use), but vegetable, canola, or corn oil work perfectly and are more wallet-friendly.

Crispy Fried Chicken Wings : Juicy, Golden & Crowd-Approved
Description
There’s nothing quite like a perfectly fried chicken wing. Crispy, crackly on the outside, juicy and flavorful on the inside—these wings are pure comfort and always a hit. This recipe uses simple pantry ingredients and one key trick (hello, cornstarch!) to guarantee wings that stay crunchy long after they leave the fryer.
Ingredients
-
2 lbs chicken wings, split (tips removed)
-
1 cup buttermilk
-
1 cup all-purpose flour
-
1/2 cup cornstarch
-
1 tsp salt
-
1/2 tsp black pepper
-
1 tsp garlic powder
-
1 tsp paprika (smoked if possible)
-
Optional: 1/4–1/2 tsp cayenne pepper
-
Oil for frying (vegetable, canola, or peanut oil)
Instructions
Pat wings dry with paper towels. Place in a bowl or zip-top bag with buttermilk. Cover and refrigerate at least 30 minutes (up to overnight for best flavor).
Pour oil into a heavy pot or deep skillet to about 2–3 inches deep. Heat to 350°F (175°C).
In a large bowl, whisk together flour, cornstarch, salt, pepper, garlic powder, paprika, and cayenne (if using).
Remove wings from buttermilk, letting excess drip off. Press firmly into the flour mixture, coating every surface. Shake off excess and place on a wire rack.
Carefully lower wings into hot oil (6–8 at a time). Fry 8–10 minutes, turning occasionally, until deep golden and internal temperature reaches 165°F (74°C).
Transfer wings to a wire rack set over a baking sheet (not paper towels). This keeps them crispy on all sides.
Enjoy plain and crunchy, or toss in your favorite sauce.
Notes
-
Cornstarch is the secret: It creates a light, shatter-crisp crust.
-
Keep oil hot: Let oil return to 350°F between batches.
-
Don’t crowd the pot: Overcrowding = soggy wings.
-
Wire rack > paper towels: Prevents steam from softening the crust.
-
Double dredge: For ultra-craggy wings, dip back into buttermilk and flour again.
Nutritional Information*
*Please note: This is an approximate estimate for 1 serving (about 4-5 wings) using vegetable oil for frying, without sauce. Values can vary based on specific ingredients and serving size.
- Calories: ~380
- Protein: 25g
- Carbohydrates: 12g
- Fat: 25g
- Saturated Fat: 5g
- Fiber: 0g
- Sugar
Final Thoughts: More Than Just a Wing
So there you have it—the roadmap to a perfect, crispy fried chicken wing. But let’s be honest: this recipe is about so much more than just a plate of food.
It’s about the confident sizzle when the chicken hits the oil. It’s about the satisfying crunch that makes everyone at the table stop talking. It’s about the messy fingers, the shared bowls of sauce, and the simple joy of making something incredible with your own two hands.
You’re not just following steps—you’re creating an experience. Whether it’s for a rowdy game day, a comforting weeknight dinner, or just because you deserve a treat, these wings are a little act of edible love. They’re a reminder that the best food isn’t about perfection; it’s about connection, a bit of shared happiness, and the courage to get a little flour on your shirt.
Remember my grandma’s kitchen? That’s the real secret ingredient. It’s the care, the patience, and the intention you bring to the process. So don’t stress over the fry time or the exact cayenne measurement. Cook with confidence, share with generosity, and enjoy the moment.
Now, go make some memories—and some seriously good wings. You’ve got this.
Beau