
Unearth Lunchbox Magic: Dino Dig Sandwich Fossils!
Hey foodie friends! Beau here from Feastical, and I’ve got a recipe that’s about to turn your kitchen into a Jurassic playground. Imagine this: golden-brown pressed sandwiches shaped like stegosauruses and T-Rexes, with edible “fossil” imprints peeking through the crust. These Dino Dig Sandwich Fossils aren’t just lunch—they’re a full-blown adventure packed between two slices of bread! Perfect for kiddos (or kids-at-heart!), these handheld treasures combine the cozy nostalgia of classic ham and cheese with pure, unadulterated fun. I’m talking cookie-cutter dinos, playful stamping, and that irresistible toasty crunch. Whether it’s for school lunches, picnics, or just a Tuesday treat, these sandwiches transform the ordinary into something extraordinary. Trust me, when you see those little eyes light up at the sight of a “fossilized” brontosaurus? Pure kitchen victory. So grab your spatula (and maybe a tiny paleontologist helper), and let’s make lunchtime roar!
Why Dino Fossils? A Crusty Trip Down Memory Lane
This recipe? It’s basically my childhood packed in a lunchbox. When I was six, my grandma—Queen of Kitchen Magic—would surprise me with “dinosaur hunts” in my sandwich bag. She’d use her antique butter stamps (meant for fancy dinner rolls) to press tiny patterns into my PB&Js. One rainy Tuesday, she swapped the flowers for a toy dinosaur’s foot, pressing it gently into the bread. “Look, Beau,” she whispered, eyes twinkling, “a stegosaurus fossil!” My mind exploded. Suddenly, lunch wasn’t just food; it was a dig site! I’d “excavate” bites with my plastic fork, hunting for cheese “bones.” Decades later, making these for my nephew Liam, I saw that same wonder in his eyes. He spent 20 minutes comparing his sandwich fossil to his dino encyclopedia! That’s the secret, friends: food isn’t just fuel. It’s joy, memory, and imagination served on a plate. Grandma knew it—and now, so do we.
Your Paleontology Kit: What You’ll Need
Gather these simple ingredients—flexibility is key!
- 4 slices whole wheat or white sandwich bread – Whole wheat adds nutty depth (and sneaky fiber!), but fluffy white is classic. Stale-ish bread holds stamps better!
- 2 slices deli ham – Honey-glazed or smoked! Swap for turkey or even thin-sliced chicken for a lighter “fossil.”
- 2 slices cheddar cheese – Sharp cheddar melts beautifully. Pro tip: Freeze slices for 10 minutes—they won’t tear when stamping!
- Butter or mayo (optional) – Spread thinly outside for golden crispness. Mayo gives extra browning magic!
- Dino cookie cutters & stamp tools – Cookie cutters shape the beast; stamps create fossils. No stamps? Use LEGO dino feet, clean toy dinosaurs, or even a fork!
Crafting Your Cretaceous Creations: Step-by-Step
Ready to make history? Let’s dig in!
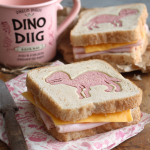
- Assemble Your “Sediment Layers”: Lay out two bread slices. Layer ham and cheese evenly. Top with remaining bread. Chef’s hack: Leave a ½-inch border—prevents filling blowouts when stamping!
- Shape Your Dinosaurs: Press cookie cutter firmly through both bread layers. Wiggle gently to release. Save scraps for breadcrumbs! Tip: Use large, simple shapes (stegosaurus, apatosaurus)—they hold stamps best.
- Fossilize the Finds: Dip stamps in flour (prevents sticking!). Press gently into top bread—don’t pierce through! Think “dino footprints,” not meteor craters. Fun twist: Let kids choose their dino’s “footprint” pattern!
- Toast to Perfection (Optional but Epic): Heat a skillet or panini press over medium. Spread outer bread lightly with butter/mayo. Cook 2-3 minutes per side until golden and cheese melts. Press down lightly with spatula—this deepens those fossil grooves!
- Cool & Pack: Let rest 2 minutes—this “sets” the fossils. Pack in lunchboxes with veggie “rocks” (cherry tomatoes, cucumber coins).
Presenting Your Prehistoric Feast
Make it an expedition! Serve sandwiches on a “dig site” plate with green leaf lettuce “foliage,” carrot stick “bones,” and a side of yogurt “quicksand.” For lunchboxes, tuck them into parchment paper like unearthed artifacts. Pair with a mini “science journal” (aka a sticky note with dino facts) for extra giggles. The key? Let those fossil imprints shine—don’t bury them under sides!
The Science Behind the Stamp – Why It Works
Ever wonder how a simple press transforms bread into a fossilized masterpiece? It’s all about texture and tension! When you stamp a sandwich, you’re compressing the bread’s surface, creating tiny ridges and valleys that toast unevenly. The stamped areas stay paler (like ancient rock), while the untouched parts crisp into golden “sediment.” Here’s the delicious physics at play:
Bread Structure: Sandwich bread is a foam-like matrix of gluten and starch. Pressing it ruptures air pockets, making those areas denser and less prone to browning. For the clearest fossils, use bread with a tight crumb (like whole wheat) rather than airy artisanal loaves.
Cheese’s Role: Cheddar is the ideal “fossil binder” because it’s firm when cold but melts cohesively. As it heats, the cheese fills gaps beneath the stamped grooves, creating a “cast” of your dino imprint. Pro tip: Avoid pre-shredded cheese—its anti-caking coatings prevent smooth melting!
Butter vs. Mayo: Butter’s water content steams the bread slightly, yielding a softer crunch. Mayo (oil + eggs) browns faster due to its higher smoke point, giving deeper color and crispness—perfect for high-contrast fossils.
Stamping Tools: The best stamps have shallow, irregular textures (think: toy dinosaur feet with subtle scales). Avoid sharp edges—they slice rather than impress. For a natural look, dust stamps with flour or cornstarch to prevent sticking without adding flavor.
Fun Experiment: Try stamping after toasting for a “raised fossil” effect—the heat sets the bread’s structure, so presses create indentations without collapsing. Kids love comparing pre- and post-toast stamps like real paleontologists analyzing erosion!
Paleo-Play! Turning Lunch into a Learning Adventure
These sandwiches aren’t just cute—they’re stealthy teaching tools. Here’s how to turn mealtime into a mini science lesson (without the eye rolls):
1. Fossil Layers: Explain how real fossils form in sedimentary rock by layering the sandwich ingredients like geologic strata. “The ham is the oldest layer, buried under cheese lava!” Use a clear glass to assemble sideways, showing the “cross-section.”
2. Dino Diet Debate: Pair sandwiches with discussion prompts: “Is a T-Rex fossil made of plants or other dinos?” Include a “herbivore” version (veggie fillings) and “carnivore” (meaty) to explore diets.
3. Excavation Etiquette: Give kids plastic knives or tweezers to “dig” out cheese “bones” from the bread. Teach brush-and-pick techniques with a soft pastry brush to dust off “debris” (aka crumbs).
4. Fossil Record: Make a “field guide” placemat with sandwich stamp silhouettes and matching dino names. Challenge kids to ID their sandwich like a real fossil hunter!
5. Edible Archaeology: Hide a surprise “artifact” (a single raisin or olive) in one sandwich—whoever finds it gets to name a new dinosaur species!
Bonus Activity: Crush leftover bread scraps into “fossil breadcrumbs.” Mix with melted butter, press into a jar, and layer with jam “lava” to create an edible sediment model.
Beyond Sandwiches – Dino-Fying Every Meal
Take the fossil fun further with these Jurassic twists on classics:
Dino Egg Omelet: Beat eggs with spinach, pour into a greased dino cookie cutter in a pan, and cook until set. Peel away the mold to reveal a “dino egg” with veggie “shell fragments!”
Pasta-osaurus Rex: Press cooked penne into a buttered dino-shaped mold, top with marinara “mud,” and bake at 375°F until crispy. Flip onto a plate—instant fossilized pasta skeleton!
Volcano Pancakes: Stack pancakes into a cone, drizzle with strawberry syrup “lava,” and use banana slices as “steam clouds.” Add a stamped toast T-Rex on the side.
Extinct Desserts:
-
Amber Fossils: Set gummy bugs in orange JELLO “amber” cubes.
-
Chocolate Mud Pies: Mix crushed cookies into pudding, top with pretzel “dino bones,” and stamp a chocolate-covered graham cracker fossil on top.
Savvy Tip: Use silicone dino ice cube trays to freeze broth into “fossil cubes” for soups, or yogurt “tar pits” for smoothie bowls.
Evolve Your Recipe: Fun Twists!
- Veggie Volcano: Swap ham for smashed avocado or hummus + shredded carrots.
- Breakfast T-Rex: Use cinnamon bread, cream cheese, and banana slices. Stamp before assembling!
- Gluten-Free Fossil Hunt: GF bread works great—just toast slightly longer.
- Pizza-saurus Rex: Marinara, mozzarella, and mini pepperonis under the stamps.
- Sweet Tooth Dino: Almond butter + jam between brioche. Dust “fossils” with powdered sugar!
Beau’s Kitchen Chronicles
This recipe’s evolved more than a Darwin finch! Originally, I used Grandma’s biscuit stamps—until Liam’s toy T-Rex left way cooler footprints. One fail? Using a waffle iron for “fossil textures.” Spoiler: It looked like dino roadkill. Stick to gentle hand-stamping! Now, I host “Dino Dig” parties: Kids stamp their own sandwiches while I tell cheesy dino jokes (“What do you call a sleeping dinosaur? A dino-snore!”). The sandwiches always vanish faster than a comet. Pro tip: Freeze unbaked stamped sandwiches for instant lunchbox wins—just toast straight from frozen!
Dino Dilemmas? Solved!
Q: My stamps keep tearing the bread! Help?
A: Your bread might be too soft. Try lightly toasting slices first, or freeze bread for 15 minutes. Press slower—gentle pressure is key!
Q: Can I make these ahead?
A: Absolutely! Assemble (unstamped), wrap in cling film, and refrigerate overnight. Stamp and toast next morning—the cold helps hold the imprint!
Q: Cheese oozes out when toasting. Disaster?
A: Nope—flavor bonus! But to prevent it: Use thicker cheese slices, leave that ½-inch border, and don’t overstuff. A panini press contains mess best!
Q: No cookie cutters? No problem!
A: Use a glass to cut circles, then stamp. Or slice sandwiches into “dino bone” rectangles—stamps still work!
Dino Dig Sandwich Fossils: Pressed Ham & Cheese with Stamps
- Total Time: 15–20 mins
Description
Uncover lunchtime fun with these toasted, dino-shaped delights. Packed with ham, cheese, and imagination, they turn every bite into an edible adventure!
Why You’ll Love It
These golden sandwiches are more than tasty—they’re tactile, toasty time machines. Whether it’s for your little explorer or your inner child, they deliver flavor with a side of fossil-fueled fun. Ready to dig in?
Ingredients
-
4 slices whole wheat or white bread
-
2 slices deli ham (or turkey/chicken)
-
2 slices cheddar cheese (freeze for 10 min for clean stamping)
-
Butter or mayo (optional, for crisping)
-
Dino cookie cutters & stamps (or clean toy dinos!)
Instructions
-
Build the Sandwich: Layer ham and cheese between two bread slices. Leave a ½-inch edge to prevent oozing.
-
Cut into Dinos: Press cutter firmly through sandwich. Gently release and save scraps for croutons!
-
Stamp Your Fossils: Lightly flour your stamp/toy. Press gently onto the top bread layer—don’t push through.
-
Toast (Optional): Heat skillet or panini press. Butter/mayo outer sides. Toast 2–3 min per side until golden and melty.
-
Cool & Serve: Let cool 2 min to set the imprint. Pack with veggie “rocks” or plate like a dig site!
Notes
-
Too soft? Slightly freeze or toast bread for firmer stamping.
-
No stamp? Forks or toy dino feet make great fossils!
-
Make-ahead: Assemble, wrap, chill overnight—stamp and toast fresh.
-
Messy cheese? Use thick slices and don’t overfill.
- Prep Time: 10 mins
- Cook Time: 6 mins
Nutrition
- Calories: 220 Cal Per Sandwich
- Fat: 10g
- Carbohydrates: 20g
- Protein: 11g
Quick Fossil Facts
Servings: 2 sandwiches | Prep: 10 mins
Per Sandwich: Calories: ~220 | Protein: 11g | Creativity Level: Jurassic
Final Thoughts: Why Food + Fun = Lifelong Memories
The magic of these sandwiches isn’t just in their shape—it’s in the story they tell. My grandma’s butter-stamp trick taught me that cooking isn’t about perfection; it’s about playfulness. Whether you’re a parent sneaking veggies into a “T-Rex tooth” (aka a cucumber wedge) or an adult reliving childhood wonder, these tiny edible adventures reconnect us to joy.
So go ahead: Press that toy dinosaur into your grilled cheese with abandon. Let the cheese ooze like molten prehistoric tar. Watch as a simple sandwich becomes a time machine to giggles and wide-eyed discovery. After all, the best recipes aren’t just measured in cups and grams—they’re measured in grins, gasps, and the triumphant cry of “I found a fossil!”