
The Ultimate Dinnertime Win: Nuggets That Actually Pack a Flavor Punch
Hey friends, Beau here! Let’s talk about a universal truth: everyone loves chicken nuggets. From the littlest kitchen helper to the most seasoned foodie at the tailgate, there’s something irresistibly fun about picking up a perfectly crispy bite and diving it into something delicious. But let’s be real—sometimes, the freezer aisle version just… doesn’t hit the spot. They can be bland, boring, and leave you wondering where the actual chicken went.
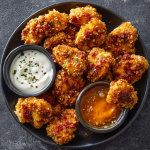
That’s why I’m so fired up to share my recipe for homemade Buffalo Chicken Nuggets. We’re not just making nuggets; we’re crafting little golden vessels of joy, coated in a crispy, craggy exterior that gives way to juicy, tender chicken, all tossed in that iconic, tangy, spicy buffalo sauce. The magic, though, doesn’t stop with the sauce. The real game-changer here is the dip. This recipe is your canvas, and the dips are your palette. Want cool and creamy ranch one night and zesty garlic yogurt the next? Go for it! That’s the Feastical philosophy: food should be full of flavor, fun to make, and flexible enough to match your mood.
Imagine this: a platter of these glistening, spicy nuggets in the center of the table, surrounded by a rainbow of dipping bowls. It’s a meal that sparks conversation, satisfies cravings, and is secretly way easier to make than you think. So, tie on your apron, grab your favorite bowl for mixing, and let’s turn a classic concept into your new go-to comfort food masterpiece. Your spatula and your taste buds are gonna thank you.
More Than a Game Day Snack: A Sauce-Spattered Memory
This recipe takes me straight back to my first “grown-up” apartment, where the kitchen was so small you could practically stir the pasta from the couch. My buddies and I were glued to the TV for a huge game, and I, as the resident “food guy,” was on snack duty. Wings were the obvious choice, but they felt fussy for our cramped setup. Then, inspiration struck (probably born from desperation and a well-stocked pantry). What if I took the simple, crowd-pleasing shape of a nugget and drenched it in all the buffalo flavor we craved?
The result was a beautiful, sauce-splattered mess of triumph. We stood around my tiny counter, fingers glistening, debating the superior dip (I was team blue cheese, my friend Sam will forever swear by ranch), and going through napkins like they were going out of style. Those nuggets weren’t just food; they were the centerpiece of laughter, heckling at the refs, and that perfect feeling of togetherness. That’s the spirit I want to bring to your kitchen. You don’t need a fancy setup or a special occasion—just a craving for something deliciously fun.
Gathering Your Flavor Arsenal: It’s All About the Texture & Tang
Here’s everything you’ll need to create these crispy, spicy bites. I’ve added my two cents on each ingredient because knowing the “why” makes you a more confident cook!
- 1½ lbs boneless, skinless chicken breasts: The star of the show! I prefer breasts for their lean, even shape which makes for perfect nugget-uniformity. Chef’s Insight: For even more tender nuggets, you can use chicken thighs. They have more fat and will stay incredibly juicy.
- Salt & pepper to taste: The fundamental wake-up call for your chicken. Don’t be shy here—seasoning the meat itself is step one for great flavor.
- ½ cup all-purpose flour: Our first layer of the crispy-coat trifecta. It creates a dry base for the egg to stick to, which locks in the chicken’s juices. Sub Tip: For a gluten-free version, swap with almond flour or your favorite GF blend.
- 2 large eggs, beaten: The glorious, sticky “glue” that holds our crispy shell onto the chicken. Whisk them well with a fork until they’re fully blended.
- 1 cup panko breadcrumbs: The secret to an ultra-crispy, shatteringly good crust! Panko crumbs are airier and flakier than regular breadcrumbs. Chef’s Insight: For a deeper flavor, toast the panko in a dry skillet for a few minutes before using. It’s a game-changer!
- Oil for baking or air frying: A high-heat oil like avocado, canola, or light olive oil is perfect. We’re not deep-frying, but a light spray or brush helps achieve that golden brown color.
For The Signature Buffalo Sauce:
- ¼ cup hot sauce (like Frank’s RedHot): The non-negotiable heart of the sauce. Frank’s has the perfect vinegar-forward tang. Sub Tip: Any cayenne pepper-based hot sauce will work, but the flavor profile will change slightly.
- 2 tbsp unsalted butter, melted: Butter mellows the sharp heat of the sauce and helps it cling to every nook and cranny of the nuggets. It’s what makes the flavor rich and rounded.
- 1 tsp honey (optional but recommended): My little balancing act. A touch of sweetness cuts through the vinegar and heat beautifully. For a stricter traditional wing sauce, you can skip it.
Let’s Build Some Crunch: A Step-by-Step Dance in the Kitchen
Don’t let the three-step coating process intimidate you! Think of it as a simple, satisfying assembly line. I’ll walk you through each step with all my favorite hacks.
Step 1: The Setup & Chicken Prep. First, preheat your oven to 425°F (or your air fryer to 400°F). Line a baking sheet with parchment paper or foil for easy cleanup. Now, take your chicken breasts and pat them dry with a paper towel—this is crucial for the coating to stick! Cut them into 1 to 1.5-inch bite-sized pieces. Not too big, not too small. Think “perfect two-bite” size. Season them all over with salt and pepper. Chef’s Hack: Use one hand for your dry ingredients (flour, panko) and one hand for your wet (egg). This keeps you from getting “club hand” – you know, that dreaded glob of batter-covered fingers!
Step 2: The Coating Trifecta. Set up three shallow bowls or plates in a row. Bowl 1: flour. Bowl 2: beaten eggs. Bowl 3: panko breadcrumbs. Take a chicken piece, dredge it in the flour, and shake off any excess. Next, dunk it fully into the egg, letting the excess drip off. Finally, press it firmly into the panko, ensuring it’s fully coated on all sides. Place it on your prepared baking sheet. Repeat with all pieces, giving them a little space on the sheet so they crisp up evenly, not steam.
Step 3: The Bake (or Air Fry) & Sauce Toss. Lightly spray or brush the tops of your coated nuggets with oil. This promotes browning. Bake for 15-18 minutes, flipping them halfway through, until they are deeply golden brown and the chicken is cooked through (internal temp of 165°F). If using an air fryer, cook in a single layer (you may need batches) for about 12-15 minutes, shaking the basket halfway. While they cook, whisk together your buffalo sauce ingredients in a large bowl. As soon as the nuggets are out of the oven and hot, add them to the bowl with the sauce. Gently toss and fold until every nugget is gloriously coated. Pro Tip: Tossing them while hot helps the sauce seep into the crispy layers just a bit.
Plate It Pretty (or Just Dive In!)
Presentation is part of the fun! I love serving these family-style on a big, rustic wooden board or a vibrant platter. Scatter some celery sticks and carrot batons around the edge for that classic, crunchy, cooling contrast. Then, get creative with your dips! Use small ramekins, little jars, or even shot glasses to hold an array of dipping options. Label them with cute chalkboard tags if you’re feeling fancy. It transforms dinner into an interactive experience. For a casual weeknight, just pile them high on a plate with a big dollop of your favorite dip on the side. No rules, just enjoyment. The goal is to make it inviting and fun—because you’ve just made something amazing from scratch.
Make It Your Own: 5 Flavorful Twists
The beauty of this base recipe is its adaptability. Here are some ways to play with the formula:
- Sweet & Smoky BBQ Swap: Replace the buffalo sauce with ⅓ cup of your favorite BBQ sauce mixed with 1 tbsp of melted butter. Finish with a sprinkle of smoked paprika.
- Nashville Hot Style: After baking, toss nuggets in a spicy oil made with 3 tbsp melted butter or oil, 1 tbsp cayenne pepper, 1 tsp brown sugar, and ½ tsp garlic powder. Serve with pickles and white bread for the full experience.
- Parmesan Herb Crust: Mix ½ cup grated Parmesan into the panko breadcrumbs. Add 1 tsp each of dried oregano and garlic powder. Skip the buffalo toss and serve with marinara for a chicken parm nugget vibe.
- Gluten-Free & Air Fryer Favorite: Use almond flour and gluten-free panko. Cook in the air fryer for an unbelievably crispy result that’s also GF. The sauce is naturally gluten-free!
- Meal Prep Magic: After coating, freeze the uncooked nuggets in a single layer on a sheet, then transfer to a bag. Bake from frozen, adding 5-7 minutes to the cook time. Perfect for quick lunches or dinners!
Beau’s Corner: Notes from a Sauce-Splattered Apron
This recipe has evolved from that first messy apartment experiment. I’ve learned that doubling the sauce recipe is never a bad idea—some folks (me) like them extra saucy. I’ve also found that letting the coated nuggets rest on the sheet for 5-10 minutes before baking helps the coating really set, minimizing fallout. And a funny story? I once tried to “streamline” the process by mixing the flour, egg, and panko all in one bowl. Do not recommend. It created a bizarre, lumpy paste that turned into a singular, nugget-shaped monstrosity in the oven. We ate it anyway (waste not, want not!), but the three-bowl method is sacred for a reason. Trust the process!
Your Questions, Answered
Q: My coating is falling off! What did I do wrong?
A: The most common culprit is not shaking off the excess flour or egg. A light, even coat at each stage is key. Also, ensure your chicken is patted dry before you start. A wet surface is the enemy of adhesion.
Q: Can I make these ahead of time?
A: Absolutely! You can coat the nuggets and refrigerate them on the sheet pan, covered, for up to 4 hours before baking. You can also freeze them uncooked (see variation above) for future you.
Q: How do I keep them crispy after saucing?
A> Serve them immediately! The sauce will eventually soften the crust, which is part of its charm. If you need to hold them, keep the sauce and nuggets separate until just before serving. You can also keep cooked, unsauced nuggets warm and crisp in a 200°F oven.
Q: Are these too spicy for kids?
A> You control the heat! Set aside a few un-sauced nuggets for the kids, or use a milder hot sauce. The honey also really helps tame the spice level.
Buffalo Chicken Nuggets : Spicy Bites with Endless Dip Combos
Description
Everyone loves chicken nuggets—but these homemade Buffalo Chicken Nuggets bring real flavor. They’re crispy on the outside, juicy inside, and tossed in a tangy, buttery buffalo sauce. Easy enough for a weeknight, fun enough for game day, and perfect with your favorite dips.
Ingredients
For the nuggets
-
1½ lb boneless, skinless chicken breasts, cut into bite-size pieces
-
Salt and black pepper, to taste
-
½ cup all-purpose flour
-
2 large eggs, beaten
-
1 cup panko breadcrumbs
-
Cooking oil spray or 2 tbsp neutral oil (canola, avocado)
For the buffalo sauce
-
¼ cup hot sauce (Frank’s RedHot or similar)
-
2 tbsp unsalted butter, melted
-
1 tsp honey (optional, for balance)
For serving (optional)
-
Ranch or blue cheese dressing
-
Celery and carrot sticks
Instructions
-
Preheat
-
Oven: 425°F (220°C)
-
Or Air Fryer: 400°F (200°C)
-
-
Season the chicken
Pat chicken dry and season lightly with salt and pepper. -
Set up coating station
-
Bowl 1: flour
-
Bowl 2: beaten eggs
-
Bowl 3: panko breadcrumbs
-
-
Coat the chicken
Dredge each piece in flour → dip in egg → press into panko.
Place on a lined baking sheet, leaving space between pieces. -
Cook
-
Oven: Spray lightly with oil and bake 15–18 minutes, flipping halfway.
-
Air Fryer: Cook in a single layer for 12–15 minutes, shaking halfway.
Chicken should be golden and reach 165°F (74°C) internally.
-
-
Make the sauce
Whisk hot sauce, melted butter, and honey in a large bowl. -
Toss & serve
Add hot nuggets to the sauce and gently toss until coated. Serve immediately with dips.
Notes
-
Extra crispy: Toast panko breadcrumbs in a dry skillet for 2–3 minutes before coating.
-
No soggy nuggets: Toss in sauce right before serving.
-
Milder heat: Use less hot sauce or add extra honey.
-
Gluten-free option: Use gluten-free flour and GF panko.
-
Juicier nuggets: Chicken thighs work great if you prefer darker meat.
Nutritional Breakdown (Because Knowledge is Power!)
Here’s a general estimate per serving (about ¼ of the recipe), assuming baking and using all the sauce. Remember, dips will add to these numbers. Using an air fryer may slightly reduce fat content.
- Calories: ~350
- Protein: 30g (Excellent source! Chicken is a powerhouse.)
- Carbohydrates: 18g (Primarily from the panko and flour for that essential crunch.)
- Fat: 18g (Comes from the chicken, egg, butter in sauce, and coating oil.)
- Sugar: 1g (Only from the optional honey, making this a relatively low-sugar savory treat.)
This is a balanced meal when paired with veggie sticks and a sensible dip choice. Using lean chicken breast keeps the protein high and fat in check.
The Last Bite
And there you have it, friends—your new secret weapon for a guaranteed smile at the dinner table. These Buffalo Chicken Nuggets prove that a little effort in the coating department pays off in massive flavor and fun. They’re a celebration of texture, a playground for dips, and a recipe that’s as comfortable on a Tuesday night as it is at a Saturday gathering.
I hope this recipe brings as much laughter and satisfaction to your kitchen as it has to mine. Remember, cooking isn’t about perfection; it’s about the joy of creating and sharing. So if a little sauce drips on the floor, or your nuggets aren’t all geometrically identical, it’s all good. You made something delicious from scratch, and that’s always worth celebrating.
Now, I’ve gotta know—what’s your ultimate dip combo? Tag me over on @Feastical when you make these! Until next time, keep your kitchen messy and your heart full.
Happy cooking,
Beau