Easy Easter Trifle Dessert – A Colorful, Creamy Spring Treat
Hey there, friends! Beau here, welcoming you back to Feastical. Can you feel it? That crisp, hopeful air that whispers of blooming flowers and longer days? Spring has officially sprung, and with it comes one of my absolute favorite holidays for gathering around the table: Easter. Whether you’re hosting a big, bustling brunch or a cozy dinner with your favorite people, I believe the perfect dessert should be two things: absolutely stunning to look at and a total joy to make. No stress allowed in my spring kitchen!
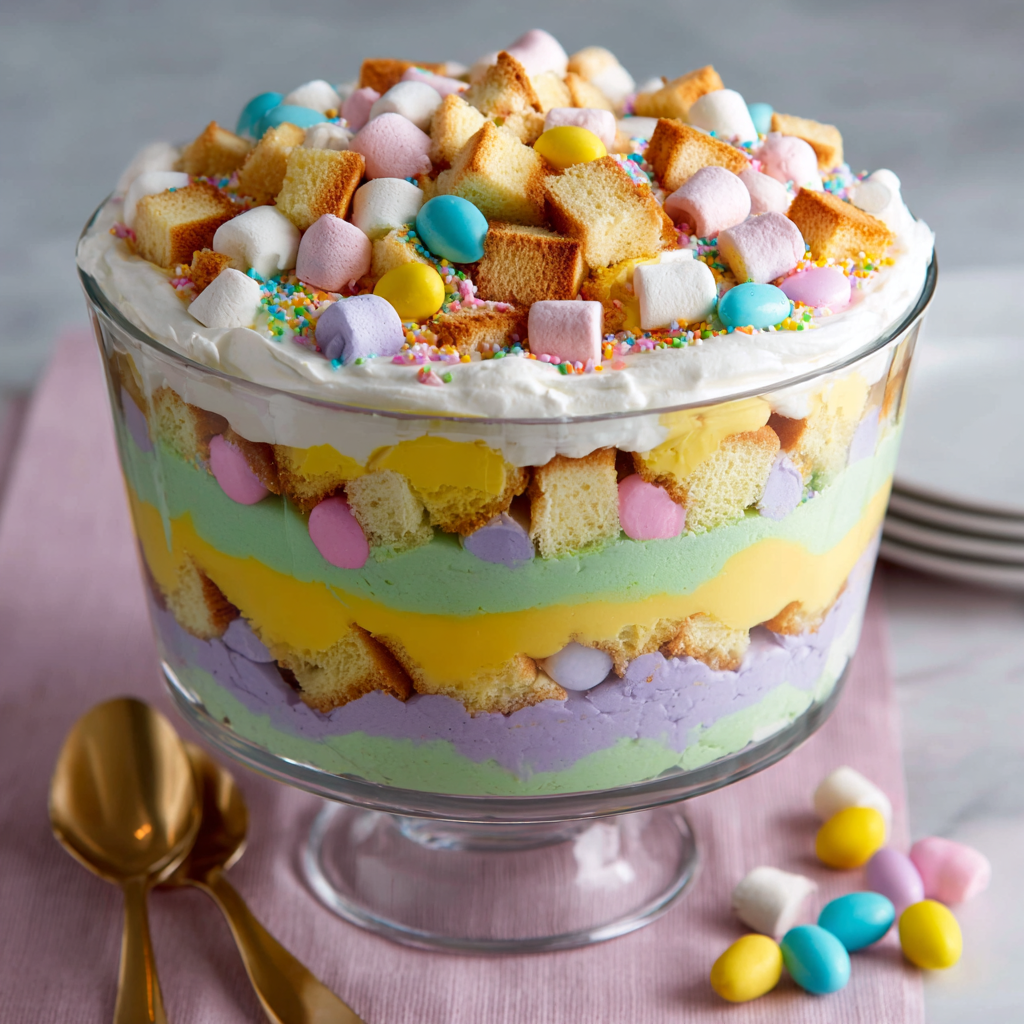
That’s exactly why I’m so excited to share this Easy Easter Trifle Dessert with you today. We’re talking about a glorious, sky-high creation layered with fluffy cake, dreamy vanilla cream, and cheerful pops of pastel candy. It’s a rainbow in a bowl! The best part? It’s seriously simple. We’re using smart shortcuts (no shame in my game!) that let you focus on the fun part—building those beautiful, Instagram-worthy layers. This trifle isn’t just a dessert; it’s a centerpiece, a conversation starter, and a guaranteed smile-maker for kids and adults alike. So, grab your prettiest glass bowl and let’s create a sweet memory together.
Why This Trifle Steals My Heart Every Spring
This recipe always takes me right back to my Grandma Lou’s house. Easter at her place was an event. The table groaned under platters of ham, but my eyes were always locked on the sideboard, waiting for her famous “Spring Surprise” bowl to make its grand appearance. It wasn’t a fancy trifle like we see now—hers was layers of leftover pound cake, fresh berries she’d macerated with a little sugar, and clouds of real whipped cream she’d beat by hand.
She’d let me help, of course. My job was the “architect of layers,” as she called it. I’d press the cake cubes down gently and she’d guide my little hands with the spoonfuls of cream. The moment of truth was when she’d lift the big glass bowl high for the whole family to see, the layers all jumbled and beautiful through the glass. The collective “Ooooh!” from the table was pure magic. My version here is a nostalgic nod to her—a bit more playful with candy and colors, but with the same spirit: food made with love, meant to be shared in a great, big, delicious mess of happiness.
Gathering Your Rainbow: Ingredients & Insider Tips
Here’s everything you’ll need to build your edible spring masterpiece. I’ve added my little chef notes next to each one because knowing the *why* makes you a more confident cook!
- 1 box vanilla or white cake mix (plus the ingredients listed on the box, usually oil, eggs, and water): This is our fantastic, no-fuss foundation. Chef’s Insight: White cake mix is a blank canvas. It lets our pastel food coloring shine without competing flavors. Feeling fancy? A lemon cake mix is a glorious, zingy twist!
- Food coloring gels (pink, yellow, green, purple – optional but so fun!): Pro Tip: I highly recommend gel food coloring over liquid. The colors are more vibrant and intense, so you need just a tiny drop to achieve gorgeous pastel hues without adding extra liquid to your batter.
- 2 (3.4 oz) boxes instant vanilla pudding: Our creamy, lush layer. Why Two? Trust me, one box just doesn’t give you that luxurious, thick layer we want. This ensures every bite is rich and satisfying.
- 4 cups cold, cold milk: This is non-negotiable! The pudding sets best with icy-cold milk. I sometimes even pop my measuring cup in the freezer for 10 minutes before I start.
- 1 (8 oz) tub whipped topping (like Cool Whip), thawed: The fluffy cloud layer. Substitution Tip: For a homemade touch, swap this with 2 cups of heavy cream whipped with ¼ cup of powdered sugar and a dash of vanilla.
- 1 cup mini marshmallows: These little guys add a delightful, pillowy texture and a hint of vanilla sweetness. They’re the fluffy bunnies of our edible garden!
- 1 cup pastel M&Ms or Easter candy eggs: The colorful confetti! Chef’s Fun Hack: Reserve a handful of the brightest, prettiest candies for the very top to make your decoration pop.
- Sprinkles, crushed vanilla wafers, or bunny graham crackers (for topping): This is where you get creative! The sprinkle crunch or cookie crumble adds the final layer of texture and theme.
Building Your Edible Masterpiece: Step-by-Step
Alright, team! Let’s roll up our sleeves and build something beautiful. Follow these steps, and you really can’t go wrong. I’m talking you through it like you’re right here in my kitchen.
Step 1: Bake & Color Your Canvas. First, bake your cake according to the package directions in a 9×13 pan. Let it cool completely—I mean it! A warm cake will turn your trifle into a soggy mess. Once cool, cut the cake into roughly 1-inch cubes. Now for the fun: divide the cubes into 4 bowls. Add a tiny drop of gel food coloring to each (pink, yellow, green, purple) and gently toss until you have beautiful pastel cake cubes. This step is optional, but it creates that stunning “Easter egg” effect in every layer.
Step 2: Whip Up the Creamy Dream. In a large bowl, pour in your ICE-COLD milk. Whisk in both boxes of instant pudding mix for a full 2 minutes. No shortcuts on the whisking time—this is what activates the thickening. Let it stand for 5 minutes to set up perfectly. It should be thick and luscious.
Step 3: The Grand Layering Assembly. Grab your trifle bowl or a large, clear glass serving dish. The visual is everything! Start with a layer of your pastel cake cubes. Don’t be too neat—a casual, tumbled look is charming. Next, spoon a generous layer of the set pudding over the cake, spreading it to the edges. Dollop a thick layer of whipped topping over the pudding. Now, the confetti: scatter a handful of mini marshmallows and pastel candies.
Step 4: Repeat & Conquer. Do it all again! Cake, pudding, whipped topping, candy. Keep going until your bowl is gloriously full, ending with a gorgeous top layer of whipped topping. This is your blank slate for decorating.
Step 5: The Finishing Flourish. Go wild with your toppings! Create a sprinkle border, make a nest of crushed cookies with a few candy eggs in the center, or artfully place your reserved brightest candies. This is your signature.
Step 6: The Essential Chill. Cover lightly and refrigerate for at least 1 hour before serving. This waiting period is magic—it lets the flavors mingle and the cake soften just slightly into the creamy layers. It’s worth the wait, I promise!
How to Serve This Showstopper
Presentation is key with a trifle! Carry that beautiful glass bowl right to the center of your Easter table and let it get the “oohs” and “ahhs” it deserves. To serve, use a large, deep spoon so you can dig all the way down to the bottom and get every single layer in one perfect scoop. I like to serve it in clear dessert cups or bowls so everyone can admire the rainbow stripes they’ve just been given.
This dessert is rich and sweet, so it pairs beautifully with a cup of strong coffee, a glass of cold milk, or even a crisp, bubbly Prosecco for the adults. It’s the ultimate finale to a spring feast, offering a little bit of everything: cake, cream, and candy in every bite.
Make It Your Own: Delicious Twists & Swaps
The beauty of a trifle is its versatility. Don’t be afraid to play! Here are a few of my favorite riffs on this classic:
- Berry Bliss: Swap the candies for layers of fresh strawberries, blueberries, and raspberries. Add a layer of lemon curd between the pudding and whipped topping for a bright, tangy kick.
- Chocolate Bunny Haven: Use a chocolate cake mix. Swap the vanilla pudding for chocolate pudding. Layer with chocolate chips and top with chocolate shavings and a few chocolate Easter bunnies.
- Lemon Berry Sunshine: Use a lemon cake mix. Fold a tablespoon of lemon zest into the whipped topping. Layer with lemon pudding (use 2 boxes) and fresh blueberries or raspberries.
- Dietary-Friendly Delight: Use a gluten-free cake mix and ensure your candies are gluten-free. For a dairy-free version, use plant-based milk (oat or almond work great for pudding), dairy-free whipped topping, and vegan candies.
- Carrot Cake Trifle: Bake a carrot cake (from a mix or your favorite recipe). Use cheesecake-flavored pudding. Layer the cake with the pudding, whipped topping, and crushed walnuts or pecans. Top with a sprinkle of cinnamon!
Beau’s Kitchen Notes
This recipe has been my Easter go-to for years, and it’s evolved with every batch. One year, I got a little too eager with the food coloring and ended up with neon-bright cake cubes that made us all laugh—turns out, less is more! Another time, I forgot to chill it and learned the hard way that the layers need that time to become best friends.
My biggest piece of advice? Have fun with it. Let your kids choose the sprinkle colors. Let your partner be in charge of the candy distribution. This dessert is about joy, not perfection. The slightly lopsided layer or the rogue sprinkle just adds to its homemade charm. After all, the most important ingredient is always the love and laughter you stir into it.
Your Questions, Answered!
Q: Can I make this trifle the night before?
A: You can *assemble* it the night before, but with one caveat: hold off on adding the final candy and sprinkle topping until just before serving. Otherwise, they might bleed color or get soggy. The cake and creamy layers actually get better with a long, cozy chill in the fridge!
Q: My pudding layer seems runny. What happened?
A: The usual suspect is not using cold enough milk, or not whisking for the full 2 minutes. Don’t panic! Pop the whole trifle bowl in the fridge for an extra 30-60 minutes. The pudding will continue to set firm.
Q: Can I use fresh fruit instead of candy?
A: Absolutely! Fresh berries are a fantastic, refreshing swap. Just know that very juicy fruits (like sliced strawberries) will release liquid. To prevent a soupy trifle, toss berry slices with a teaspoon of sugar and let them drain in a colander for 10-15 minutes before layering.
Q: What if I don’t have a trifle bowl?
A: No problem! A clear glass salad bowl, a large pitcher, or even individual parfait glasses work wonderfully. The goal is just to see those gorgeous layers!

Easy Easter Trifle Dessert : A Colorful, Creamy Spring Treat
Description
This bright and cheerful Easter trifle is everything a spring dessert should be—easy to assemble, beautiful to display, and absolutely delicious. With layers of fluffy cake, creamy vanilla pudding, whipped topping, and festive candies, it’s the perfect centerpiece for your Easter table. Plus, it uses simple shortcuts that make it totally stress-free!
Ingredients
Cake Layer
-
1 box vanilla or white cake mix
-
Ingredients listed on the cake box (usually eggs, oil, water)
-
Gel food coloring (pink, yellow, green, purple — optional)
Creamy Layer
-
2 boxes (3.4 oz each) instant vanilla pudding
-
4 cups very cold milk
-
1 tub (8 oz) whipped topping, thawed
-
Or use 2 cups heavy cream + ¼ cup powdered sugar + 1 tsp vanilla, whipped
-
Fun Mix-Ins
-
1 cup mini marshmallows
-
1 cup pastel M&Ms or candy eggs
-
Optional toppings: sprinkles, crushed vanilla wafers, bunny graham crackers
Instructions
1. Bake the Cake
-
Prepare the boxed cake according to package instructions.
-
Let it cool completely.
-
Cut into 1-inch cubes.
-
(Optional) Divide cubes into 4 bowls and toss each with a drop of gel food coloring for a pastel rainbow effect.
2. Make the Pudding
-
Whisk 2 pudding mixes with 4 cups COLD milk for 2 full minutes.
-
Let sit for 5 minutes to thicken.
3. Assemble the Trifle
In a large trifle bowl (or any clear bowl), layer in this order:
-
Pastel cake cubes
-
A thick layer of pudding
-
A layer of whipped topping
-
Sprinkle of mini marshmallows + pastel candies
Repeat layers until the bowl is full.
End with whipped topping on top.
4. Decorate
Add sprinkles, cookies, candy eggs, or anything festive. Make it fun and colorful!
5. Chill
Refrigerate for at least 1 hour before serving so the layers can set.
Notes
-
Cold milk = thick pudding. Make sure it’s very cold.
-
Don’t layer while the cake is warm — it will make the trifle soggy.
-
Add candy topping right before serving to avoid color bleed.
-
No trifle bowl? Use a clear salad bowl, pitcher, or individual dessert cups.
Nutritional Information*
Okay, friends, let’s keep it real—this is a celebratory dessert, meant to be enjoyed fully! But for those who like to know, here’s a general breakdown per serving (assuming 12 generous servings from this recipe):
Calories: ~320 | Fat: 12g | Carbohydrates: 48g | Sugar: 34g | Protein: 3g
*Please note: This is an estimate based on the specific brands and ingredients used. Values can vary significantly with substitutions (like using sugar-free pudding, a different cake mix, or homemade whipped cream). This info is provided as a courtesy, but for precise dietary tracking, I recommend calculating with your exact ingredients using a trusted app or calculator.
Final Thoughts from My Kitchen to Yours
And there you have it—my signature Easter Trifle, shared with you from my heart (and my kitchen) to yours. This recipe embodies everything I love about Feastical: it’s feel-good, it brings people together, and it proves that creating something spectacular doesn’t have to be complicated.
This Easter, I hope this colorful, creamy treat becomes a part of your family’s tradition. I hope it’s the dessert that disappears first, the one that has everyone asking for the recipe. Most of all, I hope your home is filled with the same warmth, joy, and delicious smells that inspired me to start this foodie journey.
If you make it, I’d love to see your creation! Tag me @feastical on social media. Now, go forth and build something beautiful. Happy Easter, and happy cooking!
With love and a full spoon,
Beau