
The Best Chocolate Pudding Recipe: Your Spoonful of Pure, Unapologetic Joy
Hey, friends! Beau here, from my kitchen to yours. Let’s talk about a truth we can all agree on: sometimes, life just calls for a big, comforting bowl of chocolate pudding. Not the kind from a little plastic cup (though, no judgment here!), but the real deal—silky, deeply chocolatey, and warm from the stove. The kind that coats your spoon and tastes like a childhood memory and a hug all at once.
I’m a firm believer that magic happens in simple pots with simple ingredients. Today’s recipe is the poster child for that belief. This homemade chocolate pudding is a game-changer. It’s richer than any store-bought version, smoother than you ever dreamed, and comes together with just a handful of pantry staples in under 20 minutes. We’re talking about a dessert that’s equally perfect for a Tuesday night pick-me-up as it is for impressing dinner guests. It’s the culinary equivalent of your favorite cozy sweater. So, grab your favorite whisk and a trusty saucepan. We’re about to make a bowl of pure, unadulterated chocolate bliss that will ruin you for any other pudding forever. Let’s get cooking!
Why This Pudding? A Little Story From My Nana’s Table
This recipe isn’t just a list of ingredients to me. It’s a direct line back to my Nana Collier’s linoleum-floored kitchen. She wasn’t a fancy cook, but she was a real one. Her solution for a rainy day, a skinned knee, or a case of the “teenage mopes” (her words for my moods) was always the same: a pot of warm chocolate pudding.
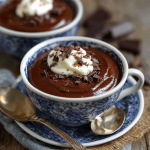
I can still see her, humming an old tune, whisking that darkening mixture on her avocado-green stove. The ritual was everything. The gentle scrape of the whisk against the pot, the first incredible smell of cocoa hitting the warm milk, and the triumphant moment it thickened into velvety perfection. She’d pour it into mismatched teacups and we’d eat it warm, right at the kitchen table, while she told me stories. That pudding wasn’t just dessert; it was love, patience, and the simple promise that everything would be okay. Every time I make this, I’m right back there. I want you to have that feeling, too—to create your own little moments of sweet, chocolatey comfort. Let’s make some memories, one spoonful at a time.
Gathering Your Chocolate Dream Team: The Ingredients
Here’s the beautiful part: the magic comes from just a few everyday players. Let’s break them down. I like to measure everything out before I start—it’s called mise en place, and it makes the cooking process feel like a calm, organized dance instead of a frantic scramble.
- ½ cup granulated sugar: Our sweet foundation. It balances the bitterness of the cocoa. For a deeper flavor, you can swap half with light brown sugar.
- ¼ cup unsweetened cocoa powder: This is the star! Use a good-quality one—it makes all the difference. I prefer natural cocoa for a classic, fruity-chocolate flavor. Dutch-process works too, for a mellower, darker taste.
- 3 tablespoons cornstarch: This is our thickening wizard. It’s what transforms milky liquid into luscious, spoonable pudding. Make sure it’s fresh for maximum power!
- ¼ teaspoon fine salt: Don’t skip it! Salt is a flavor enhancer, not just a salty taste. It makes the chocolate flavor pop and rounds out the sweetness perfectly.
- 2¾ cups whole milk: The backbone of our creaminess. The higher the fat content, the richer the final pudding. For an ultra-decadent version, swap ¾ cup of the milk for heavy cream.
- 1 teaspoon pure vanilla extract: The aromatic finish. It adds a beautiful, warm note that complements the chocolate. A tiny splash of almond extract is also a fun secret twist.
- 2 tablespoons unsalted butter: Our finishing touch for gloss and mouthfeel. It adds a subtle richness and a beautiful sheen. For a dairy-free version, a good plant-based butter works great here.
- Optional: 2 ounces chopped dark chocolate or chocolate chips: My pro-chef move for extra depth. Stirring in real chocolate at the end sends the flavor into the stratosphere. It’s like turning the volume up to eleven.
Let’s Make It: Your Step-by-Step Roadmap to Pudding Perfection
Ready? Put on some good music, tie on your apron, and let’s do this. It’s a simple process, but a few key tricks ensure silky-smooth success every single time.
- The Dry Team Huddle: In a medium saucepan (off the heat), whisk together the sugar, cocoa powder, cornstarch, and salt. Whisk them really well until you see no more streaks of white cornstarch. This prevents those dreaded lumps later on. Think of it as getting everyone introduced and friendly before the party starts.
- The Gradual Pour: Now, slowly drizzle in about ½ cup of the cold milk while whisking constantly. You’ll get a thick, pasty mixture. This step, called making a “slurry,” is our ultimate anti-lump insurance. Once it’s smooth, confidently whisk in the rest of the milk until everything is beautifully combined.
- The Patient Cook: Place the saucepan over medium heat. Now, your mission is to whisk. Constantly. Not frantically, but with a steady, even rhythm, making sure to scrape the bottom and corners of the pot. You’ll see it start to steam, then get frothy, and then—magic!—it will begin to thicken. This takes about 5-8 minutes. Chef’s Key Hack: Don’t rush by cranking the heat. Medium heat allows the cornstarch to activate smoothly without scorching.
- The Bubble Watch: Keep whisking! Once you see the first big, lazy bubble *bloop* up in the center, let it bubble gently for a full 60 seconds. This cooks out the starchy taste from the cornstarch and ensures the perfect set. The pudding will be thick enough to coat the back of a spoon.
- The Flavor Finish: Pull the pot off the heat immediately. Now, stir in the vanilla, butter, and your optional chopped chocolate. The residual heat will melt it all into a glossy, luxurious pool. Whisk until the butter and chocolate are fully melted and incorporated. Taste it (carefully, it’s hot!). This is the moment of truth—isn’t it incredible?
- The Final Rest: Pour your beautiful pudding into serving cups or a large bowl. To prevent a “skin” from forming (though I love the skin!), press a piece of plastic wrap directly onto the surface of the pudding. This is the professional way to keep it perfectly smooth.
Serving It Up: From Simple to Spectacular
How you serve this pudding is half the fun! It’s a versatile superstar.
For the purest experience, dive in while it’s still warm. There’s something utterly divine about that just-made, slightly loose texture. Spoon it into your favorite mug and curl up on the couch.
For classic chilled pudding, pop the covered cups into the fridge for at least 2-3 hours, or overnight. It will set up firm and cool, perfect for layering in parfaits.
Want to dress it up? The options are endless! Top with a mountain of softly whipped cream, a sprinkle of flaky sea salt, some toasted nuts (hazelnuts are a dream!), fresh berries, or a few crunchy chocolate shards. You can even use it as a luxurious dip for strawberries or pretzels. Get creative and make it your own!
Make It Your Own: 5 Delicious Twists
Once you’ve mastered the classic, the playground is open! Here are a few of my favorite ways to riff on this recipe.
- Mocha Madness: Whisk 1-2 teaspoons of instant espresso powder or finely ground coffee in with the dry ingredients. It won’t taste like coffee, just like a deeper, more complex chocolate. Trust me on this.
- Peanut Butter Cup: After removing from heat, stir in ¼ cup of smooth peanut butter along with the butter. Swirl a little extra on top before serving.
- Vegan/Dairy-Free Delight: Super easy! Use full-fat canned coconut milk or your favorite unsweetened plant-based milk (oat and almond are great). Swap the butter for coconut oil or vegan butter. The result is incredibly rich and fantastic.
- Black Forest Parfait: Layer chilled pudding with lightly sweetened whipped cream and jarred morello cherries or a quick cherry compote in a glass. It’s a showstopper.
- Orange Chocolate Dream: Add the zest of one orange to the sugar and rub it together with your fingers before mixing with the other dry ingredients. The citrus oil perfumes the whole pudding beautifully.
Beau’s Kitchen Notes & Stories
This recipe has been my trusty sidekick for years. I’ve made it in tiny apartment kitchens and for huge holiday crowds. The funniest fail? The time I was chatting with a friend and got distracted, letting the heat get too high. I ended up with a few tiny “chocolate scrambled eggs” (lumps) in my pot. I just strained the pudding through a fine-mesh sieve into my cups—crisis averted, and no one knew! It’s a forgiving recipe.
Over time, I’ve learned that the quality of your cocoa is the single biggest flavor upgrade. And that taking the full minute to cook after the first bubble is non-negotiable for texture. This pudding has evolved from my Nana’s simple version to my own canvas for flavors, but its soul—that warm, comforting, chocolatey heart—has never changed.
Your Questions, Answered: FAQs & Troubleshooting
Q: My pudding is lumpy! What did I do wrong and can I fix it?
A: Lumps usually happen if the dry ingredients weren’t fully incorporated with the initial cold milk, or if the heat was too high. Don’t panic! The best fix is to immediately take it off the heat and grab your immersion blender or a regular blender (careful, it’s hot!). Blend until silky smooth. You can also press it through a fine-mesh sieve. It’ll save the day.
Q: Can I make this ahead of time?
A: Absolutely! In fact, it’s better if it chills for at least 3 hours to fully set. It keeps beautifully, covered tightly in the fridge, for up to 3 days.
Q: My pudding is too thin/runny after chilling.
A> This means the cornstarch didn’t fully activate, likely because it didn’t come to a full, bubbling boil for that full minute. Next time, be patient and let it bubble. For this batch, you can enjoy it as a delicious chocolate sauce over ice cream!
Q: What’s the difference between this and cooked pudding mix?
A> Taste and ingredients! Ours uses real cocoa (and optional real chocolate), butter, and vanilla for a complex, homemade flavor. The mix often contains stabilizers and artificial flavors. Once you go scratch, you never go back.
Best Chocolate Pudding Recipe: Rich, Creamy & Made from Scratch
Description
This homemade chocolate pudding is rich, velvety, and unbelievably easy. With just a few pantry ingredients and one saucepan, you get a warm, deeply chocolatey dessert that tastes way better than anything store-bought. Perfect for a quick treat, a cozy night in, or as a base for parfaits and layered desserts.
Ingredients
-
½ cup granulated sugar
-
¼ cup unsweetened cocoa powder (natural or Dutch)
-
3 tbsp cornstarch
-
¼ tsp fine salt
-
2¾ cups whole milk
-
1 tsp vanilla extract
-
2 tbsp unsalted butter
-
Optional: 2 oz chopped dark chocolate or chocolate chips (for extra depth)
Notes
-
Mocha: add 1–2 tsp instant espresso to dry ingredients
-
Peanut Butter: stir in ¼ cup smooth peanut butter at the end
-
Vegan/Dairy-Free: use coconut milk or oat milk + vegan butter
-
Orange Chocolate: add 1 tsp orange zest to the sugar
-
Black Forest: layer with cherries + whipped cream
Nutritional Information (A Quick Note!)
Alright, let’s keep it real. This is a dessert, a treat meant to be savored and enjoyed fully. It’s made with real, whole ingredients. A serving of this delicious homemade pudding (about ¾ cup) has approximately: 230 calories, 5g of protein, 30g of carbohydrates, and 10g of fat. Remember, these are estimates and can vary based on specific brands and any substitutions you make (like using lower-fat milk). The important thing is that you know exactly what’s in your food—no mystery chemicals, just good, honest chocolatey goodness. Enjoy it mindfully and without guilt!
Final Thoughts: Your Spoon Awaits
And there you have it, friends—your passport to the world’s best homemade chocolate pudding. This isn’t just a recipe; it’s a reminder that the most satisfying things in life are often the simplest to create. You have the power to make something extraordinary from a few basic ingredients and a little bit of love and whisking.
I hope this recipe finds its way into your regular rotation, becoming your go-to for bad days, celebrations, and everything in between. Make it, share it, top it with your favorite things, and most importantly, enjoy every single spoonful.
Thanks for cooking with me today. If you make it (and I really hope you do!), tag me @Feastical or drop a comment on the blog—I love seeing your kitchen creations! Now, go forth and pudding.
With a full heart and a happy spoon,
Beau