
Sweet Meets Strong: Your New Favorite Protein-Packed Treat
Hey friends, Beau here from Feastical! Grab your favorite mug of coffee (or tea, no judgment here) and pull up a chair. Let’s talk about one of life’s great kitchen conundrums: how do you satisfy that deep, undeniable sweet tooth without derailing your healthy habits? For the longest time, I felt like I had to choose. It was either a decadent dessert that made me feel like I needed a nap afterward, or a “healthy” snack that tasted about as exciting as cardboard. Sound familiar?
Well, I’m here to tell you that era is officially over. Enter the hero of our story today: Raspberry White Chocolate Protein Cups. Imagine the creamy, dreamy sweetness of white chocolate, the bright, tart zing of raspberries, and the satisfying, muscle-loving power of protein—all layered into one perfect, bite-sized cup. These aren’t just a “good-for-you” snack; they’re a downright celebration in your mouth. They’re the treat you reach for after a great workout, the little reward during a hectic afternoon, or the guilt-free dessert that proves eating well can—and should—be absolutely delicious. So, let’s ditch the compromise and make something that truly brings the joy. Your spatula and your sweet tooth are about to become best friends.
The Raspberry Revelation: A Story from My Kitchen
This recipe actually has its roots in a little kitchen disaster—or what I like to call a “happy accident.” A few summers back, I was obsessed with making homemade berry jams. One particularly ambitious batch of raspberry jam turned out… well, let’s just say it was more “raspberry soup” than spreadable delight. I was staring at this bowl of beautiful, tart, seedy liquid, not wanting to waste it, when my eyes landed on a bag of white chocolate chips and my protein shaker from that morning’s workout.
A lightbulb went off. What if I used the chia seeds sitting in my pantry to thicken this “soup” and layer it with something creamy and protein-packed? A few messy experiments later (involving a lot of licking spoons and a very patient dog waiting for drops), these cups were born. They remind me that sometimes the best creations come from not getting it right the first time, but from playing, tasting, and having fun with your food. Every time I make them now, I think of that sunny kitchen, my failed jam, and the delicious solution that came from it. Food has a funny way of working out like that, doesn’t it?
Gathering Your Flavor Arsenal
Here’s everything you need to create these little cups of joy. I’ve added my two cents on each ingredient because knowing the “why” behind the “what” makes you a more confident cook!
- For the Bottom & Top Layers:
- White Chocolate Chips (1 cup total): This is our sweet, creamy foundation. Chef’s Insight: Look for a brand with real cocoa butter for the best melt and flavor. Don’t have chips? A high-quality white chocolate bar chopped up works beautifully.
- Coconut Oil (2 tablespoons total): Our magic melter and texture maestro. It helps the chocolate melt smoothly and sets up firmly. Sub Tip: If you’re not a coconut fan, refined coconut oil has a neutral taste, or you can use a tiny bit of cocoa butter for a next-level experience.
- Vanilla or White Chocolate Protein Powder (1 scoop): The protein powerhouse! Chef’s Hack: Use a powder you love the taste of on its own. A whey/casein blend or a good plant-based vanilla protein gives a fantastic, creamy texture. This is where the “strong” in “sweet meets strong” comes from!
- For the Vibrant Raspberry Layer:
- Fresh or Frozen Raspberries (½ cup): The tangy heart of the cup. Frozen berries are perfect here—they’re often more affordable, available year-round, and mash up just as well. No need to thaw completely!
- Honey or Maple Syrup (1 teaspoon): A touch of natural sweetness to balance the raspberry’s tartness. Sub Tip: Agave nectar works too, or omit it if your berries are super sweet.
- Chia Seeds (1 tablespoon): Our natural thickener! These tiny seeds create a lovely jammy texture without any cooking. Chef’s Insight: They also add a bonus boost of fiber and omega-3s. A true kitchen superhero.
Let’s Build Some Magic: Step-by-Step
Okay, team. Aprons on? Let’s do this. This process is simple, but these little tips will make it foolproof.
- Prep Your Stage. Line a mini muffin tin with 12 paper liners. This is non-negotiable for easy removal! No mini tin? Use a regular muffin tin and make 6 larger cups—just adjust the layering amounts.
- Create the Creamy Base. In a microwave-safe bowl, combine ½ cup of the white chocolate chips and 1 tablespoon of coconut oil. Microwave in 20-second bursts, stirring well between each, until completely smooth. Chef’s Hack: Be patient! Burnt chocolate is sad chocolate. You can also do this over a double boiler if you prefer. Once melted, quickly stir in your scoop of protein powder until you have a thick, luscious mixture. It will thicken fast, so work quickly!
- Layer One: Spoon and Set. Spoon about 2 teaspoons of the white chocolate protein mixture into the bottom of each liner. Use the back of the spoon to spread it up the sides just a tiny bit—this helps “cup” the next layer. Pop the whole tin into the freezer for a solid 10 minutes. This sets the base so our raspberry layer doesn’t sink in.
- Make the Raspberry Heart. While the base chills, place your raspberries in a small bowl. Mash them with a fork until you get a chunky sauce. Stir in the honey and chia seeds. Let this sit for at least 5 minutes. You’ll see it start to thicken beautifully—that’s the chia seeds doing their gel-like thing!
- Layer Two: The Tart Middle. Pull your tin from the freezer. Give the raspberry chia jam a final stir, then place a small dollop (about 1 teaspoon) right in the center of each frozen white chocolate base.
- Seal the Deal with the Top Layer. Repeat the melting process with the remaining ½ cup white chocolate chips and 1 tablespoon coconut oil. Once smooth, carefully spoon it over each cup, covering the raspberry layer completely. A little swirl of the spoon creates a lovely finish. Pro Tip: Tap the tin gently on the counter to settle the top layer and remove any air bubbles.
- The Final Chill. Freeze the whole tray for 20-30 minutes, or until the tops are completely firm to the touch. And voila! You’ve just created a batch of portable, protein-packed perfection.
How to Serve & Savor Your Creation
These cups are incredibly versatile. I like to store them in a sealed container in the freezer—they have the most amazing firm-yet-creamy texture straight from the cold. They’re the ultimate grab-and-go snack from the freezer. If you prefer a slightly softer bite, store them in the fridge; they’ll hold their shape but be a touch creamier.
For serving, let them sit at room temperature for just a minute or two before you pop them in your mouth. This lets the flavors really bloom. I love having two with my afternoon coffee for a perfect pick-me-up, or packing a few in a small insulated bag for post-gym fuel. They feel indulgent, but you know exactly what’s inside: real, good-for-you ingredients.
Make It Your Own: Endless Flavor Twists!
The basic formula here is your playground. Once you master the classic, try one of these fun spins:
- Double Chocolate Dream: Use dark chocolate chips instead of white chocolate for both layers, and add a tablespoon of cocoa powder to the protein mix. For the middle, try a mashed cherry or strawberry chia jam.
- Peanut Butter Cup Remix: For the base and top layers, use milk or dark chocolate. For the middle layer, mix 2 tablespoons of powdered peanut butter (PB2) with a little water or milk to create a thick, peanut buttery paste. Heaven!
- Tropical Getaway: Keep the white chocolate layers. For the center, mash ½ cup of mango or passionfruit pulp with the chia seeds. Sprinkle a little toasted coconut on top before the final set.
- Mint Chocolate Chip: Add ¼ teaspoon of peppermint extract to the white chocolate protein base. Fold in a few mini dark chocolate chips for texture. So refreshing!
- Fully Plant-Powered: Ensure your chocolate chips are dairy-free, use maple syrup, and pick your favorite vegan vanilla protein powder. It works like a charm!
Beau’s Kitchen Notes
This recipe has evolved from my initial “jam rescue” mission. I found that adding the protein powder to the melted chocolate, rather than mixing it dry with other ingredients, prevents any grittiness and gives that irresistibly smooth texture. The coconut oil is the other secret weapon—it’s the reason these cups snap when you bite into them but melt so nicely in your mouth.
A funny side note: My dog, Biscuit, has developed a sixth sense for when I’m making these. He parks himself right under the kitchen island, waiting for me to “accidentally” drop a single raspberry. It’s our little ritual now. Cooking is always better with a furry (or human) friend nearby!
Your Questions, Answered
Q: My protein mixture got super thick and clumpy when I added the powder. What did I do wrong?
A: This happens if the melted chocolate cools down too much before adding the powder. Make sure your chocolate/oil mix is fully melted and *warm* (not hot) when you stir in the protein. If it seizes up, you can gently re-warm the whole mixture for 5-7 seconds in the microwave and stir vigorously to smooth it out.
Q: Can I use fresh fruit instead of chia seeds to thicken the raspberry layer?
A: Fresh fruit alone will be too runny and will make the layers soggy. The chia seeds are crucial for creating a gel-like, jammy texture without cooking. If you must omit them, you could reduce the raspberries on the stove with a little extra sweetener until thick, then cool completely before using.
Q: Why do I have to store them in the freezer/fridge? Can’t they stay on the counter?
A> Because of the coconut oil and melted chocolate, these cups are designed to be kept cool. At room temperature, they will become very soft and lose their shape. Think of them like a gourmet chocolate bar—best enjoyed cool!
Q: My top layer cracked when I bit into it. Is that normal?
A> A slight snap is perfect! But if it’s cracking into pieces, your top layer might have been a bit too thick or frozen too rapidly. Next time, try pouring the top layer when it’s slightly warmer and tap the tin to spread it thinly and evenly.
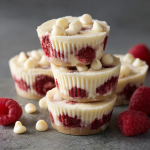
Raspberry White Chocolate Protein Cups : High-Protein Sweet Snack
Description
Sweet, creamy white chocolate layered with a bright raspberry–chia filling and boosted with protein. A perfect healthy snack or post-workout treat.
Ingredients
White Chocolate Protein Layers
-
1 cup white chocolate chips, divided
-
2 tbsp coconut oil, divided
-
1 scoop vanilla or white chocolate protein powder
Raspberry Chia Filling
-
½ cup fresh or frozen raspberries
-
1 tsp honey or maple syrup
-
1 tbsp chia seeds
Instructions
1. Prepare
-
Line a mini muffin tin with 12 paper liners.
-
For larger cups, use a regular muffin tin (makes 6).
2. Make the Bottom Layer
-
Melt ½ cup white chocolate chips + 1 tbsp coconut oil in 20-second microwave bursts, stirring until smooth.
-
Stir in protein powder until thick and creamy.
-
Spoon 2 teaspoons into each liner, spreading slightly up the sides.
-
Freeze 10 minutes.
3. Make the Raspberry Filling
-
Mash raspberries in a bowl.
-
Stir in honey and chia seeds.
-
Let sit 5 minutes to thicken.
-
Place 1 teaspoon of the raspberry mixture onto each frozen chocolate base.
4. Make the Top Layer
-
Melt the remaining ½ cup white chocolate + 1 tbsp coconut oil.
-
Spoon over each cup to fully cover the raspberry layer.
-
Gently tap the pan on the counter to remove air bubbles.
5. Chill
-
Freeze 20–30 minutes until fully set.
-
Store in the fridge or freezer.
Notes
-
If the chocolate becomes clumpy when adding protein powder, gently reheat for a few seconds and stir well.
-
The chia seeds are essential for thickening the raspberry layer.
-
Keep the cups chilled — room temperature will soften them too much.
Nutritional Highlights (Approximate, Per Cup)
Let’s be clear: I’m a cook, not a dietitian. But I love knowing what’s fueling my body. These values are estimates based on specific ingredients, but they give you a great idea of why these cups are such a smart choice.
- Calories: ~110 | Fat: 7g (the good kind from coconut oil and chocolate!)
- Carbohydrates: 8g | Fiber: 2g (thanks, chia seeds and berries!)
- Protein: 4g (the star of the show!)
They provide a balanced mix of macros to satisfy hunger, curb sugar cravings, and support your energy levels. It’s a snack that truly loves you back.
Final Thoughts from My Kitchen to Yours
And there you have it, friends—the full story behind my beloved Raspberry White Chocolate Protein Cups. More than just a recipe, I hope this is an invitation to play in your kitchen, to turn accidents into opportunities, and to make food that makes you feel amazing inside and out.
Remember, at Feastical, we believe food should be a feel-good hug, never a chore. These little cups embody that spirit for me: simple to make, soulfully satisfying, and packed with real-life flavor. I’d love to hear how your batch turns out! Tag me on social or drop a comment on the blog. Now, go enjoy that well-deserved, protein-packed treat. You’ve earned it.
With a full heart and a happy stomach,
Beau