
Mini Cheeseburger Sliders: Your New Go-To Party Hero
Hey friends, Beau here! Let’s talk about one of life’s universal truths: everything is just a little bit more fun when it’s miniaturized. Am I right? There’s something about bite-sized food that just makes people smile, gather, and dive in with zero hesitation. And when you take the undisputed king of comfort food—the cheeseburger—and shrink it down into a perfect, poppable package? Well, you’ve just created edible magic.
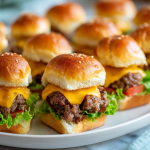
These Mini Cheeseburger Sliders are my absolute secret weapon for everything from chaotic weeknights to packed game day parties. They deliver that full-throttle, juicy, cheesy, crave-worthy burger experience in a neat little two-bite bundle. No fuss, no giant mess, and absolutely no compromise on flavor. We’re talking golden, buttery buns hugging a perfectly seasoned mini-patty, melted cheese oozing over the edges, and all your favorite toppings stacked high.
The best part? They come together in a flash. Whether you’re feeding a hungry crowd or just treating the family to a fun dinner, this recipe is your new best friend. It’s simple, soulful, and guaranteed to make your kitchen the happiest place in the house. So, preheat that oven, and let’s make some mini burger memories together!
More Than a Snack: A Game Day Tradition
I’ll never forget the first time I truly understood the power of the slider. It was a crisp autumn Sunday, and my living room was packed wall-to-wall with friends, all wearing our team’s colors (and desperately hoping for a win). I’d spent the morning prepping what I thought was a brilliant, gourmet spread, but as kickoff approached, a minor panic set off in my chef-brain. How was anyone supposed to balance a plate, a drink, and a giant burger while yelling at the TV?
In a moment of inspiration (or perhaps desperation), I grabbed the ground beef I had set aside for meatballs and formed it into tiny, silver-dollar-sized patties. I scooped up a bag of soft dinner rolls from the bakery, sliced them all in one go, and created an assembly line of cheesy, beefy goodness. I slid that first tray out of the oven, the scent of toasted buns and sizzling beef filling the air, and placed it on the coffee table. They were gone in under two minutes. The silence was broken only by the sounds of happy chewing and the game on the screen. That was the moment I knew: these weren’t just small burgers. They were a vehicle for joy, connection, and keeping the party going, one perfect bite at a time.
Gathering Your Flavor Arsenal
One of the things I love most about this recipe is its beautiful simplicity. You don’t need a pantry full of exotic ingredients to create something truly spectacular. Here’s your shopping list, complete with a few of my chef-y insights to make each component shine.
- 1 lb Ground Beef (80/20 blend): This is your star player! I highly recommend an 80/20 mix (80% lean, 20% fat). That bit of fat is pure flavor gold and guarantees a juicy, non-dry slider. Chef’s Tip: For a lighter option, ground turkey or chicken work great, just add a tablespoon of olive oil to the mix to keep it moist.
- Salt & Pepper to taste: The dynamic duo! Don’t be shy here. A good, generous seasoning on the outside of the patty creates a delicious crust.
- 1/2 tsp Garlic Powder: We’re adding this to the meat for a consistent, mellow garlic flavor that permeates every bite. No one bites into a chunk of raw garlic this way!
- 1/2 tsp Onion Powder: Same idea as the garlic powder. It gives you that foundational savory note that makes you go, “Mmm, what is that?” It’s the secret handshake of good burger seasoning.
- 8–10 Slider Buns or Dinner Rolls: King’s Hawaiian Sweet Rolls are my personal favorite for a touch of sweetness that plays amazingly with the salty beef and cheese, but any soft, packable slider bun will do the trick.
- 8–10 slices Cheddar or American Cheese: Let the great cheese debate begin! Cheddar gives you that classic, sharp tang, while American cheese melts into that iconic, creamy, nostalgic blanket. Chef’s Tip: No shame in the American cheese game—its meltability is legendary. Feel free to mix and match!
- Optional Toppings: This is your playground! Think dill pickle chips, crisp shredded lettuce, thin tomato slices, caramelized onions, or a classic trio of ketchup, mustard, and mayo.
- Optional: 2 tbsp Melted Butter + 1 tsp Sesame Seeds: This is the pro-move for a gorgeous, bakery-worthy finish. Brushing the tops with butter and seeds makes them golden, shiny, and adds a lovely little crunch.
Let’s Get Building: Your Step-by-Step Guide to Slider Perfection
Alright, team, it’s go-time. Put on your favorite apron (or don’t, I’m not the boss of you), and let’s transform these simple ingredients into the talk of the town. I’ll walk you through every step with a few of my favorite kitchen hacks along the way.
- Preheat and Prep. Fire up your oven to 375°F (190°C). If you’re using a skillet, get it over medium-high heat. While that’s warming up, let’s tackle the buns. Take your whole pack of slider buns and, without separating them, use a long serrated knife to slice the entire block in half horizontally. This one-cut wonder saves you so much time and keeps everything uniform. Place the bottom half in a baking dish or on a sheet pan. Chef’s Hack: A tiny sprinkle of garlic salt on the bottom bun layer before adding the patties? Life-changing.
- Form the Perfect Patties. In a medium bowl, gently combine your ground beef, salt, pepper, garlic powder, and onion powder. Don’t overwork the meat! Over-mixing makes for tough, dense sliders. Divide the mixture into 8-10 equal portions (I use a small cookie scoop for perfect uniformity). Gently roll them into balls and then flatten into patties that are slightly wider than your buns. Pro-Tip: Press a small, shallow dimple into the center of each patty with your thumb. This prevents them from puffing up into little meatballs as they cook, giving you a flat, perfect patty for stacking.
- Cook to Juicy Perfection. If you’re using the oven method, arrange your patties on a baking sheet and bake for 8-10 minutes, or until cooked through. For stovetop glory, cook the patties in a skillet for 2-3 minutes per side. You’re looking for a nice brown sear and an internal temperature of 160°F. No peeking too often! Let them get that good color.
- The Cheese Melt. This is the best part. In the last minute of cooking, place a slice of cheese over each patty. If you’re in a skillet, you can add a tiny splash of water to the pan and cover it with a lid for 30 seconds to steam-melt the cheese into a glorious, gooey blanket.
- Assemble with Love. Now for the fun part! Place your cheesy patties directly onto the bottom layer of buns in your baking dish. This is where you add your toppings. I like a smear of special sauce (mayo, ketchup, relish, and a dash of vinegar), a pickle chip, and maybe some finely diced onion. Once your toppings are set, place the top bun layer over everything.
- The Golden Finish. Brush the top of the buns generously with the melted butter and sprinkle with sesame seeds. This not only adds flavor but gives them that beautiful, professional look. Pop the whole assembled tray back into the oven for about 5 minutes, just until the buns are warm and golden and everything is melded together in cheesy, beefy harmony.
How to Serve These Little Legends
Presentation is part of the fun! I love serving these sliders right in the baking dish they were cooked in—it’s rustic, inviting, and means less cleanup for you. Just pop the whole tray in the center of the table and watch the hands reach in.
For a party, I turn it into a full slider bar. Keep the baked sliders plain (just beef and cheese), and then set up small bowls with all the topping options: crispy bacon bits, sautéed mushrooms, jalapeño slices, different sauces, and a big bowl of tangy coleslaw. This lets everyone build their dream bite and keeps the food interactive and engaging.
What to serve on the side? You can’t go wrong with a mountain of crispy, seasoned waffle fries or a light, crunchy garden salad to balance the richness. And don’t forget the napkins—these are joyfully messy!
Mix It Up! Creative Slider Twists
The basic slider is a masterpiece, but it’s also an incredible canvas for your culinary creativity. Here are a few of my favorite ways to shake things up:
- The Bacon Ranch Bliss: Mix a packet of dry ranch seasoning into the ground beef before forming the patties. Top with cheddar cheese and a piece of crispy cooked bacon. Serve with a side of ranch for dipping.
- The Hawaiian Luau: Use King’s Hawaiian Rolls (if you weren’t already!). Top your beef patty with a slice of provolone cheese, a thin ring of pineapple, and a drizzle of teriyaki sauce. Sweet, salty, and sublime.
- The Pizza Burger: Mix some Italian seasoning and grated Parmesan into the beef. Top with a slice of mozzarella and a spoonful of warm marinara sauce. It’s a flavor party in your mouth.
- BBQ Cheddar: Skip the ketchup and mustard and slather the buns with your favorite BBQ sauce. Add a tangy slice of sharp cheddar and some crispy fried onions for a real crowd-pleaser.
- Buffalo Chicken Swap: For a poultry twist, use ground chicken or shredded rotisserie chicken mixed with buffalo sauce and a tablespoon of breadcrumbs. Top with blue cheese crumbles and a drizzle of ranch. Game day heaven!
Beau’s Kitchen Confidential
This recipe has truly evolved in my kitchen over the years. I used to be a strict “one-burger-at-a-time” griddle guy, but when I discovered the ease of the tray-bake method for a crowd, it was a total game-changer. The first time I made them for my niece’s birthday, she looked at me with ketchup on her cheek and said, “Uncle Beau, these are the best tiny burgers EVER.” That’s the review that really matters.
One funny fail I had early on was using burger buns that were too large and flimsy—the whole structure just collapsed into a delicious but messy pile. That’s how I learned the importance of a soft but sturdy, packable roll. It’s all part of the journey! Don’t be afraid to make this recipe your own. That’s what cooking is all about.
Your Slider Questions, Answered!
Over the years, I’ve gotten a lot of great questions about this recipe. Here are the answers to the most common head-scratchers.
Q: My patties always shrink and get thick. How do I keep them flat?
A: The two biggest tricks are 1) Don’t overwork the meat, and 2) Make that thumbprint dimple in the center! This counters the natural tendency of the protein fibers to contract and pull the patty inward. Make the patties slightly wider than the bun, and they’ll shrink into a perfect fit.
Q: Can I make these sliders ahead of time?
A: Absolutely! You can assemble the entire tray (with the butter topping) a few hours ahead, cover it tightly with plastic wrap, and keep it in the fridge. Just add a few extra minutes to the baking time since you’re starting from cold. It’s a party host’s dream.
Q: My cheese isn’t melting nicely. Help!
A: I feel your pain. The steam-melt method I mentioned (a splash of water in the hot pan, then cover with a lid) is foolproof. Also, if you’ using a harder cheese like cheddar, shredding it yourself will make it melt more smoothly than pre-shredded cheese (which has anti-caking agents).
Q: What’s the best way to reheat leftovers?
A: The microwave can make the buns soggy. For the best results, reheat them in a 350°F oven or a toaster oven for about 5-10 minutes until warm and the bun is crispy again.
Mini Cheeseburger Sliders : Bite-Sized, Juicy, and Crowd-Ready
Description
These Mini Cheeseburger Sliders are the ultimate crowd-pleaser — easy to assemble, fast to cook, and packed with that classic cheeseburger flavor everyone loves. With tender, perfectly seasoned mini patties, melty cheese, and soft golden buns, they’re ideal for game days, birthdays, or fun weeknight dinners. Best of all? They’re customizable, kid-friendly, and ready in no time.
Ingredients
-
1 lb ground beef (80/20 blend)
-
Salt & pepper, to taste
-
½ tsp garlic powder
-
½ tsp onion powder
-
8–10 slider buns or dinner rolls
-
8–10 slices cheddar or American cheese
-
Optional toppings: pickles, shredded lettuce, tomato, diced onion, ketchup, mustard, mayo
-
Optional butter topping: 2 tbsp melted butter + 1 tsp sesame seeds
Instructions
1. Prepare the buns
Preheat oven to 375°F (190°C).
Keeping the buns connected, slice the entire block horizontally. Place the bottom half in a baking dish.
2. Make the patties
In a bowl, gently mix ground beef with salt, pepper, garlic powder, and onion powder.
Divide into 8–10 small patties, slightly wider than the buns. Press a small thumbprint dimple in the center of each one.
3. Cook the patties
-
Oven: Bake patties on a tray for 8–10 minutes.
-
Skillet: Cook 2–3 minutes per side over medium-high heat.
Add cheese during the last minute to melt.
4. Assemble the sliders
Place each cheesy patty onto the bottom buns. Add your favorite toppings, then place the top bun layer on.
5. Add the golden finish (optional)
Brush tops with melted butter and sprinkle with sesame seeds.
Bake for 5 minutes, until warm and lightly toasted.
Notes
-
Don’t overmix the meat — it keeps the patties tender.
-
Dimple the patties to prevent puffing.
-
Use King’s Hawaiian rolls for a sweet-and-savory combo.
-
Steam-melt the cheese (add a splash of water and cover for 30 seconds).
-
Want a make-ahead option? Assemble fully, refrigerate, and bake when ready.
Nourishment Note (Because We Care!)
Let’s keep it real—this is a treat, a celebration, a feel-good food. But it’s always good to know what you’re enjoying! The following is a general estimate for one slider (with cheese and a standard bun), and remember, your numbers may vary based on the specific ingredients and toppings you use.
Approximate Nutrition (per slider):
Calories: ~220 | Protein: 13g | Fat: 12g | Carbohydrates: 14g
Want to lighten it up a bit? You absolutely can! Use 93% lean ground beef or ground turkey, opt for low-fat cheese, and load up on those healthy veggie toppings like lettuce, tomato, and onion. The beauty of this recipe is its flexibility to fit your lifestyle while still tasting downright delicious.
Final Thoughts
And there you have it, my friends—your complete guide to mastering the magnificent mini cheeseburger slider. This isn’t just a recipe; it’s a tool for connection, a catalyst for laughter, and a guaranteed way to make any meal feel a little more special.
I hope you feel inspired to whip up a batch for your next gathering, or just for a Tuesday night that needs a boost of fun. Remember, the best food isn’t about being perfect; it’s about being shared. So gather your people, preheat that oven, and get ready for the happy silence that only a plate of truly great food can bring.
If you make them, I’d love to see your creations! Tag me @Feastical on social media so I can share in the joy. Now, go forth and get your slider on!
With love and a full heart (and an even fuller plate),
Beau
***