
The Only Cream Cheese Cut-Out Sugar Cookie Recipe You’ll Ever Need
Hey friends, Beau from Feastical here! Let’s talk about a kitchen quest that has haunted many of us: The Quest for the Perfect Cut-Out Sugar Cookie. You know the one. You dream of beautifully shaped, festive cookies that hold their edges like a champ. You imagine them soft and tender, not crunchy and brittle. You picture a canvas just begging for a swirl of royal icing and a blizzard of sprinkles.
But then… reality hits. The dough is too sticky. The shapes spread into abstract blobs in the oven. You end up with cookies that taste more like sweet cardboard than a buttery delight. I’ve been there, my friend. I’ve had my share of cookie-related kitchen frustrations, and I’m here to tell you that the search is officially over.
Welcome to the cookie that changed the game for me: the Cream Cheese Cut-Out Sugar Cookie. This isn’t just another recipe; it’s your new secret weapon. The secret, as you might have guessed, is a glorious block of cream cheese. It’s the magic ingredient that adds a subtle tang, creates an unbelievably soft and tender crumb, and gives the dough a perfect, roll-able consistency. These cookies are everything a decorated cookie should be—they hold their shape with bakery-worthy precision, but they bite like a soft, buttery dream.
So, whether you’re prepping for the holiday season, a birthday party, or just a Tuesday that needs a little extra sparkle, you’re in the right place. Grab your favorite rolling pin and let’s create some edible magic together.
A Sprinkle of Nostalgia: Why These Cookies Feel Like Home
I can’t think about these cookies without getting a little sentimental. My Grandma Collier was the undisputed queen of holiday baking. Her kitchen in December was a place of pure, flour-dusted wonder. The air was thick with the scent of ginger, molasses, and, most importantly, her famous sugar cookies.
One year, when I was probably eight years old, she finally deemed me “old enough” to help with the royal icing. With the seriousness of a heart surgeon, she handed me a piping bag. My job was the delicate task of outlining the Christmas trees. I squeezed a little too hard, and a giant blob of green icing erupted, completely drowning a poor, unsuspecting cookie. I froze, expecting disaster. But Grandma just threw her head back and laughed that deep, joyful laugh of hers. “Well, that one’s extra special, Beau!” she said. “Let’s give it a whole forest of sprinkles.”
That’s the spirit I bring to my kitchen every time I make this recipe. It’s not about perfection. It’s about the joy of creating, the fun of decorating, and the memories you make with every slightly lopsided snowman and every over-sprinkled Christmas tree. This recipe is my homage to those days—a little more refined with the cream cheese hack, but carrying the same heart and soul.
Gathering Your Cookie Crew: The Ingredients
Part of what makes this recipe so wonderful is its simplicity. You likely have most of this in your pantry right now! Here’s the lineup, with a few of my chef-y insights to help you understand the “why” behind the “what.”
- ½ cup unsalted butter, softened – This is the flavor foundation. Using unsalted butter lets you control the salt level perfectly. “Softened” is key here! It should be cool to the touch but yield easily when you press it. Think “spreadable” consistency, not melted.
- 3 oz cream cheese, softened – Here’s the star of the show! The cream cheese adds fat and moisture, which translates to an incredibly soft, tender cookie that stays that way for days. It also introduces a subtle tang that balances the sweetness beautifully. Make sure it’s full-fat for the best texture.
- 1 cup granulated sugar – For that classic, sweet sugar cookie taste. We cream it with the butter and cream cheese to incorporate air, which helps give the cookies a lovely, light structure.
- 1 large egg – Our binding agent! The egg brings the dough together and adds richness and structure.
- 1 tsp vanilla extract – The warm, familiar flavor we all know and love. Use the real stuff if you can—it makes a difference!
- ½ tsp almond extract (optional) – This is my pro-tip for next-level flavor. It doesn’t make the cookies taste like almonds, per se, but it gives them a wonderfully complex, almost bakery-style depth. If you’re not a fan, you can simply leave it out.
- 2 ¼ cups all-purpose flour – The backbone of our cookie. I always fluff my flour with a spoon before scooping it into the measuring cup, then level it off. This prevents you from accidentally using too much and ending up with dry dough.
- 1 ½ tsp baking powder – This is our leavening agent, and it’s what gives these cookies their slight lift and soft, cake-like texture (as opposed to baking soda, which would make them crispier).
- ¼ tsp salt – Don’t skip this! Salt is a flavor enhancer. It makes the buttery, sweet flavors pop and prevents the cookies from tasting flat.
Let’s Get Baking: The Step-by-Step Fun
Ready to make some dough? Follow these steps, and you’ll be a cut-out cookie pro in no time. I’ve sprinkled in my favorite kitchen hacks to ensure your success!
- The Creaming Method is Key. In a large bowl, cream together the softened butter, cream cheese, and sugar. Use an electric mixer on medium speed for a good 2-3 minutes. You’re not just mixing; you’re beating air into the mixture until it becomes pale, fluffy, and wonderfully light. This is the first secret to a tender cookie.
- Incorporate the Wet Team. Beat in the egg, vanilla, and that magical almond extract (if using). Scrape down the sides of the bowl with a spatula to make sure everything is evenly combined. You should have a smooth, glossy mixture at this point.
- Whisk the Dry Crew. In a separate bowl, whisk together the flour, baking powder, and salt. Whisking is important here—it evenly distributes the baking powder so you get a consistent rise in every single cookie.
- Bring It All Together. Gradually add the dry ingredients to the wet ingredients, mixing on low speed just until the flour disappears. Chef’s Hack: Don’t overmix! As soon as you no longer see dry streaks of flour, stop the mixer. Overworking the dough develops gluten, which can lead to tough cookies.
- Chill Out. Seriously. Divide the dough into two equal disks, wrap each tightly in plastic wrap, and chill them in the fridge for at least 1 hour, or up to 2 days. This is non-negotiable! Chilling firms up the butter and cream cheese, which prevents the cookies from spreading in the oven. It also makes the dough much easier to roll out without sticking.
- Roll and Cut with Confidence. When you’re ready to bake, preheat your oven to 375°F (190°C). Take one disk of dough out of the fridge. Lightly flour your work surface and rolling pin. Roll the dough to about ¼-inch thickness. Chef’s Hack: For perfectly even cookies, try using rolling pin rings! If you don’t have them, two wooden dowels of the same thickness placed on either side of your dough work great as a guide.
- Cut Those Shapes! Dip your cookie cutters in a little flour before each cut to prevent sticking. Cut your shapes close together to minimize scraps. You can re-roll the scraps once, but be aware they might be a tad tougher after the second roll.
- Bake to Perfection. Place the cut-out shapes on a parchment-lined baking sheet about an inch apart. Bake for 8-10 minutes. You’re looking for the edges to be just barely starting to turn a light golden brown. The centers should still look soft and set, but not wet. Chef’s Hack: They will continue to cook on the hot baking sheet after you pull them out, so erring on the side of underdone is better than overdone!
- The Cool Down. Let the cookies cool on the baking sheet for 5 minutes before transferring them to a wire rack to cool completely. This is crucial for decorating—if you try to ice a warm cookie, it will melt into a puddle of sadness.
Showtime: How to Serve and Decorate Your Masterpieces
Now for the best part—making these cookies your own! Once they are completely cool, it’s time to unleash your inner artist.
I’m a huge fan of a simple royal icing or a glaze icing (made with powdered sugar, milk, and a touch of vanilla) for decorating. The glaze is a bit easier for beginners. Tint your icing with gel food coloring for vibrant, beautiful hues without thinning it out.
For a classic look, use the “flooding” technique: pipe a thicker outline around the edge of your cookie, then thin the remaining icing with a tiny bit of water or milk and “flood” the center, using a toothpick to guide it into the corners. This creates a smooth, professional-looking surface.
And of course, don’t forget the sprinkles, sanding sugar, and edible pearls! Add them while the icing is still wet so they stick. Pile these finished cookies high on a beautiful platter for a party, or package them in cellophane bags tied with a ribbon for the most heartfelt homemade gifts.
Mix It Up! Creative Recipe Twists
This dough is a fantastic base for so many flavors. Don’t be afraid to get creative!
- Lemon Zest Delight: Add the zest of one large lemon to the dough when you cream the butter and sugar. It gives the cookies a bright, sunny, and incredibly fresh flavor that pairs wonderfully with a simple lemon glaze.
- Spiced & Nice: For a fall or winter twist, whisk 1 teaspoon of cinnamon, ½ teaspoon of nutmeg, and a pinch of cloves into your dry ingredients. It’s like a snickerdoodle and a sugar cookie had the most delicious baby.
- Chocolate Roll-Outs: Replace ¼ cup of the all-purpose flour with ½ cup of unsweetened cocoa powder for a rich chocolate version. Perfect for Halloween bats or Valentine’s hearts!
- Citrus Burst: Swap the almond extract for orange extract, or add the zest of an orange. A little orange icing on top? Pure bliss.
- Gluten-Free Friend: You can easily make this recipe gluten-free by using a 1:1 gluten-free all-purpose flour blend. I’ve had great success with brands like Bob’s Red Mill or King Arthur.
Beau’s Kitchen Chronicles: A Few Final Thoughts
This recipe has been a labor of love, tweaked and perfected over many holiday seasons. The biggest “aha!” moment was realizing the cream cheese wasn’t just for flavor—it was the texture game-changer. I once tried to rush the chilling process by putting the dough in the freezer for 15 minutes. Let’s just say I ended up with a rock-solid disk that took an hour to thaw and a valuable lesson in patience. Trust the process, friends!
Another fun evolution? The thickness. I used to roll them thinner, but I found that a solid ¼-inch gives you that perfect balance of a defined shape and a soft, substantial bite. This is your recipe now, so make it, bake it, and share it with someone you love.
Your Questions, Answered!
Over the years, I’ve gotten a lot of questions about this recipe. Here are the most common ones to help you bake with confidence.
Q: My dough is too sticky to roll! What did I do wrong?
A: This almost always means it needs more chilling time. Pop it back in the fridge for another 30 minutes. Also, make sure you’re using just enough flour on your surface and rolling pin to prevent sticking—too much can make the cookies dry.
Q: Why did my cookies spread and lose their shape?
A: The usual suspects are: 1) Your butter/cream cheese was too soft when you creamed it, 2) The dough didn’t chill long enough, or 3) Your oven temperature is off. I highly recommend using an oven thermometer to ensure you’re baking at the right temp!
Q: Can I make the dough ahead of time?
A> Absolutely! You can wrap the dough disks tightly and refrigerate them for up to 2 days. You can also freeze them for up to 3 months. Just thaw in the fridge overnight before rolling.
Q: How do I store the finished, decorated cookies?
A: Once the icing is fully set, store them in a single layer in an airtight container at room temperature. They’ll stay soft and delicious for up to a week. You can separate layers with parchment paper if you need to stack them.
Cream Cheese Cut-Out Sugar Cookies : Soft, Flavorful & Perfect for Decorating
Description
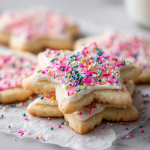
Cream Cheese Cut-Out Sugar Cookies
Soft, tender, and perfect for decorating!
Prep Time: 20 min | Chill Time: 1 hr | Bake Time: 8–10 min | Yield: ~24 cookies
Ingredients
-
½ cup unsalted butter, softened
-
3 oz cream cheese, softened
-
1 cup granulated sugar
-
1 large egg
-
1 tsp vanilla extract
-
½ tsp almond extract (optional)
-
2 ¼ cups all-purpose flour
-
1 ½ tsp baking powder
-
¼ tsp salt
Instructions
-
Cream butter, cream cheese, and sugar until pale and fluffy (2–3 min, electric mixer).
-
Add egg and extracts, mix until smooth. Scrape sides of the bowl.
-
Whisk dry ingredients in a separate bowl (flour, baking powder, salt).
-
Combine wet & dry on low speed until just incorporated. Avoid overmixing.
-
Chill the dough: Divide into two disks, wrap in plastic, refrigerate 1 hr (or up to 2 days).
-
Preheat oven to 375°F (190°C). Roll dough to ¼-inch thickness on a lightly floured surface.
-
Cut shapes with cookie cutters (lightly flour cutters to prevent sticking).
-
Bake 8–10 min on parchment-lined sheet. Edges lightly golden, centers set.
-
Cool 5 min on baking sheet, then transfer to wire rack before decorating.
Notes
-
Use royal icing or glaze (powdered sugar + milk + vanilla).
-
Pipe thicker outline first, then flood center with thinned icing.
-
Add sprinkles or edible decorations while icing is wet.
Nutrition
- Calories: 120 Cal Per Serving
- Sugar: 7g
- Sodium: 45mg
- Fat: 5g
- Carbohydrates: 16g
- Cholesterol: 20mg
Nutritional Information (Because We’re All Friends Here)
I believe in enjoying real, feel-good food without guilt, but I also know it’s helpful to have the facts! This nutritional info is an estimate per cookie (based on a batch of 24), without icing.
Per cookie (approx.):
Calories: 120 | Total Fat: 5g | Saturated Fat: 3g | Cholesterol: 20mg | Sodium: 45mg | Total Carbohydrates: 16g | Dietary Fiber: 0g | Sugars: 7g | Protein: 1g
Remember, the joy and connection that come from baking and sharing these cookies are just as nourishing as the ingredients themselves. Enjoy every bite!
Final Thoughts from My Kitchen to Yours
Well, there you have it—my heart and soul in cookie form. These Cream Cheese Cut-Out Sugar Cookies are more than just a recipe; they’re a tool for creating joy. They’re forgiving, fun, and foolproof enough for a baking newbie yet impressive enough for a seasoned pro.
The real magic happens when you gather your people around the kitchen counter, each with their own piping bag or container of sprinkles. It’s in the laughter, the (intentional or accidental) mess, and the proud display of your collective creations. So don’t stress about making them perfect. Focus on making them with love.
I hope this recipe becomes a cherished part of your own family traditions. If you make them, I’d be absolutely thrilled to see your results! Tag me on social @Feastical or @BeauCollier so I can share in the fun.
Happy baking, friends!
Beau