Mini Red Velvet Cheesecake Bites: Your New Favorite Party Trick
Hey friends, Beau here from Feastical! Let’s talk about a little magic, shall we? You know that feeling when you’re staring down a dessert table, torn between a slice of rich, tangy cheesecake and a gorgeous, crimson piece of red velvet cake? It’s a delicious dilemma we’ve all faced. Well, my food-loving friends, I’m here to solve that problem once and for all. Get ready to fall head-over-heels for these Mini Red Velvet Cheesecake Bites.
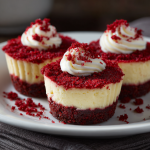
Imagine this: a tender, almost brownie-like red velvet crust, packed with that signature cocoa flavor. On top of that, a layer of the creamiest, smoothest, most luxuriously tangy cheesecake you’ve ever tasted, all baked into a perfect, pop-in-your-mouth size. They’re stunning to look at, incredibly fun to make, and even more fun to eat. Whether you’re hosting a fancy soiree, need a show-stopping treat for a potluck, or just want to make your Tuesday feel a little more special, these bites are your answer. They’re proof that the best things really do come in small, deliciously portioned packages. So, preheat your ovens and grab your favorite mixing bowl—we’re about to create some serious kitchen joy.
A Slice of Nostalgia: Where This Recipe Was Born
This recipe isn’t just a random combination for me; it’s a delicious collision of my two favorite childhood desserts. My Grandma Eleanor, a woman who believed a meal wasn’t complete without something sweet, had two legendary specialties. The first was a towering, snow-white coconut cake, but the second… the second was her Red Velvet Cake. It was a thing of beauty, with a deep red crumb that felt impossibly moist and a flavor that was more than just “chocolate.” It was complex, a little mysterious, and always, always made with a hefty dose of love.
Years later, I had my first proper New York-style cheesecake at a little deli, and my dessert world exploded. The dense, creamy, tangy filling captivated me. One day, while experimenting in my first real apartment kitchen (a.k.a. a kitchen the size of a postage stamp), I had a brilliant, if I do say so myself, idea. What if I took the soul of Grandma’s red velvet and married it to the elegance of that cheesecake? After a few… let’s call them “learning experiences”… these mini bites were born. They’re my personal homage to tradition and innovation, all wrapped up in a beautiful, bite-sized package.
Gathering Your Ingredients: The Dream Team
Great food starts with great ingredients. Here’s everything you’ll need to bring these little gems to life. Don’t worry, I’ve included my favorite chef hacks and substitutions to make this recipe work for you!
For the Red Velvet Crust:
- 1 cup red velvet cake crumbs – You can crumble up a baked and cooled homemade cupcake or use a slice of store-bought cake. Chef’s Insight: Using actual cake (instead of just crumbs and cocoa) gives the crust an incredible, fudgy texture that’s far superior to a standard graham cracker base.
- 2 tablespoons melted butter – This is our binding agent, giving the crumbs that perfect sandy texture that holds together. Unsalted is best so you control the salt level, but salted will work in a pinch!
For the Luscious Cheesecake Filling:
- 16 oz (two blocks) full-fat cream cheese, softened – This is non-negotiable for the creamiest texture. Take it out of the fridge at least an hour before you start. Pro Tip: Feel the package. It should yield gently to pressure. If it’s still cold, you’ll get lumpy filling, and we don’t want that!
- ½ cup granulated sugar – This sweetens the deal without making it overly sweet, letting the tangy cream cheese flavor shine.
- 2 large eggs, at room temperature – Room temp eggs incorporate much more smoothly into the cream cheese, ensuring a silky, not curdled, filling.
- ¼ cup sour cream – The secret weapon! Sour cream adds a wonderful tang and an extra layer of creamy richness that makes these bites truly irresistible.
- 1 teaspoon pure vanilla extract – The warm, floral notes of vanilla are the perfect complement to both the chocolate and the cheese. It’s the flavor bridge.
- A tiny pinch of salt – This might seem odd, but salt is a flavor enhancer. It makes the sweet taste sweeter and balances the tang perfectly.
For the Optional (But Highly Recommended) Toppings:
- Freshly whipped cream – For a cloud-like finish.
- Extra red velvet crumbs – For a pop of color and texture.
- White chocolate drizzle – Because everything is better with a little chocolate drizzle.
Let’s Get Baking: Your Step-by-Step Roadmap to Bliss
Ready to make some magic? Follow these steps, and you’ll be a mini cheesecake master in no time. I’ve packed this section with all my favorite tips to guarantee your success.
- Prep Party! First things first, preheat your oven to a cozy 325°F (160°C). This lower temperature is key for baking cheesecake gently, preventing cracks and ensuring a creamy center. While it’s warming up, line a mini muffin pan with those cute little paper liners. This makes removal a total breeze and keeps our bites looking pristine. Chef’s Hack: Give the liners a very light spritz with cooking spray. It helps the finished cheesecake peel away cleanly.
- Create the Crust. In a medium bowl, combine your 1 cup of red velvet cake crumbs and the 2 tablespoons of melted butter. Use a fork to mix it until it resembles wet sand and holds together when you pinch it. Now, take about 1 teaspoon of this mixture and press it firmly into the bottom of each prepared mini liner. I like to use the back of a small measuring spoon or my fingers to really compact it. A firm crust means it won’t fall apart when you take a bite!
- Whip Up the Filling. In a large mixing bowl, beat the softened cream cheese and ½ cup of granulated sugar together on medium speed. Use a hand mixer or stand mixer fitted with the paddle attachment. Beat for a good 2-3 minutes, scraping down the sides of the bowl halfway through, until the mixture is completely smooth and lump-free. This is the most important step for a silky texture! Now, beat in the room-temperature eggs, one at a time, mixing just until each is incorporated. Over-beating at this stage can incorporate too much air and cause puffing and cracking. Finally, mix in the ¼ cup sour cream, 1 teaspoon vanilla, and that tiny pinch of salt. Mix until it’s just combined and beautifully smooth.
- Fill ‘Er Up! Transfer your cheesecake filling to a piping bag or a large zip-top bag with a corner snipped off. This is my go-to method for neat, easy, and mess-free filling! Pipe the filling over the crust in each liner, filling them up to just below the top. Leaving a tiny bit of space gives them room to rise slightly without overflowing.
- Bake to Perfection. Carefully place the pan in your preheated oven and bake for 15-18 minutes. You’re looking for the edges to be set, while the centers still have a slight jiggle when you gently shake the pan. They will firm up dramatically as they cool. Chef’s Secret: For extra insurance against cracks, you can place a pan of hot water on the rack below the cheesecakes to create a steamy environment.
- The All-Important Chill. Once baked, remove the pan from the oven and let the cheesecake bites cool completely in the pan on a wire rack. Then, and this is crucial, transfer the entire pan to the refrigerator to chill for at least 2 hours, but preferably overnight. This patience-testing step allows the flavors to meld and the texture to become perfectly firm and lush.
Plating Up: How to Serve These Showstoppers
Now for the best part—serving and eating! These bites are gorgeous all on their own, but a little flair never hurt anybody. For a simple, elegant look, arrange them on a beautiful cake stand or a rustic wooden board. Just before serving, top each one with a small dollop of freshly whipped cream and a tiny sprinkle of reserved red velvet crumbs. For a truly decadent touch, melt some white chocolate chips with a teaspoon of coconut oil, drizzle it over the tops, and watch your guests’ eyes light up.
They are the ultimate party dessert, perfect for passing around. I love serving them with a cup of strong coffee to cut through the richness or a cold glass of milk for the ultimate nostalgic treat. They also make incredible edible gifts—package a few in a clear cellophane bag tied with a ribbon, and you’ve just become someone’s favorite person.
Make It Your Own: Delicious Recipe Variations
One of the best things about this recipe is its versatility. Feel free to get creative and put your own spin on it!
- The Chocolate Lover’s Dream: Add ½ cup of mini chocolate chips to the cheesecake filling right before piping. You could also use a chocolate cake for the crust instead of red velvet for a double-chocolate experience.
- Lemon Zest Twist: Brighten things up by adding the zest of one lemon to the cheesecake filling. The combination of bright citrus and rich, creamy cheesecake is a match made in heaven.
- Gluten-Free Friendly: Simply use your favorite gluten-free red velvet cake mix or recipe to make the crumbs for the crust. The rest of the recipe is naturally gluten-free!
- Peppermint Patty: Perfect for the holidays! Add ¼ teaspoon of peppermint extract to the cheesecake filling and top with a drizzle of dark chocolate and crushed candy canes.
- Cookies & Cream: Swap the red velvet crust for a crust made from Oreo cookie crumbs (filling included!) mixed with butter. It’s a classic combo that never fails.
Beau’s Chef’s Notes: A Few Parting Thoughts
This recipe has been a labor of love, and it’s evolved quite a bit from my first attempt (which involved a very crumbly crust and a slightly lumpy filling—we live and we learn!). I’ve found that the flavor is absolutely at its peak after a full 24 hours in the fridge, so if you can plan ahead, do it. The wait is worth it, I promise.
And a funny story: I once brought a batch of these to a friend’s barbecue. I turned my back for two minutes to grab a drink, and when I looked back, the entire platter was gone. A quiet, serious-looking man in the corner just gave me a thumbs up, his cheeks full of cheesecake. That’s the power of a great mini dessert—it brings out the joy in everyone.
Your Questions, Answered: FAQs & Troubleshooting
Let’s tackle some common questions to make sure your baking experience is smooth sailing.
Q: My cream cheese was a little cold, and now my filling has tiny lumps. Can I fix it?
A: Don’t panic! The best fix is to strain the filling through a fine-mesh sieve before piping it into the liners. This will catch any pesky lumps and give you that perfectly smooth texture we’re after.
Q: Can I make these without a mini muffin pan?
A> You sure can! A regular standard-size muffin pan will work beautifully. Just increase the baking time to about 20-25 minutes, and keep an eye on them for that same “set edges, jiggly center” doneness. You’ll get fewer, but larger, cheesecakes.
Q: How far in advance can I make these?
A> They are the perfect make-ahead dessert! Once cooled and chilled, store them in an airtight container in the fridge for up to 4 days. I recommend adding any whipped cream or drizzle toppings right before serving for the best texture.
Q: Can I freeze them?
A> Absolutely. After they are fully chilled, arrange them in a single layer on a baking sheet and “flash freeze” for an hour until solid. Then, transfer the frozen bites to a freezer-safe bag or container. They’ll keep for up to 2 months. Thaw in the refrigerator overnight before serving.
Mini Red Velvet Cheesecake Bites: Lush, Velvety, and Perfectly Portioned
Description
Mini Red Velvet Cheesecake Bites
Prep Time: 20 min
Bake Time: 15–18 min
Chill Time: 2+ hours (or overnight)
Total Time: ~3 hours
Ingredients
Red Velvet Crust:
-
1 cup red velvet cake crumbs (homemade or store-bought)
-
2 tbsp melted butter
Cheesecake Filling:
-
16 oz (2 blocks) full-fat cream cheese, softened
-
½ cup granulated sugar
-
2 large eggs, room temperature
-
¼ cup sour cream
-
1 tsp pure vanilla extract
-
Pinch of salt
Optional Toppings:
-
Whipped cream
-
Extra red velvet crumbs
-
White chocolate drizzle
Variations:
-
Chocolate Lover’s Dream: Add ½ cup mini chocolate chips to filling or use chocolate cake for crust
-
Lemon Zest Twist: Add zest of 1 lemon to filling
-
Gluten-Free: Use gluten-free red velvet cake for crumbs
-
Peppermint Patty: Add ¼ tsp peppermint extract, drizzle with chocolate and crushed candy canes
-
Cookies & Cream: Swap crust for Oreo cookie crumbs + butter
Instructions
-
Preheat Oven & Prep Pan
-
Oven: 325°F (160°C)
-
Line a mini muffin pan with paper liners; lightly spray with cooking oil
-
-
Make Crust
-
Mix cake crumbs with melted butter until sandy and holds together
-
Press ~1 tsp of mixture into the bottom of each liner; compact firmly
-
-
Make Filling
-
Beat cream cheese and sugar until smooth (2–3 min)
-
Beat in eggs, one at a time, just until incorporated
-
Mix in sour cream, vanilla, and salt until smooth
-
-
Assemble Bites
-
Pipe filling over crust in each liner, filling to just below the top
-
-
Bake
-
15–18 min until edges are set and centers slightly jiggle
-
Optional: place pan of hot water below pan for extra moisture and to prevent cracking
-
-
Cool & Chill
-
Cool in pan on a wire rack, then refrigerate at least 2 hours (overnight is best)
-
-
Serve
-
Top with whipped cream, extra crumbs, or chocolate drizzle
-
Arrange on a cake stand or serving board
-
Notes
-
Lumpy Filling: Strain through a fine-mesh sieve before piping
-
No Mini Muffin Pan: Use standard muffin pan; bake 20–25 min
-
Make Ahead: Store in airtight container in fridge up to 4 days
-
Nutrition
- Calories: 110 Cal Per Serving
- Fat: 8g
- Carbohydrates: 8g
- Protein: 2g
Nutritional Information*
Alright, let’s talk real life. These are a treat, and we should enjoy them as such! Here’s a general breakdown per mini cheesecake bite (without toppings), based on a yield of 24.
- Calories: ~110
- Protein: 2g
- Fat: 8g
- Carbohydrates: 8g
*Please note: This is an estimated nutritional breakdown based on the specific ingredients I used. Your actual numbers may vary depending on the brands and exact measurements you use. This information is provided as a courtesy, but for precise dietary needs, it’s always best to calculate using your specific ingredients.
Final Thoughts from My Kitchen to Yours
Well, there you have it, my friends—everything you need to create these unforgettable Mini Red Velvet Cheesecake Bites. They’re more than just a dessert; they’re a little bite of joy, a conversation starter, and a surefire way to make any occasion feel special. I hope this recipe brings as much happiness to your kitchen as it has to mine.
Remember, cooking is about the journey, not just the destination. Don’t stress over a little lump or a messy drizzle. The love you put into it is the most important ingredient of all. Now, I’d love to see your creations! Tag me @Feastical on social media so I can cheer you on.
Until next time, keep your whisks busy and your hearts full.