The Appetizer That Steals the Show Every Single Time
Hey friends, Beau here! Let me paint you a picture. You’ve got people coming over in, oh, about an hour. The house is clean(ish), the music is on, and the drinks are chilling. But that little voice in your head starts whispering, “What are you going to feed everyone?” You need something impressive, something delicious, something that looks like you fussed for hours but secretly comes together with a few smart shortcuts.
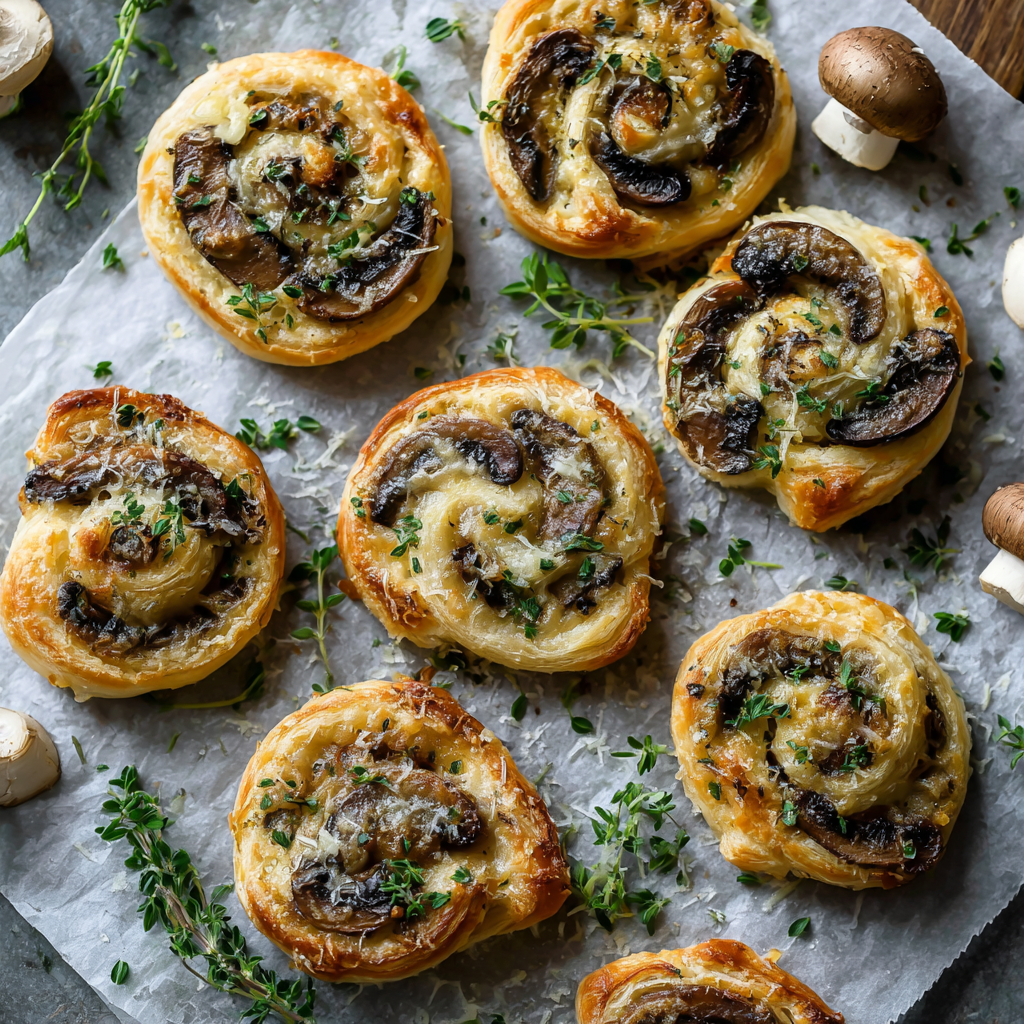
Enter my Savory Mushroom Puff Pastry Pinwheels. These little spirals of joy are my ultimate party superhero. Imagine this: a flaky, buttery puff pastry, rolled up with a deeply savory, garlicky mushroom and onion filling, and oozing with not one, but two kinds of cheese. They bake up into golden, puffed masterpieces that are impossible to resist. I’ve seen trays of these vanish in minutes, followed by a chorus of “What’s in these?” and “Can I get the recipe?” They’re the culinary equivalent of a warm welcome hug, and today, I’m so excited to show you exactly how to make them.
A Pinwheel, A Party, and A Happy Accident
I’ll never forget the first time I made a version of these. It was my third year of college, and I was hosting a last-minute “study group” (which was code for “potluck and hangout”). My budget was tight, but my ambition was high. I had a box of mushrooms, a leftover onion, and a roll of puff pastry I’d snagged from the freezer aisle. My plan was vague, but my hunger was specific.
I sautéed everything together, slathered it on the pastry, and rolled it up. I didn’t have a proper baking sheet, so I used a warped, old pizza pan. I held my breath as they baked, hoping they wouldn’t be a disaster. What emerged from the oven was pure magic. They were golden, cheesy, and the entire apartment smelled incredible. They were the hit of the night, and that happy accident taught me a valuable lesson: the best food isn’t about being fancy; it’s about being flavorful, generous, and made with a dash of love (and a good dose of melted cheese). This recipe is that same spirit, just refined over years of making it for the people I care about most.
Gathering Your Cast of Flavor Characters
This recipe is all about simple ingredients doing extraordinary things together. Here’s your shopping list, with a few of my chef-y insights to help you understand the “why” behind each one.
- 6 tbsp Olive Oil: We use a generous amount to really sauté our veggies to perfection. It adds a fruity depth that butter can’t. Chef’s Insight: If you prefer, you can use half butter and half oil for a richer flavor, but the oil helps the mushrooms get a beautiful sear without burning.
- 2 medium Onions, finely chopped: These sweeten as they cook, forming the flavor base of our filling. Substitution Tip: Yellow or white onions are perfect here. In a pinch, a large shallot will work, too!
- 32 oz Mushrooms, finely chopped: This might seem like a lot, but mushrooms shrink down dramatically! We’re using their earthy, umami power to create a hearty, meaty texture. Chef’s Insight: Don’t be shy about using a mix! Cremini, shiitake, and even a few chopped portobellos create a fantastic, complex flavor.
- 2 tbsp Mayonnaise: I know, I know. “Mayo, Beau?” Trust me on this. It’s not for flavor, but for function. It acts as a binder, keeping the filling moist and preventing it from drying out in the oven. Substitution Tip: You can use full-fat Greek yogurt or even sour cream if you’d like.
- 2 Garlic Cloves, minced: The aromatic soulmate to our mushrooms. Fresh is best here! Chef’s Insight: Feel free to add a third clove if you’re a true garlic lover. We don’t judge!
- 1/2 tsp Salt & 1/2 tsp Black Pepper: The essential seasonings to make all the other flavors pop. Always season in layers!
- 1 cup grated Parmesan Cheese: This brings a salty, nutty, umami punch that elevates the mushrooms beautifully. Chef’s Insight: For the best flavor, grate it yourself from a block. The pre-grated stuff often has anti-caking agents that can make it a bit gritty.
- 2–3 cups shredded Mozzarella Cheese: This is our glorious, melty, stretchy cheese. Substitution Tip: Low-moisture mozzarella is key here to prevent sogginess. You can also swap in provolone, Gruyère, or fontina for a different melt.
- 2 packages Puff Pastry, thawed: Our secret weapon for an elegant, flaky crust with minimal effort. Chef’s Hack: Thaw it overnight in the fridge, not on the counter. This keeps the butter cold, which is the secret to a super-flaky pastry.
- 2 Eggs, beaten (for egg wash): This is our finishing touch! Brushing it on gives the pinwheels that gorgeous, professional-looking golden-brown sheen.
- Optional Twist: 1 tsp fresh Thyme or Rosemary, chopped: A little fresh herb goes a long way to brighten up the earthy mushrooms.
- Optional Twist: A dash of Chili Flakes for heat: For those who like a little kick! It adds a wonderful, subtle warmth in the background.
Let’s Get Rolling: Your Step-by-Step Guide to Pinwheel Perfection
Ready to create some magic? Put on your favorite apron, and let’s get to it. I’ll walk you through every step, with all my best tips to ensure your pinwheels are flawless.
Step 1: Preheat and Prep
Preheat your oven to 375°F (190°C). This is a crucial first step—a properly hot oven is what makes the puff pastry, well, puff! Line your baking sheets with parchment paper. Chef’s Hack: Parchment paper is non-negotiable here. It prevents sticking and makes cleanup an absolute dream. No scrubbing pans after the party!
Step 2: Sauté the Savory Filling
In a large skillet, heat the olive oil over medium heat. Add your finely chopped onions and cook for about 5-7 minutes, until they’re soft and translucent. Now, stir in the minced garlic—ah, that smell!—and cook for just 30 seconds until fragrant. Don’t let the garlic burn! Next, add all those finely chopped mushrooms. Chef’s Insight: They will look like a mountain at first, but don’t worry. Just keep stirring occasionally. They will release their liquid and slowly shrink down and turn a beautiful golden brown. This is where the flavor develops, so be patient and let all that moisture evaporate. This should take about 10-12 minutes. Once the mixture is fairly dry, stir in the mayonnaise, salt, pepper, and any optional herbs or chili flakes. Take the skillet off the heat and let this filling cool completely. Chef’s Pro-Tip: A warm filling will melt the butter in the puff pastry and make it a nightmare to roll. I sometimes spread it on a plate and pop it in the fridge for 10 minutes to speed this up.
Step 3: Assemble the Pinwheels
On a lightly floured surface, roll out one sheet of thawed puff pastry just enough to smooth out any folds. Spread half of the cooled mushroom mixture evenly over the entire surface, leaving just a tiny border around the edges. Now, for the best part: the cheese! Sprinkle half of the Parmesan and mozzarella generously over the mushroom layer. You want every bite to be cheesy.
Step 4: Roll and Slice with Confidence
Now, starting from one of the longer sides, tightly roll the pastry up into a log, like a jelly roll. Don’t be afraid to roll it snugly! Once it’s rolled, give the seam a little pinch to seal it. Using a sharp serrated knife, slice the log into ½-inch rounds. Chef’s Hack: A gentle sawing motion works best here—don’t press down or you’ll squish the beautiful spiral. Place the rounds cut-side-up on your prepared baking sheet, about an inch apart to allow for puffing. Repeat the entire process with the second sheet of pastry and the remaining filling and cheese.
Step 5: Bake to Golden Glory
Give the tops of your pinwheels a gentle but thorough brush with the beaten egg wash. This is what gives them that gorgeous, glossy, bakery-quality finish. Slide the baking sheets into your preheated oven and bake for 20-25 minutes. You’re looking for a deep golden-brown pastry and melted, bubbly cheese. They’ll fill your kitchen with an aroma that is simply irresistible.
Step 6: The All-Important Rest
I know it’s tempting to grab one straight from the oven, but trust me on this one. Let the pinwheels rest on the baking sheet for at least 5 minutes before serving. This allows the cheese to set slightly, so they’re easier to pick up, and it gives the flavors a moment to meld together perfectly.
How to Serve These Show-Stopping Pinwheels
Presentation is part of the fun! I love piling these golden pinwheels high on a beautiful wooden board or a rustic platter. Scatter a few extra fresh herbs around them for a pop of color. They are the ultimate party appetizer, perfect for passing around with cocktails or wine. But don’t stop there! These are incredibly versatile. Serve a couple alongside a big, bright salad for a fantastic light lunch or a simple dinner. They’re also a huge hit as a fancy snack for game day or a holiday party. No matter how you serve them, be prepared for them to disappear fast!
Make It Your Own: Delicious Pinwheel Twists
Once you’ve mastered the classic, the pinwheel world is your oyster! Here are a few of my favorite ways to mix things up:
- The “Everything But The Kitchen Sink”: Add ½ cup of finely chopped spinach (thawed and squeezed dry) and ¼ cup of crumbled feta cheese to the filling for a Greek-inspired twist.
- The Carnivore’s Dream: Stir in ½ cup of finely chopped cooked bacon or ham into the mushroom mixture before rolling. The salty, smoky flavor is a game-changer.
- Sun-Dried Tomato & Pesto Swirl: Swap the mushroom filling for a layer of store-bought basil pesto, a sprinkling of sun-dried tomatoes (packed in oil, patted dry), and mozzarella.
- Make-Ahead Magic: You can assemble the logs, wrap them tightly in plastic wrap, and keep them in the fridge for up to 24 hours before slicing and baking. You can also freeze the unbaked logs; just slice and bake from frozen, adding a few extra minutes to the baking time.
Beau’s Back-Pocket Tips & Stories
This recipe has been my faithful companion for years, and it’s evolved in fun ways. I once accidentally used phyllo dough instead of puff pastry for a holiday party—let’s just say it was a crumbly, buttery mess that still tasted amazing! Lesson learned: always double-check your freezer. The biggest improvement I ever made was learning to let the filling cool completely. My early attempts were a bit soggy because I was too impatient. Now, I use that cooling time to clean up the kitchen and get a head start on the dishes, so I can actually enjoy the party with my guests.
Your Pinwheel Questions, Answered!
Q: My pinwheels came out a bit soggy on the bottom. What happened?
A: The most common culprit is a filling that was too warm when you assembled them, which melts the butter in the pastry. Always let the mushroom mixture cool completely. Also, make sure you’ve cooked the mushrooms long enough for all their liquid to evaporate.
Q: Can I make these ahead of time?
A: Absolutely! You can assemble the whole log, wrap it tightly in plastic wrap, and refrigerate it for up to a day. Slice and bake when you’re ready. You can also freeze the unbaked log for up to 3 months. Slice it while it’s still a little firm and bake from frozen, adding 5-7 extra minutes.
Q: My pastry didn’t puff up very much. Why?
A: This usually means the pastry was over-handled or got too warm. Work quickly and keep it cold. Also, make sure your oven is fully preheated—a hot oven is essential for creating that steam that makes the pastry layers separate and puff.
Q: Can I use a different cheese?
A> Of course! Cooking is about creativity. Gruyère, sharp cheddar, Gouda, or fontina would all be delicious. Just make sure whatever you use is good at melting.
Savory Mushroom Puff Pastry Pinwheels with Cheese & Garlic
Description
Savory Mushroom Puff Pastry Pinwheels
Flaky, cheesy, and party-ready—perfect as an appetizer or snack.
Ingredients
Filling:
-
6 tbsp olive oil (or 3 tbsp oil + 3 tbsp butter for richer flavor)
-
2 medium onions, finely chopped
-
32 oz mushrooms, finely chopped (cremini, shiitake, or a mix)
-
2 garlic cloves, minced
-
2 tbsp mayonnaise (or Greek yogurt / sour cream)
-
½ tsp salt
-
½ tsp black pepper
-
Optional: 1 tsp fresh thyme or rosemary, chopped
-
Optional: a dash of chili flakes
Cheese:
-
1 cup grated Parmesan
-
2–3 cups shredded mozzarella (low-moisture)
Pastry & Finish:
-
2 packages puff pastry, thawed
-
2 eggs, beaten (for egg wash)
Instructions
1. Preheat & Prep
-
Preheat oven to 375°F (190°C).
-
Line baking sheets with parchment paper.
2. Sauté the Filling
-
Heat olive oil in a large skillet over medium heat.
-
Cook onions 5–7 min until soft and translucent.
-
Add garlic, cook 30 sec until fragrant.
-
Stir in mushrooms and cook 10–12 min until liquid evaporates and mushrooms are golden.
-
Remove from heat; stir in mayonnaise, salt, pepper, and optional herbs or chili. Cool completely.
3. Assemble the Pinwheels
-
Roll out one sheet of thawed puff pastry to smooth folds.
-
Spread half the cooled mushroom mixture evenly, leaving a ½-inch border.
-
Sprinkle half the Parmesan and mozzarella over filling.
4. Roll & Slice
-
Roll pastry tightly from one long side into a log; pinch seam to seal.
-
Slice into ½-inch rounds using a serrated knife. Place cut-side up on baking sheet, 1 inch apart.
-
Repeat with second pastry sheet and remaining filling/cheese.
5. Bake
-
Brush tops with beaten egg.
-
Bake 20–25 min until golden and bubbly.
6. Rest & Serve
-
Let pinwheels rest 5 min before serving.
-
Serve on a platter or wooden board, optionally garnished with fresh herbs.
Notes
-
Soggy bottoms? Let the filling cool completely and ensure mushrooms are dry.
-
Cheese swap: Gruyère, cheddar, Gouda, or fontina all work.
-
Make ahead: Assemble logs, refrigerate up to 24 hours, or freeze unbaked for up to 3 months.
-
Twists:
-
Spinach & feta for a Greek version
-
Bacon or ham for a meaty option
-
Pesto & sun-dried tomato swirl
-
Nutrition
- Calories: 136 Cal Per Serving
- Fat: 9g
- Carbohydrates: 10g
- Protein: 5g
Nutritional Information (Because We’re All Curious!)
Okay, let’s be real—these are a treat, and we’re here for it! But if you’re keeping an eye on things, here’s a rough breakdown per pinwheel (assuming you get 64 from the batch):
- Calories: 136
- Protein: 5g
- Fat: 9g
- Saturated Fat: 3.5g
- Carbohydrates: 10g
- Sugar: 1g
- Fiber: 0.5g
- Sodium: 190mg
Remember, this is an approximation and can vary based on the specific brands of ingredients you use. The key is to enjoy them mindfully as part of a fun gathering or a special treat!
Your New Go-To Party Trick
And there you have it, my friends! My all-time favorite, foolproof recipe for Savory Mushroom Puff Pastry Pinwheels. They’re more than just an appetizer; they’re a conversation starter, a memory maker, and a guaranteed way to make any gathering feel a little more special. I hope this recipe brings as much joy to your kitchen as it has to mine. Now, I’d love to hear from you! Did you add your own twist? Did they disappear as fast as they do at my place? Tag me on social with #Feastical so I can see your beautiful creations. Happy cooking!
Final Thoughts: Your New Go-To Party Trick
And there you have it, friends! My not-so-secret secret to effortless, crowd-pleasing entertaining. These Savory Mushroom Puff Pastry Pinwheels are more than just a recipe; they’re a reliable little trick up your sleeve for any occasion that calls for something special.
They prove that you don’t need a chef’s kitchen or a whole day to create something truly memorable. All it takes is a few simple ingredients, a happy accident of an idea from years ago, and the confidence to roll it all up into one delicious package.
So the next time that little voice of panic starts whispering before guests arrive, you can just smile, head to the kitchen, and whip up a batch of these. I promise they’ll fill your home with an incredible aroma and your table with happy, satisfied people.
I hope this recipe becomes a trusted favorite in your home, creating as many happy memories for you and your loved ones as it has for me. Now get baking, and prepare to take a bow!
With love and a full plate,
Beau