
Sourdough Butter Crackers: Your New Favorite Snack Secret
Hey friends, Beau here! Let’s have a little heart-to-heart about that jar living in the back of your fridge. You know the one. It’s the sourdough starter discard that you lovingly feed, but then feel a tiny pang of guilt every time you have to pour some off. I’ve been there, staring into the abyss of that tangy, bubbly paste, wondering if there’s a better way. Well, my fellow food-lovers, I’m here to tell you that there is, and it’s a game-changer.
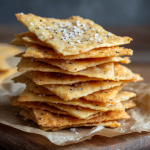
Forget complicated loaves that demand your entire Saturday. Today, we’re turning that discard into pure, unadulterated snack-time gold: Sourdough Butter Crackers. Imagine the flakiest, most buttery cracker you’ve ever had, then give it a subtle, sophisticated tang that makes it utterly irresistible. These crackers are crisp, they’re satisfying, and they come together in less time than it takes to watch your favorite sitcom. They’re the perfect vehicle for cheese, a stunning addition to a charcuterie board, or just a dangerously addictive snack all on their own. So, let’s roll up our sleeves, rescue that discard from the compost bin, and bake up a batch of pure, crunchy joy.
The Accidental Crackers That Stole My Heart
This recipe was born from a happy little kitchen accident. A few years back, I was in a serious sourdough phase, baking loaf after loaf. My kitchen counter was a flour-dusted laboratory of fermentation. One evening, I was prepping for a pizza night and had a bowl of discard left over. Instead of tossing it, I had one of those “what if?” moments. I threw it in a bowl with some flour, a generous glug of melted butter, and a pinch of salt, rolled it out with more hope than precision, and slid it into the oven alongside a focaccia.
What emerged was a revelation. The thin sheet of dough had puffed up in spots, turned a beautiful golden brown, and snapped with a perfect crispness. I broke off a piece, and my eyes went wide. It was a cracker! But not just any cracker—it had a depth of flavor that store-bought versions could only dream of. That batch never even made it to the pizza party; my wife and I devoured them straight off the baking sheet, standing over the stove. From that day on, these crackers became a Feastical staple, a delicious testament to the magic that happens when we play with our food.
Gathering Your Cracker Crew: The Ingredients
One of the best things about this recipe is its simplicity. You likely have everything you need right in your pantry. Let’s break it down:
- 1 ½ cups (400g) Sourdough Starter Discard: This is your star player! Make sure it’s stirred down. It doesn’t matter if it’s fresh from a feed or has been in the fridge for a week—the tangier, the better. The sourdough not only adds incredible flavor but also gives the crackers a unique, tender-yet-crisp texture. No starter? No problem! You can substitute with 1 ½ cups of a thick, plain yogurt and buttermilk mixture (half and half), though you’ll miss the signature tang.
- 3 cups (360g) All-Purpose Flour: The trusty foundation of our cracker. It gives the dough structure. If your dough feels a little too sticky when you mix it, don’t be shy—add an extra tablespoon or two of flour until it comes together nicely.
- 16 tbsp (226g) Unsalted Butter, Melted: This is where the magic happens. Using melted butter (instead of cutting it in) ensures every single nook and cranny of this dough gets coated in rich, delicious fat. This is what creates that incredible, flaky, “melt-in-your-mouth” quality. I use unsalted so I can control the salt level perfectly.
- 2 tsp (10g) Fine Sea Salt: This is a key flavor agent, so don’t skimp! Fine sea salt incorporates evenly throughout the dough. If you only have coarse kosher salt, just use a little less, as it’s saltier by volume.
- Optional Twists (Get Creative!): This is your playground. I love adding 1 tsp of garlic powder for a savory punch or ½ tsp of cracked black pepper for a little heat. Smoked paprika or chili flakes are also fantastic contenders.
- Toppings for the Finish: This is non-negotiable for that professional touch. A sprinkle of sesame seeds, flaky sea salt, or everything bagel seasoning takes these from great to “can-I-have-the-recipe-now?!” status.
Let’s Get Baking: Your Step-by-Step Guide to Cracker Perfection
Ready to see how easy this is? Follow these steps, and you’ll be a cracker-making pro in no time.
- Preheat and Prep: Fire up your oven to a nice, even 350°F (175°C). This is the perfect temperature to cook the crackers through and get them golden without burning. While it’s heating, line your baking sheets with parchment paper. Chef’s Hack: If you don’t have parchment, a light coating of butter or non-stick spray will work, but parchment makes cleanup a dream and ensures nothing sticks.
- Mix the Dough: In a large bowl, combine the sourdough discard, flour, melted butter, salt, and any of your chosen optional seasonings. I like to use a sturdy spatula at first, then I get my hands in there to bring it all together into a smooth, slightly soft dough. Little Chef Tip: If the dough feels too wet, add a sprinkle of flour. If it’s too dry, a tiny splash of water will do the trick. You’re in control!
- Divide and Conquer: Turn the dough out onto a lightly floured surface and divide it in half. This makes it much easier to roll out thinly. Working with one half at a time keeps the process manageable and stress-free.
- Roll It Thin (The Secret to Crispiness!): This is the most important step! Place one half of the dough between two sheets of parchment paper. Now, roll it out until it’s incredibly thin—about 1/8 of an inch thick, or even thinner if you can. You should almost be able to see the parchment paper through it. Why so thin? A thin roll guarantees a crispy, snappy cracker instead of a soft, bready one. Trust me on this!
- Score and Top: Peel off the top layer of parchment. Now, use a knife, a pizza cutter, or a pastry wheel to score the dough into whatever size squares or shapes you like. Don’t cut all the way through—just score the surface. This makes them easy to break apart after baking. Now, sprinkle your chosen toppings evenly over the dough and gently press them in with the palm of your hand or the bottom of a measuring cup.
- Bake to Golden Bliss: Carefully slide the parchment paper with the scored dough directly onto your prepared baking sheet. Bake for 15-18 minutes, but keep a close eye on them. Ovens can vary! You’re looking for a beautiful, even golden brown color and a firm, crisp feel. Pro Move: Rotate the baking sheet halfway through baking for an perfectly even bake, especially if your oven has hot spots.
- The Cool Down: This is the final test of your patience! Let the crackers cool completely on the baking sheet. They will continue to crisp up as they cool. Once they’re at room temperature, break them apart along the scored lines.
How to Serve These Homemade Masterpieces
Okay, you’ve baked the world’s best crackers. Now what? The possibilities are endless! For a simple, elegant appetizer, arrange them on a wooden board with a wedge of sharp cheddar, a creamy brie, or a tangy blue cheese. A dollop of fig jam or honey on the side is pure magic. They are also the ultimate soup and salad companion—imagine dunking one of these into a steaming bowl of tomato basil soup. Absolute heaven.
For your next party, create a dedicated cracker and dip station. These crackers are sturdy enough to hold up to thick, chunky salsas, robust hummus, or a warm spinach and artichoke dip. And don’t forget about charcuterie! Their tangy flavor is a perfect match for salty prosciutto, spicy soppressata, and peppery salami. Honestly, they’re so good you might just find yourself eating them straight from the jar—I won’t tell!
Make It Your Own: Delicious Recipe Variations
Once you’ve mastered the basic recipe, the fun really begins. Here are a few of my favorite ways to mix things up:
- Everything Bagel Twist: Swap the sea salt in the dough for everything bagel seasoning, and then sprinkle more on top before baking. It’s a flavor explosion in every bite.
- Herb Garden Delight: Add two tablespoons of finely chopped fresh herbs to the dough. Rosemary and thyme are a classic combination, but dill or chives are also fantastic.
- Whole Wheat & Honey: Substitute half of the all-purpose flour with whole wheat flour for a nuttier, heartier cracker. Add a tablespoon of honey to the dough to balance the earthiness with a touch of sweetness.
- Cheesy Pleaser: Stir in ½ cup of finely grated Parmesan or sharp cheddar cheese into the dough. The cheese melts into the cracker, making it even more irresistible.
- Gluten-Free Friendly: You can use a 1:1 gluten-free all-purpose flour blend in place of the regular flour. The texture will be slightly more delicate, but just as delicious!
Beau’s Kitchen Notes & Stories
Over the years, this recipe has seen many iterations. I once accidentally used cold, cubed butter instead of melted, and you know what? It created a flakier, almost pie-crust-like texture that was incredible. So if you have the time, feel free to try that method! Another time, my niece decided to “decorate” a batch with an entire container of rainbow sprinkles before I could stop her. We baked them anyway, and while they were… interesting… with cheese, they were a huge hit with her kindergarten class. The point is, don’t be afraid to experiment. The best family recipes often come from happy little kitchen mishaps.
Your Cracker Questions, Answered!
Q: My crackers are soft and not crispy. What did I do wrong?
A: The number one culprit is that the dough wasn’t rolled thin enough. Remember, paper-thin is the goal! The second most common issue is not letting them cool completely on the baking sheet. They crisp up as they cool. If they’re still soft after cooling, you can pop them back in the oven for a few more minutes.
Q: Can I make the dough ahead of time?
A: Absolutely! You can wrap the dough tightly in plastic wrap and keep it in the fridge for up to 3 days. Let it sit at room temperature for about 20 minutes before rolling, as it will firm up in the fridge.
Q: How should I store these crackers, and how long do they last?
A: To keep them super crisp, store them in an airtight container at room temperature. They’ll stay perfect for about a week… if they last that long! You can also freeze the baked crackers for up to 2 months.
Q: My dough is too sticky to handle. Help!
A> No worries! Just add a little more flour, one tablespoon at a time, until the dough becomes smooth and manageable. Different starter consistencies and flour brands can affect the hydration, so a small adjustment is totally normal.
Sourdough Butter Crackers: Crispy, Tangy, and Totally Addictive
Description
Turn that sourdough starter discard into crunchy, buttery, melt-in-your-mouth crackers. With a subtle tang, golden crisp, and endless flavor possibilities, these crackers are perfect for cheese boards, soups, dips, or just snacking straight from the jar.
Ingredients
For the Dough:
-
1 ½ cups (400 g) sourdough starter discard (stirred down)
-
3 cups (360 g) all-purpose flour
-
16 tbsp (226 g) unsalted butter, melted
-
2 tsp (10 g) fine sea salt
Optional Flavor Twists:
-
1 tsp garlic powder
-
½ tsp cracked black pepper
-
½ tsp smoked paprika or chili flakes
Toppings:
-
Flaky sea salt, sesame seeds, or everything bagel seasoning
Instructions
1. Preheat & Prep
-
Preheat oven to 350°F (175°C).
-
Line baking sheets with parchment paper.
2. Mix the Dough
-
In a large bowl, combine starter discard, flour, melted butter, salt, and any optional seasonings.
-
Mix with a spatula, then use your hands to form a smooth, slightly soft dough.
-
Adjust with extra flour or a splash of water if needed.
3. Divide & Roll
-
Turn dough onto a lightly floured surface and divide in half.
-
Roll each half between two sheets of parchment paper until about 1/8 inch thick (thin is key!).
4. Score & Top
-
Peel off the top parchment sheet.
-
Score the dough into squares or rectangles (don’t cut all the way through).
-
Sprinkle chosen toppings evenly and press lightly.
5. Bake to Golden Bliss
-
Transfer dough with parchment to baking sheet.
-
Bake 15–18 minutes, watching closely.
-
Rotate halfway through for even baking.
6. Cool & Break Apart
-
Let crackers cool completely on the baking sheet.
-
Break along scored lines.
Serving Suggestions
-
Pair with cheeses: brie, cheddar, blue cheese.
-
Serve with dips: hummus, salsa, or spinach-artichoke dip.
-
Charcuterie boards love these crackers—salty meats, tangy cheeses, sweet jams.
-
Or just snack straight from the jar!
Notes
-
Soft Crackers: Dough wasn’t rolled thin enough or didn’t cool completely. Re-bake briefly if needed.
-
Sticky Dough: Add flour 1 tbsp at a time until manageable.
-
Flaky Texture: Try using cold, cubed butter instead of melted for a pie-crust-like texture.
Nutrition
- Calories: 170 Cal Per Serving
- Fat: 10 g
- Carbohydrates: 17 g
Quick Nutrition & Prep Info
Let’s be real, we’re not eating crackers for their health benefits, but it’s always good to know what you’re enjoying! Here’s the approximate breakdown per serving (based on 16 servings):
- Prep Time: 10 mins
- Bake Time: 15–18 mins
- Total Time: ~30 mins
- Calories: ~170
- Fat: 10g
- Carbs: 17g
- Protein: 2g
Remember, these are homemade with simple, real ingredients, and you control the salt and butter. That’s a win in my book!
Your New Go-To Snack Awaits
And there you have it, friends—the humble sourdough discard, transformed into a snack that’s worthy of any celebration, big or small. This recipe is more than just a way to avoid food waste; it’s a reminder that the simplest things in the kitchen often bring the most joy. It’s about the sound of a satisfying snap, the rich taste of butter, and the proud feeling of saying, “I made these!”
So the next time you’re about to toss that discard, I hope you’ll remember this recipe. Whip up a batch, share them with someone you love, and savor every crispy, tangy bite. From my Feastical kitchen to yours, happy baking!
Final Thoughts: More Than Just a Cracker
So there you have it—the secret to turning your “discard” into a moment of pure, crunchy delight. This recipe is about more than just preventing food waste; it’s about reclaiming a little piece of your kitchen creativity. It’s a reminder that some of the best discoveries aren’t found in a meticulously planned recipe, but in a happy accident and the courage to ask, “what if?”
Don’t let that jar of starter sit in guilt any longer. You now hold the key to transforming it into something truly special. So go on, preheat that oven, melt that butter, and fill your kitchen with the irresistible, toasty aroma of homemade crackers. You’re not just baking a snack; you’re creating a new tradition. Trust me, once you taste that buttery, tangy snap, you’ll wonder how you ever settled for anything less.
Happy baking!
—Beau