
Chicken Parmesan Sliders: Your New Go-To Party Hero!
Hey friends, Beau here from Feastical! Let me paint you a picture. You’re hosting a game day gathering, a family movie night, or just a casual get-together with your favorite people. The energy is high, the conversation is flowing, and then… the hunger hits. You need something that screams “comfort food,” something everyone will love, and something that doesn’t chain you to the stove all day while your guests are having all the fun. Sound familiar?
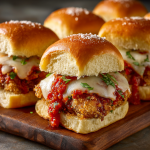
Well, pull up a chair and get ready to meet your new kitchen bestie: Crispy, Cheesy, Crowd-Pleasing Chicken Parmesan Sliders. We’re taking everything you adore about a classic, soul-warming Chicken Parm—the golden, crunchy crust, the tender chicken, the tangy marinara, and that glorious, stretchy mozzarella cheese—and we’re packing it all into a fun, handheld, perfectly portioned package.
These sliders are the ultimate party food. They’re easy to make ahead, they feed a crowd without a fuss, and they disappear from the platter faster than you can say “touchdown!” But here’s my favorite part: they make everyone feel like a kid again. There’s just something incredibly joyful about picking up your own personal, mini chicken parm sandwich and taking that first, epic bite. No knife and fork required, just pure, unadulterated deliciousness. So, let’s roll up our sleeves and create some magic that’s guaranteed to bring everyone together around the table.
The Slider That Started It All
This recipe has a special place in my heart because it was born out of a little bit of kitchen chaos and a whole lot of love. A few years back, I was hosting a big family reunion in my backyard. My plan was to make my famous, from-scratch Chicken Parmesan. But as the day went on, the guest list grew, and I realized I had severely underestimated the number of chicken breasts I’d need. Panic started to set in!
Staring into the fridge, I spotted a pack of soft, mini buns I’d bought for pulled pork later in the week. A lightbulb went off. What if I sliced the chicken breasts I did have into smaller pieces, fried them up, and served them on these buns? It was a Hail Mary pass, but it worked. Those sliders were the absolute hit of the party. My cousin’s kids, who usually turn their noses up at anything “fancy,” devoured three each. My grandma said it was the best thing she’d eaten all year. That day, I learned that sometimes the best recipes aren’t meticulously planned; they’re born from a desire to feed the people you love, no matter the circumstances. These sliders are a testament to that.
Gathering Your Flavor Arsenal
Don’t let the list intimidate you! Part of the beauty of this recipe is its flexibility. I’ll walk you through each component and give you my best chef hacks and substitutions along the way.
For the Homemade Marinara (The Soul of the Dish):
- 1 tablespoon olive oil: Our cooking fat. It adds a lovely, fruity depth. Any neutral oil works, but olive oil gives it that authentic Italian feel.
- 1/2 cup diced onions: The sweet, aromatic base of our sauce. No fresh onions? A teaspoon of onion powder stirred in with the dried herbs is a fine quick fix.
- 3 garlic cloves, chopped: Because life is always better with garlic. Feel free to use the pre-chopped jarred stuff to save time—I won’t tell!
- 1 (28 oz) can whole plum tomatoes, crushed by hand: This is my secret weapon. San Marzano tomatoes are the gold standard—they’re sweeter and less acidic. Crushing them by hand (or with a potato masher) gives the sauce a fantastic, rustic texture. Chef’s Insight: You can use a can of crushed tomatoes, but hand-crushing is a fun, cathartic step that makes you feel like a true nonna.
- 1 tsp each dried basil & oregano, 1/2 tsp dried thyme: The holy trinity of Italian herbs. If you have an Italian seasoning blend, you can use about 1 tablespoon of that instead.
- 1/2 tsp fennel seeds: This is my little pro-move. It gives the sauce a subtle, sweet sausage-like flavor that is just incredible. You can skip it, but trust me, it’s a game-changer.
- 1/4 tsp red pepper flakes: For a gentle, background warmth. Adjust to your family’s spice tolerance!
- 1 tsp salt: To make all those beautiful flavors pop.
- Chef’s Shortcut: Look, I get it. Sometimes you just need dinner on the table. Using 2-3 cups of your favorite store-bought marinara sauce is a totally legit and delicious shortcut! No judgment here.
For the Crispy Chicken:
- 4 boneless, skinless chicken breasts: We’re going to slice these into slider-sized cutlets. For even easier cooking, you can sometimes find pre-cut chicken cutlets at the store.
- The Breading Station (Flour, Eggs, Panko): This three-step process is what gives us that iconic, crispy crust. Keep one hand for dry ingredients and one for wet to avoid “club fingers.”
- 2 cups panko breadcrumbs: Panko is a Japanese-style breadcrumb that’s lighter and flakier than traditional crumbs, resulting in a super-crispy, non-greasy coating. It’s the key to the perfect crunch!
- 1/3 cup grated Parmesan cheese: We’re mixing this right into the panko. It adds a salty, savory, umami punch to the crust itself.
- Salt and pepper to taste: Season every layer! Don’t forget to season the chicken directly before you start breading.
- About 1/4 cup olive oil for frying: You don’t need to deep fry; a shallow pan-fry in a good skillet (cast iron is perfect!) will give us that gorgeous golden-brown color.
For Assembly:
- 1 cup shredded mozzarella cheese: The melty, glorious glue that holds it all together. Low-moisture, part-skim mozzarella works great and doesn’t make the buns soggy.
- 16 mini buns (slider buns): Hawaiian sweet rolls are my personal favorite—their slight sweetness is a fantastic contrast to the savory chicken and tangy sauce. But any soft mini bun will do the trick!
Let’s Build Some Deliciousness: Your Step-by-Step Guide
Okay, team! Let’s get cooking. I’ll be right here with you, talking you through each step with all my favorite tips and tricks.
Step 1: Crafting Your Marinara Masterpiece
If you’re going the homemade route, start here. Heat the olive oil in a medium saucepan over medium heat. Add your diced onions and sauté until they turn soft and translucent, about 5-7 minutes. You’re not looking for color, just sweetness. Now, add the garlic and cook for just one more minute until it’s fragrant—be careful not to burn it! Burnt garlic is bitter, and we’re all about the love here.
Now for the fun part: dump in your can of tomatoes. Roll up your sleeves and get in there with your hands, crushing each tomato one by one. It’s messy, it’s fun, and it’s how the pros do it! Alternatively, a potato masher works wonders. Stir in all your herbs, fennel seeds, red pepper flakes, and salt. Bring it to a lively simmer, then reduce the heat to low and let it bubble gently for 20-30 minutes. This simmering time allows the flavors to marry and the sauce to thicken up beautifully. Give it a stir every now and then.
Chef’s Hack: Taste your sauce after about 15 minutes. Does it need more salt? A pinch of sugar to balance the acidity? Make it yours!
Step 2: Prepping and Breading the Chicken (The Assembly Line)
While the sauce simmers, let’s tackle the chicken. Place your chicken breasts on a cutting board. Using a sharp knife, carefully slice each breast horizontally into 3 or 4 thin, even cutlets. The goal is to have pieces that are roughly the size of your slider buns. Season both sides generously with salt and pepper.
Now, set up your breading station! You’ll need three shallow dishes. In the first, spread out your flour. In the second, beat your three eggs until uniform. In the third, mix together the panko breadcrumbs, grated Parmesan, dried basil, and oregano.
Here’s the golden rule: Dry hand, wet hand. Use one hand (your “dry” hand) to place a chicken cutlet into the flour, coating it lightly and shaking off any excess. Then, use that same dry hand to drop it into the egg wash. Now, use your other hand (your “wet” hand) to flip it in the egg, ensuring it’s fully coated. Finally, use your wet hand to move it to the panko mixture. Use your dry hand to scoop the crumbs over the top, pressing gently to make sure they adhere. This method saves you from ending up with two completely breaded hands! Place the breaded cutlet on a clean plate and repeat with the rest.
Step 3: Frying to Golden Perfection
Heat about 1/4 cup of olive oil in a large skillet (I adore my cast iron for this) over medium heat. To test if the oil is ready, flick a tiny bit of panko into it—if it sizzles immediately, you’re good to go.
Working in batches to avoid crowding the pan, carefully place the chicken cutlets in the hot oil. You should hear a happy sizzle! Cook for 3-4 minutes per side, until the crust is a deep, golden brown and the chicken is cooked through. The internal temperature should read 165°F (74°C) on a meat thermometer.
Chef’s Tip: As each batch finishes, transfer the chicken to a wire rack set over a baking sheet. This keeps the bottom from getting steamy and soggy, which is what happens if you put it directly on a paper towel-lined plate. We want maximum crunch!
Step 4: The Grand Finale: Assembly!
Preheat your oven to 350°F (175°C). Now, let’s build our sliders! You can do this two ways:
Method 1 (The Individualist): Place the bottom halves of all your slider buns on a large baking sheet. Spread a spoonful of marinara sauce on each one. Top with a crispy chicken cutlet. Sprinkle a generous pinch of shredded mozzarella over each piece of chicken. Crown it with the top bun.
Method 2 (The Party Platter): This is my go-to for a crowd. Without separating the buns, slice the entire sheet of Hawaiian rolls in half horizontally, so you have one giant top and one giant bottom. Place the bottom slab on your baking sheet. Spread a thin layer of marinara over the entire surface. Arrange all your chicken cutlets on top, then blanket everything with the cup of mozzarella. Place the top slab of buns on, and you’re ready to warm.
Once assembled, pop the whole baking sheet into the preheated oven for 5-7 minutes, just until the cheese is melty and the buns are warm and slightly toasty. If you used the Party Platter method, you can slice them into individual sliders after warming.
How to Serve These Beauties
Presentation is part of the fun! For a casual vibe, I love piling these sliders high on a big wooden cutting board or a large, vibrant platter. Scatter a few fresh basil leaves over the top for a pop of color and freshness. It screams, “Dig in!”
What to serve on the side? Keep it simple and satisfying. A big, bright Italian salad with a sharp vinaigrette cuts through the richness perfectly. A bowl of sweet potato fries or crispy roasted rosemary potatoes are also a match made in heaven. And for those who like to dip? Put a little extra warm marinara sauce in a small bowl right in the center of the platter for double-dipping action.
These sliders are the life of the party, but they’re also a fantastic, fun family dinner. Pair them with a simple veggie like roasted broccoli or a quick coleslaw, and you’ve got a meal that will make everyone smile.
Shake It Up! Fun Variations to Try
Once you’ve mastered the classic, the world is your oyster! Here are a few of my favorite twists:
- Parmesan Pull-Apart Slider Bake: Use the “Party Platter” assembly method. Before adding the marinara, brush the inside of the top and bottom buns with a mixture of melted butter, garlic powder, and a tablespoon of grated Parmesan. Assemble and bake as directed. It’s a garlic bread and chicken parm hybrid dream!
- Spicy ‘Nduja Twist: Love heat? Stir a tablespoon of ‘nduja (a spicy, spreadable Italian sausage) into your marinara sauce as it simmers. It will infuse the whole sauce with a deep, smoky heat.
- Eggplant Parm Sliders (Vegetarian): Swap the chicken for sliced eggplant! Use the same breading and frying method, but cook the eggplant for just 2-3 minutes per side until golden and tender.
- Air Fryer Magic: Want a lighter version? Your air fryer is your friend! Spray the breaded chicken cutlets with cooking spray and air fry at 400°F (200°C) for 10-12 minutes, flipping halfway through, until crispy and cooked. It works like a charm.
- Prosciutto & Fresh Mozzarella: For a gourmet touch, place a thin slice of fresh mozzarella on each chicken piece instead of shredded. After warming the sliders, drape a thin slice of prosciutto over the chicken before adding the top bun.
Chicken Parmesan Sliders : Crispy, Cheesy, and Crowd-Pleasing
Description
Chicken Parmesan Sliders
Prep Time: 20 mins
Cook Time: 25 mins
Total Time: 45 mins
Servings: 12 sliders
Ingredients
For the Chicken
-
2 large chicken breasts, cut horizontally into 4 thin cutlets
-
1 cup buttermilk (or 1 cup milk + 1 tsp lemon juice, rested 5 min)
-
1 cup flour
-
1 cup seasoned breadcrumbs (Italian-style preferred)
-
½ cup grated Parmesan cheese
-
1 tsp garlic powder
-
½ tsp onion powder
-
½ tsp paprika
-
½ tsp salt
-
¼ tsp black pepper
-
Vegetable oil, for frying
For Assembly
-
1 package (12-count) Hawaiian rolls
-
1½ cups marinara sauce (store-bought or homemade)
-
2 cups shredded mozzarella cheese
-
¼ cup grated Parmesan cheese
-
2 tbsp melted butter
-
½ tsp garlic powder
-
1 tbsp fresh parsley, chopped
Instructions
1. Prep the Chicken:
Cut chicken breasts into smaller slider-sized pieces (about 12). Pat dry with paper towels.
2. Bread the Chicken:
Set up three bowls:
-
Bowl 1: flour mixed with garlic powder, onion powder, paprika, salt, and pepper
-
Bowl 2: buttermilk
-
Bowl 3: breadcrumbs mixed with Parmesan cheese
Dredge each chicken piece in flour, dip into buttermilk, then coat in breadcrumb mixture.
3. Fry the Chicken:
Heat about ½ inch of oil in a skillet over medium-high heat. Fry chicken pieces 3–4 minutes per side until golden and cooked through (165°F/74°C internal temp). Drain on paper towels.
4. Assemble the Sliders:
Preheat oven to 375°F (190°C).
Slice the Hawaiian rolls in half horizontally (keep them connected).
Place the bottom halves on a parchment-lined baking sheet.
Layer in order:
-
Spoon marinara sauce over the bottoms.
-
Add the fried chicken pieces.
-
Spoon a little more sauce on top of each chicken piece.
-
Sprinkle mozzarella and Parmesan over the top.
-
Add the top halves of the rolls.
5. Brush and Bake:
In a small bowl, mix melted butter, garlic powder, and parsley. Brush over the tops of the rolls.
Bake uncovered for 10–12 minutes, until the cheese melts and the tops are golden.
6. Serve:
Let rest 5 minutes, then slice along the roll lines and serve warm.
Notes
-
Make it spicy: Add crushed red pepper flakes or a drizzle of spicy marinara.
-
Shortcut: Use frozen breaded chicken tenders or cutlets to save time.
-
Make ahead: Bread and fry the chicken up to a day ahead; reheat before assembling.
Nutrition
- Calories: 310 Cal Per Serving
- Carbohydrates: 24g
- Protein: 23g
Beau’s Kitchen Chronicles
This recipe has evolved so much since that first frantic family reunion. I’ve learned that the type of bun makes a huge difference—Hawaiian rolls were a total game-changer. I’ve also started adding that fennel seed to the sauce after a trip to Sicily, where I tasted it in a nonna’s ragù and nearly fell out of my chair. The best recipes are living things; they grow and change with you.
One of my favorite kitchen fails turned into a win was the time I ran out of panko. I crushed up plain potato chips mixed with a little Parmesan, and you know what? It was insanely delicious. A little salty, super crunchy. Don’t be afraid to improvise—that’s where the real fun is!
Final Thoughts: More Than Just a Sandwich
So, there you have it. What started as a kitchen panic attack has become one of my most trusted, joy-spreading recipes. These Chicken Parmesan Sliders are more than just a convenient party food; they’re a little bundle of shared happiness.
They prove that you don’t need a fancy, complicated menu to be the host everyone raves about. You just need food made with a little bit of love and a whole lot of flavor—food that makes people feel good. It’s the sight of a platter disappearing in minutes, the sound of a satisfied “Mmm!” from across the room, and the simple joy of a meal that brings everyone to the table, literally and figuratively.
Whether you stick to the classic recipe, take a shortcut with store-bought sauce, or get creative with one of the fun variations, you’re not just making dinner. You’re creating a moment. You’re building a memory around the simple, universal love of a really, really good sandwich.
So go ahead, give them a try. I have a feeling this recipe might just become your new kitchen bestie, too.
Now get out there and feed the people you love,
Beau