Your New Go-To Snack: No-Bake Healthy Protein Balls
Hey friends, Beau here! Let’s get real for a second. How many times have you found yourself staring into the abyss of your pantry at 3 PM, looking for something—anything—to silence that grumbling stomach and fuel you through the rest of the day? You’re not reaching for a carrot stick, let’s be honest. You’re dreaming of something sweet, a little chocolatey, and satisfying. But then the guilt sets in before you’ve even taken a bite. Sound familiar?
Well, my food-loving friend, I’m about to change your snacking life forever. We’re whipping up a batch of my legendary Healthy Protein Balls. These little powerhouses are the ultimate kitchen heroes: no baking required, endlessly customizable, and so delicious you’ll forget they’re actually good for you. They’re the perfect union of a treat and fuel, ready in minutes, and guaranteed to become a staple in your fridge. Think of them as your edible secret weapon against hanger, sluggish afternoons, and those late-night sugar cravings. So, grab a bowl and let’s make something magical happen!
A Kitchen Disaster That Led to a Snacking Triumph
I wish I could tell you this recipe was born from a flawless, sun-drenched moment of culinary genius. The truth is, it came from a kitchen catastrophe. Picture this: It was 2018, and I was hosting a big game day party at my place. I’d spent hours prepping elaborate appetizers, and my pièce de résistance was a towering platter of beautifully decorated energy bars I’d baked. With five minutes until guests arrived, I went to slice them… and they completely crumbled into a sad, granola-like pile. Panic mode!
I stared at the rubble, my heart sinking. But then, I had a wild idea. I grabbed a scoop of the mess, squeezed it in my hand, and it held together! I started rolling the “rubble” into little balls, tossed them with a bit of powdered sugar to hide the evidence, and presented them as “Game Day Power Bites.” They were the first thing to disappear. Everyone raved, asking for the recipe. That day, a kitchen fail taught me a beautiful lesson: sometimes, the best recipes aren’t about perfection; they’re about a little improvisation and a whole lot of heart. These protein balls are the polished, perfected version of that happy accident.
Gathering Your Power-Packed Ingredients
One of the best things about this recipe is its flexibility. You probably have most of this in your pantry right now! Here’s what you’ll need and why each ingredient is a rockstar.
- 1 cup Rolled Oats (Old-Fashioned): This is our base, providing lasting energy and fiber. Chef’s Insight: Don’t use instant oats! They’re too fine and can make the texture mushy. Rolled oats give that perfect, substantial chew.
- ½ cup Natural Peanut Butter: Our superstar binder and protein source. Substitution Tip: Any nut or seed butter works wonderfully here. Almond butter, cashew butter, or even sunflower seed butter for a nut-free version are all fantastic.
- ⅓ cup Honey or Maple Syrup: This is our natural sweetener and the other key binder. Chef’s Insight: Maple syrup keeps these vegan, while honey gives a lovely floral sweetness. If your mixture seems dry, add an extra tablespoon.
- ¼ cup Ground Flaxseed or Chia Seeds: A mega-dose of fiber, omega-3s, and nutrients. Substitution Tip: You can use one or the other, or a mix! If you only have whole flaxseeds, just give them a quick blitz in a spice grinder or blender.
- ¼ cup Mini Dark Chocolate Chips: Because every hero needs a sidekick, and that sidekick is chocolate. Chef’s Insight: The mini chips distribute the chocolatey joy more evenly in every single bite. Cacao nibs are a great less-sweet alternative!
- 1 scoop (2-3 tbsp) Vanilla or Chocolate Protein Powder (optional): This is your protein boost! Substitution Tip: If you don’t use protein powder, you can replace it with an additional ¼ cup of oats or ground flaxseed. Easy!
- 1 tsp Vanilla Extract: The flavor enhancer that makes everything taste like a baked good, even though we’re not baking. Don’t skip it!
- Pinch of Salt: This is my secret weapon. It balances the sweetness and makes all the other flavors pop. Trust me on this.
Let’s Get Rolling: Your Foolproof Steps to Protein Ball Bliss
This isn’t just a recipe; it’s a 10-minute therapy session. Get ready to get your hands a little dirty and feel like a kitchen wizard.
- Mix Your Dry Team. Grab a medium-sized mixing bowl and dump in your rolled oats, ground flaxseed (or chia), protein powder (if you’re using it), and that all-important pinch of salt. Give it a good whisk with a fork. You’re not just mixing; you’re introducing these ingredients to each other so they become best friends by the time we’re done. Chef’s Hack: If you want a smoother texture, you can pulse the oats in a food processor a few times first. I like the hearty chew, so I leave them as-is.
- Bring in the Wet Team. Now, plop in your peanut butter, honey (or maple syrup), and vanilla extract. This is where the magic starts. I like to use a sturdy spatula at first to begin combining everything. It’s going to look like it won’t come together, but have faith! Chef’s Hack: If your nut butter is super thick or straight from the fridge, warm it for 15 seconds in the microwave to make it easier to mix.
- Get Your Hands in There! When the spatula starts struggling, it’s time to use the best tools you have: your hands! Dive in and start kneading the mixture like you’re playing with edible Play-Doh. Squeeze it, press it, and mix until no dry spots remain and a thick, cohesive dough forms. This is oddly satisfying, I promise.
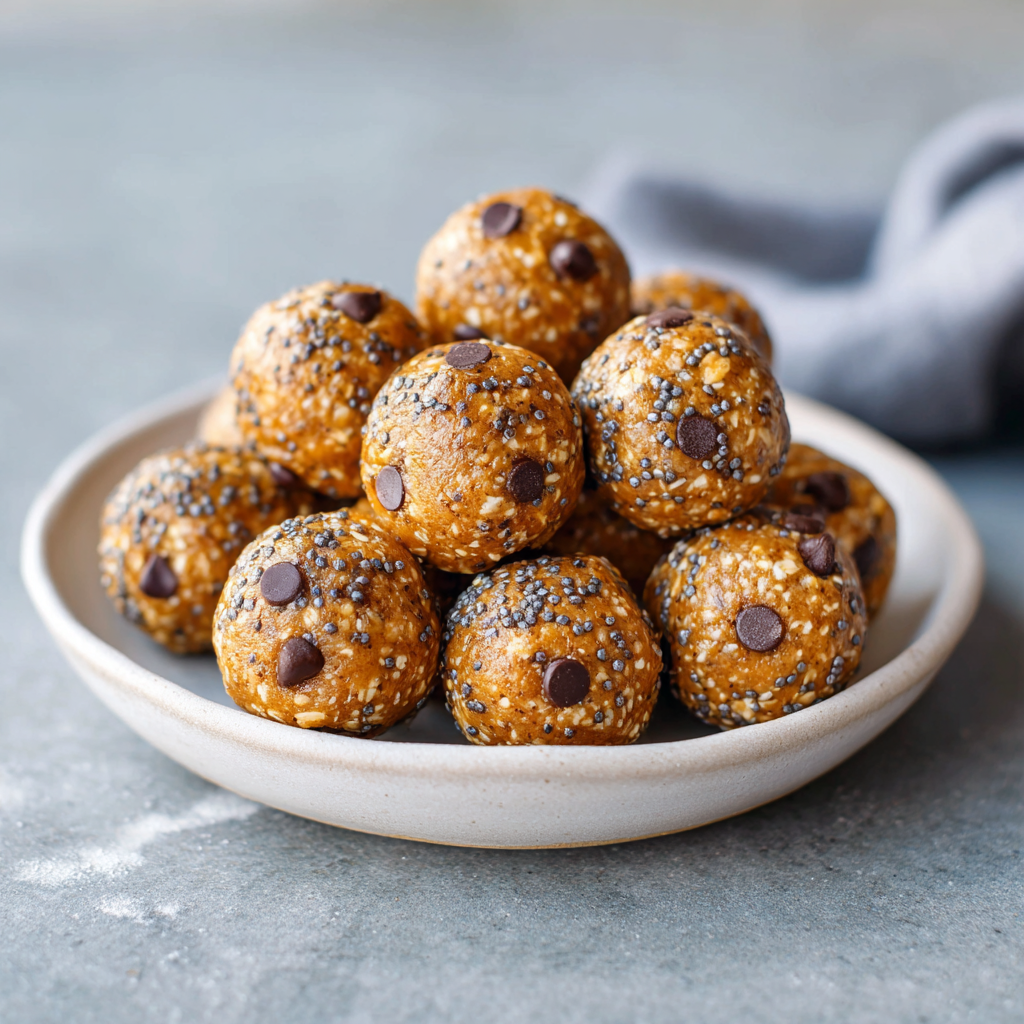
- The Grand Finale: Chocolate. Once your dough is uniform, sprinkle in those glorious mini chocolate chips. Fold them in gently with your hands or the spatula until they’re evenly distributed. We want every ball to have its fair share of chocolatey goodness.
- The Chill Test (Optional but Smart). Now, take a small pinch of the dough and try to roll it into a ball. If it holds together easily, you’re golden! If it feels a bit too soft or sticky, no sweat. Just pop the entire bowl into the fridge for 10-15 minutes. This firms up the fats and makes rolling a breeze.
- Roll, Roll, Roll Your Balls. Using a tablespoon cookie scoop or just a regular spoon, portion out the dough. Scoop up about a tablespoon’s worth and roll it firmly between your palms until it’s a smooth, round sphere. Chef’s Hack: If the mixture is sticking to your hands, lightly spray them with cooking spray or rub a tiny bit of coconut oil on your palms. Game-changer!
- Store for Snacking Success. Line ’em up on a plate or baking sheet. You can eat one immediately (the chef’s privilege!), but for the best texture, I recommend letting them set in the fridge for at least 30 minutes. Then, transfer them to an airtight container. They’ll keep happily in the fridge for up to a week, or you can freeze them for up to 3 months for instant snack attacks.
How to Serve Your Homemade Protein Balls
Okay, you’ve made these beautiful little orbs of energy. Now what? The beauty is in their versatility!
I love keeping a container right at the front of my fridge for a grab-and-go breakfast with my morning coffee. They’re the perfect pre-workout boost about 30 minutes before you hit the gym, or the ideal post-workout refuel. Toss one or two in a small reusable bag and throw them in your kid’s lunchbox (or your own!) for a lunchtime treat that’s miles better than a sugary snack bar.
For a fun dessert, roll the finished balls in a light coating of unsweetened cocoa powder, shredded coconut, or even crushed nuts for a little extra pizzazz. Serve a platter at your next book club or gathering, and watch them vanish. They’re conversation starters, I’m telling you!
Mix It Up! 5 Delicious Variations to Try
Once you’ve mastered the base recipe, the culinary world is your oyster! Here are a few of my favorite spins to keep things exciting.
- Tropical Paradise: Swap the peanut butter for coconut butter, use maple syrup, and replace the chocolate chips with chopped dried mango and unsweetened shredded coconut. It’s like a vacation in a bite!
- Almond Joy: Use almond butter, and mix in 2 tablespoons of cocoa powder with the dry ingredients. Fold in unsweetened shredded coconut and chopped almonds instead of chocolate chips. You’ll feel like you’re indulging in your favorite candy bar.
- Gingerbread Spice: Perfect for the holidays! Add 1 tsp of cinnamon, ½ tsp of ginger, and a pinch of nutmeg and cloves to the dry ingredients. Use molasses instead of half the honey for that authentic gingerbread flavor, and use raisins or chopped dates instead of chocolate chips.
- Nut-Free “Sunflower Joy”: For my friends with allergies, use sunflower seed butter and replace the chocolate chips with sunflower seeds and dairy-free chocolate chips. It’s just as delicious and totally inclusive!
- Double Chocolate Mint: Use chocolate protein powder, add 2 tablespoons of cocoa powder, and replace the vanilla extract with ¼ tsp of peppermint extract. Fold in cacao nibs or dairy-free chocolate chips for an ultra-chocolatey, refreshing treat.
Beau’s Kitchen Notes & Stories
This recipe has truly evolved in my kitchen over the years. It’s been scaled up for potlucks, scaled down for late-night solo cravings, and adapted more times than I can count based on what’s in the pantry. One time, I was out of chocolate chips and used crushed pretzels instead for a sweet-and-salty situation—mind-blowing!
The biggest lesson? Don’t be afraid to play with your food. This isn’t a fussy soufflé; it’s a forgiving, friendly recipe that wants to work for you. The dough is your canvas. If it feels too dry, add a touch more honey or nut butter. Too wet? A sprinkle more oats will fix it right up. You’ve got this.
Your Questions, Answered!
Q: My mixture is too dry and crumbly. It won’t hold together when I roll it. Help!
A> No worries! This is the most common issue and an easy fix. The culprit is usually the nut butter or the honey. Add more binding agent. Mix in an additional tablespoon of peanut butter and/or honey (or maple syrup) until the dough becomes pliable and holds together when you squeeze it.
Q: Can I make these without a protein powder?
A> Absolutely! Just omit it. The recipe works perfectly without it. You’ll still get plenty of protein from the nut butter and seeds. If you want to maintain the volume, you can add an extra ¼ cup of oats or ground flaxseed.
Q: Why do mine taste a bit bland?
A> My friend, you likely forgot the salt! That tiny pinch is crucial for elevating all the other flavors. Also, make sure you’re using a nut butter you love the taste of on its own, and don’t be shy with the vanilla extract. A little flaky sea salt on top after rolling can also elevate them to a whole new level.
Q: Are these freezer-friendly?
A> They are freezer champions! After rolling, place them on a baking sheet to freeze solid (this prevents them from sticking together in a big clump), then transfer to a freezer bag or container. They’ll keep for up to 3 months. Thaw at room temperature for 10-15 minutes or just grab one and eat it frozen—it’s like a little fudge pop!

Healthy Protein Balls : Easy, No-Bake, and Packed with Energy
Description
Hey friends! If you’ve ever found yourself staring into the pantry mid-afternoon, craving something sweet, chocolatey, and satisfying—but also healthy—this recipe is for you. These no-bake protein balls are quick to make, endlessly customizable, and perfect for snacks, pre- or post-workout fuel, or even a guilt-free dessert.
Ingredients
-
1 cup rolled oats (old-fashioned)
-
½ cup natural peanut butter (or almond/cashew/sunflower butter)
-
⅓ cup honey or maple syrup
-
¼ cup ground flaxseed or chia seeds
-
¼ cup mini dark chocolate chips (optional)
-
1 scoop (2–3 tbsp) vanilla or chocolate protein powder (optional)
-
1 tsp vanilla extract
-
Pinch of salt
Instructions
-
Mix dry ingredients: In a medium bowl, combine oats, flaxseed or chia, protein powder (if using), and a pinch of salt.
-
Add wet ingredients: Mix in peanut butter, honey or maple syrup, and vanilla extract. Use a spatula until it starts coming together.
-
Knead by hand: Use your hands to form a thick, uniform dough. Add a little extra nut butter or honey if too dry.
-
Fold in chocolate chips: Gently distribute chocolate chips throughout the dough.
-
Chill (optional): If the dough is sticky, refrigerate for 10–15 minutes to firm up.
-
Roll into balls: Using a tablespoon, scoop and roll dough into smooth spheres. Lightly coat hands with cooking spray if needed.
-
Store: Place in an airtight container. Refrigerate up to 1 week or freeze up to 3 months.
Notes
-
Tropical Twist: Use coconut butter, dried mango, and shredded coconut.
-
Almond Joy: Almond butter, cocoa powder, shredded coconut, and chopped almonds.
-
Gingerbread Spice: Add cinnamon, ginger, nutmeg, cloves, molasses, and raisins.
-
Nut-Free: Use sunflower seed butter and sunflower seeds with dairy-free chocolate chips.
-
Double Chocolate Mint: Chocolate protein powder, cocoa powder, and peppermint extract.
Nutrition
- Calories: 130Cal Per Serving
- Sugar: 6g
- Fat: 7g
- Carbohydrates: 12g
- Fiber: 2g
- Protein: 5g
A Quick Peek at the Nutrition
Now, I’m a chef, not a dietitian, so please take this as a friendly estimate. The exact numbers will vary based on the specific brands and ingredients you use. But here’s a general idea of the powerhouse you’re creating (per ball, based on a batch of 15):
- Calories: ~130
- Protein: 5g (A solid boost to keep you full and support your muscles!)
- Carbohydrates: 12g (A mix of complex carbs from the oats for energy and simple carbs from the honey for a quick pick-me-up.)
- Fat: 7g (Mostly the healthy, unsaturated kind from the nut butter and seeds, which is great for brain health and satiety.)
- Fiber: 2g (Thanks to the oats and flaxseed, helping with digestion and keeping you feeling satisfied.)
- Sugar: 6g (Primarily natural sugars from the honey and a bit from the chocolate chips.)
Remember, these are a wholesome snack, not a “diet” food. They’re about giving your body real, tasty fuel.
Your Snacking Game, Forever Changed
And there you have it! Your complete guide to becoming a no-bake protein ball master. This recipe is more than just a list of ingredients and steps; it’s an invitation to be creative, to not fear a little kitchen mess, and to give yourself the gift of a healthy, delicious snack that’s ready when you are.
I can’t wait for you to make these. When you do, please share your creations with me! Tag @Feastical on social media and let me know what fun variations you tried. You’re not just making a snack; you’re joining a community of foodies who believe that feeling good should taste good, too.
Final Thoughts
Forget the 3 PM slump and the guilt that comes with it. These no-bake protein balls are your deliciously simple solution. Quick, customizable, and packed with real ingredients, they’re proof that healthy snacking can be the most satisfying part of your day. Whip up a batch, and make hanger a thing of the past.
Happy snacking!
Beau
Happy rolling,
Beau