
Chicken Parmesan Sliders: Your New Go-To Crowd Pleaser!
Hey friends, Beau here from Feastical! Let’s talk about one of life’s greatest simple pleasures: food that brings everyone together. You know the kind. The dish that makes eyes light up, the one that disappears from the platter faster than you can say “seconds?” For me, that magic dish is often a big, beautiful, cheesy, shareable bake. And today, we’re taking a beloved classic and turning it into the ultimate party hero: Chicken Parmesan Sliders.
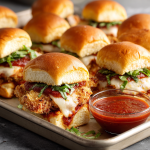
Imagine this: perfectly crispy chicken tenders, nestled in soft, buttery slider buns, smothered in a rich, garlicky marinara sauce, and absolutely buried in a blanket of molten mozzarella and parmesan cheese. We’re talking all the soul-satisfying flavor of a full-blown, restaurant-style Chicken Parm, but in a fun, handheld, no-fuss format. These sliders are baked to golden-brown perfection, making them the undisputed MVP for game day spreads, potlucks, busy weeknights, or anytime you need to feed a hungry crew with a smile.
I’ve built this recipe to be your new kitchen best friend. It’s incredibly flexible, forgiving, and designed for maximum flavor with minimal stress. Whether you’re a seasoned pro who loves to fry your own chicken or someone who appreciates a brilliant shortcut (no judgment here!), this recipe adapts to you. So, preheat that oven, grab your favorite baking dish, and let’s create some cheesy, glorious magic together.
A Slider-Sized Trip Down Memory Lane
This recipe always takes me back to my first big football party I ever hosted. I was young, eager to impress, and maybe a little overly ambitious. I decided I was going to make homemade Chicken Parmesan for a dozen friends. Let’s just say the kitchen looked like a tomato sauce bomb had gone off, I was juggling multiple pans, and my guests were hovering hungrily while I frantically tried to plate everything at once.
It was in that beautiful, chaotic moment that I had a lightning bolt of an idea. What if I could capture all that flavor, but make it ahead of time and serve it in a way that was easy, communal, and fun? I grabbed a bag of slider rolls, layered everything casserole-style, and popped it in the oven. The result? A silent, smiling room of happy people, all digging into these warm, cheesy, perfectly portioned sliders. It was a total game-changer. That’s the spirit I’ve baked into this recipe—it’s not just about great food, it’s about creating more time and joy with the people you’re feeding.
Gathering Your Slider Squad: The Ingredients
Here’s the beautiful part: the ingredient list is straightforward and packed with opportunities to make it your own. This is your culinary playground!
- 24 Cooked Chicken Tenders: This is your main event! I love the flexibility here. You can absolutely make your own from scratch—just season, dredge in flour, egg, and panko, then pan-fry or bake until golden. But on a busy day? A high-quality bag of frozen, fully-cooked tenders (baked or air-fried according to the package) is a lifesaver. Chef’s Insight: Using pre-cooked chicken is the ultimate shortcut that cuts your active prep time down to almost nothing!
- 2 Cups Marinara Sauce: Choose a brand you genuinely love, because its flavor will shine through. Or, if you’re feeling fancy, use your favorite homemade recipe! Substitution Tip: If you’re out of marinara, a simple can of crushed tomatoes seasoned with a pinch of salt, dried basil, and a garlic clove simmered for 10 minutes works wonderfully.
- 2 Cups Shredded Mozzarella Cheese: The glue that holds our cheesy dreams together! I highly recommend shredding a block of low-moisture, whole-milk mozzarella yourself. It melts far more smoothly and doesn’t have the anti-caking agents that pre-shredded bags do. Chef’s Hack: For an extra flavor boost, mix in some of the parmesan right with the mozzarella!
- 24 Slider Rolls: The foundation. Hawaiian or brioche-style rolls are my top picks because their slight sweetness is a fantastic counterpoint to the savory, tangy sauce and cheese. They also get incredibly soft and pillowy when baked.
- ½ Cup Grated Parmesan Cheese: This is our secret weapon for a salty, umami punch. The nutty flavor of real Parmigiano-Reggiano makes a world of difference compared to the shelf-stable canisters.
- 4 Tbsp Melted Butter, 1 Minced Garlic Clove, 1 Tbsp Fresh Parsley: This trio is non-negotiable for the glorious, golden-brown, flavor-packed top crust. It’s the detail that makes people say, “Wow, this is next-level.”
- Fresh Basil or Spinach Leaves (Optional): I love tucking a few leaves in for a pop of color and a fresh, herbal note that cuts through the richness.
Let’s Build Some Slider Magic: Step-by-Step
Ready to assemble? This is where the fun really begins. Follow these steps, and you’ll be a slider master in no time.
- Preheat and Prep: Fire up your oven to 350°F (175°C). This is the perfect temperature for melting cheese and toasting buns without burning. Take your 9×13-inch baking dish and give it a quick spritz with cooking spray or line it with parchment paper. Chef’s Hack: Lining the dish isn’t just for easy cleanup; it also makes lifting the whole block of sliders out for slicing a total breeze!
- The Great Roll Slice: This is a game-changing trick! Take your package of 24 slider rolls and, keeping them all connected, slice the entire block in half horizontally. You’ll have one giant “sheet” of roll tops and one giant “sheet” of roll bottoms. Place the bottom half directly into your prepared baking dish. No wrestling with individual buns!
- Layer on the Goodness: Now, place one cooked chicken tender onto each roll bottom. They should fit snugly. Next, take your marinara sauce and spoon it generously over each piece of chicken. Don’t be shy! Then, unleash the cheese. Sprinkle the shredded mozzarella and parmesan evenly over everything, making sure to get some in every nook and cranny. If you’re using fresh basil or spinach, now’s the time to scatter those leaves over the cheese for a fresh, green layer.
- Top It Off & Butter Up: Gently place the top half of the rolls back on, creating a beautiful, cheesy sandwich. In a small bowl, whisk together the melted butter, minced garlic, and chopped parsley. Using a pastry brush, generously and lovingly brush this garlic butter mixture all over the top of the rolls. This is what gives them that irresistible, bakery-worthy golden sheen and incredible flavor.
- Bake to Perfection: Here’s the key to perfect sliders: cover the entire dish loosely with aluminum foil. This initial covered bake (about 15 minutes) allows the heat to penetrate, warm the filling through, and gently steam the rolls so they become incredibly soft. Then, remove the foil and bake for another 5-7 minutes, or until the cheese is spectacularly bubbly and the tops of the rolls are a perfect golden brown.
- The Finale: Slice and Serve! Carefully remove the dish from the oven. Let it rest for just 2-3 minutes—this makes slicing cleaner. Then, use a sharp knife to slice along the perforations between the rolls. Use a small spatula to lift them out, and watch them disappear!
How to Serve These Cheesy Wonders
Presentation is part of the fun! I love serving these sliders right in the baking dish they were cooked in—it’s rustic, inviting, and says “dig in!” For a casual gathering, just place the dish in the center of the table with a stack of napkins and let everyone help themselves.
If you want to fancy it up a bit for a party, arrange the individual sliders on a large wooden board or platter. I like to garnish the platter with a few extra sprigs of fresh basil and maybe a little bowl of warm marinara sauce for extra dipping. A side of a simple garlic aioli or a zesty Italian salad with a sharp vinaigrette is the perfect partner to balance out the richness of the sliders. They’re a complete meal all on their own, but they play wonderfully with others!
Make It Your Own: Delicious Recipe Variations
The beauty of this recipe is its adaptability. Don’t be afraid to get creative and tweak it to your heart’s content!
- The “Meatball Sub” Slider: Swap the chicken tenders for fully cooked, bite-sized meatballs! Use a toothpick to secure them if they’re a bit round.
- Spicy Arrabbiata Twist: Love a little heat? Use a spicy arrabbiata sauce instead of marinara, and mix some sliced pepperoncini or a sprinkle of red pepper flakes into the cheese layer.
- Pesto Lover’s Dream: Before adding the marinara, spread a thin layer of basil pesto directly onto the bottom bun halves. The combination of pesto, marinara, and cheese is absolutely divine.
- Veggie-Packed Power-Up: Want to sneak in some veggies? Sauté some sliced mushrooms, bell peppers, and onions and layer them under or over the chicken tender.
- Gluten-Free & Low-Carb Friendly: You can still enjoy the fun! Use your favorite gluten-free slider buns or, for a low-carb option, skip the bun and bake the chicken, sauce, and cheese layers in a dish, then scoop it up with veggie sticks or enjoy it with a fork.
Beau’s Chef’s Notes & Kitchen Stories
This recipe has been a living, evolving thing in my kitchen for years. I’ve learned that the best recipes are the ones that grow with you. One of my favorite “mistakes” was the time I ran out of mozzarella and had to use a blend of provolone and fontina. It was so good it’s now a regular variation in my house! The moral of the story? Don’t be afraid to improvise. Cooking is about joy, not perfection. These sliders have been there for last-minute potlucks, late-night study sessions with my niece, and countless Sunday football wins (and losses). They’re more than just a recipe; they’re a little edible piece of community.
Your Slider Questions, Answered!
Let’s tackle a few common questions to ensure your slider success.
Q: Can I make these sliders ahead of time?
A: Absolutely! You are a meal-prep genius. Assemble the entire dish right up to the point of baking (including the garlic butter on top), cover it tightly with foil, and refrigerate for up to 24 hours. When you’re ready, just pop it in the oven. You may need to add a few extra minutes to the baking time since it’s starting from cold.
Q: My slider buns got a bit soggy. How can I prevent that?
A: Great question! Sogginess usually comes from the sauce. A pro tip is to create a tiny “barrier” by spreading a very thin layer of softened butter or even a light schmear of cream cheese on the bottom bun halves before adding the chicken. This helps seal the bread and keep it sturdy.
Q: What’s the best way to reheat leftovers?
A: To maintain that crispy top, the oven or air fryer is your best friend. Reheat at 350°F for about 5-10 minutes, or until warm. The microwave will work in a pinch, but it will steam the buns and make them soft.
Q: Can I use a different cheese?
A: Of course! While mozzarella is classic for its meltiness, feel free to experiment. A combination of provolone, fontina, or even a little smoked gouda would be delicious. Just make sure whatever you use is a good melting cheese.
Chicken Parmesan Sliders : Crispy, Cheesy, and Baked to Perfection
Description
Hey friends, Beau here from Feastical! If you love the classic Chicken Parmesan but wish it could be handheld, fun, and easy to serve to a crowd, these sliders are your dream come true. Crispy chicken tenders, soft buttery slider buns, garlicky marinara, and a blanket of gooey mozzarella and parmesan cheese—they’re the ultimate comfort food in miniature. Perfect for game days, potlucks, or anytime you need a cheesy crowd-pleaser!
Ingredients
-
24 cooked chicken tenders (homemade or high-quality pre-cooked)
-
2 cups marinara sauce (store-bought or homemade)
-
2 cups shredded mozzarella cheese
-
½ cup grated parmesan cheese
-
24 slider rolls (Hawaiian or brioche recommended)
-
4 tbsp melted butter
-
1 clove garlic, minced
-
1 tbsp fresh parsley, chopped
-
Fresh basil or spinach leaves (optional, for garnish)
Instructions
Step 1: Preheat & Prep
Preheat oven to 350°F (175°C). Spray a 9×13-inch baking dish or line with parchment paper for easy cleanup.
Step 2: Slice Your Rolls
Slice the block of 24 slider rolls horizontally in one go, creating a bottom and top layer. Place the bottom layer in your baking dish.
Step 3: Layer the Goodness
-
Place a chicken tender on each roll bottom.
-
Spoon marinara sauce generously over the chicken.
-
Sprinkle mozzarella and parmesan evenly.
-
Optional: scatter basil or spinach leaves for a fresh note.
Step 4: Top & Butter
Place the top layer of rolls over the cheese. Mix melted butter, minced garlic, and parsley, then brush over the top layer.
Step 5: Bake to Perfection
-
Cover loosely with foil and bake 15 minutes.
-
Remove foil and bake an additional 5–7 minutes until tops are golden and cheese is bubbly.
Step 6: Slice & Serve
Let rest 2–3 minutes. Slice along the bun seams and serve straight from the dish or on a platter.
Notes
-
Make-Ahead: Assemble, cover with foil, and refrigerate up to 24 hours. Add extra bake time if cold.
-
Prevent Soggy Buns: Spread a thin layer of butter or cream cheese on bottom buns before adding chicken.
-
Reheating: Oven or air fryer at 350°F for 5–10 minutes preserves the golden top.
-
Cheese Swap: Provolone, fontina, or smoked gouda work beautifully.
Nutrition
- Calories: 280 Cal Per Serving
- Fat: 14 g
- Carbohydrates: 22 g
- Protein: 17 g
Nutritional Information (Approximate, Per Slider)
Let’s keep it real—this is a treat meant to be enjoyed! But I believe in transparency, so here’s a general breakdown. Remember, these values can vary based on the specific brands of ingredients you use (like the type of chicken tender or rolls).
- Calories: ~280
- Protein: 17g
- Carbohydrates: 22g
- Fat: 14g
To lighten it up a bit, you can use low-fat cheese, a leaner chicken tender option (like grilled), and whole-wheat slider buns. But sometimes, your soul just needs that full, cheesy, buttery experience, and that’s more than okay!
Final Thoughts from My Kitchen to Yours
Well, there you have it, my friends—my heart and soul poured into a pan of Chicken Parmesan Sliders. This recipe is a testament to what I truly believe: that the best food is meant to be shared, to be easy, and to bring a genuine moment of happiness to your table. It’s not about fancy techniques or hard-to-find ingredients; it’s about creating connection, one cheesy, delicious bite at a time.
I hope this recipe becomes a trusted favorite in your home, just like it is in mine. I’d love to hear how it turns out for you! Tag me on social @Feastical or drop a comment on the blog with your own twists and stories. Now, go forth and bake something Feastical!
With love and a full plate,
Beau