Sticky Chili-Garlic Chicken Bowls: Your New Takeout Obsession
Hey friends, Beau here from Feastical! Let’s be real for a second. We’ve all been there. It’s been a long day, your stomach is growling, and the siren song of the takeout app is getting louder by the minute. The promise of something saucy, spicy, and delivered right to your door is a powerful one. But what if I told you that you could create a meal at home that’s even better than takeout? A meal that’s bursting with bold, sticky, chili-garlic flavor, packed with fresh, crunchy toppings, and drizzled with a sauce so good we literally named it “Yum Yum”?
That’s exactly what these Sticky Chili-Garlic Chicken Bowls are all about. This isn’t just a recipe; it’s a full-sensory experience. Imagine tender, juicy chicken coated in a glaze that’s the perfect balance of sweet, spicy, and savory. We’re talking about a sauce that caramelizes into sticky, gorgeous perfection on the grill or in your pan. Then, we balance all that fiery goodness with fluffy jasmine rice, cool slices of avocado and cucumber, and the tangy punch of kimchi. And the pièce de résistance? A generous, creamy, utterly addictive drizzle of our homemade Yum Yum sauce that ties the whole party together in your bowl.
This recipe is designed for real life. It’s for weeknight wins, for feeding a crowd without stress, and for those moments when you want a meal that feels like a celebration. So, let’s put those takeout menus aside for one night and create some magic together. I promise, your kitchen is about to smell incredible, and your taste buds are in for the ride of their lives.
The Night We Invented “Yum Yum” Sauce
This recipe has a special place in my heart because it was born out of a happy kitchen accident. A few years back, a bunch of my friends showed up unannounced, ravenous after a long hike. My fridge was… let’s call it “creatively stocked.” I had some chicken thighs, a motley crew of condiments, and a whole lot of determination to avoid ordering ten different pizzas.
I whipped up a quick marinade with what I had—soy sauce, a squirt of honey, a heaping spoonful of chili paste, and a whole lot of garlic. While the chicken was sizzling away, I stared into the abyss of my condiment shelf: mayo, ketchup, Worcestershire. In a moment of “what’s the worst that could happen?” I mixed them all together. My friend Sam took one bite of the chicken dipped in this mystery pink sauce, her eyes went wide, and all she could say was, “Yum. YUM.” The name stuck instantly. That chaotic, thrown-together meal turned into one of the most-requested recipes in my arsenal, and I’m so excited to finally share the polished, perfected version with you.
Gathering Your Flavor Arsenal
Here’s everything you’ll need to create these epic bowls. Don’t be intimidated by the list—a lot of this is pantry staples, and I’ve included plenty of swaps and chef insights to make it your own.
For the Sticky Chili-Garlic Chicken:
- 3 lbs boneless, skinless chicken (breasts or thighs): I’m a thigh guy myself—they’re more forgiving and stay juicier, but breasts work beautifully if that’s your preference. Just keep an eye on them so they don’t dry out!
- 2 tbsp + ⅔ cup tamari or soy sauce: We use a little to marinate the chicken briefly before adding the rest to the sauce. Tamari is a great gluten-free option with a slightly richer, smoother flavor.
- 4 tbsp orange juice (fresh if possible!): The bright, subtle acidity from the OJ cuts through the richness and helps create that incredible sticky glaze. No fresh oranges? The bottled stuff works in a pinch.
- ½ cup honey: This is our sweet backbone. For a deeper flavor, try maple syrup. For a vegan version, agave nectar works perfectly.
- 4–5 tbsp chili paste (like Sambal Oelek or Gochujang): This is your heat control! Start with 4 tbsp for a medium kick, and go up from there if you’re feeling brave. Gochujang will add a lovely, fermented depth.
- 2 tbsp fresh ginger, chopped & 4 cloves garlic, chopped: Non-negotiable flavor bombs! Please, please use fresh. The jarred stuff just doesn’t bring the same vibrant punch.
- 4 tbsp olive oil: Helps the marinade cling to the chicken and prevents sticking during cooking.
- Black pepper, to taste: Freshly cracked is always best.
- Optional Twists: A tbsp of rice vinegar or lime juice adds a fantastic zing right at the end. A tsp of toasted sesame oil stirred into the marinade gives an incredible nutty, deep flavor.
For the Famous Yum Yum Sauce:
- ⅔ cup olive oil mayo: The creamy base. I like the flavor of olive oil mayo, but any good-quality mayo will do.
- 4 tbsp ketchup: Don’t knock it ’til you’ve tried it! It adds sweetness, tang, and that iconic pink color.
- 2 tbsp Worcestershire sauce: The secret umami weapon. It adds a complex, savory depth that makes the sauce truly irresistible.
- 2 tsp seasoned salt: I use Lawry’s. It’s the perfect blend of salt and spices that makes this sauce so moreish.
- ½ tsp cayenne pepper: A little warmth to balance the creaminess. Adjust to your taste!
- Optional Twist: A tsp of lemon juice or a dash of sriracha can brighten things up or add an extra kick.
For Serving & Building Your Bowl:
- 6–7 cups cooked jasmine or basmati rice: Their fragrant, fluffy texture is the perfect bed for our bold chicken.
- 1–2 cucumbers, thinly sliced & 2 avocados, sliced: Our cool, fresh elements that provide a lovely contrast to the spicy chicken.
- 1 cup kimchi: The tangy, fermented crunch is a game-changer. If you’re new to kimchi, start with a small amount!
- Handful of fried wontons or crispy shallots: The textural MVP! That final crunch makes every bite exciting.
- Optional extras: Pickled red onions or shredded carrots add a gorgeous pop of color and another layer of flavor and crunch.
Let’s Get Cooking: Building Your Flavor Masterpiece
Okay, team! Aprons on, music playing, let’s transform these ingredients into a meal you’ll be dreaming about. We’re going to work in a logical flow so everything comes together hot and delicious at the same time.
- Marinate the Chicken (The Flavor Foundation): In a medium bowl, grab your 2 tbsp of soy sauce and toss your chicken in it. Let it sit for just 10-15 minutes while you make the main marinade. This little pre-seasoning step helps the chicken absorb flavor deeply. Now, in a separate, larger bowl, whisk together the remaining ⅔ cup soy sauce, orange juice, honey, chili paste, ginger, garlic, olive oil, and a good crack of black pepper. This is your magic potion! Chef’s Hack: Always reserve about ¼ cup of this marinade in a small bowl before you add the chicken. This is your clean, safe basting glaze for later—no cross-contamination!
- Get Your Grill or Pan Screaming Hot: Whether you’re grilling outdoors or using a grill pan or cast-iron skillet on the stove, get it nice and hot over medium-high heat. You want to hear a confident sizzle when that chicken hits the surface. If you’re baking, preheat your oven to 400°F (200°C).
- Cook to Caramelized Perfection:
- Grill/Pan Method: Shake off excess marinade and lay the chicken down. Don’t touch it! Let it sear for 5-7 minutes per side until you get those beautiful grill marks and the chicken releases easily. In the last 2-3 minutes of cooking, brush the reserved, clean marinade onto the cooked side. Flip, brush the other side, and let it caramelize into a sticky, glossy glaze. Cook until the internal temperature hits 165°F (74°C).
- Bake Method: Place the marinated chicken on a parchment-lined baking sheet. Bake for 20-25 minutes, brushing with the reserved glaze in the last 5-10 minutes to get that sticky finish.
- Rest is Best: Once cooked, transfer the chicken to a cutting board and let it rest for 5-10 minutes. This is non-negotiable for juicy chicken! It allows the juices to redistribute throughout the meat. If you cut into it right away, all those beautiful juices will run out onto your cutting board. While it rests, you can slice your avocado and cucumber.
- Whip Up the Yum Yum Sauce: This couldn’t be easier. In a small bowl, combine the mayo, ketchup, Worcestershire sauce, seasoned salt, and cayenne. Whisk until it’s smooth, creamy, and uniformly pink. Give it a taste and adjust the seasoning if needed. Pop it in the fridge until you’re ready to assemble.
- Slice and Dice: After the chicken has rested, slice it against the grain into bite-sized strips or chunks. Slicing against the grain ensures every piece is tender and easy to eat.
Bowl Assembly: The Grand Finale
This is where the art happens! Building the bowl is part of the fun and makes the meal feel extra special. Here’s my favorite way to layer it up for maximum visual and flavorful impact.
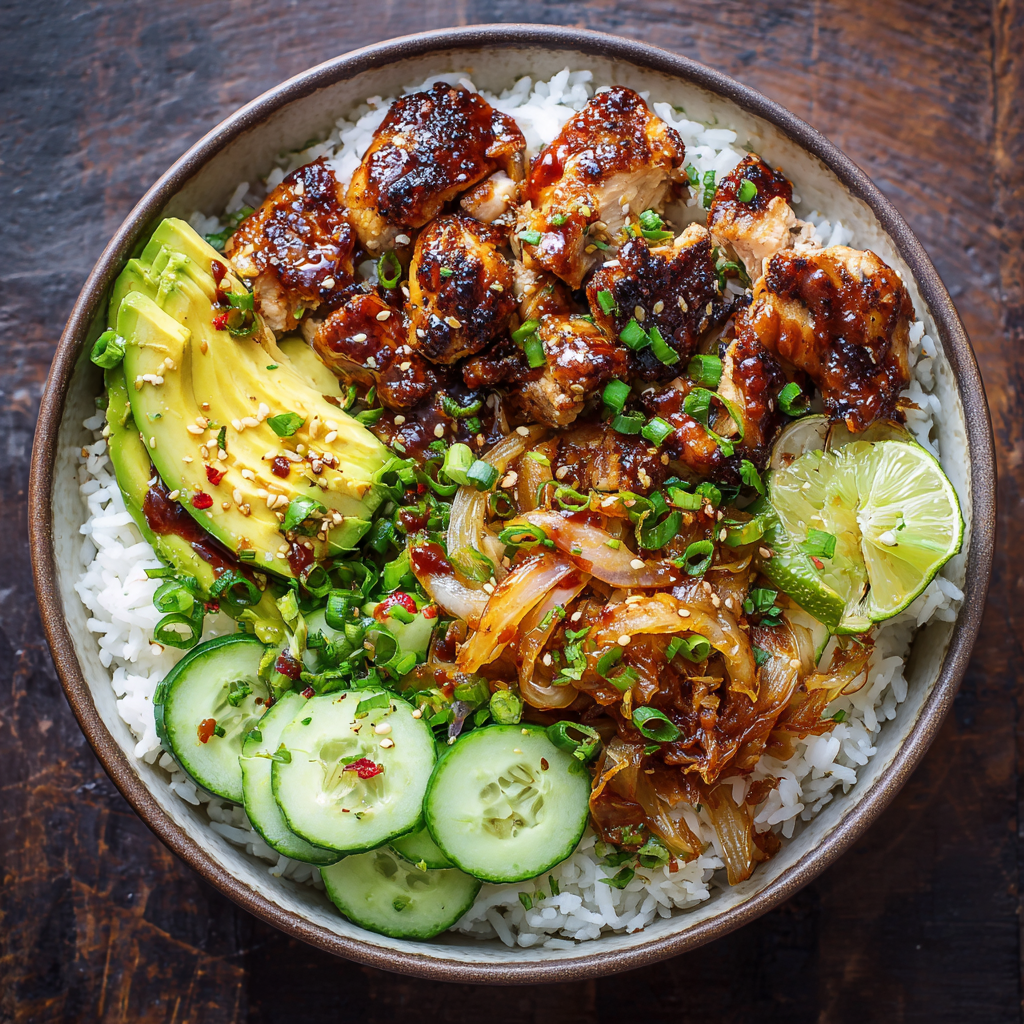
Start with a generous fluffy base of warm jasmine rice. Then, artfully arrange your sliced sticky chili-garlic chicken over one section of the rice. Next, create little “flavor stations” around the bowl: a neat pile of cool cucumber slices, a fan of creamy avocado, a vibrant mound of tangy kimchi. Scatter a handful of those crispy fried wontons or shallots over everything for that essential crunch factor.
Now, the moment we’ve all been waiting for. Take that bowl of Yum Yum sauce and drizzle it liberally over the entire creation. Don’t be shy! You can even serve extra on the side for dippin’. The final result is a beautiful, colorful, textural masterpiece that’s as Instagram-worthy as it is delicious. Grab a big fork, dig down to get a bit of everything in one bite, and prepare for your mind to be blown.
Make It Your Own: Delicious Twists & Swaps
The beauty of a bowl recipe is its flexibility. Here are a few ways to mix it up and keep things exciting!
- Go Veggie! Swap the chicken for extra-firm tofu (pressed and cubed) or thick slices of halloumi cheese. The marinade and cooking method work beautifully for both.
- Turn Up the Heat (or Turn It Down): For a five-alarm fire, add a teaspoon of Sriracha or a chopped fresh Thai chili to the marinade. For a milder, family-friendly version, reduce the chili paste to 2 tablespoons and use a mild ketchup-based Yum Yum sauce without the cayenne.
- Korean BBQ Vibe: Replace the chili paste with Gochujang and the honey with brown sugar for a deeper, fermented, sweet-and-spicy flavor that’s classic Korean BBQ.
- Different Grain, Different Gain: Not feeling rice? Serve this over quinoa, cauliflower rice for a low-carb option, or even a bed of crunchy shredded romaine lettuce for a deconstructed salad bowl.
- Pineapple Punch: Add ½ cup of crushed pineapple (juice and all) to the marinade. It adds a wonderful tropical sweetness and helps tenderize the chicken.
Beau’s Brain Dump & Kitchen Stories
This recipe has evolved so much from that first chaotic night. I’ve learned that marinating the chicken for at least 4 hours (or even overnight) makes the flavor penetrate down to its very soul. I also started adding that splash of rice vinegar at the end for brightness, and it was a total game-changer. One funny fail: I once tried to blend the Yum Yum sauce in a blender to make it extra smooth. Let’s just say it turned into a pink, mayo-based soup. A whisk and a little elbow grease are all you need! The moral of the story? Don’t overcomplicate the good stuff.
Your Questions, Answered!
Q: My sauce isn’t getting “sticky.” What am I doing wrong?
A: The stickiness comes from the sugar in the honey caramelizing. Make sure your heat is high enough when you apply the reserved glaze at the end. If you’re baking, you can even pop the chicken under the broiler for the last 1-2 minutes to really bubble and caramelize that glaze. Just watch it like a hawk!
Q: Can I make this ahead of time?
A> Absolutely! You can marinate the chicken for up to 24 hours. The Yum Yum sauce actually gets better after sitting in the fridge for a few hours, as the flavors meld. You can also cook the chicken, let it cool, slice it, and store it in an airtight container for up to 3 days. Reheat gently in the microwave or a skillet.
Q: My chicken is cooking too fast on the outside but is raw inside!
A> This usually means your heat is too high. You want a good sear, but if the outside is burning before the inside cooks, lower the heat to medium and cook for a longer time. If grilling, you can move the chicken to a cooler part of the grill to finish cooking through after you get a good sear. Using a meat thermometer is the best way to avoid guesswork!
Q: Is there a substitute for Worcestershire sauce in the Yum Yum sauce?
A> For a vegetarian version, you can use coconut aminos or a extra teaspoon of soy sauce, though the flavor will be slightly different. In a real pinch, a tiny bit of balsamic vinegar mixed with a dash of soy sauce can mimic the tangy-savory notes.

Sticky Chili-Garlic Chicken Bowls with Yum Yum Sauce : Bold, Spicy & Better Than Takeout
Description
These bowls are sweet, spicy, savory, and utterly addictive. Juicy chicken, sticky chili-garlic glaze, creamy Yum Yum sauce, fresh veggies, and crispy toppings—better than takeout, guaranteed.
Ingredients
Sticky Chili-Garlic Chicken
-
3 lbs boneless chicken (thighs or breasts)
-
2 tbsp soy sauce (for pre-marinating)
-
⅔ cup soy sauce (for main marinade)
-
4 tbsp orange juice
-
½ cup honey (or maple syrup for vegan)
-
4–5 tbsp chili paste (Sambal Oelek or Gochujang)
-
2 tbsp fresh ginger, chopped
-
4 cloves garlic, chopped
-
4 tbsp olive oil
-
Black pepper, to taste
-
Optional: 1 tbsp rice vinegar or lime juice, 1 tsp toasted sesame oil
Yum Yum Sauce
-
⅔ cup mayonnaise (olive oil or vegan)
-
4 tbsp ketchup
-
2 tbsp Worcestershire sauce (or vegetarian alternative)
-
2 tsp seasoned salt
-
½ tsp cayenne pepper
-
Optional: 1 tsp lemon juice or sriracha
Bowls & Toppings
-
6–7 cups cooked jasmine or basmati rice
-
1–2 cucumbers, thinly sliced
-
2 avocados, sliced
-
1 cup kimchi
-
Handful fried wontons or crispy shallots
-
Optional: pickled red onions, shredded carrots
Instructions
1. Pre-Marinade Chicken
-
Toss chicken with 2 tbsp soy sauce for 10–15 min.
2. Make Main Marinade
-
Whisk together remaining soy sauce, orange juice, honey, chili paste, ginger, garlic, olive oil, black pepper.
-
Reserve ¼ cup for basting.
3. Cook Chicken
Grill/Pan:
-
Preheat pan or grill to medium-high. Sear chicken 5–7 min per side.
-
In last 2–3 min, brush reserved marinade, flip, brush other side. Cook until 165°F (74°C).
Bake:
-
Preheat oven to 400°F (200°C). Bake 20–25 min, brushing reserved marinade during last 5–10 min.
4. Rest & Slice
-
Let chicken rest 5–10 min, then slice against the grain.
5. Make Yum Yum Sauce
-
Whisk mayo, ketchup, Worcestershire, seasoned salt, cayenne until smooth. Chill until serving.
6. Assemble Bowls
-
Layer rice, chicken, cucumber, avocado, kimchi, and crispy toppings.
-
Drizzle generously with Yum Yum sauce. Serve extra on the side.
Notes
-
Marinate Longer: 4 hours or overnight for deeper flavor.
-
Vegetarian/Vegan: Swap chicken for pressed tofu or halloumi.
-
Heat Control: Add extra chili paste or sriracha to taste.
-
Grain Swap: Quinoa, cauliflower rice, or shredded lettuce.
-
Tropical Twist: Add ½ cup crushed pineapple to the marinade.
Final Thoughts: Your New Kitchen Staple Awaits
So, there you have it. What started as a desperate attempt to feed my hungry friends has become one of my all-time favorite recipes, and I have a feeling it’s about to become one of yours, too.
These Sticky Chili-Garlic Chicken Bowls are more than just a meal; they’re a testament to the magic that can happen in your own kitchen. They prove that you don’t need a delivery driver to get a dinner that’s bursting with excitement, texture, and flavor. This is the kind of recipe that builds confidence—the one you’ll pull out when you want to impress, when you need a reliable weeknight hero, or when you simply want to treat yourself to something truly special.
It’s a complete experience. From the sizzle of the chicken in the pan and the incredible aroma of garlic and chili filling your kitchen, to the joyful, messy art of building your own perfect bowl. That final drizzle of Yum Yum sauce isn’t just a garnish; it’s a victory lap.
So, the next time that takeout craving hits, I hope you remember this recipe. Remember that you have the power to create something not just as good, but better—fresher, more vibrant, and made exactly to your taste.