
Your New Favorite Holiday Tradition: “Can’t Fail” Divinity
Hey friends, Beau here! Can we talk about a little piece of edible magic for a minute? I’m talking about that old-school, cloud-like, melt-in-your-mouth confection that your grandma probably made: Divinity. I see you – maybe you’ve been a little intimidated by it. You’ve heard the whispers about humidity being the enemy and candy thermometers being a must. But what if I told you there’s a version that’s… well, “can’t fail”?
This isn’t just any candy recipe. This is the one you pull out when you want to impress the in-laws, become the hero of the cookie swap, or just treat yourself to a sweet, nostalgic bite of pure joy. It’s soft, it’s fluffy, it has that perfect little nutty crunch, and it’s so much easier than the old-fashioned kind. We’re using a brilliant little shortcut that guarantees a perfect, pillowy texture every single time. So, if you’ve ever stared longingly at a plate of divinity but were too scared to try making it, your moment has arrived. Grab your mixing bowl and that jar of marshmallow creme hiding in your pantry – we’re about to make some sweet, sweet memories.
The Sweet Taste of Memory
For me, divinity will always taste like my Great-Aunt Shirley’s kitchen in December. The air would be thick with the scent of pine and roasting turkey, but the real action was always at her Formica-topped kitchen table. She’d have what looked like a tiny edible snowstorm happening, with little white clouds of candy dotted across sheets of waxed paper. My job, as the official “official taster,” was critical. I had to ensure every batch was up to snuff. She’d hand me a piece, her hands dusted with a fine powder of sugar, and watch my face. The moment that sweet, vanilla-kissed fluff dissolved on my tongue, I’d give her a vigorous thumbs-up. It was our little ritual. She’s been gone for years now, but every time I whip up a batch of this “Can’t Fail” Divinity, I’m eight years old again in her warm, bustling kitchen, feeling utterly loved and deeply important. That’s the power of a great recipe – it’s a time machine for your heart.
Gathering Your Cloud-Making Ingredients
One of the best things about this recipe is its beautiful simplicity. You only need a handful of ingredients to create something truly spectacular. Here’s the lineup:
- 1½ cups granulated sugar: This is the foundation of our candy. The sugar cooks down to create the structure and the classic, clean sweetness that divinity is known for. Don’t be tempted to reduce it – the chemistry needs it!
- Dash of salt: Never, ever skip the salt in a sweet recipe! A tiny dash is our secret weapon. It doesn’t make the candy taste salty; it just makes the vanilla and sugar flavors pop and become more complex, cutting through the pure sweetness.
- ⅓ cup water: Simple H2O is our cooking liquid. It helps the sugar dissolve evenly so we don’t end up with a grainy texture. It’s the launchpad for our sugar syrup.
- 1 (7 oz) jar Marshmallow Creme (like Hip-O-Lite or Jet-Puffed): Here she is – the star of the show and our “can’t fail” guarantee! This magical fluff gives us a head start on that airy, stable texture, making the whole process much more forgiving than the traditional egg-white method.
- ½ cup chopped nuts: I’m a classicist and love pecans here, but walnuts are fantastic too. They provide a wonderful textural contrast and a toasty, rich flavor that balances the sweetness. Chef’s Tip: Toast your nuts lightly in a dry pan before chopping! It unlocks their oils and makes them infinitely more flavorful.
- 1 tsp vanilla extract: The soul of the dish. Use the good, pure stuff if you can. That warm, aromatic vanilla is what makes divinity taste like a hug from the inside.
Let’s Make Some Magic: Step-by-Step
Okay, team, let’s get cooking! Read through all the steps once before you start. Candy-making is a bit of a dance, but I’ll be your partner, guiding you through every move.
- Prep Your Station: Before you even think about turning on the stove, lay out sheets of wax paper or parchment paper on your countertops. This is a non-negotiable first step! Once that hot sugar syrup is ready, you need to be able to work quickly. Having your landing pad ready is key. Also, get out your stand mixer or electric hand mixer and have it ready to go.
- Create the Sugar Syrup: In a medium-sized, heavy-bottomed saucepan, combine the sugar, salt, and water. Stir it over medium heat just until the sugar dissolves. Once it’s clear and bubbling, stop stirring! This is important. If you stir after this point, you can cause the sugar to crystallize. Attach your candy thermometer to the side of the pan, making sure the tip isn’t touching the bottom. Let it boil away until it reaches the hard-ball stage, which is 250°F (125°C). This usually takes about 10-15 minutes. No candy thermometer? No panic! You can do the “cold water test”: drop a tiny bit of the syrup into a cup of cold water. If it forms a hard, firm ball that you can squish between your fingers, you’re good to go!
- The Marshmallow Base: While the syrup is boiling, scoop the entire jar of marshmallow creme into the bowl of your stand mixer. If you’re using a hand mixer, use a large, heatproof bowl. Pro tip: Lightly greasing your spoon or spatula with a little butter or cooking spray will make getting every last bit of that sticky fluff out of the jar a breeze!
- The Big Pour & Mix: Once your syrup hits 250°F, immediately remove it from the heat. Now, with your mixer on low speed, slowly and carefully pour the hot syrup in a thin stream directly into the marshmallow creme. Be careful, it’s crazy hot! Once all the syrup is in, crank the mixer up to medium-high speed and let it work its magic. We’re going to beat it for about 5-7 minutes, or until the mixture becomes thick, glossy, and slightly stiff. You’ll know it’s ready when the beaters start leaving defined trails in the candy and it holds its shape. It should look like a beautiful, glossy, white cloud.
- Fold in the Goodies: Stop the mixer! Now, using a sturdy spatula, gently fold in the vanilla extract and your toasted, chopped nuts. “Folding” means you’re cutting down through the middle of the batter, sliding the spatula across the bottom, and turning the mixture over itself. This keeps all that beautiful air we just whipped into it. Be gentle but thorough.
- Time to Spoon & Set: Working relatively quickly (the mixture will start to set), drop teaspoonfuls of the divinity onto your prepared wax paper. For dainty, bite-sized pieces, I like using a ½ teaspoon. If you want those classic, generous puffs, go for a full teaspoon or even a tablespoon. If the mixture gets too stiff to scoop easily, you can add a few drops of hot water and stir gently to loosen it up. Then, the hardest part: walk away. Let the divinity cool and set completely. This usually takes 30-45 minutes. You’ll know they’re ready when they’re firm to the touch and easily peel off the paper.
How to Serve Your Heavenly Creation
You’ve done it! You’ve created little edible clouds of joy. Now, how do you present them? I’m a firm believer that food tastes better when it looks beautiful. For a classic, homespun look, pile them high on a vintage cake stand or a simple white platter. They look stunning all on their own. During the holidays, I love arranging them in a festive tin between layers of wax paper – they make the most thoughtful, heartfelt gifts. For a party, consider placing a single piece in colorful mini cupcake liners; it makes them easy to grab and adds a lovely pop of color. However you choose to serve them, pair them with a hot cup of black coffee or a tall glass of cold milk. The contrast is absolutely perfect.
Make It Your Own: Delicious Divinity Twists
The classic version is perfection, but who says we can’t play with our food? Here are a few of my favorite ways to mix things up:
- Chocolate Swirl: After folding in the nuts, drizzle in 2-3 tablespoons of melted and slightly cooled dark or semi-sweet chocolate. Fold just a few times to create a beautiful marbled effect. Don’t overmix, or you’ll lose the swirl!
- Fruity Pebbles: Feeling fun? Replace the nuts with ½ cup of crushed, fruity cereal. It adds a burst of color and a fantastic fruity flavor that kids (and kids-at-heart) adore.
- Peppermint Patty: For a festive winter twist, swap the vanilla for ½ teaspoon of peppermint extract and fold in ¼ cup of crushed candy canes or peppermint baking bits. It’s incredibly refreshing.
- Nut-Free & Fancy: No nuts? No problem! Simply leave them out and add ½ cup of chopped dried cranberries or cherries for a sweet-tart kick. Toasted coconut flakes are another incredible option.
- Espresso Kick: For the adults, add 1-2 teaspoons of instant espresso powder to the sugar syrup along with the water. It creates a mocha-flavored divinity that is absolutely to die for.
A Few Chef’s Secrets from My Kitchen to Yours
Over the years, this recipe has become my go-to, but it wasn’t always perfect. I remember one particularly… ambitious batch where I decided to triple the recipe. Let’s just say my stand mixer was not happy, and I ended up with divinity slowly creeping over the edge of the bowl like a sweet, sticky glacier. Lesson learned: don’t crowd your mixer! Stick to a single or double batch for best results. Another thing I’ve learned is that while this recipe is forgiving, it still has a sweet tooth’s sense of drama. It truly works best on a dry day. If it’s humid or rainy, the candy can absorb moisture from the air and stay a bit sticky. If that happens, just store them in a single layer with plenty of space in an airtight container – they’ll still taste incredible!
Your Divinity Questions, Answered!
I’ve gotten a lot of questions about this recipe over on Feastical. Here are the most common ones to help you out:
- Q: My divinity never got stiff and is still runny. What happened?
A: The most likely culprit is that your sugar syrup didn’t get hot enough. Make sure it hits a firm 250°F. Another possibility is under-mixing. You really need to beat it until those trails hold their shape. If it’s too late to fix, no worries! You can use it as a delicious ice cream topping. - Q: Can I make this without corn syrup?
A> This specific “can’t fail” version relies on the stabilizers in the marshmallow creme, which typically contains corn syrup. For a corn-syrup-free divinity, you’d need to use the traditional egg-white method, which is a bit more finicky. - Q: How should I store divinity, and how long does it last?
A: Store them in a single layer (or between layers of wax paper) in an airtight container at room temperature. They’ll keep their perfect texture for about 1-2 weeks. Do not refrigerate, as the fridge will introduce moisture and make them sticky. - Q: My candy is grainy. Why?
A: Graininess usually means the sugar crystallized. This can happen if you stirred the syrup after it started boiling, or if a sugar crystal got stuck to the side of the pan. To prevent this, you can brush down the sides of the pan with a wet pastry brush right as the syrup starts to boil.
A Little Note on Nutrition
Let’s be real, friends – divinity is a treat, a confection, a pure delight. It’s not a health food, and that’s perfectly okay! Life is all about balance. A single piece of this heavenly candy comes in at around 40 calories, with minimal fat and less than a gram of protein. It’s primarily sugar. So, the goal here isn’t to fuel your body for a marathon; it’s to fuel your soul with a bite of nostalgia and joy. Enjoy it mindfully, savor each fluffy bite, and share the rest with people you love. That’s what good food is all about.
Print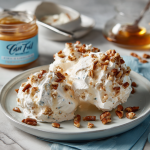
“Can’t Fail” Divinity
Description
Divinity is a classic, fluffy, melt-in-your-mouth candy that has been delighting generations. This simplified “can’t fail” version uses marshmallow creme to guarantee soft, pillowy divinity every time—perfect for the holidays, gift-giving, or a nostalgic treat!
Ingredients
-
1½ cups granulated sugar
-
Dash of salt
-
⅓ cup water
-
1 (7 oz) jar marshmallow creme
-
½ cup chopped nuts (pecans or walnuts), lightly toasted
-
1 tsp vanilla extract
Instructions
-
Prep your station: Line a counter or baking sheet with wax paper. Have your mixer ready.
-
Make the sugar syrup: In a medium saucepan, combine sugar, salt, and water. Heat over medium until sugar dissolves. Do not stir once boiling. Cook until 250°F (hard-ball stage). (Or test by dropping syrup in cold water—if it forms a firm ball, it’s ready.)
-
Prepare marshmallow base: Scoop marshmallow creme into a large mixing bowl.
-
Combine syrup and marshmallow: With mixer on low, slowly pour hot syrup into the marshmallow creme. Increase speed to medium-high and beat 5–7 minutes until thick, glossy, and slightly stiff.
-
Fold in flavor: Gently fold in vanilla extract and toasted nuts.
-
Spoon and set: Drop teaspoonfuls onto prepared wax paper. Let set 30–45 minutes until firm.
Notes
-
Prevent stickiness: Best made on dry days; store in an airtight container at room temp.
-
Chocolate swirl: Fold in 2–3 tbsp melted chocolate for a marbled effect.
-
Peppermint: Use ½ tsp peppermint extract + ¼ cup crushed candy canes.
-
Nut-free: Replace nuts with dried cranberries or toasted coconut.
-
Espresso kick: Add 1–2 tsp instant espresso powder to syrup for a mocha flavor.
Nutrition
- Calories: 40 Cal per1 tsp piece
- Fat: 1 g
- Carbohydrates: 9 g
You’re a Candy-Making Pro!
And there you have it! You’ve just mastered a classic candy that’s sure to earn you rave reviews and requests for the recipe. I’m so proud of you for taking the leap. This “Can’t Fail” Divinity is more than just a recipe; it’s a connection to the past, a reason to gather in the kitchen, and a simple, sweet way to show someone you care. I’d love to hear how your batch turns out! Tag me on social @Feastical or shoot me an email with your pictures and stories. Now, go forth and spread the sweetness!
Final Thoughts: More Than Just a Candy
So, there you have it. What once seemed like a daunting, old-fashioned art is now a simple, joyful ritual waiting to happen in your own kitchen. This “Can’t Fail” Divinity isn’t just about creating a perfect confection—though you absolutely will. It’s about reclaiming a piece of culinary heritage and making it your own. It’s about the quiet satisfaction of watching sugar and air transform into something magical, and the shared smiles that follow the first, melting bite.
Remember, the true secret ingredient isn’t the marshmallow creme or the vanilla; it’s the confidence to try. This recipe is your invitation to create those warm, fuzzy kitchen memories for yourself and for others. Whether you’re carrying on a family tradition or starting a brand new one, each fluffy white puff is a little testament to the fact that the sweetest things in life are often the simplest to make.
Now, go dust that counter with powdered sugar, and get ready to make a little edible magic. Your new favorite holiday tradition is waiting.