
The Snack That Started a Party: Parmesan Tortellini Bites
Hey friends, Beau here from Feastical! Let me paint you a picture. You’ve got a big game on the TV, friends are starting to trickle in, and the air is buzzing with that happy, pre-fun energy. You need a snack. Not just any snack, but the snack. The one that disappears from the platter in minutes, the one that has everyone huddled around the kitchen island, begging for the recipe. The snack that makes you look like a culinary rockstar with what feels like zero effort.
Well, my foodie friend, you’ve just found it. Meet your new secret weapon: Crispy Parmesan Tortellini Bites.
Imagine this: a tender, cheesy tortellini, hugged by a golden, crunchy crust that’s loaded with savory Parmesan and a kiss of garlic. They’re hot, they’re poppable, and when you dip them into a warm, tangy marinara sauce… it’s a flavor explosion that hits every single happy button. They’re everything you love about those legendary toasted ravioli from your favorite Italian joint, but perfectly bite-sized for maximum snacking efficiency. I’m talking about a snack so good, it might just upstage the main event. So, grab your apron (or don’t, I’m not the boss of you), and let’s make some magic happen.
The Accidental Appetizer That Stole the Show
I have to confess, this recipe wasn’t born from hours of meticulous planning in a test kitchen. Nope. This was a classic “what-do-I-have-in-the-fridge-before-friends-come-over” miracle. It was a chaotic Sunday afternoon years ago. My beloved college football team was playing a huge rivalry game, and my apartment was about to be packed. I had a package of cheese tortellini destined for a simple dinner, some leftover breadcrumbs, and a nub of Parmesan cheese that was begging for a purpose.
In a moment of pure, hungry inspiration, I decided to bread a few of those cooked tortellini and give them a quick fry. The result was pure, unadulterated chaos—the good kind. The first batch vanished before I could even get the second one into the oil. My friends abandoned the pre-game commentary to crowd into my tiny kitchen, their eyes locked on the sizzling pot. Those humble tortellini bites became the star of the day, and a Feastical staple was born. It’s a reminder that sometimes, the best recipes come from a little bit of kitchen chaos and a whole lot of hunger.
Gathering Your Flavor Arsenal
One of the best things about this recipe is its beautiful simplicity. You only need a handful of ingredients to create something truly spectacular. Here’s the lineup:
- 1 (9 oz) package refrigerated cheese tortellini – This is our star! The refrigerated kind holds its shape beautifully during cooking and frying. You can absolutely use frozen (just thaw it first), but the texture from the fresh pasta is just *chef’s kiss*.
- 1/2 cup grated Parmesan cheese – We’re not just topping with this; it’s in the crust. Use the real deal, freshly grated if you can. The pre-grated stuff in a can doesn’t melt as well and lacks that punchy, salty flavor we’re after.
- 1/2 cup breadcrumbs (Italian-style preferred) – These are the foundation of our crispy coating. The Italian-style ones already have herbs and seasoning built-in, which is a fantastic flavor shortcut. No Italian-style? No problem! Just add a pinch of dried oregano and basil to your plain breadcrumbs.
- 1/2 tsp garlic powder – This is our flavor secret weapon. It distributes the garlic flavor evenly throughout the crust without any risk of burning, unlike fresh garlic.
- 2 eggs, beaten – This is our glue! The beaten egg acts as the perfect sticky agent to help our Parmesan-breadcrumb mixture cling to every nook and cranny of the tortellini.
- Oil for frying or air-frying – For frying, a neutral oil with a high smoke point is key. I love avocado oil or canola oil. For air-frying, a quick spritz of cooking spray is all you need to achieve that golden perfection.
- Marinara sauce, for dipping – The perfect tangy partner for our cheesy, crispy bites. I love using a high-quality store-bought sauce and warming it up with a fresh basil leaf stirred in. It makes all the difference!
Let’s Get Crispy: Your Foolproof Guide
Alright, team, it’s go-time. This process is as easy as 1-2-3 (literally, it’s a three-step coating process), and I’ll be with you every step of the way with my favorite chef hacks.
- Cook & Cool the Tortellini: First, cook your tortellini according to the package directions. But here’s my first pro-tip: cook them for 1 minute less than it says! They’re going to get another round of heat in the oil or air fryer, and this ensures they stay tender and don’t get mushy. Once they’re cooked, drain them and give them a few minutes to cool down. A hot tortellini is a sticky tortellini, and we want a clean coating process.
- Create the Magic Crust: While the pasta is cooling, let’s make the coating. In a medium bowl, mix together your grated Parmesan, breadcrumbs, and garlic powder. Give it a good whisk with a fork to break up any clumps and ensure every single bite is perfectly seasoned. I sometimes add a pinch of black pepper here for a little extra warmth.
- The Coating Station: This is where the magic happens. Set up your assembly line: one bowl with your beaten eggs, one bowl with your Parmesan-breadcrumb mixture, and a clean plate or baking sheet for your coated tortellini. This “station” method keeps things organized and mess-free. Now, working in small batches, drop a handful of tortellini into the beaten egg. Use a fork to toss them around, making sure they’re fully coated. Let the excess egg drip off, then transfer them to the breadcrumb mixture.
- Get ‘Em Coated: Use a spoon to gently toss the tortellini in the breadcrumb mixture, pressing lightly to make sure every millimeter gets covered in that cheesy, crunchy goodness. Place the finished bites on your clean plate. Repeat until all your tortellini are dressed to impress!
- The Grand Finale: Cooking!
- For Frying (The Classic Crispy Route): Pour about 1 inch of oil into a heavy-bottomed pot or deep skillet and heat it to 350°F (175°C). If you don’t have a thermometer, test it by dropping in a small breadcrumb—if it sizzles immediately, you’re good to go. Fry the tortellini in batches for 2-3 minutes, until they’re a deep, golden brown. Don’t overcrowd the pot! This keeps the oil temperature steady, which is the key to a non-greasy, super-crispy crust. Use a slotted spoon to transfer them to a paper towel-lined plate.
- For Air-Frying (The Lighter, Easier Route): Arrange your coated tortellini in a single layer in your air fryer basket. Give them a generous spritz of cooking spray—this is crucial for browning! Air fry at 375°F (190°C) for 8-10 minutes, shaking the basket halfway through, until they’re golden and crispy. No preheating the oil, no mess, all the crunch.
Plating Up for Maximum “Wow”
Presentation is part of the fun! You don’t just want to dump these glorious golden bites into a bowl. Let’s make them look as incredible as they taste.
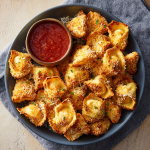
I love using a wide, shallow platter or even a small wooden board. Pile the hot tortellini bites high in the center. Right next to them, place a small bowl of that warm marinara sauce. For a pop of color and freshness, scatter some finely chopped fresh parsley or basil over the top of the tortellini. It makes the colors pop and adds a lovely fresh aroma.
Stick a handful of decorative cocktail picks or small forks nearby to make grabbing and dipping a breeze. This isn’t just a snack; it’s an experience. Set it out on the counter and watch your guests gravitate towards it like moths to a flame. It’s a beautiful thing.
Make It Your Own: Delicious Twists & Swaps
The basic recipe is a straight-up home run, but the fun doesn’t stop there. Feel free to get creative and tailor these bites to your mood or dietary needs!
- Meat Lover’s Dream: Swap the cheese tortellini for a refrigerated three-cheese and meat tortellini. The savory flavor of the meat inside pairs perfectly with the Parmesan crust.
- Spicy ‘Nduja Kick: For my friends who like a little heat, mix 1-2 tablespoons of ‘nduja or a teaspoon of red pepper flakes into your marinara sauce before warming it up. The spicy, oily ‘nduja melts into the sauce and creates an incredible dipping experience.
- Panko Power: For an even crunchier, shatteringly crisp coating, swap the regular breadcrumbs for Panko breadcrumbs. Their light, flaky texture creates a truly next-level crunch.
- Baked, Not Fried: If you want to avoid frying or don’t have an air fryer, you can bake these! Arrange the coated tortellini on a parchment-lined baking sheet, give them a heavy spritz of oil, and bake at 425°F (220°C) for 12-15 minutes, flipping halfway through.
- Gluten-Free & Vegan Friendly: Use your favorite gluten-free or vegan tortellini. For the coating, use gluten-free breadcrumbs and a vegan Parmesan alternative. For the egg wash, a simple mix of 3 tablespoons of plant-based milk and 1 tablespoon of cornstarch works wonders as a binder.
Beau’s Brain Dump & Kitchen Confessions
Over the years, I’ve made these bites more times than I can count, and they’ve evolved in little ways. I once, in a moment of sheer madness, tried to coat uncooked tortellini. Don’t be like past Beau. It creates a gummy, undercooked mess. Always cook them first!
Another fun story: I was once making a double batch for a huge family gathering and ran out of breadcrumbs halfway through. In a panic, I crushed up some plain potato chips for the second half. The result? Surprisingly delicious! A little salty, super crunchy. It just goes to show that sometimes, the best kitchen innovations come from happy little accidents.
Your Questions, Answered!
I’ve gotten a lot of questions about this recipe over on Feastical’s social media. Here are the ones I see most often!
- Can I make these ahead of time? You bet! You can coat the tortellini and arrange them in a single layer on a baking sheet a few hours ahead of time. Keep them covered in the fridge until you’re ready to fry or air-fry. You can even freeze them on the sheet, then transfer to a freezer bag for up to a month. Cook from frozen, adding a few extra minutes to the cooking time.
- My coating is falling off! What did I do wrong? The most common culprit is not letting the cooked tortellini cool enough. If they’re too hot and steamy, the egg wash slides right off. Give them a good 10-15 minutes to cool down. Also, make sure you’re letting the excess egg drip off before moving to the breadcrumbs.
- Why are my air-fried bites not as crispy as the fried ones? That spritz of oil is non-negotiable for the air fryer method! It helps conduct heat and promotes browning and crisping. Don’t skip it. Also, make sure they’re in a single layer with a little space between each one for the air to circulate.
- What other dipping sauces do you recommend? Marinara is the classic, but don’t be afraid to experiment! A creamy Alfredo sauce, a spicy sriracha mayo, a cool and creamy ranch, or even a balsamic glaze for a sweet and tangy twist are all phenomenal.
Parmesan Tortellini Bites
Description
Hey friends! Beau here. Picture this: tender cheese tortellini encased in a golden, crispy Parmesan-and-garlic crust, ready to be dipped in warm, tangy marinara. They’re bite-sized, poppable, and the ultimate crowd-pleasing snack for game day, parties, or anytime you need a quick, indulgent hit of comfort food.
Ingredients
Tortellini Bites:
-
1 (9 oz) package refrigerated cheese tortellini (or thawed frozen tortellini)
-
½ cup grated Parmesan cheese (freshly grated is best)
-
½ cup breadcrumbs (Italian-style preferred; plain breadcrumbs + ¼ tsp dried oregano & basil works too)
-
½ tsp garlic powder
-
2 eggs, beaten
-
Oil for frying (neutral, high smoke point: canola, avocado) or cooking spray for air-frying
For Dipping:
-
Marinara sauce, warmed
-
Optional garnish: fresh parsley or basil
Instructions
1. Cook & Cool the Tortellini
-
Boil tortellini according to package instructions, but 1 minute less than directed to prevent overcooking.
-
Drain and let cool 10–15 minutes so the coating sticks properly.
2. Prepare the Coating
-
In a medium bowl, mix Parmesan, breadcrumbs, and garlic powder. Optional: add a pinch of black pepper.
-
Set up a coating station:
-
Bowl 1: beaten eggs
-
Bowl 2: Parmesan-breadcrumb mixture
-
Plate or baking sheet: coated tortellini
-
3. Coat the Tortellini
-
Toss cooled tortellini in the beaten eggs, letting excess drip off.
-
Transfer to the breadcrumb mixture, pressing lightly to cover completely.
-
Place coated tortellini on plate/baking sheet. Repeat until all tortellini are coated.
4. Cook the Tortellini
Frying (Classic Method):
-
Heat 1 inch of oil to 350°F (175°C). Test with a breadcrumb—should sizzle immediately.
-
Fry in batches, 2–3 minutes until deep golden brown. Don’t overcrowd.
-
Remove with a slotted spoon and drain on paper towels.
Air-Frying (Lighter Method):
-
Arrange tortellini in a single layer; spritz generously with cooking spray.
-
Air fry at 375°F (190°C) for 8–10 minutes, shaking halfway, until golden and crisp.
Notes
-
Cook tortellini first—coating raw pasta creates a gummy mess.
-
Cool tortellini before coating for better adhesion.
-
Small batches maintain oil temperature and crispiness.
-
Air fryer: spritz oil and leave space between tortellini for even cooking.
Nutrition
- Calories: 230 Cal Per Serving
- Sodium: 450mg
- Fat: 12g
- Saturated Fat: 4g
- Carbohydrates: 22g
- Protein: 9g
- Cholesterol: 45mg
Let’s Talk Nourishment
Now, I’m all about feel-good food, and that includes being mindful of what we’re putting into our bodies. While these are definitely a “treat-yo-self” kind of snack, it’s good to know what you’re enjoying. This nutritional info is an estimate based on the air-fried version, as it’s a bit lighter.
Prep Time: 15 min | Cook Time: 10 min | Total Time: 25 min | Yields: About 30 bites (5 servings)
Per Serving (approx. 6 bites):
Calories: 230 | Protein: 9g | Carbohydrates: 22g | Fat: 12g | Saturated Fat: 4g | Cholesterol: 45mg | Sodium: 450mg | Fiber: 1g | Sugar: 2g
Remember, these numbers can vary based on the specific brands of ingredients you use and your cooking method (deep-frying will increase the fat content). The protein from the cheese and eggs, and the carbs from the pasta and breadcrumbs, make these a surprisingly satisfying snack that provides a quick burst of energy—perfect for a party or a pre-dinner pick-me-up!
Your New Go-To Party Hero
And there you have it! The full story behind my all-time favorite party snack. These Parmesan Tortellini Bites are more than just a recipe; they’re a guaranteed good time. They’re proof that you don’t need fancy ingredients or complicated techniques to create something truly memorable and delicious.
So the next time you’re staring into the fridge before a gathering, remember this recipe. Embrace the chaos, bread those tortellini, and get ready for the compliments to roll in. I absolutely love seeing your kitchen creations, so if you make these, be sure to tag me @Feastical on social media so I can see your masterpiece!
Now go forth, cook with confidence, and make someone’s day a little more delicious. Happy snacking!