Heavenly Bites: Your New Favorite Angel Food Cake Cookies
Hey friends, Beau here! Let’s be real for a second. Is there anything more wonderfully simple and soul-soothing than a classic angel food cake? That cloud-like texture, that delicate sweetness that just melts on your tongue… it’s a hug in cake form. But let’s also be real about something else: sometimes, you don’t want to haul out the tube pan, separate a dozen eggs, and patiently wait for a full-sized cake to cool. Life gets busy, cookie cravings hit hard, and we need a little bit of that heavenly magic, stat.
That’s exactly why I’m so ridiculously excited to share this recipe with you today. We’re taking everything we adore about angel food cake and transforming it into the most delightful, soft, and chewy cookies you’ve ever sunk your teeth into. And the best part? We’re doing it with just three simple ingredients and about 15 minutes of your time. No kidding!
These Angel Food Cake Cookies are my go-to for last-minute potlucks, a fun baking project with the kids, or when I just need a sweet little treat that feels a bit lighter. They’re impossibly easy, incredibly satisfying, and they taste like a sweet little cloud decided to take a cozy nap in your cookie jar. So, preheat that oven, grab your favorite mixing bowl, and let’s whip up some pure, uncomplicated joy together.
A Slice of Sunshine and a Hand-Me-Down Recipe
This recipe always takes me back to my grandma’s sun-drenched kitchen. She was the queen of “semi-homemade” magic long before it was a trend. She believed good food was about the feeling it created, not about slaving over a hot stove for hours. I remember one sweltering summer afternoon, the kind where the air felt like a warm blanket. I was maybe ten years old, covered in grass stains, and desperately craving something sweet.
Grandma just smiled, wiped the sweat from her brow, and pulled out a box of cake mix and a tub of yogurt. My little-kid brain was confused. “We’re making a cake? But it’s too hot for cake!” She just winked and said, “We’re making sunshine, honey.” What came out of the oven weren’t cakes, but these puffy, golden-topped little cookies. We ate them sitting on the back porch steps, still warm, and they were pure bliss. That day, she didn’t just teach me a recipe; she taught me that the best kitchen tricks are often the simplest ones, and that a little creativity can turn a few basic ingredients into a core memory.
Gathering Your Cloud-Making Kit
Here’s the beautiful part: your shopping list is incredibly short. This is all you need to create cookie magic. Let’s break it down, because even simple ingredients deserve a little love and explanation.
- 1 box (approx. 15.25 oz) Classic White Cake Mix: This is the powerhouse of our recipe, providing the structure and that signature angel food cake flavor. I often use Baker’s Corner or a similar store brand—it works perfectly! Chef’s Insight: Avoid cake mixes that already have pudding in the mix, as they can make the dough too dense. We want light and airy!
- 2 cups Nonfat Greek Yogurt: This is our brilliant swap for eggs and oil! The yogurt adds moisture, a slight tang that balances the sweetness, and a boost of protein. It’s what gives the cookies their wonderfully soft and chewy texture. Substitution Tip: You can use full-fat Greek yogurt for a slightly richer cookie, or even a plain regular yogurt (just know the batter might be a tad thinner). For a dairy-free version, an unflavored, unsweetened plant-based yogurt works wonders.
- 1 teaspoon Vanilla Extract: The supporting actor that makes the star shine brighter. A good vanilla enhances the sweet, delicate flavor of the cake mix and makes your whole kitchen smell amazing. Chef’s Insight: If you’re feeling fancy, a scrape of real vanilla bean paste would be sublime here!
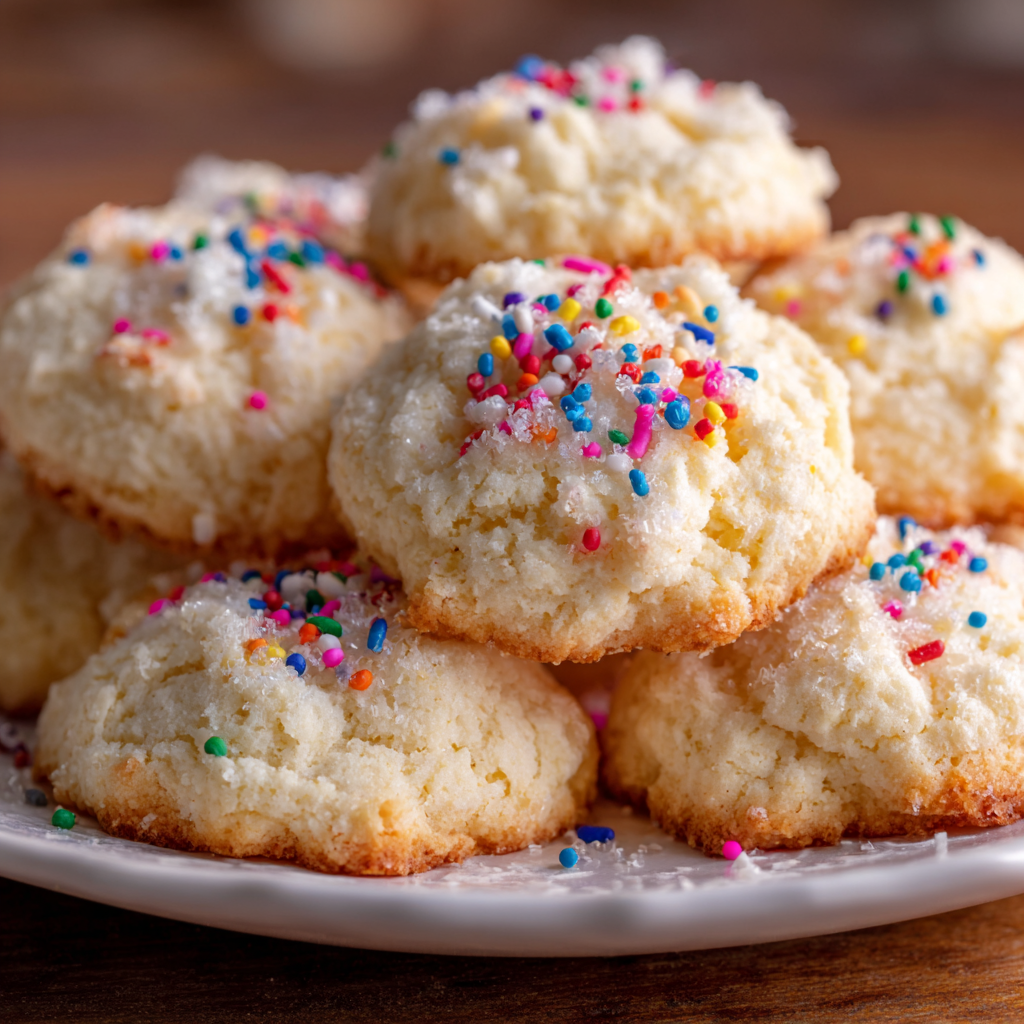
- Optional: Holiday Sprinkles or Powdered Sugar for Topping: This is where you make them your own! A sprinkle of colorful jimmies makes them party-ready, while a dusting of powdered sugar right after baking gives them that elegant, snow-kissed look.
Let’s Bake! Your Foolproof Cookie Roadmap
Ready to see some magic happen? Follow these steps, and you’ll be a cookie hero in no time. I’ve packed this section with all my favorite little hacks to ensure your success.
- Preheat and Prep. Fire up your oven to 350°F (175°C). This is the perfect temperature to get these cookies to puff up beautifully without browning too much. Now, line a baking sheet with parchment paper. Chef’s Hack: Do not skip the parchment! This batter is sticky, and parchment is your best friend for easy cleanup and preventing any stuck-on cookie tragedies.
- The Big Mix. In a large mixing bowl, combine the entire box of cake mix, the Greek yogurt, and the vanilla extract. Now, grab a sturdy spatula or a wooden spoon and mix until you have a thick, sticky, and fully combined dough. Chef’s Commentary: Don’t be tempted to use an electric mixer here—it’s overkill and can overwork the dough. A little arm workout is good for the soul! The dough will be very thick and tacky, and that’s exactly what we want.
- Scoop and Plop. Using a medium cookie scoop (about 1.5 tablespoons), drop rounded mounds of dough onto your prepared baking sheet, spacing them about 2 inches apart. Chef’s Hack: The beauty of these cookies is their rustic, “cloud-like” appearance. Don’t try to roll them into perfect balls—just scoop and plop! If you’re adding sprinkles, now’s the time to press a few onto the top of each cookie before baking.
- Bake to Perfection. Slide the baking sheet into your preheated oven and bake for 10-12 minutes. You’re looking for the cookies to be “set”—they won’t brown much on top, but the edges and bottoms will be a very light golden color. Chef’s Insight: They might still look a little soft in the center, and that’s perfect! This is the secret to their soft, cake-like interior. Do not overbake!
- The Patient Cool Down. This might be the hardest step! Let the cookies cool on the hot baking sheet for at least 5 minutes before you even think about moving them. Chef’s Hack: They are very delicate right out of the oven and need this time to firm up. After 5 minutes, you can gently transfer them to a wire rack to cool completely. I promise, the wait is worth it.
How to Serve Up a Little Slice of Heaven
Okay, the cookies are cooled, and your willpower has been heroic. Now, how do we make these simple bites feel extra special? Presentation is part of the fun!
For a classic, elegant look, give them a generous dusting of powdered sugar right before serving. It looks like a light snowfall and adds a tiny extra burst of sweetness. If you’re serving them for a birthday or holiday, a small bowl of extra sprinkles on the side lets guests customize their own cookie.
Now, let’s talk pairings. These cookies are a dream with a hot cup of coffee or a cold glass of milk. For a truly decadent dessert, sandwich a small scoop of vanilla bean ice cream or fresh whipped cream between two cookies. It’s an instant ice cream sandwich that will blow your mind! They also make a fantastic base for strawberry shortcake—just top a cookie with macerated strawberries and a dollop of whipped cream. Divine.
Make Them Your Own: Fun Flavor Twists!
Once you’ve mastered the basic recipe, the playground is open! Here are a few of my favorite ways to mix things up and keep this recipe on heavy rotation.
- Lemon Zest Sunshine: Add the zest of one large lemon to the dough. The bright, citrusy flavor cuts through the sweetness and is an absolute classic pairing. A simple lemon glaze (powdered sugar + lemon juice) drizzled on top takes it to the next level.
- Funfetti Party Time: Swap the white cake mix for a Funfetti mix! Fold in an extra tablespoon or two of rainbow sprinkles into the batter for maximum color and fun. It’s an instant party in a cookie.
- Chocolate Dream: Use a devil’s food cake mix instead of white. You’ll get a rich, chocolatey, brownie-like cookie that’s still incredibly soft. Fold in a handful of white chocolate chips to really lean into the “angel” theme.
- Berry Blast: Gently fold in ½ cup of freeze-dried strawberry or raspberry pieces (crushed into small bits) into the dough. They add a fantastic pop of fruity flavor and a little bit of texture without making the dough wet.
- Gluten-Free & Dairy-Free Friendly: Use your favorite gluten-free white cake mix and a plain, unsweetened almond or coconut yogurt. The method stays exactly the same, so everyone can enjoy a taste of heaven.
Beau’s Kitchen Chronicles
This recipe has been a staple in my kitchen for years, and it’s evolved in the best ways. I once, in a pre-coffee haze, accidentally used a vanilla frosting instead of the yogurt. Let me tell you, that was a sticky, sweet disaster we don’t need to repeat! The beauty of this recipe is its flexibility. I’ve made them with kids who are just learning to bake, and I’ve served them at fancy dinner parties where everyone demanded the recipe.
The biggest lesson? Embrace the “plop.” These cookies aren’t meant to be perfectly uniform. Their rustic, craggy tops are part of their charm. So don’t stress, have fun, and know that even if they’re a little misshapen, they’re going to taste absolutely incredible.
Your Questions, Answered!
I’ve gotten a lot of questions about these cookies over the years, so I’ve compiled the most common ones right here to be your troubleshooting guide.
Q: My dough is really, really sticky. Did I do something wrong?
A: Not at all! A very thick and sticky dough is completely normal for this recipe. That’s why using a cookie scoop and parchment paper is non-negotiable. If it’s absolutely unworkable, you can chill it for 15-20 minutes, but I find that a confident “scoop and plop” is all you need.
Q: Can I make the dough ahead of time?
A: You can! Simply mix the dough, cover the bowl tightly with plastic wrap, and store it in the refrigerator for up to 24 hours. Let it sit at room temperature for 10-15 minutes before scooping and baking. The cookies might be slightly denser, but still delicious.
Q: Why are my cookies flat?
A: This usually happens if the dough was over-mixed. Once the ingredients are just combined, stop mixing! Over-mixing can develop the gluten in the cake mix, leading to a flatter, tougher cookie. Remember, gentle is the name of the game.
Q: How should I store these cookies?
A: Because of the yogurt, it’s best to store them in a single layer in an airtight container in the refrigerator. They’ll keep for 3-4 days. You can also freeze the baked cookies for up to 2 months!
Angel Food Cake Cookies
Description
A Slice of Sunshine and a Hand-Me-Down Recipe
This recipe always takes me back to my grandma’s sun-drenched kitchen. She was the queen of “semi-homemade” magic before it was cool. Her motto? Good food is about the feeling it creates, not how long you’re stuck at the stove.
I still remember one sweltering summer afternoon — I was ten, grass-stained, and craving something sweet. Grandma smiled, grabbed a box of cake mix and a tub of yogurt, and said, “We’re making sunshine, honey.”
Instructions
1. Preheat and Prep
Preheat oven to 350°F (175°C) and line a baking sheet with parchment paper.
Don’t skip the parchment — this dough is sticky!
2. Mix the Magic
Combine cake mix, Greek yogurt, and vanilla in a large bowl. Stir by hand with a sturdy spoon until thick and sticky.
No mixers needed — a little arm work keeps the dough tender.
3. Scoop and Plop
Drop rounded scoops (1½ tablespoons each) onto the baking sheet, 2 inches apart.
Press in sprinkles now if using. The rustic “cloud” look is part of their charm!
4. Bake to Perfection
Bake for 10–12 minutes, until the tops are set and the edges are pale golden.
They may look soft in the center — that’s perfect. Don’t overbake!
5. Cool with Care
Let cookies rest on the hot baking sheet for 5 minutes before transferring to a wire rack to cool completely.
Nutrition
- Calories: ~80 kcal
- Sugar: 9 g
- Fat: 1 g
- Carbohydrates: 16 g
- Protein: 2 g
A Lighter Little Treat
Now, I’m a chef, not a nutritionist, but I always like to have a general idea of what I’m eating. One of the things I love about these cookies is that by using Greek yogurt instead of the typical eggs and oil, we’re creating a treat that feels a bit lighter. You’re getting a nice little protein boost from the yogurt, which is a win in my book!
Please remember, these are approximate values and can vary based on the specific brands of ingredients you use. But for a general idea, per cookie (based on a yield of 24):
- Calories: ~80 kcal
- Fat: 1 g
- Carbohydrates: 16 g
- Sugar: 9 g
- Protein: 2 g
Allergen Note: This recipe contains gluten and dairy (if using dairy-based yogurt). Please see the variations section for easy swaps!
Go Forth and Bake with Joy!
And there you have it, my friends—the incredible, three-ingredient cookie that tastes like a dream. This recipe is proof that you don’t need a pantry full of fancy ingredients or a whole afternoon to create something truly special and delicious. It’s about the joy of baking, the smell of vanilla filling your kitchen, and the smile on someone’s face when they bite into a warm, soft cookie.
I hope this recipe becomes a quick and easy favorite in your home, just like it is in mine. It’s a little trick I’m so happy to share with you. Now, I’d love to hear from you! Did you add a fun twist? Did your kids love plopping the dough? Tag me on social @Feastical or shoot me an email—I love seeing your kitchen creations.
Final Thoughts: A Little Bit of Heaven, Made Simple
So there you have it, friends. A cookie that’s as easy to make as it is delightful to eat. These Angel Food Cake Cookies are more than just a recipe; they’re a reminder that incredible treats don’t have to be complicated. They’re proof that with a little ingenuity (and a trusty box of cake mix), you can capture the essence of a classic dessert in a brand-new, bite-sized form.
From my grandma’s sun-drenched kitchen to yours, this recipe is a testament to the joy of simple, feel-good food. It’s for the busy weeknights, the sudden sweet tooth, the baking session with a little one, and the need for a dessert that feels like a warm, fluffy hug.