The Ultimate Crowd-Pleaser: Reese’s Pieces Chocolate Chip Cookie Bars
Hey there, friend! Beau here, welcoming you back to Feastical. You know that feeling when you’re hit with a sudden, undeniable craving for something sweet, but the thought of creaming butter and sugar, sifting flour, and dirtying every bowl in the kitchen just feels… exhausting? Yeah, I’ve been there more times than I can count. Some days, even us seasoned cooks need a shortcut that doesn’t taste like one. We need a recipe that feels like a secret weapon—a guaranteed path to deliciousness with minimal fuss.
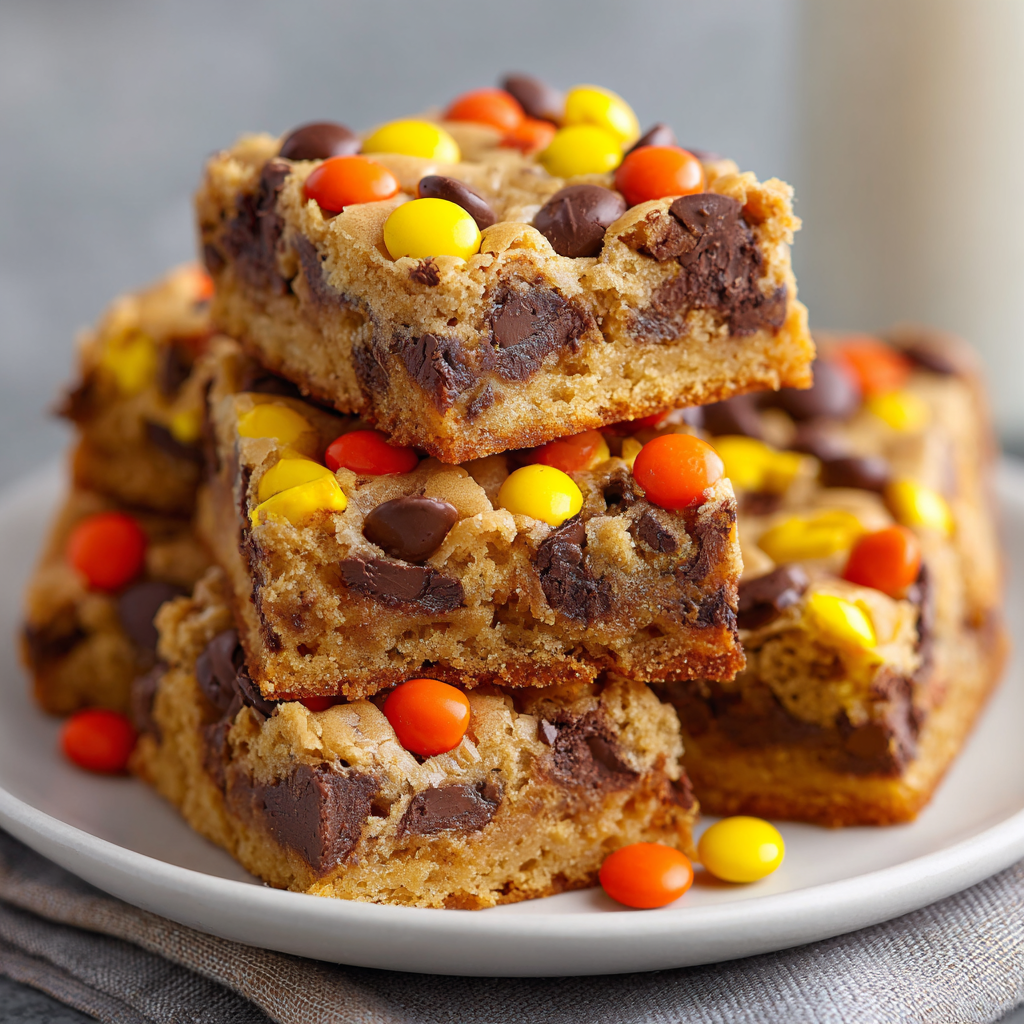
Well, pull up a stool and get ready to meet your new best friend: these outrageously good Reese’s Pieces Chocolate Chip Cookie Bars. Imagine the chewy, buttery goodness of a perfect chocolate chip cookie, but in super-simple bar form. Now, picture it studded with melty chocolate chips and crowned with a confetti of colorful, peanut-buttery Reese’s Pieces. The result? A dessert that’s a total flavor explosion and a complete textural dream.
These bars are the undisputed champions of my recipe box when it comes to easy, crowd-pleasing treats. They’re the perfect project for a lazy Sunday afternoon, a last-minute bake sale lifesaver, or a fun activity to do with the kids (who, let’s be honest, are mainly in it for the candy). So, let’s ditch the complicated steps and dive headfirst into a pan of pure, unadulterated joy. Trust me, your spatula—and your taste buds—will thank you.
A Sweet Slice of Nostalgia
This recipe takes me right back to my grandma’s kitchen, with its checkered linoleum floor and the ever-present scent of something baking. She wasn’t a fancy chef, but she was a wizard of “semi-homemade” before it was even a term. Her secret weapon? A simple box of cake mix. She could transform it into a dozen different magical creations, and her “kitchen sink cookie bars” were legendary.
I remember one sweltering summer afternoon when my cousins and I were bouncing off the walls. Instead of shooing us outside, Grandma pulled out a yellow cake mix, a stick of butter, and a treasure trove of leftover baking bits from her pantry—including a nearly forgotten bag of Reese’s Pieces. With us as her eager (and slightly messy) assistants, she whipped up a pan of these bars in minutes. The wait for them to cool felt like an eternity, but that first warm, gooey square, bursting with peanut butter and chocolate, was a pure taste of happiness. It taught me that the best recipes aren’t always the most complex; they’re the ones that bring people together and create lasting memories. This is my homage to her—and to that perfect, simple joy.
Gathering Your Sweet Supplies
The beauty of this recipe is its short and sweet ingredient list. You might already have most of this in your pantry! Here’s what you’ll need, plus a few of my chef-y insights to make it even better.
- 1 box (15.25 oz) Yellow Cake Mix: This is the magical base that gives us our structure and that classic, vanilla-kissed flavor. Chef’s Tip: I prefer a “butter recipe” or “extra moist” style cake mix for a richer taste and chewier texture, but any standard yellow mix works perfectly.
- 1 stick (½ cup) Unsalted Butter, melted: Melted butter is key here! It binds everything together and creates a wonderfully dense, chewy bar. Using unsalted lets you control the salt level, but if salted is all you have, it’ll still be delicious—just maybe skip adding any extra salt.
- 2 Large Eggs: Our binding agents! They provide structure and richness. Make sure they’re at room temperature for the easiest mixing. A quick tip: to bring eggs to room temp fast, place them in a bowl of warm water for 5-10 minutes.
- 1 tsp Pure Vanilla Extract: Don’t skip this! It enhances all the other flavors. The pure stuff makes a noticeable difference compared to imitation, adding a warm, floral depth.
- 2 cups Chocolate Chips: This is your chance to get creative! I love using semi-sweet chips for a perfect balance, but milk chocolate will make it extra sweet and decadent, or dark chocolate will add a sophisticated bitterness. A mix is always fun, too!
- 1 small bag (8-10 oz) Reese’s Pieces Candy: The star of the show! These little gems add pops of color and that unmistakable peanut butter flavor. You can find them in the candy aisle. Substitution Idea: If you’re not a peanut butter fan, M&M’s are a fantastic swap for a classic chocolate chip cookie bar vibe.
Let’s Get Baking: The Foolproof Steps
Ready? This is where the magic happens. It’s so simple, you might just have the recipe memorized after one try. I’ll walk you through each step with my favorite little hacks to ensure bar perfection.
- Preheat and Prep: First things first, preheat your oven to 350°F (175°C). This is non-negotiable for even baking! While it’s heating up, grab your 9×13-inch baking pan. Grease it generously with butter, cooking spray, or line it with parchment paper. My Pro Hack: If you use parchment paper with a little overhang on two sides, you can become a bar-removing superhero later, lifting the entire slab out for flawlessly clean cuts.
- The One-Bowl Wonder: In a large mixing bowl, combine the dry cake mix, melted butter, vanilla extract, and eggs. Now, here’s the trick: don’t overmix! Just stir with a sturdy spatula or a wooden spoon until a soft, thick dough forms and no dry streaks of cake mix remain. Overmixing can make the bars a bit tough, so a few lumps are totally fine. This dough will be thick and glorious.
- Fold in the Chocolatey Goodness: Time for the chocolate chips! Dump them into the bowl and gently fold them in until they’re evenly distributed. “Folding” just means turning the dough over onto itself repeatedly—it’s a gentler motion than stirring that prevents overworking the dough.
- Press It Perfectly: Transfer the dough to your prepared pan. This is the only slightly tricky part because the dough is thick. I like to spray my clean hands with a little cooking spray or dab them with water to prevent sticking. Then, just press the dough evenly into the bottom of the pan, making sure you get it into all the corners. We want an even layer so every bar bakes at the same rate.
- The Candy Confetti: Now for the fun part! Take your Reese’s Pieces and scatter them evenly over the top of the dough. Don’t press them down too hard—just a gentle tap so they stick. They’ll sink in a bit as they bake, creating little pockets of peanut butter bliss.
- Bake to Golden Perfection: Slide the pan into your preheated oven and bake for 20-25 minutes. Ovens can be sneaky, so start checking at the 20-minute mark. You’re looking for golden brown edges and a top that looks set. The center might still look a tiny bit soft, but that’s what you want! It will continue to set as it cools, giving you that dreamy, chewy texture. A toothpick inserted near the edge should come out mostly clean, maybe with a few moist crumbs.
- The Hardest Part: Wait! I know, I know. The smell is intoxicating. But you *must* let the pan cool completely on a wire rack before you even think about slicing. If you cut into warm bars, they’ll be gooey and fall apart. Letting them cool is the secret to getting those clean, beautiful squares. Patience, my friend, is a virtue that pays off in perfect cookie bars.
How to Serve Up the Smiles
Once your bars are completely cool, it’s showtime! Use a sharp knife to slice them into squares. I usually get about 20 generous bars or 24 smaller, two-bite pieces—perfect for a party platter.
These bars are fantastic all on their own, but let’s talk about leveling them up. For the ultimate indulgence, serve a warm bar (yes, you can gently microwave a cooled one for 10 seconds!) à la mode with a big scoop of vanilla bean ice cream. The contrast of warm, chewy bar and cold, creamy ice cream is a religious experience. For a drizzle of decadence, melt a little peanut butter and chocolate sauce and zig-zag it over the top. For a simple, kid-friendly treat, just grab and go! They’re perfect packed in lunchboxes or as an after-school snack with a tall glass of cold milk.
Get Creative: Fun Flavor Twists!
The basic recipe is a blank canvas for your culinary creativity. Here are a few of my favorite ways to mix it up:
- Peanut Butter Paradise: Swirl ½ cup of creamy peanut butter into the batter along with the chocolate chips for an even more intense peanut butter flavor. You can also use Reese’s Peanut Butter Cups, chopped, instead of or in addition to the Pieces.
- Triple Chocolate Threat: Use a devil’s food chocolate cake mix instead of yellow, and swap the chocolate chips for a mix of white chocolate and dark chocolate chips. Top with chocolate sprinkles for a chocoholic’s dream.
- Birthday Cake Blast: Use a funfetti cake mix, keep the chocolate chips, and use colorful M&M’s on top for the most festive, celebratory bars imaginable.
- Salted Caramel Delight: After pressing the dough into the pan, drizzle ½ cup of thick caramel sauce over the top, then sprinkle with the Reese’s Pieces and a light sprinkle of flaky sea salt before baking. Sweet, salty, and sublime.
- Gluten-Free Friendly: Many brands now make gluten-free yellow cake mixes! Just be sure to check that all your other ingredients (like vanilla extract) are certified gluten-free if needed.
Beau’s Kitchen Notes
This recipe has been a staple in my life for years, and it’s evolved in funny ways. I once, in a pre-coffee haze, accidentally used a box of cornbread mix. Let’s just say that sweet and savory chocolate chip cornbread bars are… an acquired taste I do not recommend! Stick to the yellow cake mix, folks.
I’ve also learned that these bars freeze like a dream. Once they’re cooled and sliced, layer them between sheets of parchment paper in an airtight container and freeze for up to 3 months. They’re my secret for always having a homemade dessert on hand for unexpected guests—or unexpected cravings.
Your Questions, Answered!
Q: My bars came out really cakey and puffy, not dense and chewy. What happened?
A: The most likely culprit is overmixing! When you mix the dough too vigorously, you incorporate more air, which leads to a cakier texture. Remember, just mix until combined. Also, double-check that you used melted butter, not softened, as that contributes to the chewiness.
Q: Can I make these without a stand mixer?
A: Absolutely! In fact, I often make them by hand. A sturdy spatula and a little elbow grease are all you need. The dough is thick, but it comes together quickly.
Q: Why did my Reese’s Pieces crack or lose their color on top?
A: This is totally normal! The candy shells can sometimes crack from the heat, and the colors can bleed a tiny bit. It doesn’t affect the taste one bit, and I think it gives them a charming, homemade look.
Q: The center of my bars is still very gooey after 25 minutes. What should I do?
A: All ovens vary. If the edges are getting too brown but the center is still raw, loosely tent the pan with aluminum foil and continue baking in 2-3 minute increments until the center is set. Next time, try an oven thermometer to ensure your oven temperature is accurate.

Reese’s Pieces Chocolate Chip Cookie Bars
Description
Craving chocolate chip cookies but short on time? These chewy, buttery bars studded with chocolate chips and Reese’s Pieces candy are the ultimate crowd-pleaser. Easy, fast, and irresistibly colorful—perfect for parties, bake sales, or anytime you need a sweet fix.
Ingredients
-
1 box (15.25 oz) yellow cake mix
-
½ cup (1 stick) unsalted butter, melted
-
2 large eggs, room temperature
-
1 tsp pure vanilla extract
-
2 cups chocolate chips (semi-sweet, milk, or dark)
-
8–10 oz Reese’s Pieces candy
Instructions
-
Preheat & Prep: Preheat oven to 350°F (175°C). Grease a 9×13-inch pan or line with parchment paper with overhang for easy removal.
-
Mix Dough: In a large bowl, combine cake mix, melted butter, eggs, and vanilla. Stir until just combined—some lumps are fine.
-
Add Chocolate Chips: Fold in the chocolate chips gently.
-
Press Dough: Press the thick dough evenly into the prepared pan. Spray hands lightly with cooking spray to prevent sticking.
-
Top with Candy: Scatter Reese’s Pieces evenly over the dough; lightly press so they stick.
-
Bake: Bake 20–25 minutes. Edges should be golden, center slightly soft. Insert toothpick near edges; it should come out mostly clean.
-
Cool & Slice: Let bars cool completely on a wire rack before slicing into 20 squares.
Notes
-
Chewy Texture: Avoid overmixing and use melted butter.
-
Peanut Butter Boost: Swirl ½ cup peanut butter into batter for extra richness.
-
Chocolate Lovers: Use a mix of white, milk, and dark chocolate chips.
-
Birthday Cake Version: Swap cake mix for funfetti and top with M&M’s.
-
Salted Caramel Twist: Drizzle ½ cup caramel sauce and sprinkle flaky sea salt before baking.
-
Gluten-Free: Use a certified gluten-free yellow cake mix.
Nutrition
- Calories: 240 Cal per bar
- Sodium: 220mg
- Fat: 12g
- Carbohydrates: 30g
- Fiber: 1g
- Cholesterol: 30mg
Nutritional Information*
Okay, let’s be real: these are a treat, through and through. But I believe in transparency! Here’s a general breakdown per bar (assuming 20 bars per pan). Remember, these are estimates and can vary based on the specific brands of ingredients you use.
Per Bar (approximate):
Calories: 240 | Total Fat: 12g | Saturated Fat: 7g | Cholesterol: 30mg | Sodium: 220mg | Total Carbohydrates: 30g | Dietary Fiber: 1g | Sugars: 20g | Protein: 3g
*This information is provided as a courtesy and is an estimate only. For precise nutritional data, I recommend using a calculator with the exact brands and quantities you use.
Final Thoughts from My Kitchen to Yours
Well, there you have it—my go-to recipe for pure, uncomplicated baking happiness. These Reese’s Pieces Chocolate Chip Cookie Bars are more than just a dessert; they’re a reminder that the best things in life (and the kitchen) don’t have to be complicated. They’re about the joy of creating, the warmth of sharing, and the simple pleasure of a perfectly chewy, chocolatey, peanut-buttery bite.
I hope this recipe finds its way into your regular rotation and becomes a beloved tradition in your home, just like it is in mine. If you make them, I’d love to hear about it! Tag me on social or leave a comment over on Feastical.com. Now, go preheat that oven and get ready for some serious compliments. Happy baking!
With a full heart and an even fuller pan,
Beau