
Hey There, Hungry Friend! Let’s Roll Into Keto Comfort Food Heaven
Picture this: It’s game night. Your crew’s huddled around the TV, and that familiar craving hits—juicy, cheesy, onion-kissed Philly cheesesteak vibes. But then… the bun guilt sets in. Sound familiar? Been there, wrestled with that carb-counting angel on my shoulder too! That’s exactly why I spent months perfecting these Keto Philly Cheesesteak Rolls. No compromise. No “meh” substitutes. Just pure, unapologetic flavor bombs that’ll make you forget carbs ever existed.
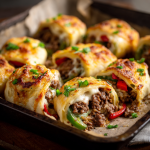
Here’s the magic: We’re wrapping that iconic beef-and-pepper filling in crispy, golden Monterey Jack cheese shells. Yep—CHEESE is the bun! It’s like your skillet and your favorite diner had a genius love child. Perfect for keto warriors, gluten-free pals, or anyone who believes comfort food should hug your soul without wrecking your goals. And the best part? You’re 25 minutes away from these beauties hitting your plate. So tie on that apron (or don’t—I won’t judge), and let’s turn your kitchen into a Philly-inspired playground!
Why This Recipe Feels Like a Late-Night Victory Dance
Flashback to my college days in Philly. After gigs with my band (shout-out to my air-guitar skills!), we’d pile into a neon-lit cheesesteak joint at 2 a.m. I’d always order mine “whiz wit”—that’s Cheez Whiz with onions for the uninitiated—and devour it leaning against my dented van. It was messy, glorious, and tasted like belonging.
Years later, when I went keto, I missed those nights. Store-bought “low-carb wraps” just didn’t cut it—they’d crack or taste like cardboard. One rainy Tuesday, I got stubborn. I roasted cheese into crispy disks as an experiment… and when I scooped that sizzling beef-pepper mix onto one? EUREKA. My kids did a living-room touchdown dance when they tasted them. Now, these rolls are my go-to for game days, potlucks, and “I deserve awesome” nights. They’re my edible high-five to flavor-first keto living!
Your Flavor Dream Team (Plus Swaps for Kitchen MacGyvers!)
- Shredded Monterey Jack (2 cups): Our “bun” MVP! Melts into lacy, crispy perfection. Chef hack: Buy blocks and shred yourself—pre-bagged stuff has anti-caking starch! Swap with mozzarella for milder vibes, or pepper jack for heat.
- Ground beef (16 oz): 80/20 fat ratio is ideal—it stays juicy without greasing out. Insider tip: Freeze beef 15 minutes before cooking for easier crumbling!
- Onion + bell pepper (½ onion, 1 pepper): The classic “wit” duo! Slice thin so they soften fast. Green peppers are traditional, but red/yellow add sweetness.
- Worcestershire sauce (1 tsp): Our umami secret weapon! Adds depth without carbs. Vegetarian? Use coconut aminos.
- Cream cheese (4 oz): Makes the filling luxuriously creamy. Pro move: Soften at room temp first—no lumps! Dairy-free? Try Kite Hill almond cream cheese.
- Salt + pepper: Season in layers—don’t be shy!
Let’s Build These Bad Boys (Without Losing a Pinky to Hunger Panic!)
Step 1: Cheese Shell Prep
Preheat oven to 375°F (190°C). Line a baking sheet with parchment paper (NOT wax paper—trust me, I learned the smoky way). Form cheese into 8 flat piles (¼ cup each). Pro spacing tip: Leave 3 inches between—they spread like gossip! Bake 5-6 min until golden-edged and bubbly. Watch closely—cheese goes from perfect to scorched in 30 seconds!
Step 2: Beef & Veggie Fiesta
While cheese bakes, brown beef in a skillet over medium-high heat. Hack alert: Don’t stir constantly! Let it develop a crust for max flavor. Drain fat (leave 1 tbsp for sautéing veggies). Add onions and peppers—sauté 4-5 min until they’re tender-crisp with a little char. Hit ’em with Worcestershire, salt, and pepper. Kill the heat, then stir in cream cheese until it’s velvety and clings to the beef like a foodie hug.
Step 3: The Grand Roll-Up
Pull cheese shells from oven. WAIT 30 SECONDS—this is crucial! Too hot, and they tear; too cool, they harden. Spoon filling onto one half of each shell. Using a spatula, gently fold cheese over filling—it’ll self-seal like a savory pastry. Chef confession: My first batch looked like abstract art. If they crack, press gently—they’ll still taste insane!
Step 4: The Patient Pause
Let rolls rest 5 minutes. Resist mouth-burning temptation! This lets the cheese firm up so you get that satisfying crunch.
Plating Like a Pro (Or Just Fork-Fight Your Family!)
Slide these golden rolls onto a rustic board—they’re too pretty to hide! Garnish with chopped chives or parsley for color pop. Pairing genius: Serve with a crisp side salad (ranch dressing FTW), roasted garlic zucchini fries, or tangy pickles to cut the richness. For parties, stick toothpicks in ’em and watch them vanish faster than my willpower near warm bread!
Shake It Up, Sugar-Free Style!
1. “Pizza Steak” Twist: Stir ¼ cup low-carb marinara into the beef mix. Top rolls with pepperoni before baking cheese shells.
2. Chicken Philly: Swap beef for ground chicken or turkey. Add a pinch of smoked paprika!
3. Mushroom Madness: Sauté 1 cup sliced mushrooms with the peppers. Umami overload!
4. Spicy Southwest: Mix in diced jalapeños and swap Monterey Jack for pepper jack. Serve with avocado crema.
5. Dairy-Free Hero: Use Violife mozzarella shreds and Kite Hill cream cheese. Beef fat is your flavor BFF here!
Confessions from My Keto Test Kitchen
These rolls are my most-stolen recipe by friends—even carb-lovers swipe ’em! Early versions used almond flour wraps… shudder. Too brittle. Then I tried cheese “taco shells,” and the lightbulb exploded! Now, I double the batch and freeze unbaked cheese piles between parchment. Crazy-busy night? I’ll bake shells straight from frozen (+1 min), fill, and dinner’s done. True story: My dog once stole a roll off the counter. He looked so guilty, I couldn’t even mad—just took photographic evidence for Instagram. #WorthIt
Your Burning Questions, Answered!
Q: Why did my cheese shells spread into one giant blob?
A: Overcrowding is the culprit! Space them like introverts at a party—3 inches apart. Also, ensure cheese is finely shredded (chunky shreds don’t melt evenly).
Q: Can I use deli roast beef instead of ground?
A: Absolutely! Chop it small, and add it with the peppers just to warm through. Ground beef gives better texture, though—it soaks up all those juices!
Q: How do I stop the filling from leaking?
A: Two tricks: 1) Drain beef WELL (soupy filling = leaks). 2) Don’t overstuff! 2-3 tbsp filling per shell is plenty. If leaks happen, embrace the “deconstructed cheesesteak” vibe!
Q: Can I meal prep these?
A: Yes! Store unfilled baked shells and filling separately for 3 days. Assemble and reheat at 350°F for 8-10 min. Avoid microwaving—they’ll get soggy.
Keto Philly Cheesesteak Rolls
- Total Time: 25 minutes
Description
Hey there, hungry friend! If you’re craving all the comfort of a melty, beefy Philly cheesesteak but want to keep it low-carb (and gluten-free), you’re about to fall hard for these Keto Philly Cheesesteak Rolls. Picture this: crispy Monterey Jack cheese shells cradling a rich, creamy beef-pepper-onion filling that hits all the right notes—smoky, savory, satisfying. Ready in just 25 minutes, these flavor bombs will make your carb cravings vanish like a cheesesteak at a tailgate. Let’s roll!
Ingredients
For the Cheese Shells
-
2 cups shredded Monterey Jack cheese (¼ cup per shell)
Tip: Shred it yourself for perfect melting!
For the Filling
-
1 lb ground beef (80/20 recommended)
-
½ medium onion, thinly sliced
-
1 bell pepper (any color), thinly sliced
-
4 oz cream cheese, softened
-
1 tsp Worcestershire sauce
-
Salt and pepper, to taste
Instructions
1. Cheese Shell Magic
-
Preheat oven to 375°F (190°C).
-
Line a large baking sheet with parchment paper.
-
Drop ¼ cup cheese into 8 piles. Flatten slightly.
-
Leave 3 inches of space between piles—cheese spreads!
-
Bake 5–6 minutes until bubbly and golden at the edges.
-
Let cool 30 seconds (not more!) before filling.
2. Filling Time
-
In a skillet, cook ground beef over medium-high heat.
-
Let it sear—don’t stir too much! Drain excess fat.
-
Add onions and peppers, sauté 4–5 min until soft and lightly charred.
-
Stir in Worcestershire sauce, salt, pepper, and cream cheese. Mix until creamy and combined.
3. Roll & Rest
-
Spoon 2–3 tbsp of filling onto one side of each cheese shell.
-
Use a spatula to gently fold over and seal the roll.
-
Let rest 5 minutes before serving—this helps the cheese firm up.
Notes
Q: My cheese shells fused into one giant blob!
A: You likely overcrowded the tray. Always leave at least 3 inches between piles.
Q: Can I use sliced deli roast beef instead?
A: Totally! Chop and warm it with the veggies—though ground beef holds flavor better.
Q: Filling’s leaking—what gives?
A: Drain meat well, don’t overfill, and let cheese shells rest before rolling.
- Prep Time: 10 minutes
- Cook Time: 15 minutes
Nutrition
- Calories: 210 Cal Per Roll
- Fat: 17g
- Carbohydrates: 2g
- Protein: 14g
Nutritional Perks (Because Knowledge is Yummy Power!)
Per roll (recipe makes 8): Calories: ~210 | Protein: 14g | Net Carbs: 2g | Fat: 17g. Macros calculated with MyFitnessPal using standard ingredients. Your numbers may vary slightly based on brands!
Final Thoughts: Why This Recipe is a Keto Game-Changer
These Keto Philly Cheesesteak Rolls aren’t just a substitute—they’re an upgrade. They prove that low-carb eating doesn’t mean sacrificing flavor, nostalgia, or fun. Whether you’re keto, gluten-free, or just looking for a delicious twist on a classic, these rolls deliver:
-
Speed: 25 minutes from fridge to plate.
-
Versatility: Endless filling variations (pizza steak, anyone?).
-
Crowd-Pleasing Power: Even carb-lovers will fight for the last one.
So next time that cheesesteak craving hits, skip the bun guilt—you’ve got cheese shells now. And trust me, once you’ve tasted that crispy, beefy, melty magic, there’s no going back.