The Appetizer That Steals Every Show (And I Mean Every. Single. One.)
Hey friends, Beau here! Let’s talk about party food for a second. We’ve all been there. You’re hosting, the clock is ticking, and you need something that looks like you spent hours in the kitchen but secretly comes together in a flash. Something that makes people’s eyes light up the second you walk it into the room. Something that disappears from the plate before you’ve even had a chance to say, “Hope you like it!”
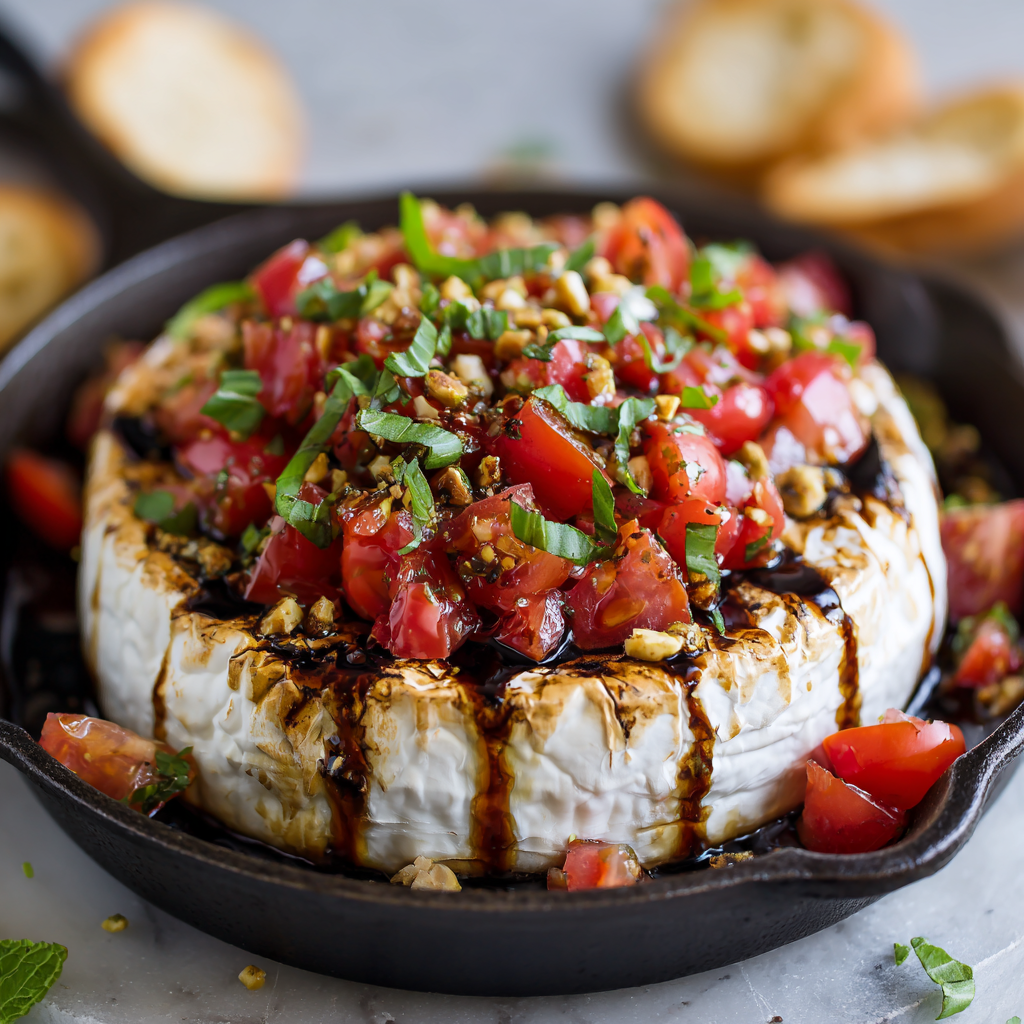
Well, my foodie comrades, I’m about to hand you your new secret weapon: Bruschetta Baked Brie.
Imagine this: a wheel of creamy, luxurious brie, warmed until it’s just begging to be scooped. On top, a vibrant, confetti-like pile of juicy diced tomatoes, fragrant basil, and garlic, all kissed with a tangy balsamic glaze. It’s the ultimate power couple—the rich, decadent cheese and the bright, fresh topping are a match made in appetizer heaven. It’s elegant enough for your fanciest dinner party but so ridiculously simple that you can whip it up for a casual weeknight treat. This isn’t just a recipe; it’s your ticket to becoming a culinary rock star. So, preheat that oven and let’s make some magic happen.
The Party That Started It All
This recipe forever holds a special place in my heart because it was the star of the show at the first big dinner party I ever hosted in my first real apartment. The place was… let’s call it “cozy.” The kitchen was approximately the size of a postage stamp, and I was determined to make a grand impression on my new friends. Ambition was high, but counter space was low.
I had plans for an elaborate, five-component canapé that, in hindsight, was a recipe for disaster. With 30 minutes until guests arrived, my kitchen looked like a tornado had hit a farmer’s market, and my canapé was a no-go. Panic started to set in. Then I spotted them: a lonely wheel of brie on the fridge door and a pint of cherry tomatoes on the counter, threatening to roll away. In a moment of sheer “what-do-I-have-to-lose” inspiration, I chopped, baked, and piled it all together. The result? A gooey, glorious mess that was an instant sensation. It was the first dish to vanish, and for the rest of the night, all anyone could talk about was “that incredible brie thing.” It taught me a valuable lesson: the best recipes aren’t about being complicated; they’re about being clever. And friends, this one is genius.
Gathering Your Flavor Dream Team
Here’s the beautiful part: this dish requires minimal ingredients for maximum payoff. Let’s break them down. This recipe is doubled to feed a crowd because, trust me, you’ll want it to!
- 2 wheels of brie (8 oz each): The star of the show! Don’t be tempted to remove the rind—it’s perfectly edible and helps hold the molten cheese together. Look for a wheel that feels soft when you gently press it. A good substitute? Camembert works beautifully for a slightly earthier flavor.
- 4 Roma tomatoes, diced: Romas are my go-to because they’re less watery than beefsteaks, which means your bruschetta topping won’t make the brie soggy. In the winter, when tomatoes are sad and pale, try using halved cherry or grape tomatoes—they’re usually sweeter!
- 1/2 cup fresh basil, roughly chopped: Please, please use fresh. It makes all the difference. Tear it with your hands just before adding it to preserve its incredible aroma and prevent bruising. In a pinch, a teaspoon of high-quality dried basil can work, but the flavor will be more muted.
- 2 tbsp extra virgin olive oil: This brings everything together and adds a fruity, rich backbone. Use the good stuff here since it’s a raw ingredient in the topping.
- 2 tbsp balsamic vinegar: This provides the essential tangy punch that cuts through the richness of the cheese. A chef’s hack? If you have a little extra time, simmer the balsamic in a small pan over low heat until it reduces and thickens into a syrup. It’s a game-changer for drizzling.
- 2 cloves garlic, minced: The flavor foundation. For a milder, sweeter garlic flavor, you can roast the cloves first and then mash them into a paste.
- 1/4 tsp salt: Just a pinch to wake up all the other flavors and help draw out the juices from the tomatoes.
Let’s Get Baking: Your Foolproof Roadmap to Cheesy Bliss
Ready? This comes together so fast. Let’s do it step-by-step, with all my favorite kitchen hacks along the way.
Step 1: Preheat and Prep. Fire up your oven to 375°F (190°C). This is the perfect temperature to get the brie wonderfully molten without it exploding out of its rind. While it’s heating, grab a small baking dish or, my personal favorite, a cast-iron skillet. Not only does it look gorgeous coming right to the table, but it also retains heat beautifully, keeping your brie gooey for longer.
Step 2: Score the Brie (The Optional-but-Smart Step). Take your brie wheels and use a small, sharp knife to lightly score a criss-cross pattern on the top rind, just piercing the surface. Why? This isn’t just for looks! It allows the heat to penetrate more evenly and gives your guests obvious “scooping lines” once it’s baked. No more awkwardly trying to break into the cheese!
Step 3: Bake to Gooey Perfection. Place your scored brie wheels into your chosen baking vessel. Pop them into the preheated oven for 12-15 minutes. You’re looking for the cheese to be soft to the touch and visibly jiggly in the center. Pro tip: If your wheels are very cold from the fridge, they might need an extra minute or two. Don’t overbake, or the cheese will separate and become oily.
Step 4: Create the Fresh Topping. While the cheese is working its magic in the oven, combine your diced tomatoes, chopped basil, olive oil, balsamic vinegar, minced garlic, and salt in a medium bowl. Give it a gentle stir and then let it sit. This marinating time is crucial—it allows the flavors to get to know each other and the tomatoes to release just a little of their delicious juice.
Step 5: The Grand Finale. Carefully remove the baking dish from the oven (it’s hot!). Immediately spoon the bruschetta mixture over the top of each melty brie wheel, allowing some of it to cascade beautifully down the sides. The contrast of the cool, fresh topping on the warm cheese is simply divine.
Step 6: Serve Immediately! This is not a “let it sit” kind of dish. Grab your favorite board, place the brie right on it (or serve from the skillet!), and surround it with toasted baguette slices, sturdy crackers, or even apple slices. Watch it disappear.
How to Serve This Masterpiece
Presentation is part of the fun! I’m a big believer in serving food right in the vessel it was cooked in—it’s rustic, inviting, and means less cleanup for you. Place the hot skillet or baking dish right in the center of a large wooden board or a heat-safe trivet to protect your table.
Now, for the dippers! You’ll want a variety of textures:
- Classic Crostini: Thinly slice a baguette, brush with olive oil, and toast until golden brown. Rub a raw garlic clove on the warm toast for an extra flavor kick.
- Sturdy Crackers:Water crackers, rosemary crackers, or even simple wheat crackers provide a great crunchy base.
- Veggie Sticks: For a lighter option, offer endive leaves, cucumber rounds, or bell pepper strips. Their cool crunch is a fantastic contrast.
- Fruit Slices: Thin slices of crisp apple or firm pear offer a sweet and savory combination that’s absolutely irresistible with the brie.
Don’t forget a small spoon for scooping up any cheesy, tomato-y goodness that escapes!
Make It Your Own: Delicious Twists & Swaps
Once you’ve mastered the classic, the flavor playground is wide open! Here are a few of my favorite ways to mix it up.
- The “Sun-Kissed” Twist: Add 1 tbsp of finely chopped sun-dried tomatoes (the oil-packed kind, drained) or roasted red peppers to your bruschetta mix. This adds a deeper, concentrated tomato flavor and a chewy texture.
- Nutty for Crunch: Before baking, sprinkle the top of the brie with a tablespoon of crushed pistachios, pine nuts, or sliced almonds. They’ll toast up in the oven, adding a wonderful nutty flavor and crunch that plays so well with the creamy cheese.
- Sweet & Savory Glaze: Drizzle the finished dish with a honey-balsamic glaze. Just mix 1 tbsp each of honey and balsamic vinegar and warm it slightly to combine. The sweet and tangy drizzle takes this to a whole new level of sophistication.
- Spicy Kick: Love heat? Add a pinch of red pepper flakes to your bruschetta mix or a finely diced jalapeño (seeds removed for less heat).
- Herb Garden Delight: While basil is classic, don’t be afraid to use other soft herbs. A combination of chopped fresh thyme, chives, and oregano is absolutely fantastic.
Beau’s Kitchen Notes & Stories
Over the years, this recipe has become my go-to, and it’s evolved in fun ways. I once accidentally used a log of goat cheese instead of brie for a holiday party (hey, the packaging was similar!). It was a happy accident—the tangy goat cheese with the sweet topping was a huge hit, though it does bake up firmer than the oozy brie.
The biggest lesson I’ve learned? Don’t stress about perfection. So what if your tomato dice isn’t uniform? Who cares if a little cheese oozes out the side? That’s part of the charm! This dish is meant to be shared, enjoyed, and devoured with gusto. The messier it is, the more people will remember it. So have fun, play with the flavors, and make it yours.
Your Questions, Answered
Q: Can I make any part of this ahead of time?
A: Absolutely! You can prepare the bruschetta topping up to 4 hours in advance and keep it covered in the fridge. Let it sit at room temperature for about 20 minutes before serving. Do not bake the brie ahead of time—it’s best served straight from the oven.
Q: My brie didn’t get very melty. What happened?
A: This usually means it needed more time in the oven. All ovens vary, so if yours runs cool, it might need a few extra minutes. Also, ensure your brie is at room temperature before baking. Taking it out of the fridge 30-60 minutes beforehand helps it heat through evenly and become perfectly gooey.
Q: The rind is tough to cut through with a cracker. Help!
A: This is why I love the scoring step! It weakens the rind. You can also assure your guests that the rind is 100% edible and delicious. If it really bothers you, you can carefully slice the top rind off *before* baking, but you’ll lose that neat little container for the cheese.
Q: What do I do with leftovers?
A: Leftovers? A rare occurrence! But if you have them, store the cooled brie and topping separately in airtight containers in the fridge for up to 2 days. Reheat the brie gently in the microwave in 15-second bursts until warm, then add the cold topping. It won’t be *quite* as perfect, but it’s still a darn good lunch.

Bruschetta Baked Brie – Fresh, Melty & Party-Perfect
Description
Hey friends! Hosting a party but short on time? I’ve got the perfect solution: Bruschetta Baked Brie. Creamy, gooey brie topped with fresh, tangy tomato-basil bruschetta—it looks fancy, tastes incredible, and comes together in under 20 minutes. Trust me, this one will disappear fast!
Ingredients
-
2 wheels of brie (8 oz each)
-
4 Roma tomatoes, diced
-
½ cup fresh basil, roughly chopped
-
2 tbsp extra virgin olive oil
-
2 tbsp balsamic vinegar
-
2 cloves garlic, minced
-
¼ tsp salt
-
Toasted baguette slices, crackers, or apple slices for serving
Optional twists:
-
1 tbsp crushed pistachios or almonds for crunch
-
Honey-balsamic glaze (1 tbsp honey + 1 tbsp balsamic vinegar)
-
Red pepper flakes for heat
Instructions
-
Preheat the Oven
Set oven to 375°F (190°C). Use a small baking dish or cast-iron skillet for easy serving. -
Prep the Brie (Optional)
Lightly score a criss-cross pattern on top of each brie wheel to help it melt evenly. -
Bake the Brie
Place brie in the oven for 12–15 minutes until soft and jiggly. If cold from the fridge, add 1–2 extra minutes. -
Make the Bruschetta Topping
In a bowl, combine diced tomatoes, basil, olive oil, balsamic vinegar, garlic, and salt. Let it sit to allow flavors to blend. -
Assemble
Remove brie from the oven and immediately spoon bruschetta on top. Allow some topping to cascade down the sides. -
Serve
Serve immediately with toasted baguette slices, crackers, or apple slices.
Notes
-
Room Temperature Brie: Let it sit out for 30–60 minutes before baking for even melting.
-
Prevent Sogginess: Roma tomatoes are best; cherry or grape tomatoes work too.
-
Make Ahead: Prepare the tomato topping up to 4 hours in advance, but bake the brie just before serving.
-
Add Crunch: Sprinkle nuts on top before baking for a delightful texture contrast.
-
Sweet & Savory: A drizzle of honey-balsamic glaze elevates it to next-level flavor.
Nutrition
- Calories: 130Cal (Per Serving,
- Fat: 10g
- Saturated Fat: 6g
Nutritional Information (Per Serving)
Okay, let’s be real: this is an indulgent appetizer, and it’s meant to be enjoyed as part of a celebration! Here’s a rough breakdown per serving (based on 16 servings, using the ingredients listed). Remember, this is an estimate and can vary based on specific brands and exact portions.
- Calories: ~130
- Fat: 10g (Saturated Fat: 6g) – Hello, delicious cheese!
- Carbohydrates: 3g
- Protein: 5g – A nice little protein boost from the dairy.
- Sugar: 1g
- Sodium: Moderate (will vary based on the saltiness of your brie and how much salt you add).
The fresh tomatoes and basil also add a dose of vitamins C and K, along with antioxidants like lycopene. So, while it’s rich, it’s not without its nutritional merits! Enjoy it guilt-free as part of a balanced diet.
Final Thoughts from My Kitchen to Yours
Friends, this Bruschetta Baked Brie is more than just a recipe. It’s a conversation starter, a crowd-pleaser, and a testament to the fact that the most memorable food is often the simplest. It’s about taking a few incredible ingredients and letting them shine together. It’s about gathering around a table, breaking bread (or crackers!), and sharing a truly delicious moment.
I hope this recipe becomes a trusted favorite in your home, just like it is in mine. It’s saved me from more than one hosting panic, and it’s brought smiles to more faces than I can count. That’s the real power of feel-good food. Now, I’d love to hear from you! Did you add your own twist? Did it become the star of your party? Tag me @Feastical on social media so I can see your beautiful creations. Happy cooking!
Beau