
Your New Go-To Chocolate Buttercream Frosting (It’s a Game-Changer!)
Hey friends, Beau here from Feastical! Let’s have a little heart-to-heart. We’ve all been there, right? You spend hours carefully measuring, mixing, and baking the most beautiful, moist, and perfect chocolate cake. It comes out of the oven smelling like a dream. It cools on the rack, patiently waiting for its crowning glory. And then… disaster. The frosting is grainy. It’s too stiff and tears the crumb. Or worse, it’s a sad, runny mess that slides right off the side and pools around the base of the cake like a delicious but deeply disappointing chocolate moat.
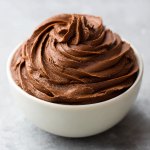
I’m here to tell you that those days are over. Consider this recipe your frosting flop insurance. This chocolate buttercream frosting is the one I’ve relied on for years—at birthday parties, bake sales, and those late-night “I just need a little chocolate comfort” moments. It’s luxuriously smooth, impossibly creamy, and packed with a rich, decadent cocoa flavor that never tastes overly sweet. It spreads like a dream, pipes beautiful swirls that hold their shape, and frankly, it might just upstage whatever you decide to put it on. So, grab your mixer and your favorite bowl. We’re about to make the only chocolate buttercream recipe you’ll ever need.
The Birthday Cake That Started It All
This recipe takes me right back to my grandma’s kitchen, with its checkered curtains and the always-present smell of something baking. Every year for my birthday, she’d let me choose the cake. And every year, without fail, I’d choose her devil’s food cake with her famous chocolate frosting. I wasn’t allowed to help with the cake itself—that was serious business—but the frosting? That was our domain.
She’d hand me the big, yellow bowl and the wooden spoon, and I’d watch in awe as a simple stick of butter transformed into something magical with the addition of powdered sugar and her special dark cocoa powder. She’d always let me lick the spoon, and I remember closing my eyes, completely transported by that deep, fudgy, not-too-sweet flavor. It was love at first taste. This recipe is my homage to hers—a little refined, but with the exact same soul. It’s more than just frosting; it’s a vessel for memory, for connection, and for pure, unadulterated joy.
Gathering Your Frosting A-Team
Great frosting starts with great ingredients. Here’s what you’ll need to make about 3 cups of this chocolatey heaven—enough to frost a 9×13” sheet cake, a two-layer 8” cake, or 24 cupcakes with beautiful swirls.
- 1 cup (2 sticks) unsalted butter, softened – This is the foundation. Using unsalted butter lets you control the salt level perfectly. And softened is the key word here! Your butter should give slightly when pressed but not be oily or melted. Think cool room temperature. This makes it creamier and helps incorporate air for a fluffier frosting.
- 3 ½ cups confectioners’ sugar (aka powdered sugar) – This sweetens and gives structure. I always recommend sifting it if you have time—it prevents lumps and makes for a silkier texture. No sifter? A fine-mesh strainer works wonders!
- ½ cup unsweetened cocoa powder – The star of the show! For the deepest, richest flavor, use a natural unsweetened cocoa powder. My personal favorite is Dutch-processed for its smoother, less acidic taste, but standard grocery store cocoa works beautifully, too.
- ¼ teaspoon salt – Don’t you dare skip this! Salt is a flavor enhancer. It cuts the sweetness and makes the chocolate flavor pop in a way you’ll immediately notice.
- 2 teaspoons vanilla extract – Use the good stuff! Pure vanilla adds a warm, complex depth that imitation vanilla just can’t match. It’s the secret handshake between the butter and chocolate.
- 2–4 tablespoons milk or heavy cream – This is your consistency control. Milk will work great, but heavy cream adds an extra layer of richness and makes the frosting even creamier. Start with 2 tablespoons and add more as needed.
Crafting Your Masterpiece: Step-by-Step
Alright, team, let’s get mixing! This process is simple, but a few chef-approved hacks will take your frosting from good to “I-can’t-stop-eating-this-with-a-spoon” great.
Step 1: The Butter Beat-Down
Place your softened butter in a large mixing bowl. Using either a stand mixer fitted with the paddle attachment or a hand mixer, beat the butter on medium-high speed for a full 2-3 minutes. We’re not just mixing it; we’re aerating it. You’ll know it’s ready when it turns pale yellow and looks light and fluffy. This crucial step incorporates tiny air bubbles that are the secret to a fluffy, not dense, frosting.
Step 2: Cocoa Incorporation
Sift the cocoa powder and salt directly into the whipped butter. Yes, sifting is a little extra step, but trust me, it’s the #1 way to avoid lumpy frosting. It ensures every particle of cocoa gets coated in fat, which unlocks its full flavor potential. Mix on low speed until the cocoa is fully absorbed and the mixture looks like a thick, dark chocolate paste. Scrape down the sides of the bowl with a spatula to make sure everything is incorporated.
Step 3: The Sweet Addition
Now, with your mixer on LOW speed, gradually add the confectioners’ sugar, about one cup at a time. I cannot stress “low speed” enough here unless you want a romantic (but messy) powdered sugar snowstorm all over your kitchen. Let each cup incorporate fully before adding the next. Once all the sugar is in, scrape the bowl again and mix on medium for another minute until it’s completely combined.
Step 4: Bringing It All Together
Add the vanilla extract and 2 tablespoons of your milk or heavy cream. Now, turn that mixer up to medium-high and let it rip for another 2-3 minutes. This is where the magic happens. Watch as the frosting transforms from a thick paste into a light, airy, and gloriously smooth cloud of chocolate goodness. Listen for the sound to change—it’ll get quieter as it whips up.
Step 5: Consistency Check
Stop the mixer and grab a spatula. Give the frosting a stir. Is it too thick for your needs? For spreading, you might want it a tad softer. For piping intricate designs, you’ll want it a bit stiffer. Add more liquid, one tablespoon at a time, beating well after each addition, until you reach your perfect consistency. Remember, you can always add more liquid, but you can’t take it out!
How to Serve & Savor Your Creation
You’ve done it! You’re standing over a bowl of perfection. Now, let’s put it to work.
If you’re frosting a cake, make sure your cake layers are completely cool. A warm cake will melt your beautiful buttercream. For a smooth finish, I like to do a “crumb coat”: a thin layer of frosting all over the cake that traps any loose crumbs. Pop it in the fridge for 15 minutes to set, then apply your final, thick, luxurious layer of frosting.
For cupcakes, fit a piping bag with your favorite tip—a large open star tip (like a 1M) is my go-to for those gorgeous bakery-style swirls. Fill the bag and pipe away! If you’re more of a “spreader,” use an offset spatula to create beautiful swoops and peaks.
And hey, let’s think outside the cake box! This frosting is incredible as a fruit dip for strawberries or pretzels, sandwiched between cookies, or just eaten straight from the bowl with a graham cracker (no judgment here).
Make It Your Own: Delicious Variations
Once you’ve mastered the classic, the world is your chocolate oyster! Here are a few of my favorite ways to mix it up.
- Mocha Madness: Dissolve ½ to 1 teaspoon of instant espresso powder into the vanilla extract before adding it. The coffee doesn’t make it taste like coffee; it just deepens and intensifies the chocolate flavor in the most incredible way.
- Flavor Twist: Swap the vanilla extract for an equal amount of almond extract (a classic pairing with chocolate) or ½ teaspoon of peppermint extract for a festive, frosty treat perfect for the holidays.
- Ultra-Dark & Rich: Use a dark black cocoa powder (like the kind used in Oreos!) for a frosting that’s less sweet and has an intense, almost oreo-like flavor. It’s stunningly dark.
- Chocolate-Chocolate Chunk: For extra texture and richness, fold in ½ cup of finely chopped dark chocolate or mini chocolate chips after the frosting is whipped.
- Dairy-Free Delight: This is an easy swap! Use your favorite plant-based butter sticks (I find the ones formulated for baking work best) and unsweetened almond or oat milk instead of dairy. It works like a charm!
Beau’s Chef Notes & Kitchen Stories
This recipe has been my faithful companion through countless baking adventures. I once accidentally doubled the vanilla extract in a batch I was making for a friend’s wedding cake trial. I was panicked, but it turned out to be the best mistake I ever made—the flavor was incredible! The bride and groom loved it so much it became the “secret ingredient” for their actual wedding cake.
Over time, I’ve learned that the real secret is in the whipping. Don’t rush the process. Those few minutes of creaming the butter and then whipping the final frosting are what separates a good frosting from a legendary one. It’s the difference between something that just sits on top of a cake and something that becomes one with it.
Frosting FAQs: Your Questions, Answered!
Q: My frosting is too runny! What did I do wrong? How can I fix it?
A: This usually happens if the butter was too soft or you added a bit too much liquid. No worries! Pop the whole bowl into the refrigerator for 20-30 minutes to let the butter firm up, then re-whip it. If it’s still too soft, you can add a little more sifted powdered sugar, a quarter cup at a time, until it thickens up.
Q: Why is my buttercream grainy?
A: Graininess almost always comes from the powdered sugar not being fully dissolved. Next time, ensure your butter is properly softened and mix on low speed when adding the sugar. For this batch, just keep mixing! Sometimes a few extra minutes on medium speed can help dissolve those stubborn sugar crystals.
Q: Can I make this frosting ahead of time?
A: Absolutely! Make it up to 3 days in advance. Store it in an airtight container in the refrigerator. When you’re ready to use it, let it come to room temperature on the counter (this might take a few hours) and then re-whip it in your mixer for a minute or two to bring back its smooth, fluffy texture.
Q: Can I freeze chocolate buttercream?
A: You bet. It freezes beautifully for up to 3 months. Thaw it overnight in the fridge, then let it come to room temperature and re-whip before using.
Chocolate Buttercream Frosting
Description
Tired of grainy, stiff, or runny frosting ruining your perfect chocolate cake? This Chocolate Buttercream is rich, smooth, and creamy with a deep chocolate flavor that’s never too sweet. It spreads beautifully, pipes like a dream, and can transform any cake, cupcake, or cookie into something extraordinary.
Ingredients
-
1 cup (2 sticks) unsalted butter, softened
-
3 ½ cups confectioners’ sugar, sifted if possible
-
½ cup unsweetened cocoa powder
-
¼ teaspoon salt
-
2 teaspoons vanilla extract
-
2–4 tablespoons milk or heavy cream
Tip: Start with 2 tablespoons of liquid and add more to reach your desired consistency. Use softened, room-temperature butter for a fluffy texture.
Instructions
-
Beat the Butter: In a large bowl, beat softened butter on medium-high speed for 2–3 minutes until light and fluffy.
-
Add Cocoa & Salt: Sift cocoa powder and salt into the butter. Mix on low until fully combined. Scrape down sides.
-
Add Sugar Gradually: Add confectioners’ sugar one cup at a time on low speed to avoid a sugar cloud. Mix on medium for 1 minute once all sugar is in.
-
Add Vanilla & Milk: Pour in vanilla extract and 2 tablespoons of milk or cream. Beat on medium-high for 2–3 minutes until smooth and creamy. Adjust liquid for spreading or piping consistency.
Notes
-
Cakes: Apply a thin crumb coat first, chill for 15 minutes, then frost generously.
-
Cupcakes: Pipe with a star tip for bakery-style swirls.
-
Other Uses: Spread between cookies, dip fruit, or enjoy straight from the bowl.
Pro Tip: Always frost fully cooled cakes or cupcakes to prevent melting.
Nutrition
- Calories: 160Cal per 2 tbsp serving
- Sugar: 16g
- Sodium: 35mg
- Fat: 10g
- Carbohydrates: 18g
- Cholesterol: 25mg
Nutritional Information*
*Please note: This is an estimate provided by an online nutrition calculator. For exact information, we recommend using your preferred calculator with the specific brands of ingredients you use.
Prep Time: 10 minutes
Yield: ~3 cups (Frosts one 9×13” cake or 24 cupcakes)
Per Serving (2 tablespoons):
Calories: 160 | Total Fat: 10g | Saturated Fat: 6g | Trans Fat: 0g | Cholesterol: 25mg | Sodium: 35mg | Total Carbohydrates: 18g | Dietary Fiber: 1g | Sugars: 16g | Protein: 1g
Final Sweet Thoughts
Well, there you have it, my friends. This isn’t just a recipe; it’s a trusty tool for your kitchen toolbox, a way to turn a simple Tuesday into a celebration, and a guaranteed crowd-pleaser. It’s the frosting that will have people asking, “How did you make this?!”
I hope this recipe brings as much joy to your kitchen as it has to mine. Remember, cooking and baking are about the journey—the little stories, the happy accidents, and the connections we make over something delicious. So don’t be afraid to get in there, get your hands a little messy, and make it your own.
I’d love to hear how it goes! Tag me @feastical on social media with your beautiful creations. Now, go forth and frost!
With love and a full bowl of buttercream,
Beau