Your New Favorite Holiday Tradition: Oreo Christmas Trees!
Hey friends, Beau here! Welcome back to Feastical, your cozy corner for recipes that feel like a big, celebratory hug. Is it just me, or does the holiday season have a magical way of making even the simplest kitchen projects feel utterly joyful? The twinkle lights are going up, the classic movies are on a loop, and my brain is officially in full-on festive mode. And that can only mean one thing: it’s time for some seriously fun, no-bake holiday treats!
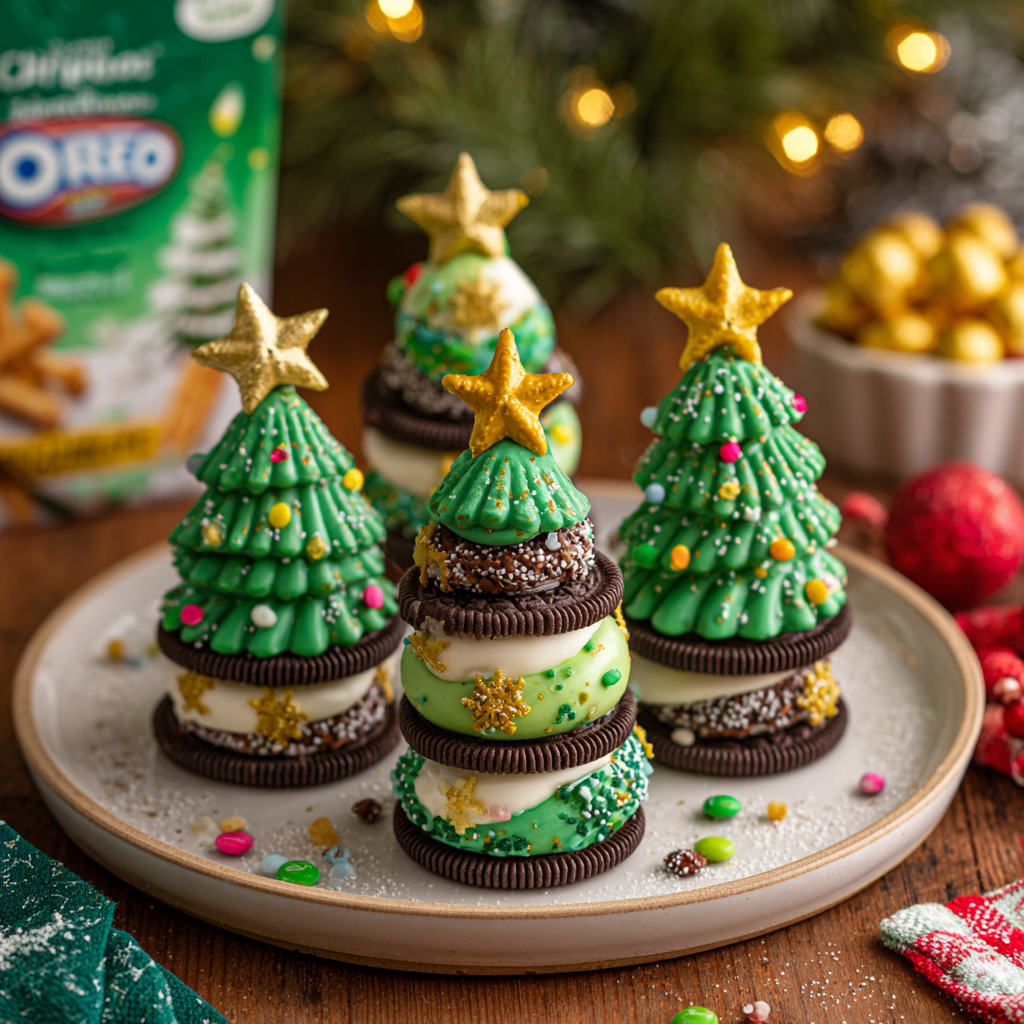
Today, we’re whipping up something that’s equal parts adorable and delicious: Oreo Christmas Trees. Imagine this: stacks of everyone’s favorite cookies, transformed into tiny, edible evergreens, dripping with sweet icing and decked out with colorful candy ornaments. They’re the perfect project to tackle with your family, a gorgeous addition to any cookie platter, and honestly, they’re just pure, unadulterated fun. The best part? You don’t need to be a pastry chef to pull these off. If you can stack cookies and get a little messy with sprinkles, you are already a master Christmas tree architect. So, put on your favorite holiday playlist, clear a little counter space, and let’s make some magic together!
A Sweet, Stacked Memory
This recipe takes me right back to my grandma’s kitchen table, which during December, was less of a dining surface and more of a festive command center. She’d have tins of cookies, trays of fudge, and us kids, armed with more sprinkles than common sense. One particularly chaotic (and wonderful) year, we were out of gingerbread but had a huge surplus of Oreos from a sale. A little experimentation later, and our first wobbly, over-decorated Oreo tree was born.
It was lopsided, the green icing was a questionable shade, and I’m pretty more sprinkles ended up on the floor than on the cookie. But when we placed it in the center of the table, we all just beamed with pride. We’d made something together, something silly and sweet that made everyone who saw it smile. That’s the spirit I want to bring to your kitchen with this recipe. It’s not about perfection; it’s about the laughter, the little fingers eagerly placing candy ornaments, and the shared joy of creating something wonderfully festive. These trees are more than a treat; they’re a tiny, edible memory in the making.
Gathering Your Evergreen Supplies
This is the fun part—the gathering! Here’s your simple shopping list to create a forest of sweet trees. Don’t stress about exact brands; this is all about creativity!
- 1 pack Oreo cookies: The mighty trunk of our tree! Classic original is perfect, but feel free to get festive—peppermint Oreos or even the golden ones would be a delicious twist.
- 250g white or green candy melts: This is our “snow” or “pine” coating. I love candy melts for this because they set firm and are designed for dipping. Chef’s Hack: No melts? No problem! Use high-quality white chocolate chips and mix in a drop or two of green gel food coloring. Gel is key—it won’t water down your chocolate!
- Assorted holiday sprinkles: This is where your personality shines! Think stars, pearls, snowflakes, red and green sanding sugars—the works! This is your ornament box.
- Mini M&Ms or candy dots: These act as our main “ornaments” on the tree. Their small, flat-bottomed shape is perfect for sticking to the icing.
- Piping bag or zip-top bag: Our tool for creating that perfect, drippy tree shape. A zip-top bag with a tiny corner snipped off works like a charm.
- Optional: Lollipop sticks or pretzel rods: If you want to turn your trees into pops for easy serving and fun lunchbox treats!
- Optional: Powdered sugar: For a light dusting of “snow” at the very end. It adds a beautiful finishing touch.
Building Your Edible Forest: Step-by-Step
Alright, team! Let’s get building. I’ll walk you through each step with all my best tips to ensure your trees are sturdy, sweet, and stunning.
- Melt Your Coating: Place your candy melts or white chocolate in a microwave-safe bowl. Heat in 20-second intervals on medium power, stirring vigorously between each burst. This is crucial! We want it smooth and fluid, not scorched. It usually takes about 60-90 seconds total. When it’s almost melted, just keep stirring—the residual heat will finish the job. Pro Tip: If your coating seems too thick for dipping, add a tiny, tiny amount of coconut oil or vegetable shortening (think ¼ tsp at a time) to thin it out to a perfect dipping consistency.
- Stack Your Tree Trunks: For each tree, you’ll need 3 Oreo cookies. Take your first Oreo and place a small dab of the melted coating in the center. Press your second Oreo on top, but offset it slightly so it’s not perfectly aligned. This creates that awesome tapered, tree-like shape! Repeat with a third Oreo, offsetting it again in the same direction. Hold it for a few seconds to let the “glue” set slightly. You’ve just built your core structure!
- The Icing Magic: Now, for the fun, messy part! You have two options here. You can carefully spoon the coating over the stacked cookies, letting it drip down the sides. Or, for more control, pour your melted coating into your piping or zip-top bag, snip a small hole in the tip, and drizzle it over the tree. Cover the entire stack, encouraging it to drip naturally for that beautiful, snowy evergreen look. Don’t worry about perfection—the drips are what make it charming!
- Deck the Halls (and the Trees!): This is a race against the clock, but a delicious one! Working quickly before the coating sets, decorate your tree. Press on your Mini M&M “ornaments,” add sprinkle “lights,” and most importantly, crown your creation with a star or large sprinkle at the very top. Let those kids go wild here—it’s their time to shine!
- The Big Chill: Gently place your finished masterpieces on a baking sheet lined with parchment paper. Let them set completely at room temperature, which takes about 15-20 minutes, or pop them in the fridge for a quicker set (about 10 minutes). This is the hardest part—waiting!
- Optional Finishing Touches: For a pop-able treat, you can carefully insert a lollipop stick or a pretzel rod into the base of the tree before the coating fully hardens. Just before serving, a light dusting of powdered sugar through a fine-mesh sieve creates a gorgeous, wintry snowfall effect.
How to Serve Your Sweet Conifers
Presentation is part of the fun with these guys! They are natural showstoppers. For a holiday party, arrange them on a platter as a centerpiece—maybe surround them with a few sprigs of fresh rosemary to look like little Christmas tree farm. They’re also perfect as individual place settings at a kids’ table; just pop one at each plate for an instant smile.
Thinking about holiday gifts? These make incredibly thoughtful and personal edible presents. Place each tree in a clear cellophane bag, tie it with a beautiful ribbon, and pair it with a mug for hot cocoa. It’s a gift that says, “I made this just for you,” and honestly, that’s the best kind of gift there is.
Branch Out: Fun Recipe Variations
Once you’ve mastered the classic, the forest is your oyster! Here are a few ways to mix it up:
- The Chocolate Forest: Use chocolate candy melts instead of white or green. Decorate with white nonpareils and red candy balls for a classic chocolate-orange color scheme.
- Peppermint Wonderland: Use peppermint Oreos and white candy melts. Crush up candy canes and use the碎片 as your main decoration for a refreshing, crunchy twist.
- Gingerbread Spice: Add a pinch of cinnamon, ginger, and nutmeg to your melted white chocolate coating before dipping. It’ll taste just like a gingerbread house!
- Vegan & Allergy-Friendly: Use gluten-free Oreo-style cookies and dairy-free/vegan white chocolate. Most sprinkles are naturally vegan, but always double-check the labels!
- Black Forest Tree: Use chocolate coating and decorate with dried cherry pieces and slivered almonds for a sophisticated, grown-up flavor profile.
Beau’s Chef Notes
This recipe has evolved so much since that first lopsided tree in grandma’s kitchen. We’ve learned that a tiny offset in the stacking makes all the difference and that gel food coloring is a game-changer. One of my favorite kitchen fails was the year I tried to use liquid green food coloring in white chocolate. It seized up immediately and turned into a grainy, green mess. We laughed so hard we cried, and then we ate the evidence with spoons. The moral of the story? Embrace the mess and the mistakes—they often taste just as good and make for the best stories later. This recipe is meant to be played with, so make it your own!
FAQs & Troubleshooting
Q: My coating is too thick and clumpy! What did I do wrong?
A: This is usually caused by overheating or getting even a single drop of water in the melts. Water is the enemy of melted chocolate! If it seizes, unfortunately, you can’t un-seize it. Start over slowly. If it’s just a little thick, try stirring in that tiny bit of coconut oil to smooth it out.
Q: My trees are wobbly and falling over. Help!
A: This likely means your “glue” (the dab of coating between layers) wasn’t enough or didn’t have a chance to set before you moved on. Make sure you’re using enough melted coating to act as a cement, and hold each new layer for a good 10-15 seconds before adding the next. Letting the fully assembled and decorated trees set on a flat surface in the fridge is your best bet for stability.
Q: Can I make these ahead of time?
A: Absolutely! They keep beautifully. Once set, store them in a single layer in an airtight container at room temperature for up to 3 days. If you stack them, they might stick together or break. I’d wait to add the powdered sugar “snow” until right before you serve them.
Q: My sprinkles are sliding off. How do I make them stick?
A: You have to work quickly! The coating sets fast. Make sure you’re adding your decorations immediately after applying the icing, while it’s still wet and tacky. If it starts to set, nothing will stick.
Oreo Christmas Trees
Description
Oreo Christmas Trees
No-bake, festive, and oh-so-fun! Perfect for family activities, holiday parties, or edible gifts.
Ingredients
-
1 pack Oreo cookies (classic, peppermint, or golden)
-
250 g white or green candy melts (or white chocolate + 1–2 drops green gel food coloring)
-
Assorted holiday sprinkles (stars, pearls, sanding sugars, snowflakes)
-
Mini M&Ms or candy dots (for ornaments)
-
Piping bag or zip-top bag (for drizzling the coating)
-
Optional: lollipop sticks or pretzel rods (for pop-style trees)
-
Optional: powdered sugar (for a snowy dusting)
Optional Variations:
-
Chocolate Forest: Chocolate candy melts + white nonpareils and red candy balls
-
Peppermint Wonderland: Peppermint Oreos + crushed candy canes
-
Gingerbread Spice: Add cinnamon, ginger, and nutmeg to white chocolate
-
Vegan/Allergy-Friendly: Gluten-free Oreos + dairy-free candy melts; check sprinkles for vegan compliance
-
Black Forest Tree: Chocolate coating + dried cherries and slivered almonds
Instructions
1. Melt Your Coating
-
Place candy melts or white chocolate in a microwave-safe bowl.
-
Heat in 20-second intervals, stirring between each, until smooth.
-
Tip: Add ¼ tsp coconut oil if too thick. Avoid overheating; water or steam can seize chocolate.
2. Stack Your Tree Trunks
-
Each tree uses 3 Oreo cookies.
-
Place a dab of melted coating on the first Oreo.
-
Stack the second Oreo slightly offset and press gently. Repeat with the third Oreo.
-
Hold for 10–15 seconds to let the “glue” set.
3. Coat the Tree
-
Spoon or drizzle melted coating over the stacked Oreos.
-
Allow it to drip naturally for a snowy evergreen effect.
4. Decorate Quickly
-
While coating is still wet, press Mini M&Ms, candy dots, and sprinkles onto the tree.
-
Top with a star or large sprinkle.
-
Optional: Insert a lollipop stick or pretzel rod for pops.
5. Let Set
-
Place trees on parchment-lined tray.
-
Room temperature: 15–20 minutes
-
Refrigerator: ~10 minutes for faster setting
6. Optional Finishing Touches
-
Dust with powdered sugar for a light snowfall effect just before serving.
Notes
-
Coating too thick or clumpy: Overheating or water contact may be the cause. Stir in a tiny bit of coconut oil to smooth.
-
Wobbly trees: Ensure enough coating “glue” between layers; hold each layer for 10–15 seconds before adding the next.
-
Sprinkles not sticking: Add decorations immediately after drizzling, while the coating is still tacky.
Quick Nutritional Info
Let’s be real—these are a celebratory treat! But here’s a general breakdown per tree (assuming a yield of 10 trees):
- Calories: ~180 kcal
- Fat: 8g
- Carbohydrates: 24g
- Protein: 2g
Allergy Info: The standard recipe contains gluten (from Oreos), dairy (from coating and Oreo cream), and may contain soy. As mentioned above, you can easily find gluten-free cookies and dairy-free/soy-free chocolate to make allergy-friendly versions for everyone to enjoy!
Final Thoughts
Well, that’s it, my friends! Your guide to creating the most delightful, conversation-starting, and downright tasty holiday treat on the block. I hope this recipe brings a little bit of Feastical joy and a whole lot of laughter into your kitchen this season. Remember, it’s not about creating a perfect, magazine-ready tree. It’s about the flour on your nose, the sprinkles on the floor, and the proud smile when you present your edible forest to the people you love.
If you make these (and I really hope you do!), I’d be absolutely thrilled to see your creations. Tag me @feastical on social media so I can share in your holiday baking fun. From my kitchen to yours, happy holidays and happy baking!
With love and a full plate,
Beau