Your New Favorite Holiday Tradition: Christmas Rice Krispy Trees!
Hey friends, Beau here from Feastical! Can you smell that? That’s the smell of melted marshmallows, a hint of butter, and pure, unadulterated holiday joy wafting from my kitchen. I’m absolutely buzzing to share this recipe with you today because it’s one of those magical ones that checks every single box on the holiday baking list. It’s incredibly easy (we’re talking no-bake, one-pot easy), it’s a total crowd-pleaser for both kids and adults, and it’s just so darn CUTE.
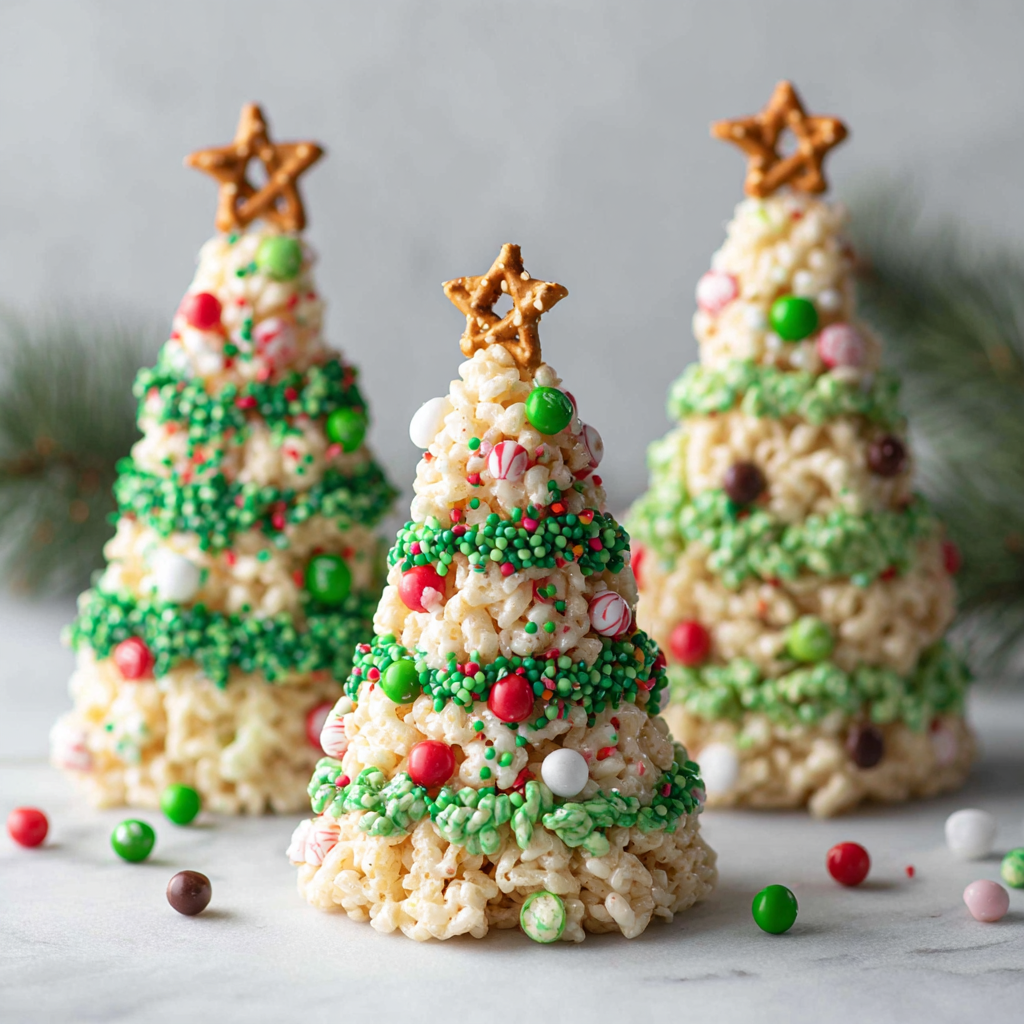
We’re making Christmas Rice Krispy Trees! These aren’t your average, everyday rice crispy treats. Oh no. We’re transforming that classic, chewy, nostalgic treat into adorable little evergreen trees, decked out with colorful candy ornaments and topped with a shining star. Imagine a platter of these cheerful green trees at your holiday party, cookie exchange, or just sitting on the counter for a sweet little pick-me-up. They bring a smile to your face before you even take a bite.
The best part? You don’t need to be a pastry chef or have a pantry full of obscure ingredients. This is about having fun, getting a little messy, and creating something delicious that brings people together. So, grab your biggest pot, round up your favorite little helpers (if you have them!), and let’s make some edible holiday magic together.
A Sticky, Sweet, and Unforgettable Memory
This recipe always takes me right back to my grandma’s kitchen, circa 1996. The year my younger cousin, Leo, decided he was a “professional dessert decorator” at the ripe old age of five. We were making a batch of these very trees, and I was meticulously placing red hots in neat little rows. Leo, however, had a more… abstract vision.
While my back was turned, he grabbed a full fistful of rainbow sprinkles and, with the dramatic flair of a budding artist, launched them into the air above our freshly formed trees. It looked less like a forest and more like a festive sprinkle bomb had gone off. There were sprinkles *everywhere*—in the trees, on the floor, even stuck to the cat who had wandered in to investigate. Grandma just laughed, wiped a sprinkle off her nose, and declared them the “most joyful trees she’d ever seen.” We still talk about “Leo’s Blizzard” every Christmas. The moral of the story? Don’t stress about perfection. The best kitchen memories often come from the happy little accidents and the messes made along the way.
Gathering Your Evergreen Forest Ingredients
Here’s everything you need to create your own edible forest. The beauty of this list is its simplicity! I’ve included my best chef-y tips and substitutions to make sure you can make this work with whatever you have on hand.
- 3 tbsp unsalted butter: This is the rich, flavorful base that gives our treats that incredible, melt-in-your-mouth quality. Using unsalted lets you control the salt level. Chef’s Tip: For a dairy-free version, a great plant-based butter works perfectly here!
- 1 (10 oz) bag mini marshmallows (~6 cups): Mini marshmallows melt faster and more evenly than large ones, which is key for a smooth, lump-free “dough.” Substitution Tip: You can use large marshmallows in a pinch—just give them a little more time to melt down.
- Green food coloring: Gel food coloring is my absolute top recommendation! It gives you a vibrant, forest-green color without thinning out your marshmallow mixture like liquid coloring can. Add it drop by drop until you hit that perfect evergreen hue.
- 6 cups Rice Krispies cereal: The iconic crispy star of the show! Make sure your cereal is fresh for the best snap, crackle, and pop. Chef’s Insight: Feel free to experiment with other crispy rice cereals—many store brands are fantastic.
- Assorted mini candies, sprinkles, or M&Ms (for ornaments): This is where your personality shines! Red hots, mini M&Ms, round sprinkles, even tiny silver dragées all make fantastic little tree ornaments. Raid your baking cupboard and have fun with it.
- Chocolate chips or candy melts (for decorating/drizzling): A little drizzle of white or dark chocolate looks like snow or icy details! Melting wafers are easiest, but chocolate chips thinned with a tiny bit of coconut oil work great too.
- Star-shaped candies or yellow M&Ms (for toppers): The crowning glory! Those classic yellow star sprinkles are perfect. If you can’t find them, a yellow M&M or even a dab of yellow frosting with a star tip works beautifully.
- Optional: pretzel sticks for “trunks”: This is my favorite pro-move. Pushing a small piece of pretzel stick into the base gives your tree a trunk and makes it so much easier for little hands to hold without getting sticky!
Crafting Your Christmas Forest: A Step-by-Step Guide
Alright, team, let’s get building! This process is simple, but a few key tips will ensure your trees are the talk of the North Pole. Read through once before you start!
- Melt the Butter: Grab your largest, heaviest-bottomed pot or Dutch oven and place it over medium-low heat. Add your butter and let it melt completely, swirling the pan occasionally. We’re using low heat for a reason—we want to gently melt the marshmallows, not caramelize or burn them. Chef’s Hack: Lightly grease the spatula you’ll be using with butter or cooking spray. Trust me, this is a game-changer for preventing marshmallow glue from taking over your utensil.
- Melt the Marshmallows: Once the butter is foamy and melted, dump in the entire bag of mini marshmallows. Now, the most important step: STIR CONSTANTLY. Use a silicone spatula or wooden spoon and keep those marshmallows moving. They’ll first puff up, then slowly collapse into a smooth, glorious, white lava. Once they’re completely melted and no lumps remain, take the pot off the heat. This whole process should only take about 5-7 minutes.
- Color Your “Dough”: Now for the fun part! Add your green food coloring. If you’re using gel, start with 3-4 drops, stir it in, and assess the color. You can always add more, but you can’t take it away! We’re going for a deep, festive green. Remember, the color will lighten slightly once we add the cereal, so go a shade darker than you think you need.
- Fold in the Cereal: Immediately pour all 6 cups of Rice Krispies cereal into the marshmallow goo. Here’s my technique: gently fold the cereal in from the bottom of the pot upwards, trying to coat every single piece without aggressively crushing them. We want to maintain that light, crispy texture. Keep folding until no dry pockets of cereal remain.
- Cool Slightly & Shape: Dump the mixture out onto a large sheet of parchment paper. Let it sit for just 2-3 minutes. You want it to be cool enough to handle but still warm and pliable. This is the perfect time to lightly grease your hands with butter or cooking spray. Pinch off a handful of the mixture and gently press and shape it into a cone form, wider at the bottom and tapering to a point at the top. Pro-Shaping Hack: For super uniform trees, pack the mixture into a lightly greased measuring cup (a 1/2 or 1/3 cup works well), then turn it out onto the parchment and gently pinch the top to a point.
- Decorate Immediately: While the trees are still slightly warm and sticky, press your candy “ornaments” into the sides. This is the time to get creative! Add a drizzle of melted chocolate for a snowy effect. If you’re using a pretzel trunk, poke it into the base now. Finally, press your star candy firmly onto the very top.
- Let Them Set: Allow your beautifully decorated trees to set completely on the parchment paper for at least 30 minutes. This lets the marshmallow re-solidify, making them easy to handle and package. Try to resist eating one right away—I know, it’s hard!
How to Serve Your edible Masterpiece
Presentation is part of the fun! You’ve made these adorable little trees, now let’s show them off.
For a simple, rustic look, arrange them on a wooden cutting board or a simple white platter. For a full-on winter wonderland scene, dust the platter with a light shower of powdered sugar “snow” before placing the trees. You can even add a few plastic reindeer or a little Santa figurine next to the plate for an extra dose of holiday cheer.
These also make incredible edible gifts! Let them set completely, then place each tree in a clear cellophane bag tied with a festive ribbon. Stack a few in a holiday tin separated by layers of parchment paper. They’re a guaranteed hit at school parties, neighbor gifts, or as a sweet treat for your mail carrier or garbage collection crew.
Branch Out: Fun Flavor Twists & Variations
Once you’ve mastered the classic, the forest is your oyster! Here are a few ways to mix things up:
- Peppermint Forest: Add 1/2 teaspoon of peppermint extract to the marshmallow mixture along with the food coloring. Decorate with crushed candy canes and a white chocolate drizzle for a cool, refreshing twist.
- Chocolate Tree Trunks: Replace 1 cup of the Rice Krispies cereal with 1 cup of Cocoa Krispies. You’ll get a marbled green-and-brown effect that looks just like a tree bark texture!
- “Snow-Covered” Pines: Skip the green food coloring altogether! Keep the mixture white and roll the shaped cones in sweetened shredded coconut or white sprinkles for a frosty, snow-laden evergreen look.
- Nutty Evergreens: For a little crunch and grown-up flavor, fold in 1/2 cup of finely chopped pistachios or almonds into the cereal mixture. The salty-nutty flavor pairs amazingly with the sweet marshmallow.
- Gluten-Free & Vegan Friendly: Easily done! Use a certified gluten-free crispy rice cereal. Use vegan butter and ensure your marshmallows are vegan (Dandies or Trader Joe’s brands are great). All the decorating candies can be swapped for vegan-friendly options too.
Beau’s Chef Notes: Lessons from a Sticky Kitchen
This recipe has evolved in my kitchen from a simple, flat square cut into triangles into these 3D cones. The pretzel stick trunk was a total happy accident—I was eating a pretzel while baking one day and it just clicked! It solved the “sticky fingers” problem and added a cute, salty crunch that balances the sweetness perfectly.
A funny note: I highly recommend designating a “sprinkle cleanup crew” if you have kids or pets. I’ve learned the hard way that those tiny colorful dots have a mysterious ability to migrate to every room in the house. I’m still finding red sanding sugar from 2018 behind my microwave. And you know what? I wouldn’t have it any other other way. Those little messes are the glitter of a life well-lived and a kitchen well-loved.
Your Questions, Answered!
Q: My mixture is too sticky to shape! What did I do wrong?
A: This usually means the mixture is still too warm. Let it rest on the parchment for another 2-3 minutes. Also, greasing your hands thoroughly is non-negotiable! A little butter or cooking spray on your palms makes the world of difference.
Q: Why are my trees turning out hard and crunchy instead of soft and chewy?
A: You likely overheated the marshmallows. Cooking them over too high a heat can make them set very hard. Always use medium-low heat and take the pot off the stove the moment the marshmallows are melted. Also, using stale cereal can lead to a less-chewy texture.
Q: Can I make these ahead of time?
A: Absolutely! These are a fantastic make-ahead treat. Once set, store them in a single layer in an airtight container at room temperature for up to 3 days. For longer storage, they freeze beautifully for up to a month. Just thaw at room temperature for an hour before serving.
Q: My green color isn’t vibrant enough. How can I fix it?
A: Gel food coloring is your best friend for vibrant colors. If you only have liquid, you’ll need to use quite a bit more, but be aware it might make the mixture a tad stickier. You can always knead in a little extra color with greased hands after the mixture is out of the pot.

Christmas Rice Krispy Trees
Description
Hey friends! These festive Rice Krispy Trees are chewy, colorful, and oh-so-fun to make. No-bake, one-pot, and totally customizable, they’re perfect for holiday parties, school treats, or just a cozy kitchen activity with kids. Think of crunchy Rice Krispies coated in marshmallow, dyed vibrant green, and decorated like little edible Christmas trees—complete with candy ornaments, chocolate drizzle, and a star on top!
Ingredients
-
3 tbsp unsalted butter (or plant-based for dairy-free)
-
1 (10 oz) bag mini marshmallows (~6 cups)
-
Green gel food coloring
-
6 cups Rice Krispies cereal
-
Assorted mini candies or sprinkles (for ornaments)
-
Chocolate chips or candy melts (for drizzle)
-
Star-shaped candies or yellow M&Ms (for toppers)
-
Optional: pretzel sticks for tree trunks
Instructions
1. Melt the Butter & Marshmallows
-
In a large pot over medium-low heat, melt the butter.
-
Add marshmallows, stirring constantly until fully melted and smooth.
2. Color the Mixture
-
Stir in green gel food coloring until you reach a vibrant evergreen hue.
3. Fold in Cereal
-
Gently fold in Rice Krispies until evenly coated.
4. Shape the Trees
-
Let mixture cool 2–3 minutes. Grease hands lightly with butter.
-
Pinch portions and shape into cones (wider at the bottom, tapering to a point).
-
Optional: insert pretzel stick for a trunk.
5. Decorate
-
Press candies into the sides as ornaments.
-
Drizzle with melted chocolate for a snowy effect.
-
Top with star candies.
6. Let Set
-
Allow trees to set on parchment for at least 30 minutes before serving.
Notes
-
Peppermint Twist: Add ½ tsp peppermint extract and top with crushed candy canes.
-
Chocolate Trunks: Mix in Cocoa Krispies for a bark effect.
-
Snowy Trees: Skip the green coloring and roll in shredded coconut.
-
Nutty Add-In: Fold in ½ cup chopped nuts for extra crunch.
-
Vegan/Gluten-Free: Use vegan butter, vegan marshmallows, and certified gluten-free cereal.
Nutrition
- Calories: 150 Cal Per Tree
- Fat: 4g
- Saturated Fat: 2.5g
Nutritional Information (Per Tree, based on 12 trees)
Let’s be real, these are a holiday treat, meant to be enjoyed for their joy and flavor! But it’s always good to know what you’re enjoying.
Calories: ~150 | Fat: 4g | Saturated Fat: 2.5g | Carbohydrates: 28g | Sugar: 16g | Protein: 1g
Allergy Info: This recipe contains dairy (from butter). To make it gluten-free, ensure your crispy rice cereal and pretzels are certified gluten-free. Always check marshmallow labels for potential allergens.
Final Thoughts: Share the Holiday Spirit
Well, friends, there you have it—your guide to creating the most whimsical, delicious, and fun holiday treat around. These Christmas Rice Krispy Trees are more than just a dessert; they’re an activity, a memory-maker, and a guaranteed spirit-lifter.
I hope you have as much fun making these as I do. I’d love to see your creations! Tag me @Feastical on Instagram or Facebook with your photos. Show me your forests, your decorating styles, and your happy little kitchen helpers. You’re not just making treats; you’re building traditions.
From my kitchen to yours, happy holidays and happy baking! Until next time, keep your spatula close and your marshmallows melting.