
Your Homemade Holiday Magic Awaits
Hey friends, Beau here from Feastical! Can we just take a moment to appreciate the sheer, unadulterated joy of the holiday season? It’s not just about the twinkling lights or the cozy sweaters—it’s about the flavors, the smells, and the memories that come wrapped up in our favorite treats. And if you’re anything like me, a huge part of that nostalgia lives inside a certain green-and-red box from the grocery store.
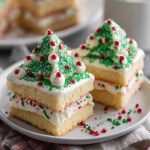
You know the one. That iconic cellophane window revealing those perfectly stacked, cream-filled Christmas tree cakes, coated in a waxy-yet-wonderful chocolatey coating and finished with a jolly red squiggle. For years, they were the highlight of my December lunchbox and the ultimate prize at the end of a long day of “helping” wrap presents. But here’s the secret I’ve discovered in my kitchen: we can make them at home, and my goodness, they are about a million times better.
I’m talking about fluffy, tender vanilla cake that actually tastes like vanilla. We’re making a sweet, cloud-like buttercream that’s so good you’ll want to eat it with a spoon. And we’re dipping it all in a simple, sweet shell and decorating it with our own two hands. This isn’t just a recipe; it’s a project, a memory-maker, and the ultimate centerpiece for your holiday dessert table. So, tie on your favorite apron, put on some classic Christmas tunes, and let’s create some Feastical magic together. We’re making Copycat Little Debbie Christmas Tree Cakes, and they’re about to become your new favorite tradition.
A Lunchbox Memory
I can still feel the crinkle of that brown paper bag and the cold metal of my lunchbox latch. It was the last week of school before winter break, and the air was buzzing with the kind of excitement only sugar and impending freedom can bring. My mom, the absolute saint, would always sneak a little surprise into my lunch on those final few days. And without fail, on the very last day, it would be there: a single, precious Little Debbie Christmas Tree Cake.
I’d always save it for last, of course. I’d eat my sandwich and my apple first, all the while sneaking glances at that magical tree-shaped treat. Unwrapping it was a ceremony. I’d carefully peel back the plastic, revealing that red and green sparkle. I’d nibble the corners first, savoring the combination of soft cake, sweet cream, and that unique coating. It wasn’t just a snack; it was a signal. It meant vacation, Santa was coming, and all was right with the world. This recipe is my love letter to that feeling. It’s my way of bringing that same burst of joy into our kitchens, but with the love and from-scratch quality that makes everything taste just a little bit sweeter.
Gathering Your Holiday Ingredients
This recipe makes a big batch—about 20-24 cakes—because trust me, you’ll want to share these (or maybe not, no judgment here!). Everything is at room temperature for a reason; it creates a smoother, more emulsified batter that bakes up light and even. Let’s break it down.
For the Fluffy Vanilla Cake:
- 3 cups all-purpose flour: The sturdy foundation of our cake. For a slightly lighter crumb, you can swap one cup for cake flour, but all-purpose works beautifully.
- 4 tsp baking powder: Our leavening hero! This is what gives the cake its signature lift and fluffy texture. Make sure yours is fresh for the best rise.
- 1 tsp salt: Never skip the salt! It balances the sweetness and enhances all the other flavors, making the vanilla pop.
- 2 cups (4 sticks) unsalted butter, room temp: The key to richness and that melt-in-your-mouth texture. Room temp butter creams together with the sugar to create air pockets, which is the secret to a light, not dense, cake.
- 4 cups sugar: It’s a sweet treat, after all! This provides sweetness and also helps aerate the butter.
- 8 large eggs, room temp: Eggs provide structure, richness, and moisture. Room temp eggs incorporate much more smoothly into the batter.
- 8 tsp vanilla extract: Yes, that’s a lot! We want a cake that actually tastes like vanilla, not just looks beige. For a real chef’s touch, use vanilla bean paste to see those beautiful little specks.
- 2 cups buttermilk, room temp: The magic ingredient! The acidity in buttermilk tenderizes the gluten, resulting in an incredibly soft, moist crumb. No buttermilk? No problem! Make a quick DIY version by adding 2 tablespoons of white vinegar or lemon juice to 2 cups of regular milk and let it sit for 5 minutes.
For the Dreamy Buttercream:
- 2 cups (4 sticks) unsalted butter, room temp: Using unsalted butter lets us control the salt level perfectly. It must be soft for a silky, non-grainy frosting.
- 10 cups powdered sugar: Also called confectioners’ sugar. It dissolves easily and gives us that smooth texture. Sift it if it’s lumpy!
- 8-10 Tbsp heavy cream: This loosens the frosting to a spreadable, creamy consistency. Start with 8 and add more as needed.
- 6 tsp vanilla extract: More vanilla! It makes the buttercream taste incredible.
- ½ tsp salt: The crucial element that cuts the sweetness and makes the frosting taste like a rich vanilla ice cream instead of just sweet butter.
For the Festive Decor:
- Green sugar sprinkles: For that classic Christmas tree sparkle.
- Red gel food dye: Gel or paste food coloring is best for vibrant red stripes without thinning out your icing.
- Optional upgrades: Want to go the extra mile? Dip the assembled cakes in melted white chocolate instead of frosting the outside for a more authentic coating. Edible glitter adds serious wow factor, and a sprinkle of crushed peppermint on top is deliciously festive.
Let’s Build Some Christmas Trees!
Okay, team! This is where the fun begins. Read through all the steps first, and remember, baking is supposed to be fun. Don’t stress about perfection—these trees are handmade with love, and that’s what makes them special.
- Preheat and Prep: Fire up your oven to 350°F (175°C). This is our golden temperature for a perfectly baked, golden-brown cake. Now, grab two standard 10×15-inch jelly roll pans or rimmed baking sheets. Line them with parchment paper! This is non-negotiable for easy removal. I never bother greasing and flouring anymore—parchment is my ultimate kitchen hack.
- Whisk the Dry Goods: In a large bowl, take your flour, baking powder, and salt. Give them a good, thorough whisk. This isn’t just mixing; you’re aerating the flour and ensuring the baking powder is evenly distributed, which prevents those weird bitter pockets and ensures an even rise. Set this bowl aside.
- Cream the Butter & Sugar: In your stand mixer fitted with the paddle attachment (a hand mixer works great too!), beat the room-temperature butter and sugar together on medium-high speed. Now, be patient here! We’re not just mixing them; we’re “creaming” them. Beat for a good 3-5 minutes, until the mixture is incredibly pale, fluffy, and almost white. This step incorporates air, which is the foundation of a light cake. Scrape down the bowl halfway through.
- Incorporate the Eggs & Vanilla: With the mixer on medium, add the eggs one at a time, letting each one fully incorporate before adding the next. This prevents the batter from breaking or curdling. Then, pour in that glorious vanilla and mix until combined. It should smell amazing already.
- Combine Wet & Dry: Reduce your mixer speed to low. We’re going to add the dry ingredients and the buttermilk in three parts, starting and ending with the dry ingredients. So, add about 1/3 of the flour mixture, mix until just combined, then half the buttermilk, another 1/3 of flour, the rest of the buttermilk, and finally the last of the flour. Mix until the last streaks of flour disappear, then STOP. Overmixing is the enemy of a tender cake—it develops gluten and makes it tough.
- Bake to Perfection: Divide the batter evenly between your two prepared pans. Use an offset spatula to spread it into a smooth, even layer, all the way to the corners. Pop them in the oven and bake for 25-30 minutes. They’re done when the tops are lightly golden and spring back when gently touched, and a toothpick inserted into the center comes out clean.
- The Cool Down: Let the cakes cool completely in the pans on a wire rack. I mean it—completely! If you try to frost a warm cake, you’ll have a melty, slidey mess. This is a great time to wash your mixer bowl and make the buttercream.
- Whip the Buttercream: In your clean mixer bowl, beat the room-temperature butter on medium speed until it’s completely smooth and creamy. Gradually add the powdered sugar with the mixer on low (unless you want a sugar dust storm), then the vanilla and salt. Once incorporated, pour in the heavy cream, increase the speed to medium-high, and beat for a full 2-3 minutes until outrageously light and fluffy.
- Cut and Assemble: Here’s the fun part! Once the cakes are cool, use a Christmas tree-shaped cookie cutter (about 3-4 inches tall is perfect) to cut out your shapes. You’ll get about 10-12 trees from each pan. Press down firmly and try to cut them as close together as possible. Now, take one tree, spread a generous layer of buttercream on its flat side, and top it with another tree to make a little cake sandwich. Repeat with all your trees!
- Frost and Decorate: You have two options here: you can give them a thin “crumb coat” of buttercream and then a final coat, or for a more authentic look, carefully dip the top of each tree in melted white chocolate, letting the excess drip off. Before the coating sets, immediately decorate with green sprinkles for “tinsel” and use the red gel food dye (put a small amount in a bag with a tiny tip cut off or use a toothpick) to draw on simple red “ornament” stripes. Let them set at room temperature or in the fridge before serving.
Sharing the Holiday Spirit
Presentation is part of the fun! These little trees are a celebration all on their own. For a simple, stunning display, arrange them on a beautiful platter or a rustic wooden board. Stack them like a little forest—it’s adorable and makes them easy to grab.
They are the ultimate party dessert, perfect for your cookie exchange, Christmas Eve gathering, or as the star of your Christmas Day dessert spread. Pair them with a cold glass of milk for the kids (and kids at heart!) or a hot cup of coffee or peppermint hot chocolate for the adults. They also make incredibly thoughtful homemade gifts. Place a few in a cellophane bag, tie it with a festive ribbon, and you’ve just given someone a delicious edible holiday card.
Make It Your Own!
Once you’ve mastered the classic, the holiday flavor world is your oyster! Here are a few of my favorite twists:
- Peppermint Twist: Add 1 teaspoon of peppermint extract to the buttercream instead of vanilla. Decorate with crushed candy canes for a cool, festive kick.
- Chocolate Lover’s Dream: Replace ¾ cup of the flour in the cake with ¾ cup of unsweetened cocoa powder for a rich chocolate cake. A chocolate buttercream would be divine here too!
- “Naked” Cake Style: Skip the outer frosting or white chocolate dip entirely! Just dust the assembled tree cakes with a light shower of powdered sugar “snow” for a simpler, less sweet option that’s just as pretty.
- Lemon Snowdrop: For a brighter, less traditional flavor, use lemon extract in the cake and buttercream. Dip in white chocolate and decorate with yellow sprinkles or zest. It’s a beautiful and refreshing alternative.
- Gluten-Free Joy: You can easily make this cake gluten-free! Use a 1:1 gluten-free all-purpose flour blend (I like the ones with xanthan gum already included). The result is just as tender and delicious.
Beau’s Kitchen Chronicles
This recipe has evolved so much in my kitchen over the years. The first time I tried it, I attempted to bake the cake in a tree-shaped pan. Disaster! The edges burned and the centers sunk. That’s when I had the epiphany to use a sheet pan and cookie cutter method—it gives you perfectly even, flat layers that are ideal for stacking. Another funny fail: I once used liquid red food coloring for the stripes instead of gel. It bled everywhere, turning my beautiful green trees into a muddy, post-Christmas mess. We live and we learn! Now, I always keep gel food coloring in my pantry. The beauty of baking is that even the “mistakes” usually still taste delicious, and they always make for a good story later.
Your Questions, Answered
Q: My cake turned out dense. What happened?
A: The most common culprits are overmixing the batter after adding the flour (which develops gluten) or using cold ingredients. Make sure your butter, eggs, and buttermilk are truly at room temperature to ensure proper emulsification and a light texture.
Q: Can I make any parts of this ahead of time?
A: Absolutely! This is a great make-ahead recipe. You can bake the cake layers, wrap them tightly in plastic wrap, and freeze them for up to a month. Thaw in the fridge overnight. The buttercream can be made and refrigerated for up to a week; just let it come to room temperature and re-whip it before using. Fully assembled cakes freeze beautifully for up to 3 months.
Q: My buttercream is too thin/too thick. How can I fix it?
A: Kitchen environments vary! If it’s too thin, beat in a little more powdered sugar, a ¼ cup at a time. If it’s too thick and difficult to spread, add more heavy cream, one tablespoon at a time, until it reaches your desired consistency.
Q: I don’t have a stand mixer. Can I still make this?
A: You sure can! A sturdy hand mixer and a little extra elbow grease will work perfectly. Just make sure to really take the time to cream the butter and sugar properly.
Copycat Little Debbie Christmas Tree Cakes
Description
Fluffy vanilla cake, cloud-like buttercream, and a sweet coating—this from-scratch version will make your holidays extra magical. Makes 20–24 cakes.
Ingredients
For the Fluffy Vanilla Cake:
-
3 cups all-purpose flour (or 2 cups all-purpose + 1 cup cake flour for lighter texture)
-
4 tsp baking powder
-
1 tsp salt
-
2 cups (4 sticks) unsalted butter, room temperature
-
4 cups sugar
-
8 large eggs, room temperature
-
8 tsp vanilla extract (or vanilla bean paste)
-
2 cups buttermilk, room temperature (or DIY: 2 cups milk + 2 tbsp vinegar/lemon juice, let sit 5 min)
For the Dreamy Buttercream:
-
2 cups (4 sticks) unsalted butter, room temperature
-
10 cups powdered sugar, sifted if needed
-
8–10 Tbsp heavy cream
-
6 tsp vanilla extract
-
½ tsp salt
For the Festive Decor:
-
Green sugar sprinkles
-
Red gel food coloring
-
Optional: melted white chocolate, edible glitter, crushed peppermint
Instructions
Step 1: Preheat & Prep
-
Preheat oven to 350°F (175°C).
-
Line two 10×15-inch jelly roll pans with parchment paper.
Step 2: Whisk Dry Ingredients
-
In a large bowl, whisk together flour, baking powder, and salt. Set aside.
Step 3: Cream Butter & Sugar
-
In a stand mixer (or with a hand mixer), beat butter and sugar on medium-high for 3–5 min until pale and fluffy.
-
Scrape down the sides halfway through.
Step 4: Add Eggs & Vanilla
-
Add eggs one at a time, fully incorporating each before the next.
-
Mix in vanilla extract.
Step 5: Combine Wet & Dry Ingredients
-
Reduce mixer to low. Add dry ingredients and buttermilk in three parts (start and end with flour).
-
Mix until just combined. Do not overmix!
Step 6: Bake the Cake
-
Divide batter evenly between prepared pans. Smooth with an offset spatula.
-
Bake 25–30 min until lightly golden and springy; toothpick comes out clean.
-
Cool completely on a wire rack.
Step 7: Make Buttercream
-
Beat butter until smooth.
-
Gradually add powdered sugar on low speed.
-
Mix in vanilla and salt.
-
Add heavy cream, beat medium-high 2–3 min until fluffy.
Step 8: Cut & Assemble
-
Use a Christmas tree-shaped cookie cutter (3–4 inches tall) to cut cakes.
-
Spread buttercream on one tree, top with another to make a sandwich. Repeat.
Step 9: Frost & Decorate
-
Option 1: Crumb coat + final buttercream layer.
-
Option 2: Dip tops in melted white chocolate. Before coating sets, add green sprinkles and use red gel for stripes.
-
Let set at room temperature or in the fridge.
Notes
-
Peppermint Twist: Add 1 tsp peppermint extract to buttercream; decorate with crushed candy canes.
-
Chocolate Version: Replace ¾ cup flour with cocoa powder; pair with chocolate buttercream.
-
Naked Cakes: Skip outer frosting; dust with powdered sugar.
-
Lemon Snowdrop: Use lemon extract; dip in white chocolate; decorate with yellow sprinkles/zest.
-
Gluten-Free: Use a 1:1 gluten-free flour blend.
Nutrition
- Calories: 420 kcal per cake
- Sugar: 43 g
- Fat: 20 g
- Carbohydrates: 56 g
- Protein: 4 g
Nutritional Information*
Alright, let’s be real: these are a decadent holiday treat! Enjoy them in the spirit of the season. The estimated nutritional information per cake (assuming 22 cakes per batch and using all the buttercream) is approximately:
- Calories: 420 kcal
- Fat: 20g
- Carbohydrates: 56g
- Sugar: 43g
- Protein: 4g
Final Thoughts: A Gift Made with Love
Friends, as we tie the final red ribbon on our baking project, I hope you’re feeling that warm, fuzzy, and utterly satisfied holiday glow. What we’ve created here is so much more than a copycat recipe; it’s a reclamation of joy. We’ve taken a beloved symbol of our childhood nostalgia and infused it with the one ingredient that mass-produced treats can never replicate: genuine, hands-on love.
These homemade Christmas Tree Cakes are a testament to the magic we can create in our own kitchens. They might not be perfectly uniform, and your red squiggle might have a little extra personality—and that’s exactly what makes them special. They carry the laughter from your kitchen, the scent of vanilla that now fills your home, and the pride of having made something truly wonderful from scratch.
So, as you share these with family and friends, or sneak one for yourself with a cup of coffee, take a moment to savor it. You’re not just tasting cake, buttercream, and chocolate; you’re tasting a memory you chose to create. You’ve added your own chapter to the story of this holiday classic.