Your New Favorite Fall Treat: No-Bake Pumpkin Cheesecake Balls
Hey friends, Beau here! Can you feel it? That crisp, cool air, the leaves starting to turn, and that undeniable urge to cozy up with all things pumpkin. It’s officially that magical time of year, and my kitchen is smelling like a dream. But I get it—between holiday prep, gatherings, and just the general busyness of life, turning on the oven for a complicated dessert isn’t always on the menu. That’s exactly why I’m so excited to share this recipe with you today.
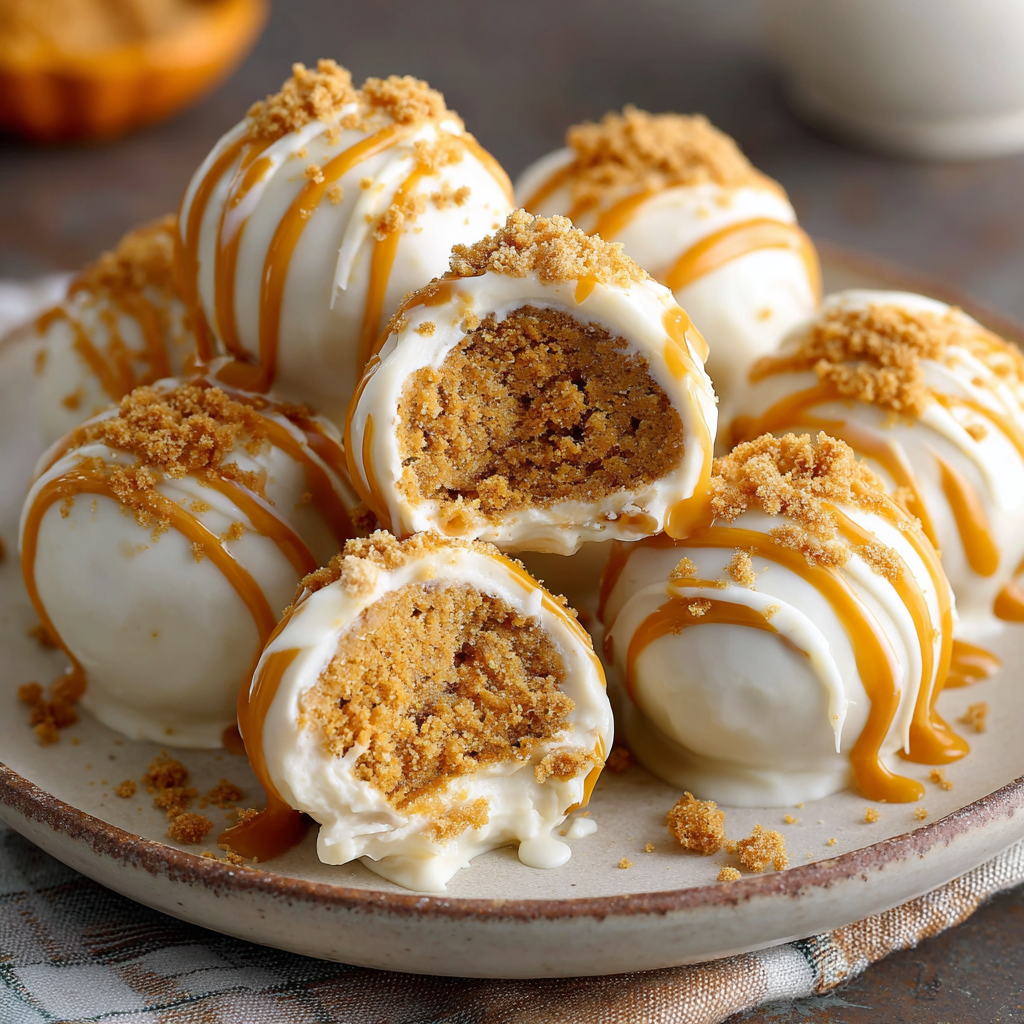
Imagine this: all the creamy, spiced, soul-warming flavor of your favorite pumpkin cheesecake, rolled into a perfect, pop-able bite. No water baths, no cracked tops, no fuss. Just a simple mix, roll, and dip situation that results in the most incredible little treats. These No-Bake Pumpkin Cheesecake Balls are here to be the star of your holiday cookie tray, the perfect homemade gift for neighbors, or just a secret little sweet treat tucked away in your fridge for when a cozy craving hits. They’re creamy, they’ve got a fantastic crunch from the crust, and that smooth white chocolate coating? Pure magic. So, grab your favorite mixing bowl and let’s make some no-bake memories together!
A Spoonful of Nostalgia: Where This Recipe Came From
This recipe takes me right back to my grandma’s kitchen table. She was the queen of “keeping it simple,” especially during the hectic holidays. Every year, without fail, she’d make her famous no-bake cheesecake. It was a glorious, jiggly masterpiece that we’d all dive into after Thanksgiving dinner. One year, I decided I wanted to take that same no-bake magic but make it portable—something we could share easily at our big family potluck.
After a little trial and (mostly delicious) error, I landed on the idea of rolling the filling into balls. The first batch was a bit soft, but adding the graham cracker and gingersnap crumbs was the game-changer. It gave them that classic “crust” texture and made them sturdy enough to dip. The moment I brought out that first platter, drizzled with a little extra chocolate, my grandma gave me that slow, knowing nod of approval. That’s the beauty of food, isn’t it? It’s not just about filling our bellies; it’s about taking those beloved traditions and adding our own chapter to the story. Now, every time I make these, it feels like she’s right there in the kitchen with me.
Gathering Your Pumpkin Cheesecake Ball Squad
Here’s the dream team of ingredients that’s going to come together to create something spectacular. The best part? You probably have a lot of this hanging out in your pantry already!
- 8 oz Cream Cheese, softened: This is the creamy, tangy heart of our cheesecake ball. Full-fat is best for flavor and structure, but reduced-fat will work in a pinch. The key word here is SOFTENED. Take it out of the fridge at least an hour before you start. This ensures a smooth, lump-free mixture.
- ⅓ cup Powdered Sugar: Sweetens everything up without the grittiness of granulated sugar. It also helps thicken the mixture slightly.
- ⅔ cup Pumpkin Purée: The star of the show! Make sure you’re using 100% pure pumpkin purée, NOT pumpkin pie filling, which is pre-sweetened and spiced.
- 1 tsp Pumpkin Pie Spice: That warm, cozy flavor we all crave. Feel free to adjust to your taste—add a pinch more if you’re a spice lover!
- 1½ cups Graham Cracker Crumbs: This gives us that classic cheesecake crust flavor and crucial texture. You can buy pre-crumbled or crush whole sheets in a zip-top bag with a rolling pin.
- 1½ cups Gingersnap Crumbs: My secret weapon! The ginger adds a wonderful, warm kick that pairs perfectly with the pumpkin. If you can’t find gingersnaps, you can use all graham cracker crumbs, but the gingersnap really takes it to the next level.
- 12 oz White Almond Bark (for coating): This is my coating of choice because it melts smoothly, sets firmly, and has a sweet, vanilla flavor that doesn’t overpower the pumpkin. You can also use white chocolate chips, but add a teaspoon of coconut oil to help them melt smoothly.
- Optional: 1 cup Orange Candy Melts (for drizzle): Purely for festive flair! A little drizzle makes these look professionally done and extra fun for Halloween or Thanksgiving.
Let’s Get Rolling: Your Step-by-Step Guide
Okay, team! Let’s do this. It’s an easy process, but a few chef-ly tips will make it absolutely foolproof.
Step 1: The Creamy Base
In a large mixing bowl, beat your softened cream cheese with an electric hand mixer (or a stand mixer with the paddle attachment) on medium speed until it’s completely smooth and creamy. This should only take about 30 seconds. Now, add in the powdered sugar, pumpkin purée, and pumpkin pie spice. Beat it all together until it’s beautifully combined and there are no streaks of cream cheese left. Pro Chef Hack: Scrape down the sides of the bowl with a spatula halfway through to ensure everything is evenly mixed.
Step 2: The Crunchy Add-In
Switch to a sturdy spatula or a wooden spoon. Dump in the graham cracker and gingersnap crumbs. Gently fold them into the wet mixture until a soft, somewhat sticky dough forms. It will look and feel like a thick, delicious paste—that’s exactly what you want!
Step 3: The Chill Session
This step is non-negotiable, my friends! Cover the bowl with plastic wrap and pop it into the refrigerator for at least 20-30 minutes. This firms up the fat in the cream cheese, making the dough MUCH easier to handle and roll. Trying to roll it right away is a sticky mess—trust me, I’ve learned the hard way so you don’t have to!
Step 4: Roll Call!
Line a baking sheet with parchment paper or a silicone baking mat. Using a small cookie scoop (about 1 tablespoon size) or a spoon, portion out the dough. Then, with clean, dry hands, roll each portion into a smooth, tight 1-inch ball. Place each ball on the prepared tray. Once they’re all rolled, slide the entire tray into the freezer for 15-20 minutes. This quick freeze is the second key to perfect dipping. A frozen ball means a firm center that won’t fall apart in the warm coating.
Step 5: The Coating Magic
Break the almond bark into chunks and place it in a microwave-safe bowl. Microwave in 30-second bursts, stirring vigorously between each burst, until it’s completely melted and smooth. Do not over-microwave! Now, remove a few balls from the freezer at a time (keeping the rest cold). Using a fork or a dipping tool, submerge a ball in the melted coating. Lift it out, tap the fork gently on the side of the bowl to let the excess drip off, and then place it back on the parchment-lined tray.
Step 6: The Finishing Touch (Optional)
If you’re using the orange candy melts, melt them the same way you did the almond bark. Transfer the melted candy to a small zip-top bag, snip a TINY corner off, and drizzle away over the set balls. Get creative with it!
Step 7: The Final Set
Let the coating set completely at room temperature, or for a faster set, pop them back in the fridge for 10 minutes. Then, it’s time to dig in!
How to Serve These Little Bites of Joy
Presentation is part of the fun! Here’s how to make these cuties shine:
For a casual family treat, simply pile them high on a cute plate or in a rustic wooden bowl. For a holiday party or cookie exchange, give them the star treatment. Arrange them on a elegant platter in a single layer, maybe with a few autumn leaves or cinnamon sticks for decoration. They look incredible nestled in mini paper candy cups—it makes them easy to grab and keeps the coating from sticking to the plate.
These also make the most heartfelt homemade gift. Package them in a clear cellophane bag tied with a pretty ribbon, or stack them in a festive holiday tin. I promise, anyone receiving these as a gift will be absolutely thrilled. They’re the perfect sweet bite with a cup of coffee after dinner, or a fun addition to a dessert charcuterie board!
Mix It Up! Delicious Recipe Variations
Once you’ve mastered the base recipe, the flavor world is your oyster! Here are a few of my favorite twists:
- The Chocolate Lover: Use chocolate graham cracker crumbs instead of regular, and dip the balls in melted dark or milk chocolate instead of white almond bark.
- The Nutty One: Roll the coated balls in finely chopped pecans or walnuts before the coating sets for a fantastic crunchy exterior.
- The Bourbon-Spiced: Add 1-2 tablespoons of bourbon or whiskey to the cream cheese mixture for a sophisticated adult twist. So good!
- Gluten-Free Friendly: Simply use certified gluten-free graham crackers and gingersnaps. The recipe works exactly the same!
- The Extra-Cozy: Add a tiny pinch of black pepper or cayenne pepper to the mix along with the pumpkin spice for a surprising and delicious warm kick.
Beau’s Chef Notes & Kitchen Stories
This recipe is a living thing in my kitchen—it’s evolved over the years! The first time I made them, I was so impatient I didn’t chill the mixture at all. Let’s just say I ended up with pumpkin cheesecake *soup* balls. It was a delicious mess, but a mess nonetheless. I’ve learned that patience with the chilling steps is the true secret ingredient.
Another fun story: I once brought these to a friendsgiving and a guy there, who claimed to “hate pumpkin,” ate about six of them before someone told him what they were. He just looked at me, shrugged, and went back for more. That’s the power of a good no-bake bite! Don’t be afraid to play around and make it your own. That’s what cooking is all about.
Your Questions, Answered!
Q: My mixture is too soft to roll, even after chilling! What did I do wrong?
A: This usually means the cream cheese wasn’t soft enough to incorporate fully, or you might have accidentally used pumpkin pie filling (which is wetter). Don’t panic! Just add more graham cracker crumbs, a tablespoon at a time, until the mixture is rollable.
Q: The coating is clumpy and thick. How can I fix it?
A: This means the almond bark might have been overheated. You can try stirring in a teaspoon of solid shortening (like Crisco) to help smooth it out. Next time, melt it more slowly using shorter bursts in the microwave.
Q: Can I make these ahead of time?
A: Absolutely! They are the perfect make-ahead dessert. Store them in a single layer in an airtight container in the fridge for up to 5 days, or you can freeze them for up to 2 months. Just thaw in the fridge before serving.
Q: Why do I have to freeze the balls before dipping?
A: Freezing them solidifies the fat, ensuring the ball doesn’t fall apart when you dip it into the warm coating. It also helps the coating set much faster and creates a satisfying snap when you bite into it.

Easy No-Bake Pumpkin Cheesecake Balls
Description
Fall flavors, no oven required. These little bites pack all the creamy, spiced goodness of pumpkin cheesecake into a poppable, shareable treat. Perfect for holiday trays, gifts, or a secret stash in your fridge, they’re easy to make and absolutely irresistible. Think cozy pumpkin spice, crunchy cookie crumbs, and a sweet chocolate shell—all in one bite-sized package.
Ingredients
-
8 oz cream cheese, softened
-
⅓ cup powdered sugar
-
⅔ cup pumpkin purée (100% pure, not pie filling)
-
1 tsp pumpkin pie spice
-
1½ cups graham cracker crumbs
-
1½ cups gingersnap crumbs
-
12 oz white almond bark (or white chocolate + 1 tsp coconut oil)
-
Optional: orange candy melts, for drizzle
Instructions
-
Beat cream cheese until smooth. Add powdered sugar, pumpkin, and pumpkin pie spice; mix well.
-
Fold in graham cracker and gingersnap crumbs until a thick dough forms.
-
Chill mixture 30 min, then roll into 1-inch balls. Freeze 15–20 min.
-
Melt almond bark in 30-sec bursts until smooth. Dip balls, let excess drip off, and place on parchment paper.
-
(Optional) Drizzle with melted orange candy melts for a festive finish.
-
Chill until coating sets. Enjoy!
Notes
-
Chill twice: once before rolling, once before dipping—this keeps them firm.
-
Too soft? Add extra crumbs, 1 tbsp at a time.
-
Swap coatings: dark or milk chocolate for a richer twist.
-
Perfect make-ahead: fridge 5 days or freeze up to 2 months.
Nutritional Information (Approximate)
Okay, let’s be real—these are a dessert, a treat, a moment of joy! But I know many of us like to have a general idea of what we’re enjoying. Here’s the approximate nutritional info per ball (based on a yield of 24 balls). Remember, these are estimates and can vary based on specific brands and ingredients used.
Per Serving: Calories: 130 | Fat: 7g | Saturated Fat: 4g | Carbohydrates: 15g | Fiber: 0g | Sugar: 11g | Protein: 2g | Sodium: 95mg
While they’re not a health food, they are a portion-controlled delight. Enjoying one or two is a perfect way to satisfy that sweet tooth without overdoing it!
Final Thoughts from My Kitchen to Yours
Well, friends, we’ve done it! We’ve created a ridiculously easy, incredibly delicious, and absolutely impressive fall treat without ever turning on the oven. I hope these No-Bake Pumpkin Cheesecake Balls bring as much joy to your kitchen and your people as they have to mine.
The real recipe here is more than the ingredients—it’s about taking a few moments to create something delightful to share. It’s about the laughter that happens while you’re rolling the balls, the satisfaction of that perfect drizzle, and the happy faces of everyone who gets to try one. So don’t stress about making them perfect. Just have fun with it! I’d love to see your creations. Tag me @Feastical on social media so I can cheer you on.
Now, go forth and make something Feastical! Until next time, happy cooking.