
Garlic Bread Rolls: Your New Favorite Side Dish is Here!
Hey friends, Beau here from Feastical! Let’s talk about one of life’s greatest, simplest pleasures: the smell of garlic and butter hitting warm bread. Is there anything that makes a house feel more like a home? I’m convinced it’s impossible to be in a bad mood when that aroma is wafting from your oven. It’s a universal signal that something seriously delicious is about to go down.
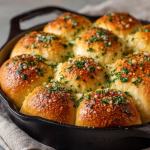
Today, we’re not just making garlic bread; we’re leveling it up. We’re creating the ultimate, irresistible, pull-apart Garlic Bread Rolls. Imagine this: soft, fluffy, cloud-like dinner rolls, each one infused with a savory, garlicky, buttery glaze, baked until they’re golden brown and begging to be pulled apart. They’re the love child of your favorite restaurant’s garlic bread and a classic, comforting dinner roll. They’re perfect for sopping up pasta sauce, essential next to a hearty salad, and honestly, they’re a meal all on their own when you just need a little carb-loaded hug.
This recipe is my go-to for a reason. It’s incredibly approachable, whether you’re a kitchen newbie or a seasoned pro. We’re using a fantastic shortcut (pizza dough!) to get these beauties on your table with minimal fuss and maximum flavor. So, tie on your favorite apron, grab your trusty baking dish, and let’s make some magic happen. These garlic bread rolls are about to become the star of your dinner table.
The First Bite: A Garlicky Love Story
This recipe takes me right back to my grandma’s kitchen. Sunday dinners at her house were a sacred tradition—a chaotic, beautiful, and incredibly loud affair with aunts, uncles, and cousins spilling out of every room. The centerpiece was always a giant pot of her famous spaghetti and meatballs, but for me, the real star was the bread.
She’d take these humble, store-bought rolls, split them open, and slather them with a mysterious mixture of butter, garlic powder, and a few herbs she’d never reveal. She’d toast them in her ancient oven until the edges were crisp and the butter was bubbling. The fight for the last one was a competitive sport among us cousins. It wasn’t fancy, but it was everything. It was the taste of family, of comfort, of being together.
These garlic bread rolls are my homage to her. I’ve taken that core memory of flavor and texture and baked it into something even more shareable and fun. It’s that same soul-warming feeling, but now we all get to pull apart our own piece of the loaf. It’s a recipe built not just on ingredients, but on nostalgia, and I can’t wait for you to make your own memories with it.
Gathering Your Garlicky Arsenal
One of the best things about this recipe is the short and sweet ingredient list. You probably have most of this in your kitchen right now! Here’s what you’ll need to create these little pockets of joy.
- 1 lb pizza dough (store-bought or homemade): This is our superstar shortcut! Using pre-made pizza dough saves so much time and effort. You can find it in the refrigerated section of most grocery stores. If you’re feeling ambitious, by all means, use your favorite homemade dough! The beauty is in the flexibility.
- 4 tbsp unsalted butter, melted: Unsalted is key here, folks. It lets us control the salt level perfectly. We’re melting it down to create our flavor-infused glaze. This is the rich, decadent base that makes everything glorious.
- 2–3 garlic cloves, minced: Fresh is best! Please, please use fresh garlic. The pre-minced stuff in a jar just doesn’t deliver the same potent, aromatic punch. Mince it finely so it distributes evenly and doesn’t burn. For true garlic lovers, lean towards 3 cloves!
- 1 tbsp fresh parsley, chopped (or 1 tsp dried): This adds a pop of color and a fresh, slightly peppery flavor that cuts through the richness of the butter. If you’re using dried, it’s totally fine—it’s what my grandma used! But if you have fresh on hand, it really brightens up the final dish.
- ½ tsp salt: This is crucial for balancing and enhancing all the other flavors. I use fine sea salt. If you’re using salted butter, you might want to reduce this to a ¼ teaspoon.
- ¼ cup grated Parmesan cheese (optional): I say “optional,” but in my kitchen, it’s mandatory. A sprinkle of good Parmesan right at the end adds a salty, nutty, umami kick that takes these rolls into the stratosphere. Feel free to use the pre-grated kind for convenience, but freshly grated from a wedge will melt and taste even better.
Let’s Get Baking: Building Your Garlic Masterpiece
Ready to transform these simple ingredients into golden perfection? Follow these steps, and you’ll be a garlic bread roll hero in no time. I’ve packed this section with all my favorite chef hacks to ensure your success!
Step 1: Prep Your Stage. First things first, preheat your oven to 375°F (190°C). This is our sweet spot—hot enough to get a beautiful golden-brown crust and cook the dough through, but not so hot that our garlic burns. While it’s heating, grab a round 9-inch baking dish or a 10-inch cast iron skillet. Give it a light coating with butter, oil, or a quick spritz of non-stick spray. This prevents any sticking and helps those bottoms get beautifully crisp.
Step 2: Shape Your Rolls. Take your pizza dough and place it on a lightly floured surface. No need to knead it! Just gently pat it into a rough rectangle. Using a sharp knife or a bench scraper (my personal favorite tool for this), divide the dough into 12 equal pieces. Don’t stress about them being perfectly identical—rustic is charming! Now, take each piece and roll it between your palms to form a smooth ball. This creates a nice, tight surface tension, which helps them rise upwards and bake evenly. Arrange them in your prepared dish, placing them close together but not squished. They should just be touching. This is the secret to getting that amazing pull-apart effect!
Step 3: The Patient Rise. Loosely cover the baking dish with a clean kitchen towel or a piece of plastic wrap. Let the dough balls rest and rise in a warm, draft-free spot for about 20-30 minutes. You’ll know they’re ready when they look slightly puffy and have snuggled up against each other. This short rest makes them extra light and tender.
Step 4: Create the Garlic Butter Elixir. While the dough is resting, make the magic potion! In a small bowl, combine the melted butter, finely minced garlic, chopped parsley, and salt. Give it a good whisk. Take a deep breath—that right there is the scent of happiness. If you’re adding Parmesan, hold it for now; we’ll use it at the very end.
Step 5: The First Butter Bath. Once your rolls have puffed up, it’s time for their first buttery shower. Using a pastry brush, gently brush half of the garlic butter mixture over the tops of the rolls. Get in between the cracks a little bit! This initial layer soaks into the dough as it bakes, infusing it with garlic flavor from the inside out.
Step 6: Bake to Golden Perfection. Pop the dish into your preheated oven and bake for 20-25 minutes. You’re looking for a deep, golden-brown top and a sound that’s more hollow than doughy when you tap the top. If you have an instant-read thermometer, the internal temperature should read between 190-200°F (88-93°C).
Step 7: The Grand Finale Glaze. This is the most important step! As soon as you pull the rolls out of the oven, immediately brush them with the remaining garlic butter. The heat of the fresh-out-of-the-oven rolls will sizzle and welcome that second layer, creating an incredible glossy finish and an explosive final hit of garlic flavor. Now, if you’re using it, sprinkle that Parmesan cheese over the top. It’ll stick perfectly to the butter and get a little melty.
How to Serve These Garlicky Clouds
You’ve done it! Now, the best part: serving them. For the full experience, serve these garlic bread rolls warm, right from the baking dish. Place the whole dish in the center of the table and let everyone pull apart their own roll—it’s interactive and fun! They are the ultimate sidekick to a big bowl of spaghetti and meatballs, a creamy soup, or a fresh garden salad. Honestly, they’re so good they can stand alone with a little marinara sauce for dipping. For a next-level brunch move, split one open and make a mini breakfast sandwich with scrambled eggs and bacon. The possibilities are endless!
Mix It Up: Your Rolls, Your Rules!
The basic recipe is a perfect classic, but feel free to get creative and make it your own! Here are a few of my favorite twists:
- Cheesy Stuffed: Before rolling the dough into balls, place a small cube of mozzarella or a teaspoon of shredded cheddar in the center and seal the dough around it. You’ll get a glorious, melty, cheesy surprise in the middle!
- Herb Garden: Add ½ teaspoon of dried Italian seasoning or a tablespoon of fresh chopped chives and basil to the butter mixture along with the parsley.
- Spicy ‘Nduja: For a kick, whisk a tablespoon of ‘nduja or a pinch of red pepper flakes into the melted butter. It adds a incredible spicy, porky depth.
- Everything Bagel: Right after the final butter brush, sprinkle the tops generously with everything bagel seasoning instead of Parmesan.
- Vegan Friendly: Super easy swap! Use a vegan pizza dough (check the label), vegan butter, and skip the Parmesan or use a plant-based alternative.
Beau’s Chef Notes & Kitchen Stories
This recipe has evolved so much since my first attempt, which I can tell you was a comedic disaster. I once, in a hurry, tried to skip the melting step and just mix cold butter with garlic. It was… chunky. And not in a good way. I’ve learned that melted butter is non-negotiable for that perfect, even coverage.
Another time, I got overzealous with the garlic and used five giant cloves. Let’s just say we had the whole house to ourselves that night—even the dog left the room! I’ve found that 2-3 is the perfect balance of flavor without venturing into vampire-repelling territory.
The biggest game-changer for me was discovering the double-brush technique. Brushing once before baking infuses the flavor, and brushing right after baking creates that irresistible glossy top and fresh garlic aroma. Don’t skip it! This recipe is forgiving, fun, and meant to be shared. I hope it finds its way into your regular rotation and creates some fantastic kitchen memories for you, just like it has for me.
Your Garlic Bread Roll Questions, Answered!
Q: Can I make these ahead of time?
A: Absolutely! You have two great options. 1) Prep the night before: Assemble the rolls in the baking dish, cover tightly with plastic wrap, and refrigerate overnight. The next day, let them sit on the counter for about 30 minutes to take the chill off before brushing with butter and baking. They might need a minute or two longer in the oven. 2) Freeze after baking: Bake them completely, let them cool, then freeze in a zip-top bag. Reheat in a 350°F (175°C) oven for 10-15 minutes until warm.
Q: My garlic burned and tasted bitter! What happened?
A: Ah, the classic garlic burn. This usually happens if the garlic is too large or if the oven is too hot. The key is to mince it very finely so it can cook gently in the butter without burning. Using a lower oven temperature (375°F is perfect) also prevents it. If you’re really worried, you can gently cook the minced garlic in the melted butter for just 30 seconds on the stovetop before adding the parsley and salt. This mellows the flavor and makes it even more resistant to burning.
Q: My rolls didn’t puff up much. Why?
A: This is almost always due to the dough being too cold or not getting enough rest. Make sure your dough is at room temperature when you start shaping it. Also, ensure your rising spot is nice and warm (on top of the preheating oven is a great spot). If your kitchen is chilly, the rise will just take a little longer. Be patient and wait until you see them visibly puff up.
Q: Can I use garlic powder instead of fresh?
A: You can, but the flavor profile will be different. Fresh garlic gives a sharper, more aromatic punch. Garlic powder provides a more mellow, all-over garlic flavor. If you use powder, I’d recommend about 1 to 1.5 teaspoons. Mix it directly into the melted butter.
Garlic Bread Rolls
Description
Hey friends! Beau here. These soft, buttery rolls are infused with garlic and herbs, baked golden, and perfect for pasta, soups, salads, or just enjoying on their own.
Ingredients
-
1 lb pizza dough (store-bought or homemade)
-
4 tbsp unsalted butter, melted
-
2–3 garlic cloves, minced
-
1 tbsp fresh parsley, chopped (or 1 tsp dried)
-
½ tsp salt
-
¼ cup grated Parmesan cheese (optional)
Instructions
1. Prep
-
Preheat oven to 375°F (190°C).
-
Grease a 9-inch round baking dish or 10-inch cast iron skillet.
2. Shape Rolls
-
On a lightly floured surface, pat dough into a rectangle.
-
Cut into 12 pieces, roll each into a ball, and place close together in the dish.
3. Let Rise
-
Loosely cover and let rise 20–30 min in a warm spot until puffy.
4. Make Garlic Butter
-
Combine melted butter, garlic, parsley, and salt in a small bowl. Set aside (reserve half for after baking).
5. First Butter Bath
-
Brush half the garlic butter over rolls, getting into the cracks.
6. Bake
-
Bake 20–25 min until golden brown and hollow-sounding when tapped.
7. Finish
-
Brush with remaining garlic butter while hot.
-
Sprinkle Parmesan if using. Serve warm and pull apart.
Notes
-
Cheesy Stuffed: Place a cube of mozzarella or teaspoon of cheddar inside each roll before shaping.
-
Herby: Add dried Italian seasoning or fresh chives/basil to the butter mixture.
-
Spicy: Mix in 1 tbsp ‘nduja or red pepper flakes.
-
Everything Bagel: Sprinkle seasoning instead of Parmesan.
-
Vegan: Use vegan dough and butter; skip or substitute Parmesan.
Nutrition
- Calories: 170 kcal per roll
- Sugar: 1g
- Fat: 7g
- Saturated Fat: 3.5g
- Protein: 4g
Nutritional Information*
Yield: 12 Rolls | Serving Size: 1 Roll
Calories: ~170 | Total Fat: 7g | Saturated Fat: 3.5g | Carbohydrates: 22g | Sugar: 1g | Protein: 4g | Sodium: 240mg
*Please note: This is an estimated nutritional breakdown based on the ingredients used. It will vary if you make substitutions. This information is provided as a courtesy from a recipe calculator and should not be considered a guarantee.
Final Thoughts: Pass the Rolls, Please!
And there you have it! From a simple ball of pizza dough to a glorious, golden, pull-apart masterpiece that’s going to have everyone asking for seconds.
These garlic bread rolls are more than just a side dish; they’re a experience. They’re about the joy of pulling apart a warm, buttery roll and sharing that moment with the people you love. They’re proof that the most memorable recipes aren’t always the most complicated ones—they’re the ones made with a little shortcut and a whole lot of heart.
I hope this recipe finds its way onto your table for countless weeknight dinners, festive holiday feasts, and everything in between. I hope it becomes your new secret weapon, your go-to comfort food, and a recipe that you’re excited to pass on.