
Spooky, Sweet, and Seriously Delicious: My Bloody Red Velvet Trifle Cups
Hey there, Feastical family! Beau here, coming at you from a kitchen that’s currently sprinkled with more red velvet crumbs than I’d care to admit. But you know what? That’s the sign of a dessert well-made, and I wouldn’t have it any other way.
With Halloween just around the corner, I know we’re all on the hunt for that perfect recipe. You know the one. It needs to be a total showstopper that makes your guests go “WOW!” but secretly, it can’t be a huge pain to pull together. Because let’s be real, we’d rather be assembling costumes and carving pumpkins than slaving over a complicated dessert all night. Am I right?
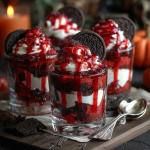
Well, my foodie friends, I have the absolute *perfect* solution for you. These Bloody Red Velvet Trifle Cups are my go-to Halloween hero. They’re creepy, elegant, indulgent, and—best of all—incredibly simple to make. We’re talking layers of devilishly moist red velvet cake, a cloud-like creamy cheesecake filling, and a dramatic, “bloody” drizzle that’s equal parts spooky and stunning. They’re individual, which means no messy slicing, and everyone gets their own perfectly layered masterpiece. So, grab your favorite mixing bowl and let’s create some deliciously haunting magic together!
A Spooky Tradition is Born
This recipe honestly came from a happy little accident a few Halloweens ago. I’d ambitiously decided to bake a towering, three-layer red velvet cake for a friend’s costume party. Long story short, I was a bit too enthusiastic with the cooling rack and one of the layers… well, let’s just say it decided to take a leap of faith onto my kitchen floor.
I was left with a pile of perfectly tasty, but tragically crumbled, red velvet cake. I stared at it for a second, my pirate costume feeling increasingly silly, and had a lightbulb moment. I grabbed the clear plastic cups I had for drinks, whipped up a quick cheesecake filling with what I had in the fridge, and layered it all up. A jar of raspberry jam thinned out with a little lemon juice became my impromptu “blood.” I arrived at the party with these ad-hoc trifle cups, and they were the undeniable hit of the night! Everyone loved the individual portions and the creepy-cool presentation. Now, it’s not a proper Halloween in my house without them. Sometimes the best recipes are born from a little bit of chaos!
Gathering Your Spooky Supplies
Here’s everything you’ll need to bring these bloody brilliant trifles to life. Don’t be afraid to get creative with substitutions—cooking is all about making it work for you!
- 1 box red velvet cake mix (plus the ingredients listed on the box): This is our fantastic shortcut! The box mix gives that classic, vibrant red color and chocolatey flavor we’re after. Chef’s Insight: I like to substitute the water called for on the box with buttermilk. It adds a wonderful tang and makes the cake even more tender.
- 1 (8 oz) block cream cheese, softened: This is the rich, tangy heart of our creamy layer. Tip: Please, please let it get to room temperature! This is the #1 secret to a lump-free, silky smooth filling. If you forget, you can microwave it for 15-20 seconds on 50% power.
- 1 cup powdered sugar: It sweetens our filling without the grittiness of granulated sugar. Substitution: You can use a granulated sugar substitute that measures like sugar, but powdered is best for texture.
- 2 cups whipped topping (like Cool Whip), thawed: This gives our filling incredible lightness. Chef’s Choice: For a truly from-scratch vibe, swap this with 2 cups of freshly whipped heavy cream. Just whip it with a tablespoon of sugar until you get stiff peaks!
- 1 cup vanilla pudding (optional): This is my secret weapon for extra creaminess and stability. It makes the filling set up beautifully and stretches it a bit further. Use the pre-made kind or instant pudding mix prepared with milk.
- 1 cup cherry or raspberry pie filling: The star of the show! This is our “blood.” I prefer the seeds in raspberry for a more realistic texture, but cherry has those gorgeous, dramatic clots. You can’t go wrong.
- Clear cups or dessert glasses: Presentation is key! Using clear vessels lets everyone see those awesome, creepy layers. Mason jars, parfait glasses, or even sturdy plastic cups all work perfectly.
Let’s Get Layering! Your Step-by-Step Guide
Okay, team! Let’s break this down. It’s all about the assembly, and I’ll be with you every step of the way with my best hacks.
- Bake that Cake! First, preheat your oven and prepare the red velvet cake mix according to the package directions, but remember my buttermilk tip if you’re using it! Bake it in a 9×13” pan for easy, even cooking. Once it’s done, let it cool completely on a wire rack. I know it’s tempting to dive in, but warm cake will melt our creamy layers! Chef’s Hack: To speed up cooling, you can pop the cake (still in the pan) right into the fridge for about 30 minutes after it’s cooled on the counter for a bit.
- Cube it Up: Once your cake is completely cool, use a serrated knife to cut it into roughly 1-inch cubes. Don’t worry about perfection—rustic, random chunks are perfect for creating nooks and crannies for our filling. This is the fun, slightly destructive part!
- Whip Up the Magic Filling: In a large bowl, beat your softened cream cheese with an electric mixer until it’s completely smooth and creamy. This should take about 2 minutes. Now, gradually beat in the powdered sugar until it’s fully incorporated. Pro Tip: Start your mixer on low speed when adding the powdered sugar unless you want a sweet, white dust cloud all over your kitchen! Finally, gently fold in the whipped topping and the vanilla pudding (if using) with a spatula until the mixture is uniform and dreamy.
- The Grand Assembly: Now for the artistic part! Grab your clear cups. Start with a layer of red velvet cake cubes at the bottom of each cup. Follow that with a generous dollop of your cream cheese filling. I like to use a spoon to spread it to the edges so you can see the distinct layers from the outside. You can repeat these layers once or twice, ending with a final thin layer of the cream cheese mixture.
- Make it “Bloody”: Just before serving, take your cherry or raspberry pie filling. Give it a good stir, and then spoon it right over the top of each trifle cup. Let it cascade down the sides for that truly gruesome, bloody effect. The contrast of the bright red “blood” against the white cream is just *chef’s kiss* spooky.
- The Final Wait: Cover your trifle cups and pop them in the fridge for at least an hour to chill and set. This waiting period is crucial—it allows all the flavors to mingle and become best friends, and it firms up the filling for the perfect spoonful.
How to Serve These Creepy Creations
Presentation is half the fun with these! Line them up on a platter for a seriously impressive dessert table display. For an extra touch of Halloween flair, you can garnish the platter with plastic spiders, creepy-crawly rings, or a few fake cobwebs (kept safely away from the cups themselves, of course!). Provide a long spoon for each cup so your guests can dive all the way down to get a bit of every layer in one glorious bite.
Mix It Up! Spooky Variations
Want to put your own spin on it? Here are a few of my favorite twists:
- Chocolate Lover’s Twist: Add a layer of chocolate pudding or chocolate shavings between the cake and cream layers.
- Boozy Blood: For the adults, stir a tablespoon of Chambord (raspberry liqueur) or Kahúa into the pie filling for an extra kick.
- Fruity Phantom: Add a layer of fresh raspberries or strawberries for a burst of fresh fruit flavor.
- Oreo Graveyard: Crush some Oreo cookies for a “dirt” layer and stick a small Halloween cookie decor on top.
- Lighter Option: Use a sugar-free cake mix, light cream cheese, and fat-free whipped topping to lighten things up without sacrificing flavor.
Beau’s Chef Notes
This recipe has evolved so much since that first crumbly-cake disaster! I’ve learned that the pudding is a game-changer for making the filling more stable, especially if you’re making these a few hours ahead. I also love using a combination of cherry and raspberry pie fillings now for a more complex “blood” look. The best part? Kids absolutely lose their minds over these. I once had my niece declare they were “disgustingly awesome,” which is the highest Halloween compliment I’ve ever received. Remember, baking should be fun, especially around the holidays. If your layers aren’t perfect, who cares? It just adds to the haunted charm!
FAQs & Troubleshooting
Q: Can I make these ahead of time?
A: Absolutely! You can assemble the cups (without the final “blood” drizzle) up to a day in advance. Keep them covered in the fridge. Add the pie filling topping just an hour or so before serving so it doesn’t soak too far down into the cream layers.
Q: My cream cheese filling is lumpy! What do I do?
A> Ah, the classic hurdle. The culprit is almost always cream cheese that’s too cold. If you have small lumps, you can sometimes beat them out with your electric mixer on high for a minute. If that doesn’t work, push the entire mixture through a fine-mesh sieve. It’s a bit of a pain, but it will save your filling! Lesson learned for next time: soften that cheese!
Q: Can I use a homemade red velvet cake instead of a mix?
A: Of course! If you have a favorite from-scratch recipe, by all means, use it! You’ll need one 9×13” cake’s worth. This is a great way to use this recipe when you’re feeling extra ambitious.
Q: The “blood” is sinking into the cream layer. Help!
A> This usually means the cream layer is still a bit too soft. Make sure you chill the assembled cups for that full hour before adding the topping. Also, ensure your pie filling is nice and thick. If it seems runny, you can simmer it in a small saucepan with a teaspoon of cornstarch slurry (equal parts cornstarch and water) to thicken it up before cooling and using.
Bloody Red Velvet Trifle Cups
- Total Time: 1 hour 5 minutes
Description
These Halloween trifles are everything: creepy, elegant, indulgent, and crazy easy to make. Imagine layers of moist red velvet cake, silky cheesecake cream, and a chilling “bloody” raspberry drizzle dripping down the sides. No messy slicing, no stress—just individual cups of haunted happiness. Perfect for parties, trick-or-treat night, or when you want to wow your crew with a dessert that looks straight out of a vampire’s cookbook.
Ingredients
-
1 box red velvet cake mix (plus ingredients on box)
Tip: Swap water with buttermilk for extra tang & tenderness -
8 oz (225g) cream cheese, softened
-
1 cup powdered sugar
-
2 cups whipped topping (or whipped cream)
-
1 cup vanilla pudding (optional, adds creaminess & stability)
-
1 cup cherry or raspberry pie filling (“the blood”)
-
Clear cups, jars, or dessert glasses
Instructions
-
Bake the Cake → Prepare red velvet mix per instructions (use buttermilk if possible). Bake in 9×13″ pan, cool completely.
-
Cube It Up → Cut cooled cake into bite-sized cubes. Rustic chunks = perfect for layers.
-
Mix the Cream → Beat softened cream cheese until smooth. Add powdered sugar, blend well. Fold in whipped topping + pudding (if using) until fluffy.
-
Assemble the Trifles → Layer cake cubes at the bottom of each clear cup. Add a spoonful of cream filling. Repeat until cup is nearly full, ending with cream.
-
Bloody Finale → Spoon pie filling on top, letting it drip down the sides for a gory effect.
-
Chill & Serve → Cover and refrigerate at least 1 hour before serving.
Notes
-
Chocolate Lovers: Add chocolate pudding or shavings.
-
Boozy Version: Stir Chambord into the pie filling for adults.
-
Kids’ Fun: Set up a “decorate your own” topping station.
- Prep Time: 20 min
- Cook Time: 45 min
Nutrition
- Calories: 380 Cal Per Cup
- Fat: 21g
- Carbohydrates: 42g
- Fiber: 1g
- Protein: 5g
Nutritional Information*
*This is an estimate per serving based on the ingredients listed and will vary with specific brands and substitutions.
Per Serving (1 cup): Calories: ~380, Protein: 5g, Carbohydrates: 42g, Fat: 21g, Fiber: 1g
Well, that’s all from my kitchen today, folks! I hope you and your family absolutely love making and devouring these Bloody Red Velvet Trifle Cups as much as I do. They’re a testament to the fact that the best Halloween memories often come from a little bit of mess and a whole lot of sweetness.
Final Thoughts
So there you have it, my ghoulish gourmands! These Bloody Red Velvet Trifle Cups are proof that the most spellbinding creations often come from the simplest ideas (and sometimes, a happy little kitchen accident).
They truly are the ultimate Halloween dessert: effortlessly impressive, wonderfully wicked, and guaranteed to delight both the kids and the kids-at-heart at your party. You get all the glory of a stunning, layered dessert with a fraction of the stress, leaving you more time to perfect your costume and enjoy the festivities.
This Halloween, I hope you embrace the fun, get a little messy, and create something deliciously memorable. Whether you’re hosting a full-blown monster mash or just craving a festive treat, these trifle cups are your perfect partner in crime.
From my haunted kitchen to yours, have a safe, spooky, and incredibly sweet Halloween!