
Black Velvet Cupcakes with Orange Frosting: Your New Halloween Obsession
Hey friends, Beau here from Feastical! Let’s talk about that moment. You know the one. You walk into a Halloween party, your arms laden with a plate of something homemade, and before you even get your coat off, a hush falls over the room. All eyes are on your creation. That, my friends, is the power of a truly show-stopping dessert. And let me tell you, these Black Velvet Cupcakes with a shock of bright Orange Frosting are the ultimate party rockstars.
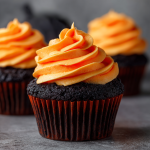
We’re not just talking about a chocolate cupcake dyed black. Oh no. This is a whole vibe. Imagine the deepest, darkest, most velvety crumb you’ve ever sunk your teeth into—moist, tender, and with just the right hint of cocoa. Now, picture topping that midnight masterpiece with a cloud of creamy, citrus-kissed orange frosting so vibrant it practically glows. The contrast is dramatic, elegant, and downright fun. They’re spooky without being kitschy, sophisticated enough for your foodie friends, and an absolute blast to make. So, preheat that oven, grab your favorite mixing bowl, and let’s create some kitchen magic that’s sure to cast a spell on everyone.
A Spooky (and Sweet) Kitchen Memory
This recipe always takes me back to my first Halloween in my own apartment. I was determined to host a party that would be legendary. The playlist was fire, the decorations were… well, cobwebby, but the food? I knew the menu needed a centerpiece. I wanted a dessert that was equal parts creepy and craveable. I started with my favorite red velvet recipe, a family heirloom of sorts, and had a wild idea: what if we went to the dark side? After a few… very messy… experiments with food coloring (my fingertips were black for a week, a story for another time), I finally nailed it. The moment I piped that first swirl of orange frosting onto the jet-black cake, I knew we had a winner. The cupcakes were the undisputed star of the party, and they’ve been a Feastical Halloween tradition ever since. They’re a reminder that the best memories are often baked with a little bit of creativity and a whole lot of love.
Gathering Your Magical Ingredients
Here’s everything you’ll need to conjure up a batch of these deliciously dark treats. Don’t just think of this as a grocery list; think of each ingredient as a key player in our delicious drama!
For the Black Velvet Cupcakes:
- 1 1/4 cups all-purpose flour: The trusty foundation of our cupcake structure. For a slightly denser, tender crumb, you can swap it with cake flour, but all-purpose works beautifully here.
- 1 cup granulated sugar: Our sweetener and a key player in creating that beautifully moist texture.
- 1/4 cup unsweetened cocoa powder: This isn’t a full-on chocolate cake, and that’s intentional! The cocoa adds a deep, rich background note that makes the “black velvet” flavor complex and delicious.
- 1 tsp baking soda & 1/2 tsp baking powder: Our dynamic leavening duo! They work together to give these cupcakes a perfect, domed rise. Make sure they’re fresh for the best lift.
- 1/2 tsp salt: The secret weapon! Salt enhances all the other flavors and balances the sweetness perfectly. Never skip it.
- 1 cup buttermilk: This is the KEY to an incredibly moist and tender crumb. The acidity also reacts with the baking soda for a great rise. No buttermilk? No problem! Make a quick DIY version by adding 1 tbsp of lemon juice or white vinegar to a cup of regular milk and let it sit for 5 minutes.
- 1/2 cup vegetable oil: Oil keeps the cupcakes moist for days, far better than butter would in this recipe. I use a neutral oil like canola or avocado.
- 2 large eggs: They bind everything together and add richness. Bring them to room temperature for a smoother batter that emulsifies better.
- 1 tsp vanilla extract: A touch of warm, sweet vanilla to round out all the flavors.
- Black gel food coloring: Chef’s pro-tip: You MUST use a gel-based coloring, not a liquid one. The gel is super concentrated, so you get that deep, dark black color without throwing off the liquid balance of your batter. I usually use about 1-2 tablespoons of gel to get that perfect midnight shade.
For the Orange Frosting:
- 1 cup (2 sticks) unsalted butter, softened: The base of our frosting. Unsalted lets us control the salt level. “Softened” is crucial here—it should be cool to the touch but yield easily when poked. Leave it on the counter for an hour before you start.
- 4 cups powdered sugar: Provides the sweetness and structure. Sift it if it’s lumpy for an ultra-smooth frosting.
- 2–3 tbsp heavy cream or milk: This loosens the frosting to the perfect piping consistency. Heavy cream will give you a richer, slightly sturdier frosting.
- 1 tsp vanilla extract: A classic pairing that works wonderfully with the orange.
- Orange gel food coloring: Again, gel is the way to go! Start with a little and add until you get that perfect, vibrant jack-o-lantern orange.
Let’s Get Baking: The Step-by-Step Magic
Ready to make some magic? Follow these steps, and you’ll be a cupcake wizard in no time. I’ve packed this section with all my favorite chef hacks to ensure your success!
- Preheat and Prep: Fire up your oven to 350°F (175°C). This gives it plenty of time to reach the perfect, steady temperature. Line your muffin tin with your favorite cupcake liners. I’m a sucker for simple black or orange liners to really make the colors pop!
- Combine the Dry Team: In a large bowl, grab your whisk and thoroughly combine the flour, sugar, cocoa powder, baking soda, baking powder, and salt. Whisking here does two things: it combines everything evenly, and it aerates the flour, which leads to a lighter cupcake. No one wants a pocket of baking soda in their bite!
- Unite the Wet Team: In a separate medium bowl, whisk together the buttermilk, vegetable oil, eggs, and vanilla extract. Whisk until it’s completely smooth and homogenous. This is where room-temperature eggs really help—they incorporate much more easily.
- Make the Batter: Now, pour your wet ingredients into the dry ingredients. Here’s my big tip: switch to a spatula and mix by hand until the batter is just combined. A few lumps are totally okay! Over-mixing is the enemy of tender cupcakes, as it develops the gluten in the flour and can make them tough. We want tender and velvety!
- Go to the Dark Side: This is the fun part! Add your black gel food coloring. Start with a tablespoon and mix it in. You’ll likely need to add more. Keep going until the batter is a deep, inky, uniform black. Don’t be shy! This is where the gel coloring earns its keep.
- Fill and Bake: Using a cookie scoop or a spoon, divide the batter evenly between the 12 liners, filling each one about 2/3 of the way full. This gives them space to rise into perfect domes without overflowing. Slide them into your preheated oven and bake for 18-20 minutes. You’ll know they’re done when the tops spring back lightly when touched, and a toothpick inserted into the center comes out with just a moist crumb or two.
- The Cool Down: This is the hardest part—waiting! Let the cupcakes cool in the pan for about 5 minutes, then transfer them to a wire rack to cool completely. I cannot stress this enough: they must be completely cool before you frost them. Otherwise, that beautiful orange frosting will melt right off into a puddle. Patience, young padawan.
- Create the Frosting: While the cupcakes cool, let’s make that glorious frosting. In a stand mixer fitted with the paddle attachment (or using a hand mixer), beat the softened butter on medium-high speed for a good 2-3 minutes until it’s pale, fluffy, and smooth. Gradually add the powdered sugar, one cup at a time, with the mixer on low speed (unless you want a sugar dust cloud!). Once incorporated, add the vanilla and 2 tablespoons of cream. Ramp the speed back up to medium-high and beat for a full 2-3 minutes until incredibly light and fluffy. Add your orange gel coloring and beat until uniform. If the frosting is too thick, add more cream, one teaspoon at a time.
- Frost and Devour: Fit a piping bag with your favorite tip (I love a large open star tip for big, beautiful swirls) and fill it with the orange frosting. Pipe generous swirls onto each completely cooled cupcake. And just like that, you’ve created edible art!
How to Serve These Spooky Stars
Presentation is part of the fun! Place them on a stark white platter to make the black and orange colors really sing. For a extra Halloween touch, you could sprinkle on some black sprinkles or even a few orange nonpareils. They’re the perfect centerpiece for your Halloween dessert table, a terrifyingly tasty treat for your kid’s classroom party, or just a fabulous way to treat yourself on a cozy fall night. Pair them with a cold glass of milk, a hot coffee, or a glass of dessert wine for the ultimate experience.
Mix It Up! Fun Recipe Variations
Want to put your own spin on this classic? Go for it!
- Chocolate Orange: Add the zest of one orange to the cupcake batter and a tablespoon of orange juice to the frosting for an intense citrus-chocolate flavor.
- Cream Cheese Frosting Lover: Swap the buttercream for a tangy cream cheese frosting. Just beat 8 oz of softened cream cheese with 1/2 cup of softened butter, then add the powdered sugar and vanilla. It’s a classic pairing for a reason!
- Spooky Sprinkles: Fold black and orange sprinkles right into the batter for a funfetti-style surprise inside.
- Gluten-Free Ghouls: Use a 1:1 gluten-free all-purpose flour blend in place of the regular flour. The results are fantastic!
- Boozy Adult Version: Add a tablespoon of Grand Marnier or another orange liqueur to the frosting for a sophisticated kick.
Beau’s Chef’s Notes
This recipe has evolved so much since that first messy kitchen experiment. My biggest lesson learned? Gel food coloring is non-negotiable. I once used an entire bottle of liquid black coloring trying to get the right shade and ended up with a runny, bitter mess. Never again! I also love playing with the cocoa powder; sometimes I use a dark Dutch-processed cocoa for an even deeper chocolate flavor. The best part of this recipe, though, is how it brings people together. I love seeing the looks of surprise and delight when someone takes that first bite. The dark cake is so unexpected, and the bright orange frosting just makes everyone smile. It’s more than a cupcake; it’s a experience.
Your Questions, Answered!
Let’s tackle some common questions to make sure your baking is foolproof.
Q: My cupcakes turned out greenish-black, not jet black! What happened?
A: Ah, the cocoa powder strikes again! Natural cocoa powder is acidic and can sometimes react with the food coloring. The best fix is to use a black cocoa powder (like the kind used in Oreos!) or a Dutch-process cocoa, which is neutral. If you only have natural cocoa, just be prepared to use a little extra black gel coloring to overcome the reddish undertones.
Q: Can I make these without food coloring?
A: You can absolutely make the cupcakes without the dye—they’ll be a lovely deep chocolate color and will taste just as amazing. For the frosting, you could try using a natural coloring like a reduction of carrot or pumpkin juice, but the color will be much more subtle. For that classic Halloween look, gel coloring is really the most effective route.
Q: My frosting is too runny/too thick. How can I fix it?
A: Frosting is all about balance! Too runny? Gradually beat in a little more powdered sugar, a quarter cup at a time, until it firms up. Too thick? Add more liquid, but just a teaspoon of cream or milk at a time. The consistency should be stiff enough to hold a peak but smooth enough to pipe easily.
Q: Can I make these ahead of time?
A: Absolutely! The unfrosted cupcakes can be baked, cooled, and stored in an airtight container at room temperature for a day, or frozen for up to 2 months. The frosting can be made and stored in the fridge for up to a week; just let it come to room temperature and re-whip it before piping. Frosted cupcakes are best enjoyed the same day but will keep at room temperature for a day.
Black Velvet Cupcakes with Orange Frosting
Description
Hey friends, Beau here from Feastical! These cupcakes aren’t just chocolate dyed black—they’re velvet-rich, with a cloud of vibrant orange frosting that practically glows. Perfect for Halloween parties, dessert tables, or a cozy fall night treat.
Ingredients
For the Black Velvet Cupcakes:
-
1 1/4 cups all-purpose flour (or cake flour for a slightly denser crumb)
-
1 cup granulated sugar
-
1/4 cup unsweetened cocoa powder (natural for subtle chocolate undertones)
-
1 tsp baking soda
-
1/2 tsp baking powder
-
1/2 tsp salt
-
1 cup buttermilk (or 1 cup milk + 1 tbsp lemon juice/vinegar, let sit 5 min)
-
1/2 cup vegetable oil (neutral, like canola or avocado)
-
2 large eggs, room temperature
-
1 tsp vanilla extract
-
1–2 tbsp black gel food coloring
For the Orange Frosting:
-
1 cup (2 sticks) unsalted butter, softened
-
4 cups powdered sugar, sifted if needed
-
2–3 tbsp heavy cream or milk
-
1 tsp vanilla extract
-
Orange gel food coloring, to desired intensity
Instructions
1. Preheat and Prep:
-
Preheat oven to 350°F (175°C).
-
Line a 12-cup muffin tin with cupcake liners (black or orange works beautifully).
2. Combine Dry Ingredients:
-
In a large bowl, whisk together flour, sugar, cocoa, baking soda, baking powder, and salt.
3. Mix Wet Ingredients:
-
In a separate bowl, whisk together buttermilk, oil, eggs, and vanilla until smooth.
4. Make the Batter:
-
Pour wet into dry ingredients. Fold gently with a spatula until just combined; a few lumps are fine.
-
Add black gel coloring gradually, mixing until uniform and deep black.
5. Fill and Bake:
-
Divide batter evenly among liners, filling ~2/3 full.
-
Bake 18–20 min, until tops spring back and a toothpick comes out with a few moist crumbs.
6. Cool:
-
Cool in pan 5 min, then transfer to a wire rack until completely cooled before frosting.
7. Make the Frosting:
-
Beat butter 2–3 min until pale and fluffy.
-
Gradually add powdered sugar, mixing on low until incorporated.
-
Add vanilla and 2 tbsp cream, beat medium-high 2–3 min.
-
Mix in orange gel coloring until uniform. Adjust consistency with more cream or sugar if needed.
8. Frost:
-
Fill a piping bag fitted with your favorite tip (large star tip recommended). Pipe generous swirls onto cooled cupcakes.
Notes
-
Display on a white platter to make colors pop.
-
Add black or orange sprinkles for extra fun.
-
Pair with milk, coffee, or dessert wine.
Nutrition
- Calories: 360 Cal
- Fat: 17 g
- Carbohydrates: 50 g
- Protein: 4 g
Nutritional Information*
*Please note: This is an estimated calculation provided by an online nutrition calculator. It should not be considered a substitute for a professional nutritionist’s advice.
Per cupcake (approx.): Calories: 360 | Protein: 4g | Carbohydrates: 50g | Fat: 17g | Fiber: 2g
Final Thoughts
Creating these Black Velvet Cupcakes with Orange Frosting is about so much more than following a recipe. It’s a journey that encompasses kitchen chemistry, artistic expression, and even a touch of cultural reflection. From the precise science of creaming butter to the playful art of piping and presentation, every step is an opportunity to create something truly special. This recipe is a gateway—a chance to build new Halloween traditions in your own home, to fill your kitchen with the warm scents of cocoa and citrus, and to experience the pure joy of presenting a creation that causes a room to fall silent in awe. So this Halloween, embrace the process. Don’t just bake cupcakes; craft an experience, share a story, and create a delicious memory that, like the best Halloween tales, will be retold for years to come. Happy baking, and happy haunting