The Cozy, Crumbly Magic of Dutch Apple Pie
Hey there, friends! Beau here, welcoming you back to my kitchen at Feastical. Is there anything in the world that smells more like pure, unadulterated joy than an apple pie baking in the oven? That sweet, cinnamon-infused aroma that wafts through the house, wrapping everything in a warm, sugary hug? It’s the scent of weekends at grandma’s, of holiday gatherings, and of simple, soul-satisfying Sundays. Today, we’re ditching the fuss of a lattice top and diving headfirst into the glorious, buttery world of Dutch Apple Pie.
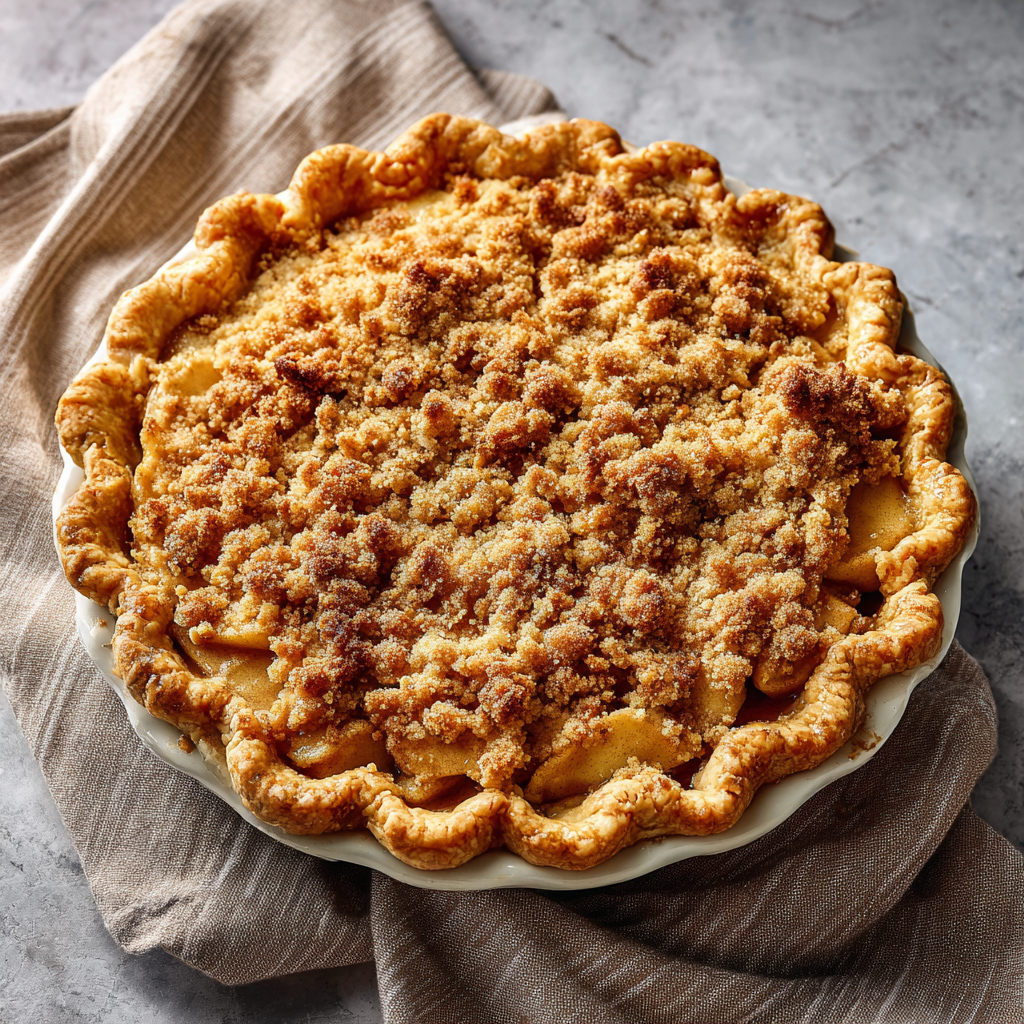
Now, if you’ve ever been intimidated by the idea of weaving a perfect pastry lattice, this recipe is your new best friend. Dutch Apple Pie swaps that intricate top crust for a generous, craggy blanket of buttery crumb topping—a streusel that bakes up into golden, crunchy, sugary perfection. It’s less about precision and more about heart. The contrast is everything: tender, spiced apples bubbling away underneath a crunchy, cookie-like topping that you’ll want to eat by the handful (no judgment here, I’ve done it). This isn’t just a pie; it’s a textural masterpiece that’s easier to make but every bit as impressive and delicious as its traditional cousin. So, preheat those ovens, grab your favorite mixing bowl, and let’s create some magic together.
A Slice of Memory
This recipe takes me right back to my first apartment after college. My kitchen was about the size of a postage stamp, and my tools consisted of one wobbly spatula, a single pot, and a hand-me-down mixing bowl from my mom. I was desperate to host my first Friendsgiving, to prove I could “adult” with the best of them. A traditional pie felt way out of my league, but this Dutch version? It felt approachable. I remember the chaos of peeling apples on my tiny counter, the nervous excitement as I mixed the crumb topping with my fingers, and the absolute triumph when I pulled that bubbling, golden-brown beauty out of my rickety oven.
The pie was far from perfect—the edges were a little dark, and I may have overloaded it with cinnamon—but the reaction from my friends was everything. That crumb topping was the star of the show. We ate it straight from the pan, scooping up warm, juicy apples and crispy crumbs with spoons, and in that messy, laughter-filled moment, I truly understood the power of food to bring people together. It wasn’t about perfection; it was about the love baked right in. That’s the feeling I want you to capture every time you make this.
Gathering Your Cast of Characters
Great food starts with great ingredients. Here’s what you’ll need to build your Dutch Apple Pie masterpiece. Don’t stress about having every single thing—cooking is about creativity, so I’ve included my favorite swaps and chef secrets right alongside.
For the Pie Crust:
- 1 (9-inch) deep-dish pie shell (homemade or store-bought) – Let’s be real, sometimes a store-bought crust is a lifesaver! No shame in that game. If you’re going homemade, my pro tip is to use a mix of butter and shortening for the ultimate flaky, flavorful base.
For the Apple Filling:
- 6–7 medium apples, peeled, cored, and sliced ¼-inch thick – I use a mix of Granny Smith (for their tartness and structure that holds up to baking) and Honeycrisp (for their incredible sweetness and juicy flavor). Other great options: Braeburn, Jonagold, or Pink Lady. Avoid Red Delicious—they turn to mush!
- ¾ cup granulated sugar – This sweetens the deal and helps pull the juices out of the apples to create that amazing syrupy filling.
- ¼ cup packed brown sugar – Adds a deep, molasses-like warmth that pairs perfectly with the cinnamon.
- 2 tablespoons all-purpose flour – This is our thickening agent, crucial for turning all those apple juices into a luscious, not-runny sauce. Cornstarch or tapioca starch work great too for a gluten-free option.
- 1 tablespoon fresh lemon juice – A bright squeeze of acid keeps the apples from browning and balances the sweetness. Bottled works in a pinch, but fresh is best!
- 1½ teaspoons ground cinnamon – The MVP of pie spices. Don’t be shy!
- ¼ teaspoon freshly grated nutmeg – Trust me, grating a whole nutmeg seed makes a world of difference compared to the pre-ground stuff. It’s warmer and more aromatic.
- A generous pinch of salt – This is non-negotiable! Salt makes all the other flavors pop and cuts through the sweetness.
- 1 teaspoon pure vanilla extract – The secret weapon! Adds a beautiful, complex background note that makes people wonder, “What is that amazing flavor?”
For the Crumb Topping:
- 1 cup all-purpose flour
- ½ cup packed brown sugar – For that rich, caramel-y flavor in every crumb.
- ¼ cup granulated sugar
- ½ cup (1 stick) cold unsalted butter, cubed – COLD is the key word here! It ensures your topping stays crumbly and doesn’t turn into a paste. I pop the cubed butter in the freezer for 5 minutes before using.
- ½ teaspoon cinnamon – A little extra spice for the topping itself? Yes, please.
- Pinch of salt
- Optional: ¼ cup chopped pecans or old-fashioned oats – Pecans add a fantastic toasty crunch, and oats give it a homey, crisp-like texture. I highly recommend trying one of these!
Let’s Get Baking: Building Your Pie, Step-by-Step
Ready to make some magic? Follow these steps, and you’ll have a show-stopping dessert that looks like it came from a professional bakery. I’ve sprinkled in all my favorite chef hacks to ensure your success.
Step 1: Preheat and Prep
Preheat your oven to 375°F (190°C). This is crucial for getting that oven spring and a crispy crust right from the start. If you’re using a frozen pie shell, make sure it’s fully thawed. Place it on a baking sheet—this makes it infinitely easier to move in and out of the oven and catches any potential bubble-overs!
Step 2: Create the Filling
In a large bowl, combine your sliced apples, granulated sugar, brown sugar, flour, lemon juice, cinnamon, nutmeg, salt, and vanilla. Now, get your hands in there! Toss everything together until the apples are evenly coated. This isn’t a job for a wimpy spoon; you want to make sure every single apple slice is kissed with flavor. Let this mixture sit for 10-15 minutes. You’ll see a syrupy liquid start to form at the bottom of the bowl—this is exactly what you want! It’s the foundation of your glorious, not-watery filling.
Step 3: Make the Crumb Topping
While the apples are macerating, let’s make the star of the show. In a separate medium bowl, whisk together the flour, brown sugar, granulated sugar, cinnamon, and salt. Add your very cold, cubed butter. Now, using a pastry cutter, two forks, or (my personal favorite method) your clean fingertips, work the butter into the dry ingredients. Pinch and rub the mixture between your fingers until it transforms from a sandy texture into clumpy, pea-sized crumbs. If you’re adding nuts or oats, stir them in now. Pop the whole bowl in the fridge while you finish the filling. Keeping it cold ensures a perfect, crumbly bake.
Step 4: Assemble the Pie
Give your apple filling one more good stir. Now, carefully pour the entire contents of the bowl—apples and all the syrupy liquid—into your pie shell. Spread it out into an even layer. Don’t skimp! Pile those apples high; they will shrink down as they bake. Now, take your chilled crumb topping and sprinkle it evenly over the entire surface of the apples. Don’t press it down! Just let it rest loosely in a beautiful, craggy blanket of goodness.
Step 5: Bake to Perfection
Place your pie (on its baking sheet!) into the preheated oven. Bake for 50 to 60 minutes. You’re looking for a few key signs of doneness: the crumb topping should be a deep, golden brown, the filling should be actively bubbling around the edges (and maybe even through the topping in places!), and the apples should be tender when poked with a knife through one of those bubbles. About halfway through the baking time, check your pie crust edges. If they are browning too quickly, gently tent them with a pie crust shield or some strips of aluminum foil to prevent burning.
Step 6: The Hardest Part: Wait!
I know, I know. The smell is intoxicating, and you want to dive right in. But you must, must, MUST let this pie cool for at least 2-3 hours on a wire rack. This waiting period is non-negotiable. It allows the bubbling filling to set and thicken properly. If you cut into it too early, you’ll have a soupy, runny mess—even if it tastes amazing, it won’t slice neatly. Trust me, it’s worth the wait.
How to Serve This Masterpiece
Once your pie has patiently cooled and set, it’s showtime! Slice it with a sharp knife, wiping the blade clean between cuts for beautiful pieces. The classic pairing is, of course, a giant scoop of vanilla ice cream. The way the cold, creamy ice cream melts into the warm, spiced apples and crunchy topping is a little slice of heaven. For an extra-decadent treat, a drizzle of warm caramel sauce or a dollop of freshly whipped cream takes it over the top. Serve it on your favorite plates and watch the smiles appear.
Make It Your Own: Delicious Variations
The beauty of this recipe is its versatility. Don’t be afraid to play around!
- Pear & Ginger Twist: Swap out half the apples for ripe pears and add 1 tablespoon of finely chopped crystallized ginger to the filling for a warm, spicy kick.
- Berry Apple Bliss: Add a cup of fresh or frozen cranberries to the apple filling for a gorgeous tartness and pop of color.
- Gluten-Free Friendliness: Use a 1:1 gluten-free flour blend for both the filling thickener and the crumb topping. Ensure your pie crust is GF too!
- Oaty Nutty Crunch: Replace half the flour in the topping with old-fashioned oats and add chopped walnuts or pecans for a granola-like texture.
- Boozy Apple: For a sophisticated twist, add two tablespoons of bourbon or calvados to the apple filling mixture.
Beau’s Chef Notes & Kitchen Stories
This recipe has been my go-to for years, and it’s evolved with me. I once, in a frantic pre-holiday rush, accidentally used salted butter and left out the added salt. The result was strangely flat and one-dimensional. I learned my lesson: salt is essential! Another time, I was chatting with a friend and lost track of time, letting the apples macerate for almost an hour. The filling released so much liquid I was worried, but I just added an extra tablespoon of flour, and it turned out perfectly—maybe even better! The moral of the story? Don’t panic. Baking is a living process. This pie is forgiving and full of love. It’s about the joy of creating something with your hands and sharing it with people you care about. The little imperfections are just proof that it was made by a human, not a machine.
Your Questions, Answered
Q: My crumb topping melted into the filling! What happened?
A: Ah, the number one culprit here is butter that was too warm. It’s vital that your butter is very cold when you make the topping. If your kitchen is particularly warm, after making the crumbs, pop the whole bowl in the fridge or even the freezer for 10-15 minutes before sprinkling it on the pie. This ensures those solid butter bits stay intact and create steam as they bake, leading to a flaky, crumbly texture.
Q: Why is my filling so runny?
A: A runny filling usually comes down to two things: 1) Not letting the pie cool completely. This is the most common mistake! The filling continues to thicken as it cools. 2) Not enough thickener. Different apples release different amounts of juice. If you know your apples are super juicy (looking at you, McIntosh!), you can bump the flour in the filling up by an extra half tablespoon. Also, make sure you’re baking the pie until you see those thick, slow bubbles—that’s a sign the thickening agents have been activated.
Q: Can I make this pie ahead of time?
A: Absolutely! This pie is a fantastic make-ahead dessert. You have two great options: 1) Unbaked: Assemble the pie completely, then wrap it tightly in plastic wrap and freeze it for up to 2 months. Bake directly from frozen, adding 20-25 minutes to the baking time. 2) Baked: Bake and cool the pie completely, then wrap it well and store it at room temperature for up to 2 days, or in the fridge for up to 4 days. Re-warm slices in a 300°F oven for 10-15 minutes to bring back that fresh-from-the-oven magic.
Q: The edges of my crust are getting too dark. Help!
A> This is a super common issue. The solution is simple: pie crust shields! You can buy fancy silicone ones, or simply take a long strip of aluminum foil and gently mold it around the crust edge before you start baking. Remove it for the last 15 minutes of baking to allow the bottom crust to fully brown. It’s a little trick that makes a huge difference.
Dutch Apple Pie (with a Buttery Crumb Topping)
- Total Time: 3 hrs 20 mins
Description
Dutch Apple Pie with Buttery Crumb Topping
Ingredients
Pie Crust:
-
1 (9-inch) deep-dish pie shell (homemade or store-bought)
Apple Filling:
-
6–7 medium apples (Granny Smith + Honeycrisp), peeled, cored, sliced ¼-inch
-
¾ cup granulated sugar
-
¼ cup packed brown sugar
-
2 tbsp flour (or cornstarch/tapioca for GF)
-
1 tbsp fresh lemon juice
-
1½ tsp ground cinnamon
-
¼ tsp freshly grated nutmeg
-
Pinch of salt
-
1 tsp vanilla extract
Crumb Topping:
-
1 cup all-purpose flour
-
½ cup packed brown sugar
-
¼ cup granulated sugar
-
½ cup (1 stick) cold unsalted butter, cubed
-
½ tsp cinnamon
-
Pinch of salt
-
Optional: ¼ cup chopped pecans or old-fashioned oats
Instructions
1. Preheat Oven & Prep:
-
Preheat oven to 375°F (190°C).
-
Place pie shell on a baking sheet to catch spills.
2. Make the Filling:
-
Toss apples with sugars, flour, lemon juice, cinnamon, nutmeg, salt, and vanilla.
-
Let sit 10–15 mins until syrup forms.
3. Make the Crumb Topping:
-
In a bowl, combine flour, sugars, cinnamon, and salt.
-
Cut in cold butter until pea-sized crumbs form.
-
Stir in nuts or oats if using. Chill until ready.
4. Assemble the Pie:
-
Pour apple filling into pie shell.
-
Sprinkle crumb topping evenly over apples without pressing.
5. Bake:
-
Bake 50–60 mins until topping is golden brown and filling bubbles.
-
Tent edges with foil if browning too fast.
6. Cool:
-
Let cool 2–3 hrs on a wire rack before slicing to set the filling.
Serving Suggestions:
-
Serve warm with vanilla ice cream, whipped cream, or caramel drizzle
Notes
-
Crumb melted? Butter too warm; keep topping cold.
-
Runny filling? Let pie cool completely; add extra flour if apples are very juicy.
-
Crust edges dark? Use foil or pie shields for protection.
-
Make-ahead: Assemble & freeze unbaked (up to 2 months) or store baked in fridge (4 days).
- Prep Time: 25 mins
- Cook Time: 55–60 mins
Nutrition
- Calories: 410 kca
- Sugar: 36g
- Fat: 18g
- Carbohydrates: 64g
Nutritional Information*
Prep Time: 25 mins | Cook Time: 55 mins | Total Time: 1 hr 20 mins (plus cooling) | Servings: 8
*This is an estimate provided for informational purposes only. I’m a chef, not a nutritionist!
Per Slice (approx.): Calories: ~410 | Carbohydrates: 64g | Protein: 3g | Fat: 18g | Saturated Fat: 8g | Sugar: 36g | Fiber: 4g
Final Thoughts
This Dutch Apple Pie is more than a recipe; it’s a journey through texture, technique, and tradition. It celebrates the humble apple, the power of a simple crumb, and the profound importance of patience. It’s a dessert built for sharing, for sparking joy, and for creating those warm, lingering memories around the table. Whether you stick to the classic script or embark on your own variations, remember that the love and care you pour into it are the truest ingredients of all. Now, go forth, bake with confidence, and get ready to accept your compliments