
Your New Go-To Apple Pie Recipe That Tastes Like a Hug
Hey friends, Beau here! Is there anything in this world that smells more like pure, unadulterated joy than a cinnamon-spiced apple pie baking in the oven? I’m talking about that magical aroma that starts as a sweet whisper and then slowly, confidently, fills every corner of your home until it’s practically pulling your family into the kitchen by their noses. That’s the power of a truly great pie. It’s not just dessert; it’s a centerpiece, a conversation starter, and a tangible piece of comfort you baked with your own two hands.
Now, I know what some of you might be thinking: “Beau, pie crust is my nemesis.” Or, “I can never get my apple filling just right—it’s always too soupy or too firm.” Trust me, I’ve been there. I’ve had my fair share of pastry disasters that were better suited for a hockey game than a dinner party. But that’s exactly why I’ve poured all my kitchen triumphs and tribulations into perfecting this recipe. This Cinnamon-Spiced Apple Pie with a Buttery Crust is my love letter to classic baking, designed to be foolproof, flavorful, and fantastically flaky. We’re using a double-crust method for two glorious pies because, let’s be real, one is never enough. One for you now, and one to gift to a neighbor (or, you know, to keep in the freezer for a rainy day—no judgment here). So, dust off that rolling pin, preheat your oven, and let’s create some magic together.
The Pie That Started It All
This recipe isn’t just a list of ingredients to me; it’s a living, breathing scrapbook of my childhood. Every autumn, my Grandma Mae would declare it “Apple Pie Season.” This wasn’t a casual suggestion; it was a weekend-long event. We’d pile into the old station wagon and drive out to the orchard, where my brother and I were put to work as “official apple testers.” Our job was to determine the perfect tart-to-sweet ratio, a responsibility we took very seriously (and which inevitably led to a few stomachaches).
Back in her flour-dusted kitchen, Grandma Mae would let me stand on a wobbly wooden stool to help her mix the filling. She never measured the cinnamon—just a generous “glug” from the jar straight into the bowl, sending a cloud of spicy fragrance into the air. Her hands, quick and sure, would weave the most beautiful lattice top I’ve ever seen. To this day, the sound of apples sizzling and bubbling away in a buttery crust takes me right back to that stool, watching her work her magic, teaching me that the secret ingredient in every great dish is always, always the love you stir into it. This pie is my best attempt to capture that feeling in every single slice.
Gathering Your Pie-Making Posse: The Ingredients
Great pies start with great ingredients. Don’t worry, we’re not using anything too crazy here—just simple, quality stuff that makes a world of difference. Here’s your shopping list for two show-stopping pies.
For the Flaky Pie Crust:
- 5 cups all-purpose flour: The foundation of our crust. I like unbleached for its slightly heartier flavor, but any good all-purpose will work beautifully.
- 2 tbsp sugar: A little sweetness to complement the apples and help with browning.
- 2 tsp salt: Crucial. Salt is the flavor enhancer that makes the butter and apples truly sing. Don’t skip it!
- 2 cups cold unsalted butter, cubed: This is the star of the show. I insist on high-quality butter and keeping it ICE COLD is the #1 rule for a flaky, not tough, crust. I pop my cubed butter into the freezer for 10-15 minutes before I start.
- ½–¾ cup ice water: The key word is ice. We add just enough to bring the dough together without warming up the butter.
- 2 tbsp apple cider vinegar: My secret weapon! The acid in the vinegar tenderizes the gluten in the flour, guaranteeing a more tender, workable crust. You won’t taste it, I promise.
For the Apple Filling:
- 12–14 apples (a mix of Granny Smith & Honeycrisp), about 6 lbs: Using two types is our genius hack! The tart Granny Smith holds its shape, while the sweet Honeycrisp breaks down a bit for that classic, gooey pie texture. Peeled and sliced about ¼-inch thick.
- 1½ cups sugar + ½ cup brown sugar: White sugar for pure sweetness, brown sugar for that deep molasses warmth. It’s the ultimate sweet team.
- 6 tbsp flour: Our thickening agent. It soaks up the juices released by the apples as they bake, preventing a sad, soupy bottom.
- 2 tbsp lemon juice + Zest of 1 lemon: The bright acid from the juice keeps the apples from browning and cuts through the sweetness. The zest adds a incredible fragrant punch.
- 3 tsp cinnamon + ½ tsp nutmeg: The dynamic duo of cozy spices. Feel free to add a pinch of cardamom or allspice if you’re feeling adventurous!
- ½ tsp salt: Again, it’s all about balancing and enhancing the flavors.
- 2 tsp vanilla extract: The flavor backbone that makes everything taste more… well, more.
- 3 tbsp maple syrup: A little splash of liquid gold adds a complex, autumnal depth you just can’t get from sugar alone.
- 4 tbsp butter, cut up: Dotting little pats of butter over the filling before adding the top crust is a pro move. It melts into the apples, making them impossibly rich and luxurious.
For Assembly:
- 2 eggs + 2 tbsp water (egg wash): Brushed on the top crust for that picture-perfect, glossy golden-brown finish.
- 2 tbsp coarse sugar (optional but highly recommended): This isn’t just pretty; it adds a delightful crunch with every bite.
Let’s Get Baking: The Step-by-Step Guide
Okay, team. Aprons on! Let’s walk through this together. Read through all the steps once before you begin—it’s like having a roadmap to pie success.
Step 1: The Crust (A Labor of Love)
In a large bowl, whisk together your flour, sugar, and salt. Now, grab your cold, cubed butter and scatter it over the flour. Using a pastry cutter, two forks, or even your fingertips, work quickly to “cut” the butter into the flour. You’re looking for a mix of sizes—some pea-sized pieces, some smaller flakes. This variety is what creates steam pockets during baking, leading to ultimate flakiness. Now, drizzle in the apple cider vinegar and a few tablespoons of the ice water. Use a fork to gently mix. Keep adding water, one tablespoon at a time, just until the dough begins to clump together when you press it. You might not need all the water! Divide the shaggy dough into four equal discs, wrap them tightly in plastic wrap, and chill in the fridge for at least an hour (or up to 2 days). This rest period is non-negotiable—it relaxes the gluten and re-chills the butter.
Step 2: The Filling (Flavor Party)
While the dough chills, let’s make the filling. This is the fun part! In an enormous bowl, toss your sliced apples with the lemon juice and zest. This coats them and prevents browning. In a separate smaller bowl, whisk together the white sugar, brown sugar, flour, cinnamon, nutmeg, and salt. Dump this spicy, sugary mixture over the apples and toss, toss, toss until every single slice is coated. Now, stir in the vanilla and maple syrup. Let this glorious mess sit for 15-20 minutes. You’ll see a syrup start to form at the bottom—this is exactly what we want! That syrupy goodness is our future thickened filling.
Step 3: Roll & Assemble (The Main Event)
Preheat your oven to 400°F (200°C). Lightly flour your surface and grab two of your dough discs. Roll one out into a circle about 12 inches in diameter. Don’t worry about a perfect circle; rustic is charming! Gently lift and place it into a 9-inch pie dish, letting the edges hang over. Repeat for the second pie. Now, give your apple filling one more good toss and divide it evenly between your two pie shells. It will look like a mountain—it will shrink as it bakes! Dot the tops of the filling with the cut-up butter.
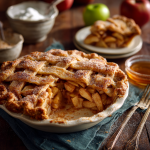
Now, for the tops! Roll out your remaining two discs. You can go classic with a full top (just remember to cut a few slits for steam to escape) or get fancy with a lattice weave. To lattice: cut the rolled dough into long strips, about 1 inch wide. Lay half the strips vertically over the pie, then weave the other half horizontally. Crimp the edges together with the bottom crust. My method: press together with your fingers, then use a fork to make a decorative seal around the rim.
Step 4: Bake to Golden Perfection
Whisk your eggs with 2 tbsp of water to make an egg wash. Gently brush this over the entire top crust of both pies. This is your shine and glue. Sprinkle generously with that coarse sugar. Place the pies on a baking sheet (this is KEY to catch any bubbling-over juices and save your oven from a sticky mess).
Bake at 400°F for 20 minutes. This initial high heat helps set the crust. Then, without opening the oven door, reduce the heat to 375°F (190°C) and bake for another 35-40 minutes. You’re looking for a deep golden-brown crust and thick, bubbly juices peeking through. If the edges are browning too fast, you can tent them with a little strip of foil.
Step 5: The Hardest Part: Wait.
I know, I know. It’s torture. But you MUST let the pies cool on a wire rack for at least 2 hours, preferably 3-4. This waiting period is when the filling sets. If you cut into it too early, it will be a delicious but runny mess. I promise it’s worth the wait!
How to Serve This Masterpiece
Presentation is part of the fun! Slice your perfectly cooled pie with a sharp, thin knife. Wipe it clean between cuts for pristine slices. The classic move is to serve it slightly warm (you can pop a slice in the microwave for 15 seconds) with a giant scoop of vanilla bean ice cream that slowly melts into the spiced apples—a combination known affectionately in my house as “à la mode magic.” For a decadent twist, drizzle a little warm caramel sauce over the top or add a dollop of freshly whipped cream. Serve it on a beautiful plate with a hot cup of coffee or tea, and get ready for the compliments to roll in.
Mix It Up! Recipe Variations
Once you’ve mastered the classic, the pie world is your oyster! Here are a few of my favorite twists:
- Bourbon Caramel Apple Pie: Stir 2-3 tablespoons of good bourbon into the apple filling along with the vanilla for a rich, grown-up flavor.
- Cheddar Crust Apple Pie: A legendary combo! Add 1 cup of finely shredded sharp cheddar cheese to the flour mixture when making your crust.
- Gluten-Free & Vegan: Use a 1:1 gluten-free flour blend for the crust and filling. Swap the butter for very cold vegan butter and use a flax egg (1 tbsp ground flax + 3 tbsp water per egg) for the wash.
- Pear & Ginger Apple Pie: Replace 3-4 of the apples with firm, ripe pears and add 1 tablespoon of freshly grated ginger to the spice mix.
- Dutch Apple Pie: Skip the top crust! Instead, mix 1 cup flour, ½ cup brown sugar, ½ cup cold butter, and ½ cup rolled oats into a crumble. Sprinkle it over the filling and bake.
Beau’s Chef Notes & Kitchen Stories
This recipe has evolved over about a decade of baking. The vinegar in the crust was a game-changer I learned from a pastry chef friend after one too many tough crusts. The maple syrup was a happy accident—I was out of brown sugar once and had to improvise, and the result was so good it became a permanent fixture.
A funny story: I once, in a pre-coffee haze, mistook the salt for sugar and made the most inedibly salty pie crust known to mankind. My dog wouldn’t even eat it. So now, I always, always taste a tiny pinch of my flour mixture before adding the butter. It’s my little ritual to avoid savory dessert disasters! Remember, baking is a science, but it’s also an art. Don’t stress about a messy lattice or a slightly lopsided crust. That’s what gives it character and proves it was made with real hands, right in your kitchen.
Apple Pie FAQs: Your Questions, Answered
Q: My bottom crust is always soggy! How do I prevent that?
A: This is the #1 question! A few tips: 1) Make sure your filling has enough flour to absorb the juices. 2) Let the filled, unbaked pie sit for a few minutes before adding the top—you might see more liquid leach out; just spoon a little of it out. 3) Bake on a preheated baking sheet. The direct heat from the sheet helps cook the bottom crust faster. 4) Glass or ceramic pie plates are better than metal for achieving a crisp bottom.
Q: Can I make this pie ahead of time?
A: Absolutely! You have options. 1) Unbaked: Assemble the pie, wrap it tightly in a few layers of plastic wrap and foil, and freeze for up to 3 months. Bake from frozen, adding about 20 minutes to the baking time. 2) Baked: Bake and cool the pie completely, then wrap and freeze. Thaw overnight in the fridge and warm in a 300°F oven for 20 minutes before serving.
Q: My filling is too runny/too firm. What went wrong?
A: Runny filling is usually due to not enough thickener (flour) or not letting the pie cool completely. Too firm can mean too much flour or using apples that don’t release enough juice. Trust the flour measurement here and, most importantly, the cooling time! The filling thickens significantly as it cools.
Q: Can I use only one type of apple?
A: You can, but the blend is highly recommended for the best texture and flavor balance. If you must use one, go for a firm, all-purpose apple like Braeburn or Jonagold. Using only a soft apple like McIntosh will lead to a mushy filling.
Cinnamon-Spiced Apple Pie with Buttery Crust
- Total Time: 2 hrs 15 mins
Description
Cinnamon-Spiced Apple Pie with Buttery Crust – Double Batch
Ingredients
For the Crust:
-
5 cups all-purpose flour
-
2 tbsp sugar
-
2 tsp salt
-
2 cups cold unsalted butter, cubed
-
½–¾ cup ice water
-
2 tbsp apple cider vinegar
For the Apple Filling:
-
12–14 apples (Granny Smith + Honeycrisp), peeled & sliced ¼-inch thick (~6 lbs)
-
1½ cups sugar
-
½ cup brown sugar
-
6 tbsp flour
-
2 tbsp lemon juice + zest of 1 lemon
-
3 tsp cinnamon
-
½ tsp nutmeg
-
½ tsp salt
-
2 tsp vanilla extract
-
3 tbsp maple syrup
-
4 tbsp butter, cut into small pats
For Assembly & Topping:
-
2 eggs + 2 tbsp water (egg wash)
-
2 tbsp coarse sugar (optional)
Instructions
1. Make the Crust:
-
Whisk flour, sugar, and salt.
-
Cut in cold butter until pea-sized and smaller flakes form.
-
Mix in vinegar and ice water, 1 tbsp at a time, until dough clumps together.
-
Divide into 4 discs, wrap, and chill 1 hr (up to 2 days).
2. Prepare the Filling:
-
Toss apples with lemon juice and zest.
-
In a separate bowl, mix sugars, flour, cinnamon, nutmeg, and salt.
-
Add to apples and toss; stir in vanilla and maple syrup.
-
Let sit 15–20 mins until syrupy.
3. Assemble Pies:
-
Preheat oven to 400°F (200°C).
-
Roll 2 dough discs into 12-inch circles; place in pie dishes.
-
Divide apple filling between pies; dot with butter.
-
Roll remaining 2 discs; place over pies (full or lattice). Crimp edges.
-
Brush tops with egg wash; sprinkle sugar.
4. Bake:
-
Bake at 400°F for 20 mins.
-
Reduce heat to 375°F (190°C) and bake 35–40 mins until golden brown and bubbly.
-
Tent edges with foil if browning too fast.
5. Cool & Serve:
-
Cool on a wire rack 2–4 hrs before slicing.
-
Serve slightly warm with vanilla ice cream, whipped cream, or caramel drizzle.
Notes
-
Soggy bottom? Preheat baking sheet, ensure proper flour in filling, or blind-bake crust.
-
Runny filling? Let pies cool completely; increase thickener if needed.
-
One apple type? Use firm apple (Braeburn or Jonagold) but blend recommended for best texture.
-
Make ahead? Assemble and freeze unbaked up to 3 months; bake from frozen (+20 mins).
- Prep Time: 1 hr 15 mins (includes chilling dough)
- Cook Time: 55–60 mins
Nutrition
- Calories: 420 Cal
- Sugar: 35g
- Fat: 19g
- Carbohydrates: 66g
Nutritional Information*
*Approximate values per slice (based on 16 slices total from 2 pies). Remember, this is a treat meant to be savored and shared!
- Calories: ~420 kcal
- Carbohydrates: 66g
- Fat: 19g
- Sugar: 35g
- Fiber: 4g
- Protein: 4g
Final Thoughts
This Cinnamon-Spiced Apple Pie is so much more than a dessert. It is a project that demands your attention and rewards it with immense satisfaction. It is a science experiment that yields delicious, edible results. It is a history lesson, connecting us to the generations of bakers who came before us, each perfecting their own version of this classic comfort. And most importantly, it is a vehicle for connection—to our past, to our homes, and to each other.
It teaches patience, from the chilling of the dough to the agonizing wait for the baked pie to cool. It teaches mindfulness, requiring you to be present in the process, to feel the dough with your hands, to smell the spices, to see the transformation in the oven. It teaches generosity, as the recipe makes two pies, quietly insisting that you share your hard-won bounty with someone else who needs a taste of homemade comfort.