Golden, Zesty, and Irresistibly Crispy: Your New Favorite Chicken is Here!
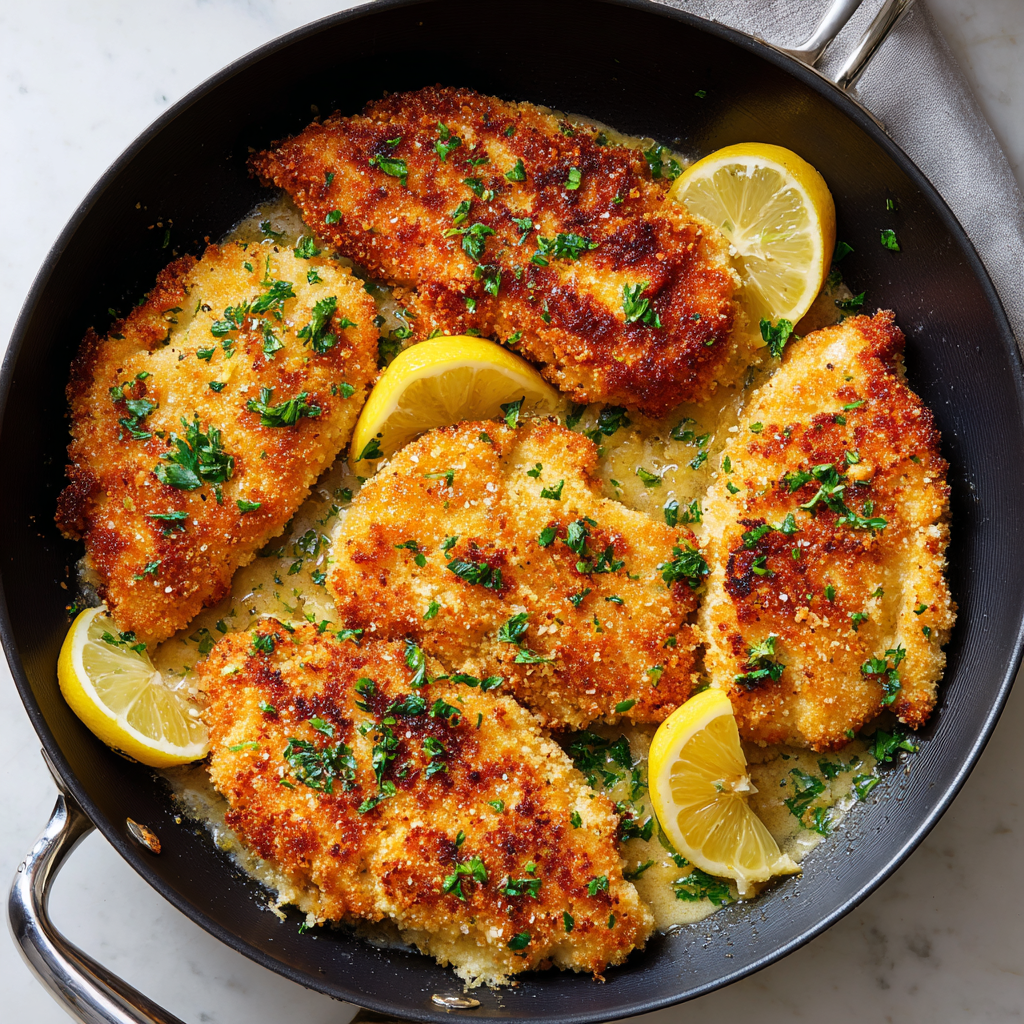
Hey friends, Beau from Feastical here! Let’s talk about one of life’s simple, magnificent pleasures: a perfectly cooked chicken cutlet. You know the one. It’s got that shatteringly crisp, golden-brown crust that gives way to the most tender, juicy chicken inside. Now, imagine that beautiful cutlet swimming in a pan sauce so good you’ll want to drink it with a straw—a sauce where rich, melted butter dances with sharp, fragrant garlic and the bright, sunny zing of fresh lemon. That, my friends, is the magic of Crispy Lemon Garlic Chicken Cutlets.
This isn’t just a recipe; it’s your ticket to a 35-minute weeknight victory that feels straight out of a cozy Italian trattoria. It’s the kind of dish that makes everyone at the table stop scrolling on their phones and actually look up to ask, “Wow, what is that smell?” The best part? It’s deceptively simple. We’re not talking fancy techniques or hard-to-find ingredients. This is about mastering a few fundamentals—a proper sear, a balanced sauce, a confident hand with seasoning—to create something truly spectacular.
Whether you’re serving it over a heap of fluffy mashed potatoes, a nest of angel hair pasta ready to soak up that glorious sauce, or a simple arugula salad for a lighter touch, this dish delivers every single time. It’s my go-to for impressing dinner guests, for treating my family on a busy Wednesday, or just for giving myself a pat on the back with a fork. So, tie on your favorite apron, grab your trusty skillet, and let’s turn your kitchen into the best little restaurant in town. Ready to get crispy?
A Little Story Behind the Sizzle
This recipe takes me right back to my first tiny apartment kitchen. It was about the size of a postage stamp, with questionable linoleum and a stove that had exactly one reliable burner. But it was mine. I’d just started getting seriously into cooking, moving beyond boxed mac and cheese and frozen pizzas. I wanted to make something that felt… grown-up. Sophisticated. But I was on a serious budget.
Chicken breasts were on sale, and I had a lemon, a few cloves of garlic, and some butter. I’d seen a chef on TV do something similar and thought, “I can totally fake that.” I pounded those chicken breasts with a can of beans (I didn’t own a meat mallet!), dredged them in some seasoned flour, and created a chaotic but delicious splatter-fest in my tiny skillet. The moment I added the lemon juice to the garlicky butter and it all sizzled and foiled up, filling my entire studio apartment with that incredible aroma, I knew I’d cracked the code. It wasn’t pretty, but man, did it taste like triumph. It was the first meal in that apartment that truly felt like *me*. Every time I make this now, I get a little hit of that proud, hungry, twenty-something energy.
Gathering Your Flavor All-Stars
Simple ingredients, big flavor—that’s the Feastical motto. Here’s what you’ll need to make this lemon garlic chicken masterpiece happen. Don’t just toss them in your cart; read my little chef notes next to each one. They make all the difference!
- 4 boneless, skinless chicken breasts: The main event! Look for breasts that are similar in size so they cook evenly. Pro Tip: If yours are huge, slice them in half horizontally to create two thinner cutlets—it makes pounding much easier and ensures a perfect cook.
- 1 cup all-purpose flour: The first layer of our crispy armor. It helps the egg wash stick, which in turn helps the breadcrumbs stick. It’s the glue of the breading world!
- 1 tsp salt & 1 tsp black pepper: The dynamic duo of seasoning. We’re seasoning every layer, people! Don’t be shy.
- 2 large eggs: Our binding agent. Beaten well, they create a sticky layer that gives the breadcrumbs something to hold onto for dear life.
- 1 cup breadcrumbs: The source of that glorious CRUNCH. I prefer plain Panko breadcrumbs for their incredible light and airy texture, but traditional fine breadcrumbs work great, too. Substitution Tip: For a gluten-free version, use a 1:1 GF flour blend and gluten-free breadcrumbs. It works like a charm!
- 2 tbsp olive oil: We use this for the initial sear. Its higher smoke point is perfect for getting that golden-brown color without burning the butter we’ll add later.
- ½ cup unsalted butter, divided: The heart and soul of our sauce. Using unsalted lets us control the sodium level perfectly. We use half for cooking the chicken and half for the sauce. Chef’s Insight: That little bit of browned milk solids from the first round of butter adds an incredible nutty, rich depth to the final sauce.
- 4 cloves garlic, minced: Fresh is non-negotiable here, friends. The pre-minced stuff in a jar just doesn’t have the same punch. We want that potent, fragrant kick!
- ¼ cup freshly squeezed lemon juice: Please, for the love of all that is good, use real lemons! The flavor is brighter, cleaner, and infinitely better than the bottled stuff. You’ll need about 2 large lemons.
- ¼ cup chicken stock: This loosens up our sauce just enough to make it spoonable and helps meld all the flavors together. White wine is a fantastic substitute here if you have a bottle open!
- 2 tbsp fresh parsley, chopped: This isn’t just a pretty green garnish. Its fresh, slightly peppery flavor cuts through the richness of the butter and adds a beautiful pop of color and freshness right at the end.
Let’s Get Cooking: The Step-by-Step Sizzle
Alright, team! Let’s fire up the stove and transform these simple ingredients into something magical. Follow these steps, and you’ll have a restaurant-quality dish on your table in no time. I’ve packed each step with my best tips and hacks to ensure your success.
- Pound the chicken breasts to an even thickness. This is the single most important step for avoiding dry, overcooked edges and a raw center. Place a chicken breast between two pieces of plastic wrap or inside a large zip-top bag. Using the flat side of a meat mallet, a heavy skillet, or even a rolling pin, gently pound until it’s about ½-inch thick all over. Chef’s Hack: No mess! Pounding inside a bag contains all the splatter.
- Set up your breading station. Get three shallow bowls or plates. In the first, combine the flour, salt, and pepper. In the second, beat the two eggs until no streaks of white remain. In the third, pour out your breadcrumbs. This assembly line setup is a game-changer for efficiency and keeping your hands clean(ish).
- Dredge each chicken breast. Here’s the secret to a perfect, non-soggy crust: use one hand for dry ingredients and one for wet. With your left hand (if you’re right-handed), coat a chicken breast in the flour, shaking off any excess. Then, using your right hand, dip it fully into the egg wash, letting the excess drip off. Finally, place it in the breadcrumbs and use your left hand to press and coat it thoroughly. Place the breaded cutlet on a clean plate or wire rack. Repeat! Pro Tip: Let the breaded cutlets sit for 5-10 minutes before cooking. This helps the coating set and adhere better, so it’s less likely to fall off in the pan.
- Cook the chicken. Heat the olive oil and 2 tablespoons of the butter in a large skillet over medium heat. Once the butter is melted and foaming, carefully add the chicken cutlets (don’t crowd the pan—cook in batches if you need to!). Cook for 4-5 minutes per side, until the crust is a deep golden brown and the internal temperature reaches 165°F. Chef’s Hack: Don’t move them around! Let them develop a beautiful sear before you even think about flipping. Remove the chicken to a clean plate and tent loosely with foil.
- Create the legendary sauce. Reduce the heat to medium-low. Melt the remaining butter in the same skillet. Those little browned bits left from the chicken? That’s liquid gold! Add the minced garlic and sauté for just 60-90 seconds until incredibly fragrant. Don’t let it burn! Pour in the fresh lemon juice and chicken stock. It will bubble and sizzle gloriously—use a wooden spoon to scrape up all those delicious browned bits from the bottom of the pan. Let it simmer for 2-3 minutes until it slightly reduces and thickens.
- Bring it all home. Return the cooked chicken cutlets to the skillet, along with any juices that collected on the plate. Spoon that beautiful lemon garlic butter sauce all over each cutlet, ensuring every nook and cranny gets some love. Let everything heat through for a minute. Sprinkle with the fresh chopped parsley right in the pan.
How to Serve This Sunshine on a Plate
This dish is the ultimate team player, but how you serve it can take it from great to legendary. My absolute favorite way is to serve it over a bed of angel hair pasta or fettuccine. The pasta acts like a delicious sponge, soaking up every last drop of that lemon garlic butter sauce. For a lighter option, it’s incredible on a pile of simple arugula dressed with just a squeeze of lemon—the warm chicken wilts the greens slightly, creating a fantastic warm salad. And you can never, ever go wrong with a side of creamy mashed potatoes or roasted asparagus. No matter how you plate it, make sure you have a piece of crusty bread on hand for mopping up the sauce. Trust me on this.
Mix It Up! Fun Flavor Twists
Once you’ve mastered the classic, the world is your crispy chicken oyster! Here are a few of my favorite ways to play with this recipe:
- Piccata Style: Add 2 tablespoons of briny capers and a handful of fresh parsley to the sauce right at the end. The salty, lemony combo is unreal.
- Creamy Dreamy: Stir in ¼ cup of heavy cream or half-and-half at the very end of making the sauce for a rich, velvety, decadent twist.
- Herb Garden Delight: Add a teaspoon of Italian seasoning or dried oregano to the breadcrumb mixture for an extra layer of herbal flavor.
- Parmesan Crisp: Mix ½ cup of freshly grated Parmesan cheese into the breadcrumbs for a cheesy, umami-packed crust.
- Spicy Kick: Add a pinch of red pepper flakes to the butter when you sauté the garlic for a gentle, warming heat.
Beau’s Chef Notes & Kitchen Confessions
This recipe has been a living, evolving thing in my kitchen for years. I’ve learned a few things the hard way so you don’t have to! First, the “resting the breaded cutlets” tip was a game-changer I learned after a particularly frustrating episode where my beautiful breading ended up stuck to the pan instead of the chicken. Patience, young grasshopper!
I also used to be terrified of pounding chicken. It felt aggressive and I was sure I was going to pulverize it. Then a chef friend told me to think of it as “gentle persuasion,” not “rageful pounding.” It changed my entire perspective. Now I find it weirdly therapeutic. And remember, the sauce is meant to be simple and light. If you want it thicker, you can let it reduce a bit longer, or add a tiny slurry of cornstarch and water. But I love it just as it is—a loose, buttery, lemony delight that ties the whole dish together. This is comfort food that wears a fancy suit. It’s humble enough for a Tuesday and elegant enough for date night. That’s its magic.
Your Questions, Answered!
Q: My breading is falling off! What did I do wrong?
A: The most common culprit is not shaking off the excess flour after the first dredge. That loose flour creates a barrier that prevents the egg from properly adhering to the chicken. Another reason could be moving the chicken too soon in the pan. Make sure your oil/butter is hot enough (a breadcrumb dropped in should sizzle immediately) and let the chicken cook undisturbed for a full 3-4 minutes to form a solid crust before you attempt to flip it.
Q: Can I make this ahead of time?
A: You can bread the chicken cutlets ahead of time! Lay them in a single layer on a baking sheet, cover with plastic wrap, and refrigerate for up to 4 hours before cooking. This can actually help the coating set. I don’t recommend cooking them fully ahead, as the crust will lose its crispness. The sauce is best made fresh and served immediately.
Q: My chicken is cooked through but the breading isn’t golden brown. Help!
A: This usually means your heat was too low. You need a good medium heat to achieve that beautiful golden-brown sear without overcooking the inside. If this happens, you can always finish the chicken under the broiler for a minute or two to crisp up the coating. Just keep a very close eye on it!
Q: Is there a way to make this recipe healthier?
A> Absolutely! For a lighter version, you can skip the breading altogether. Just season the pounded chicken breasts with salt and pepper and sear them in 1 tablespoon of olive oil. Remove them, then make the sauce as directed. You can also reduce the butter by using 2 tablespoons of butter and a tablespoon of olive oil for the sauce instead. It will still be incredibly flavorful!

Crispy Lemon Garlic Chicken Cutlets
- Total Time: 35 minutes
Description
Crispy Lemon Garlic Chicken Cutlets
Ingredients
-
4 boneless, skinless chicken breasts (pounded to ½-inch thickness)
-
1 cup all-purpose flour
-
1 tsp salt
-
1 tsp black pepper
-
2 large eggs, beaten
-
1 cup breadcrumbs (Panko preferred)
-
2 tbsp olive oil
-
½ cup unsalted butter, divided
-
4 cloves garlic, minced
-
¼ cup freshly squeezed lemon juice (~2 lemons)
-
¼ cup chicken stock (or white wine)
-
2 tbsp fresh parsley, chopped
Optional Variations:
-
Piccata Style: Add 2 tbsp capers
-
Creamy Twist: Stir in ¼ cup heavy cream
-
Herb Boost: 1 tsp Italian seasoning in breadcrumbs
-
Parmesan Crunch: ½ cup grated Parmesan in breadcrumbs
-
Spicy Kick: Red pepper flakes in butter when sautéing garlic
Instructions
1. Pound Chicken:
Place chicken between plastic wrap or a zip-top bag and gently pound to ½-inch thickness.
2. Set Up Breading Station:
-
Bowl 1: Flour, salt, pepper
-
Bowl 2: Beaten eggs
-
Bowl 3: Breadcrumbs
3. Dredge Chicken:
-
One hand for dry, one for wet. Coat in flour → egg → breadcrumbs. Press breadcrumbs to adhere. Let sit 5–10 minutes.
4. Cook Chicken:
-
Heat olive oil + 2 tbsp butter in a skillet over medium heat.
-
Cook chicken 4–5 min per side until golden brown and 165°F internal.
-
Remove and tent with foil.
5. Make Sauce:
-
Reduce heat to medium-low. Melt remaining butter.
-
Sauté garlic 60–90 seconds (do not burn).
-
Add lemon juice and chicken stock; scrape browned bits from skillet. Simmer 2–3 minutes until slightly reduced.
6. Finish Dish:
-
Return chicken to skillet and spoon sauce over. Heat through 1 min.
-
Sprinkle with fresh parsley and serve.
Notes
-
Shake off excess flour before egg wash to prevent soggy breading.
-
Let chicken sit in breadcrumbs for better adhesion.
-
Cook at medium heat for golden, crispy crust. Finish under broiler if needed.
-
Breading can be done ahead (up to 4 hours in fridge), but cook fresh for crispiness.
-
Lighter version: skip breadcrumbs and reduce butter; still flavorful.
- Prep Time: 15 minutes
- Cook Time: 20 minutes
Nutrition
- Calories: 460 Cal
- Fat: 23g
- Carbohydrates: 24g
- Protein: 38g
Nutritional Information*
Prep Time: 15 mins | Cook Time: 20 mins | Total Time: 35 mins | Servings: 4
Calories: ~460 | Protein: 38g | Carbs: 24g | Fat: 23g | Fiber: 1g
*Please note: These values are estimates based on the ingredients used and may vary depending on specific brands or substitutions.
Final Thoughts
The true beauty of a recipe like this Crispy Lemon Garlic Chicken Cutlet lies not in its complexity, but in its perfect balance of simplicity and profound satisfaction. It demonstrates that you don’t need a pantry full of esoteric ingredients or professional-grade equipment to create something truly extraordinary. You need technique, a little bit of patience, and high-quality, humble ingredients treated with respect.
This dish is more than the sum of its parts. It’s a lesson in texture—the audibly crisp crust giving way to the tender interior. It’s a masterclass in balancing flavors—the rich, nutty butter harmonizing with the sharp, aromatic garlic and the bright, acidic lemon. It’s a reminder that the most flavorful components often come from the process itself, from the fond created by a proper sear to the pan sauce built from its remnants.