
Spooky Shapes That Stay Put: Meet Your New Halloween Cookie Heroes!
Hey friends, Beau here from Feastical! Can you smell it? That crisp autumn air mixed with the promise of candy corn and pumpkin spice? Halloween’s creeping up, and you know what that means – it’s cookie time! But let’s be real: nothing kills the spooky vibes faster than pulling a tray of blobby ghosts or pumpkins that look like they’ve melted in a haunted sauna. We’ve all been there – that sad moment when your adorable bat cookie cutter yields something resembling a Rorschach test instead. *sigh*
That’s exactly why I’ve spent years tweaking and testing to create what I call my “No-Spread Heroes.” These sugar cookies are the sturdy, dependable pals of your Halloween baking squad. They hold their shape like a champ, roll out like a dream, and bake up into the perfect blank canvas for your spookiest (or cutest!) icing masterpieces. No more cookie casualties! Whether you’re hosting a monster mash, packing treat bags for tiny goblins, or just craving that nostalgic butter-sugar-vanilla hug, this recipe is your golden ticket. So dust off those cookie cutters, grab your favorite sprinkles, and let’s make Halloween magic that actually looks like Halloween!
Cookie Catastrophes & Grandma’s Ghostly Wisdom
Picture this: 8-year-old me, absolutely vibrating with excitement for my first “solo” Halloween bake. Grandma Collier, my kitchen sensei, handed me her prized vintage ghost cookie cutter. “Go on, Beau-Beau,” she winked, “show ’em how it’s done.” I meticulously cut my ghosts, beaming with pride… until the oven timer dinged. Instead of friendly phantoms, I pulled out a tray of amorphous blobs that looked like sad, beige puddles. My ghostly brigade had become a cookie crime scene! Grandma just chuckled that warm, crackling-fireplace laugh of hers. “Sugar,” she said, wiping flour off my nose, “butter’s a fickle friend when it’s warm. You gotta show it who’s boss with a little chill time.”
That little ghostly disaster became our annual mission. We experimented – less sugar? More flour? Chilling? DOUBLE chilling? We turned it into our pre-Halloween ritual, laughing over “blob ghosts” while perfecting the formula. That vintage cutter? I still use it every single year. It’s my reminder that kitchen flops are just stepping stones (and sometimes, the best stories). These no-spread cookies are the delicious result of those trials – a tribute to Grandma’s patience and the power of not giving up on a cookie dream!
Gathering Your Cookie Crew: Simple Ingredients, Big Flavor
These Halloween heroes come together with pantry staples, but each one plays a crucial role. Here’s the lineup and my pro insights:
- 1 cup (226g) unsalted butter, softened: The STAR! Unsalted lets *you* control the salt. “Softened” means cool but yielding slightly when pressed – about 65°F (18°C). Too warm? Cookies spread. Too cold? Your mixer will protest. No unsalted? Use salted butter but omit the extra salt later.
- 1 cup (200g) granulated sugar: Sweetness and structure! Granulated sugar creamed with butter creates air pockets for a tender bite that still holds firm. Powdered sugar makes them spread more.
- 1 large egg: The binder! Bring it to room temp (about 30 mins out of the fridge) for smoother mixing and even texture.
- 1 ½ tsp vanilla extract: Pure magic! Use the good stuff – pure vanilla extract – for the best flavor. Imitation works in a pinch, but pure is worth it.
- 2 ¾ cups (330g) all-purpose flour: The foundation! Measure correctly: Spoon flour lightly into your measuring cup and level it off. Scooping packs it down, leading to dry, tough cookies. Want foolproof? Weigh it!
- ½ tsp baking powder: Our secret weapon against spread! It gives just a *tiny* lift without puffing them up like balloons, keeping details sharp.
- ½ tsp salt: The flavor enhancer! It balances the sweetness and makes the vanilla pop. If using salted butter, skip this.
Let’s Bake Some Spooky Magic: Step-by-Step with Beau’s Hacks!
Ready to roll? (Literally!). Follow these steps for perfect no-spread cookies every time:
- Cream Butter & Sugar Until LIGHT & Fluffy (3-5 mins): This isn’t just mixing; it’s aerating! Use your stand mixer or hand mixer on medium-high. Beat the softened butter and granulated sugar until the mixture is super pale, almost white, and looks noticeably fluffier. Chef Hack: Scrape down the bowl halfway through! Undermixed = dense cookies, overmixed later = tough cookies. This step is your texture foundation!
- Add Egg & Vanilla: Mix Until JUST Smooth (1 min): Crack in the room-temp egg and add the vanilla. Mix on medium-low just until fully incorporated and the mixture looks uniform. Don’t go wild here – overmixing after adding the egg can make cookies tough. Chef Hack: Add a tiny pinch of cinnamon or nutmeg with the vanilla for a subtle “haunted house” warmth!
- Whisk Dry Ingredients & Add Gradually: In a separate bowl, whisk together the flour, baking powder, and salt (unless you used salted butter!). With your mixer on LOW speed, add the dry ingredients about 1/3 at a time. Mix JUST until the flour disappears after each addition. Chef Hack: Stop mixing when you still see a *few* streaks of flour! Finish mixing by hand with a spatula – it prevents overworking the gluten.
- Divide, Flatten, & CHILL (30 mins min!): Dump the dough onto a clean surface. Divide it in half. Shape each half into a disc about 1-inch thick – don’t make a ball! Discs chill faster and roll out more evenly later. Wrap tightly in plastic wrap. Chill for at least 30 minutes, but 1-2 hours is even better. Chef Hack: Chilling is NON-NEGOTIABLE for no-spread success! It re-solidifies the butter. Rushing = blob ghosts.
- Roll to Perfection (¼-inch thick): Preheat your oven to 350°F (175°C). Lightly flour your rolling surface and pin. Take ONE disc out of the fridge (keep the other cold!). Roll firmly and evenly to ¼-inch thickness. Chef Hack: Use rolling pin guides or two wooden dowels of the same thickness on either side of the dough to guarantee perfect, even thickness!
- Cut Those Spooky Shapes: Dip your cookie cutters in flour before each cut to prevent sticking. Press down firmly and decisively. Cut shapes close together for less re-rolling. Chef Hack: For intricate shapes (like spiderwebs!), place the cut dough shape on the baking sheet *before* removing the excess dough around it. Less handling = less distortion!
- Bake Until “Just Set” (9-11 mins): Place cookies on parchment-lined baking sheets, leaving about 1 inch between them. Bake one sheet at a time in the center of the oven. Watch closely! They’re done when the edges look *set* and maybe just barely show a hint of gold. The centers should still look pale and soft – NOT browned. Chef Hack: Tap the edge lightly – if it doesn’t leave an indent, they’re done. They firm up as they cool.
- Cool Completely – Patience, Padawan! Let cookies cool on the baking sheet for 5 minutes. This lets them set. Then, carefully transfer them to a wire rack to cool completely (about 30 mins) before decorating. Chef Hack: Decorating warm cookies = icing meltdown! Use this time to whip up your royal icing or buttercream.
Showcasing Your Spooky Masterpieces!
Once your edible art is decorated and dried, it’s showtime! Pile them high on a rustic wooden board for a casual graveyard gathering vibe. Arrange them by shape on tiered stands for a “haunted mansion tea party” effect. Stack them carefully in clear cellophane bags tied with orange and black ribbon for the cutest trick-or-treat favors. For maximum spook appeal, scatter some candy corn, plastic spiders, or autumn leaves around the platter. These cookies are sturdy enough to handle display, but store any leftovers (yeah, right!) in a single layer in an airtight container at room temperature for up to a week.
Mix It Up! Spooky (or Sparkly) Twists
This dough is your blank canvas! Try these fun variations:
- Chocolate Spookiness: Replace 1/4 cup (30g) of the flour with unsweetened cocoa powder for rich chocolate cookies. Perfect for bats, cats, and haunted houses!
- Citrus Zing: Add the zest of one orange or lemon to the butter-sugar mix for bright, cheerful ghosts and pumpkins.
- Spiced Sensation: Whisk 1 tsp ground cinnamon, 1/2 tsp ginger, and a pinch of cloves into the dry ingredients for warm, autumnal flavors.
- Gluten-Free Ghouls: Swap the all-purpose flour for a trusted 1:1 gluten-free baking blend (like Bob’s Red Mill). Results are fantastic!
- Almond Elegance: Replace 1/2 tsp of the vanilla with pure almond extract for a sophisticated twist. Amazing with royal icing!
Beau’s Brain Dump: Cookie Wisdom & Laughs
Okay, real talk: The first time I nailed this recipe after the “blob ghost” era, I did a literal happy dance in my tiny apartment kitchen and scared my cat. This dough has become my ultimate Halloween security blanket. One year, I made SO many bats (trying to break a personal record… don’t ask), I started seeing bat shapes when I closed my eyes! Pro Tip: You can make the dough ahead! Wrap the discs tightly and refrigerate for up to 3 days, or freeze for up to 3 months. Thaw frozen dough overnight in the fridge before rolling. Decorating? Royal icing is king for sharp details and drying hard, but a slightly thicker buttercream frosting works too (just be gentle!). My biggest evolution? Learning that slightly underbaking (just until set!) is KEY for softness that doesn’t crumble. Now, go forth and bake spooky! And if you get icing everywhere? That’s just Halloween confetti.
Print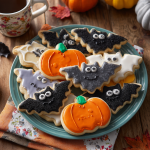
No-Spread Halloween Sugar Cookies
- Total Time: 1 hr 10 mins
Description
Crisp autumn air, the scent of pumpkin spice, and trays of cookies that actually look like bats, ghosts, and pumpkins… sounds like Halloween magic, right? These buttery sugar cookies are foolproof “no-spread heroes” that hold their shape, roll out beautifully, and taste like a nostalgic vanilla hug. Perfect for decorating parties, trick-or-treat bags, or just enjoying with hot cider by candlelight. Get ready to bake cookies that wow both in looks and flavor!
Ingredients
-
1 cup (226g) unsalted butter, softened
-
1 cup (200g) granulated sugar
-
1 large egg (room temp)
-
1 ½ tsp pure vanilla extract
-
2 ¾ cups (330g) all-purpose flour
-
½ tsp baking powder
-
½ tsp salt
Instructions
-
Cream butter & sugar until light and fluffy (3–5 mins).
-
Mix in egg & vanilla until smooth.
-
Whisk & add flour, baking powder, and salt gradually. Mix until just combined.
-
Divide dough into two discs, wrap, and chill at least 30 mins.
-
Preheat oven to 350°F (175°C). Roll dough to ¼-inch thickness on floured surface.
-
Cut shapes with cookie cutters; place on parchment-lined sheets.
-
Bake 9–11 mins, until edges look set but centers are pale.
-
Cool completely before decorating.
Notes
-
Chill time = no spread! Don’t skip it.
-
Swap ¼ cup flour for cocoa for chocolate bats.
-
Add orange zest or autumn spices for extra festivity.
-
Dough can be refrigerated 3 days or frozen 3 months.
- Prep Time: 20 mins (plus chill)
- Cook Time: 10 mins/batch
Nutrition
- Calories: 120Cal per cookie
- Carbohydrates: 16g
- Protein: 1g
Final Thoughts: Embrace the Spooky Baking Journey
Halloween baking should be fun, not stressful. Even if your first batch of cookies looks more like abstract art than elegant ghosts, remember—every baker starts somewhere! The beauty of this recipe is its reliability: once you master the basics, you can experiment with flavors, colors, and designs.
So, whether you’re hosting a haunted house party, surprising coworkers with edible treats, or just indulging in some festive baking therapy, these no-spread cookies are your ticket to Halloween success. And hey, if all else fails? Smother them in icing and call them “melted zombies.” Happy baking, spooky friends! 👻🍪