Easy Jack O’ Lantern Cake: Your New Halloween Dessert Hero!
Hey friends! Beau here from Feastical, and if your October feels like a whirlwind of costume chaos, sticky pumpkin guts, and sugar-fueled kiddos, I’ve got your dessert table salvation. Forget wrestling with carving knives—this Easy Jack O’ Lantern Cake is pure, uncomplicated JOY. Imagine: a grinning pumpkin-shaped masterpiece made from simple cake layers, vibrant frosting, and a little Halloween magic. No fancy skills needed! Whether you’re hosting a spooky soiree or just want to surprise your crew with something delightfully thematic, this cake is your edible high-five. It’s forgiving, fun to decorate (even with tiny helpers!), and guaranteed to make everyone’s eyes light up brighter than a flickering jack-o’-lantern. Let’s turn your kitchen into a festive bakery where the only “scary” part is how fast this cake disappears! 🎃✨
I know Halloween baking can feel overwhelming. Between party prep and trick-or-treat patrol, who has time for fussy fondant sculptures or temperamental tempering chocolate? That’s why I designed this beauty to be fast, flexible, and full of personality. We’re talking minimal ingredients, maximum creativity. Round cakes or Bundts? Your call! Store-bought or homemade? No judgment here! The goal? A showstopping centerpiece that sparks laughter and nostalgia without stealing your entire afternoon. So tie on that apron (the one with the questionable stain from last year’s caramel apples—no shame!), crank up your favorite spooky playlist, and let’s bake some seriously sweet memories together.
That Time My Jack O’ Lantern Cake Winked… Literally!
This cake recipe? It’s steeped in pure, chaotic Halloween nostalgia. Picture it: My niece Lily, age 5, absolutely vibrating with excitement to help “Uncle Beau” make the “pumpkin cake.” We’d baked the layers together, her tiny hands carefully stirring (and splattering) vanilla batter everywhere. Fast-forward to decorating time. I’d meticulously shaped a fondant smile. Lily, however, had bigger plans. While I turned to grab the orange frosting, she stealthily added a SECOND fondant mouth just below the first one. “Now he’s winking AND smiling, Uncle Beau! He’s happy!” she declared, beaming. We ended up with a delightfully derpy, double-mouthed pumpkin cake that looked more like it had eaten something questionable than a traditional jack-o’-lantern. The best part? It was the star of the party. Everyone adored its goofy charm, and Lily felt like a pastry Picasso. That cake taught me a golden rule I still live by: Perfection is overrated; joy is the secret ingredient. Now, every time I make this, I think of Lily’s mischievous grin and add a little extra personality to the face. Embrace the happy accidents!
Gather Your Pumpkin Squad: Simple Ingredients, Big Flavor!
Here’s your easy-breezy shopping list. Don’t stress about exact brands—this is about flexibility and fun!
- 2 round cake layers or 2 Bundt cakes (any flavor), cooled: Homemade or store-bought? YOU DO YOU! A dense pound cake or spice cake holds shape beautifully, but chocolate or vanilla are classics. No Bundt pan? Bake two 8-inch rounds! Pro tip: Level the tops if using rounds for a stable stack.
- Orange-tinted frosting (about 3-4 cups): Buttercream, cream cheese frosting, or even whipped topping works! Use gel food coloring (not liquid!) for vibrant, non-runny orange. Start with equal parts red and yellow, then adjust. Out of dye? A mix of cinnamon and paprika gives a warm autumnal hue (but test taste first!).
- 1 green flat-bottom ice cream cone (for the stem): The flat bottom is KEY for stability! Can’t find green? Tint a regular cone with green gel color or wrap it in green fruit roll-up. Feeling fancy? Mold a stem from green fondant or marzipan.
- Black fondant, fruit roll-ups, or candy (for eyes, nose, mouth): This is your creativity zone! Rolled fondant is smooth but requires kneading. Fruit roll-ups (especially the dark berry ones!) are kid-friendly and cut easily with scissors. Mini Oreos, chocolate chips, or even black licorice work too. Chef insight: Chill candy pieces slightly before placing for less smudging!
- Optional: green icing or candy for vines and leaves: Green gel icing in a tube is super easy. Thin green licorice laces make great curly vines. Or, cut small leaves from green fruit roll-ups or fondant. Adds that extra “fresh from the patch” charm!
See? No obscure ingredients! This is pantry-friendly magic. The goal is vibrant orange, a sturdy green stem, and a playful face. Everything else? Pure, delicious improvisation.
Let’s Build Your Edible Pumpkin Masterpiece!
Ready? Channel your inner cake architect! This is where the fun truly begins. Grab your cooled cakes, your orange frosting (keep it at room temp for easy spreading!), and let’s transform them into Halloween royalty.
- Stack the cakes: Place one cake layer flat-side down on your serving plate or cake board. This is your pumpkin’s base! Spread a generous, even layer of orange frosting (about 1/2 cup) over the top, right to the edges. This isn’t just glue; it’s a flavor layer! Now, carefully place the second layer rounded-side UP on top. Voila! You’ve got the iconic pumpkin dome shape. Chef Hack: Dab a little frosting under the bottom cake layer first to stop it sliding! If using Bundts, place one hole-side down, frost the flat top, then place the second hole-side UP.
- Crumb coat & chill: This step is your secret weapon against rogue crumbs ruining your smooth orange finish! Using an offset spatula or butter knife, apply a very thin layer of orange frosting over the ENTIRE cake – top and sides. Don’t worry about perfection; just trap those crumbs! Pop the cake into the fridge for 30-60 minutes (or freezer for 15-20 mins if you’re impatient like me!). This firms up the cake and frosting, making the final layer a dream. Pro Tip: Wipe your spatula clean often during this step for the smoothest crumb coat!
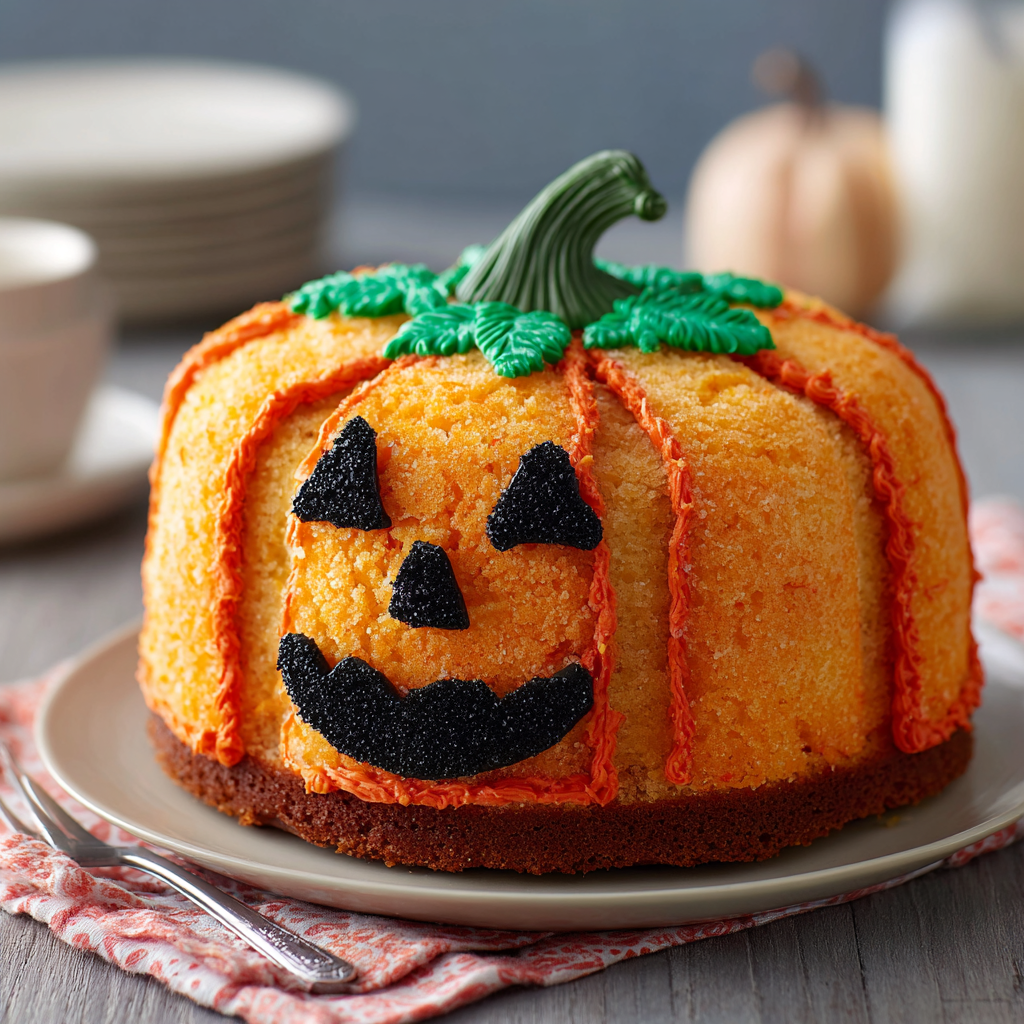
- Final frosting: Time for the glorious orange glow-up! Take your remaining frosting and generously cover the chilled cake. Start with a big dollop on top, spread it down the sides, and use smooth, even strokes. Aim for full coverage. Want those classic pumpkin ridges? Gently drag the tip of your spatula vertically from the bottom to the top of the cake at even intervals after the main frosting is on. Chef Hack: Dip your spatula in hot water, dry it quickly, then smooth the frosting for a pro finish!
- Create the stem: Grab your green flat-bottom ice cream cone. Turn it upside down so the wider, flat end becomes the top (this gives you a stable base to stick into the cake). Press it firmly into the center top of your frosted pumpkin. If it feels wobbly, add a tiny bit of frosting underneath like edible glue. Insight: Push it in deep enough so it feels secure, but not so deep it cracks the cake below!
- Decorate: Unleash your inner artist! This is where personality shines. Using your black fondant, fruit roll-ups, or candy:
- Cut out classic triangle eyes and nose.
- Shape a jagged, grinning mouth (or a winky one, Lily-style!).
- Place them gently onto the frosted cake. Tip: Use tweezers for tiny fondant pieces!
Feeling fancy? Pipe little green vines curling from the stem using green icing in a piping bag (or a ziplock with the corner snipped!). Add small green candy leaves nearby. Step back and admire your spooktacular creation!
See? Structurally sound, visually stunning, and full of character. Now, let’s talk presentation!
Showtime! Presenting Your Glowing Gourds
This cake is the party! Place it smack in the center of your dessert table. For extra Halloween vibes, surround it with scattering of candy corn, chocolate bats, or even small real mini pumpkins. Dim the lights slightly and tuck a flickering (battery-operated!) tea light underneath the cake stand for an eerily beautiful glow that makes the orange frosting pop. Slice it right at the table – those clean, cakey wedges revealing the inside flavor are part of the fun! Serve on vibrant orange or black plates. Pro tip: Have damp cloth napkins handy… sticky fingers are inevitable (and a sign of success!).
Mix It Up! Spooky & Scrumptious Twists
Don’t stop at vanilla! This cake is a blank pumpkin canvas:
- Flavor Fiesta: Use spice cake layers with cinnamon cream cheese frosting for cozy autumnal vibes. Or try chocolate cake with orange buttercream – a decadent crowd-pleaser! Pumpkin cake layers? Absolutely meta!
- Dietary Delights: Gluten-free? Use your favorite GF cake mix or recipe. Vegan? Opt for plant-based cakes and frosting (coconut oil-based buttercreams work great!). Dairy-free? Ensure your candy decorations are compliant too.
- Candy Craze: Instead of fondant, use mini chocolate chips for eyes/nose/mouth dots. Black jelly beans or M&Ms also work! For the stem, a green frosted pretzel rod is whimsical.
- Spooky Swirls: Add black gel food coloring streaks to your orange frosting before applying for a “marbled” or “spooky swirl” effect!
- Mini Monsters: Bake cupcakes instead! Frost orange, add a tiny green candy stem (like a green M&M or Mike & Ike), and pipe on mini faces.
The only limit? Your spooky imagination!
Beau’s Behind-the-Scenes Scoop & Sweet Memories
This recipe has truly evolved from a “let’s-see-if-this-works” kitchen experiment years ago! The first version? Let’s just say the Bundt cakes cracked, the cone stem toppled like a felled tree, and my black icing mouth melted into a terrifying frown. Practice (and Lily’s double-mouth innovation!) made perfect. My biggest lesson? Chilling the crumb coat is non-negotiable. It saves SO much frustration! I also learned to embrace imperfections – a slightly lopsided pumpkin or a crooked grin just adds charm and shows it’s homemade with love. One year, my dog Buster snagged a green cone off the counter mid-decorating… chaos ensued, but we improvised with a green apple slice stem! It worked. Now, I always buy extra cones. 😉 The beauty of this cake is its resilience and adaptability. It’s become my go-to Halloween tradition, sparking creativity and laughter every single time. Don’t aim for bakery-perfect; aim for joyfully delicious!
Your Jack O’ Lantern Cake Questions, Answered!
Let’s tackle those common spooky-season baking hiccups:
- Q: Can I make this cake ahead of time?
A: Absolutely! Bake and cool the cakes up to 2 days ahead; wrap tightly in plastic wrap and store at room temp. Frost and decorate the day of serving for the freshest look. The fully decorated cake can sit covered at cool room temp for several hours. Avoid refrigeration if possible, as it can dry out cake and cause condensation on frosting. - Q: Help! My cake layers are sliding! What did I do wrong?
A: Don’t panic! This usually means either the cakes weren’t fully cooled (warm cake melts frosting glue!) or the bottom layer wasn’t leveled. Fix: Carefully lift off the top layer. Scrape off the frosting layer. Level the bottom cake if needed (use a serrated knife). Reapply frosting glue and reposition the top layer. Chill well before final frosting! - Q: My orange frosting looks streaky or pale. How do I get that vibrant pumpkin color?
A: Gel food coloring is your best friend! Liquid coloring waters down frosting and requires tons, leading to streaks. Use orange gel or mix red and yellow gel. Add color gradually, mixing thoroughly between additions. Start with a small amount – gels are potent! For deep orange, you might need a teaspoon total. If it’s still pale, a tiny drop of brown gel can deepen it without changing the hue. - Q: The fondant/candy face keeps falling off! Any tricks?
A: Make sure the frosting surface isn’t too wet or warm. If it’s humid, chill the frosted cake for 10-15 mins before adding decorations. Use a tiny dab of extra frosting or piping gel as “glue” on the back of each fondant/candy piece before placing it. For heavy pieces (like thick fondant), insert a toothpick partially into the cake, then attach the piece to the exposed end of the toothpick with frosting glue (just warn guests about hidden picks!).
Remember, most “mistakes” are just opportunities for creative solutions (or funny stories!).
Print
Easy Jack O’ Lantern Cake
- Total Time: 1.5 hrs
Description
Tired of juggling pumpkin guts, sugar-high kids, and endless party prep? This cake is your shortcut to Halloween glory! Shaped like a cheerful jack-o’-lantern, it’s bright, playful, and way easier than it looks. Whether you use boxed mix or bake from scratch, this cake is forgiving, fun to decorate, and guaranteed to disappear in record time. Grab your frosting and a little imagination—it’s time to wow your crew with a dessert that’s all treat, no trick!
Ingredients
-
2 round cake layers or Bundt cakes (any flavor), cooled
-
3–4 cups orange-tinted frosting (buttercream or cream cheese)
-
1 green flat-bottom ice cream cone (for the stem)
-
Black fondant, fruit roll-ups, or candy (for eyes, nose, mouth)
-
Optional: green icing, licorice, or fondant for vines & leaves
Instructions
-
Stack: Place one cake layer flat-side down, spread frosting on top, then stack the second rounded-side up. (Bundt option: sandwich hole sides together.)
-
Crumb coat: Spread a thin frosting layer over the cake to lock in crumbs. Chill 30–60 mins.
-
Final frost: Cover completely with orange frosting. For pumpkin ridges, drag spatula lines from bottom to top.
-
Add stem: Press the green cone upside down into the top center.
-
Decorate: Cut eyes, nose, and mouth from fondant or candy. Stick on with a dab of frosting. Add vines or leaves if desired.
Notes
personality. A crooked grin or lopsided stem just makes your pumpkin cuter!
- Prep Time: 30 mins
Nutrition
- Calories: 320Cal per slice, based on 12
- Sugar: 32g
- Fat: 14g
- Carbohydrates: 45g
- Protein: 3g
Nutritional Nibbles (Approximate per slice)
Based on using standard vanilla cake and buttercream frosting, serving 20 slices: ~280 calories, 12g fat, 42g carbs, 2g protein. Values vary significantly based on specific cake/frosting brands, slice size, and decorations used. For lighter options, try angel food cake and whipped topping!
Final Thoughts: Why This Cake is a Halloween Game-Changer
This Easy Jack O’ Lantern Cake isn’t just dessert—it’s a memory-maker. It’s forgiving enough for first-time bakers yet impressive enough to wow party guests. Whether you’re racing against trick-or-treat time or hosting a full-blown Halloween bash, this cake brings the festive fun without the fuss.
So embrace the quirks: Maybe your pumpkin leans a little, or the smile is crooked. That’s where the magic lives! After all, Halloween is about joy, creativity, and maybe a little mischief. Now go forth and bake your brightest, spookiest masterpiece yet. 🎃