Spooky Sweets That’ll Make Your Halloween Unforgettable!
Hey friends! Beau here from Feastical, and can you feel it? That crisp autumn air, the rustle of fallen leaves, and the giddy buzz of Halloween creeping closer! It’s hands-down my favorite time to get creative in the kitchen. There’s something magical about whipping up treats that are equal parts delicious and delightfully spooky. And let me tell ya, if you’re looking for a showstopper that’s easier than convincing a toddler to eat candy, these 👁️🦇 Halloween Buckeyes are your new secret weapon!
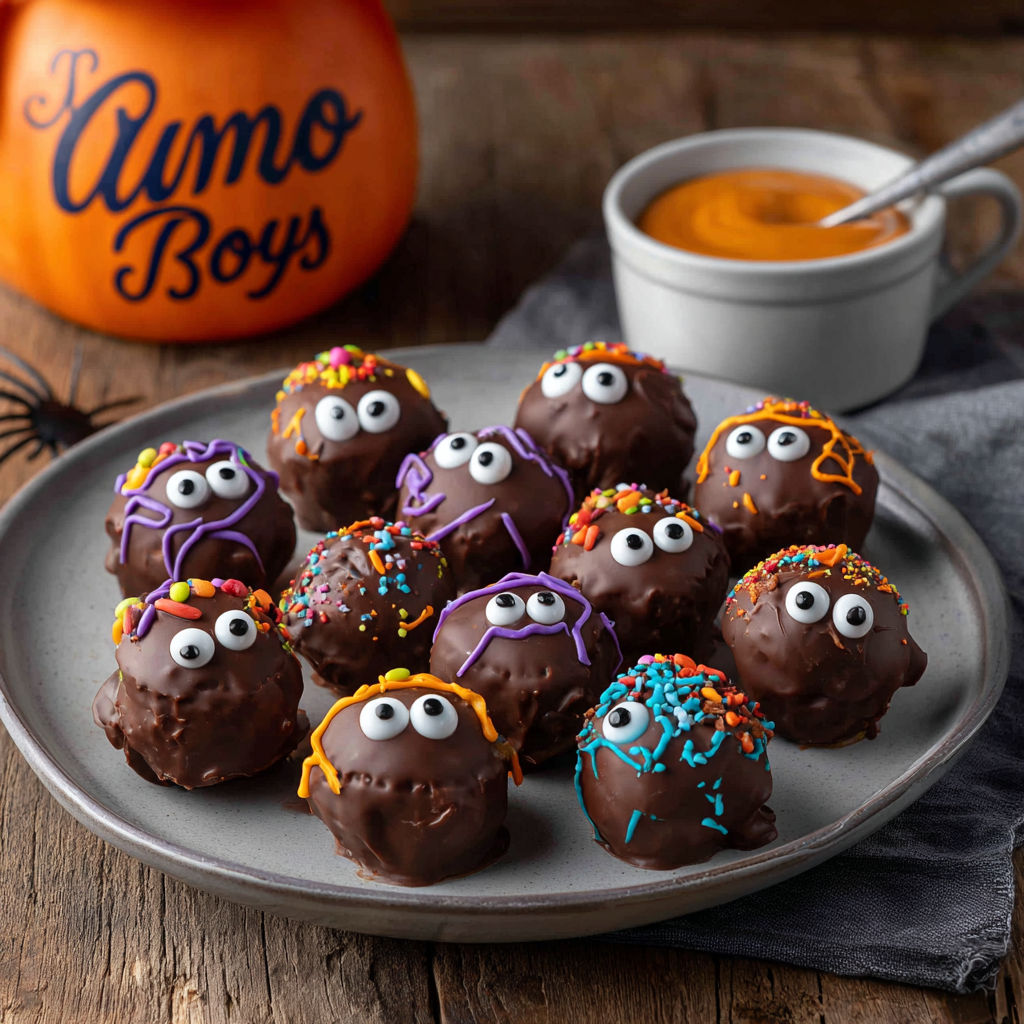
Picture this: velvety-smooth peanut butter centers that taste like a cozy hug, dipped in rich, dark chocolate, and transformed into ghoulish little eyeballs or quirky monsters with just a few playful decorations. They’re the ultimate crowd-pleaser – whether you’re hosting a monster mash, need classroom treats that won’t get side-eyed by teachers, or just want to surprise your crew with something fabulously creepy. The best part? No oven required! Seriously, if you can mix, roll, and dip, you’re golden. These little bites vanish faster than a ghost in the fog (trust me, I’ve seen it happen!), and they bring that pure, uncomplicated joy that makes gathering around food so special. So, grab your favorite mixing bowl and let’s turn simple ingredients into edible Halloween magic!
A Buckeye Tradition with Batty Beginnings
Okay, story time! My love affair with buckeyes started way before Feastical was even a twinkle in my eye. Picture a much younger Beau, maybe 10 years old, covered in powdered sugar like a mini yeti, helping my grandma in her gloriously chaotic kitchen every October. Her classic buckeyes were legendary in our family. One particularly memorable Halloween, I decided to “help” by adding red food gel to make them “bloodshot eyeballs.” Let’s just say… it looked less like a spooky masterpiece and more like a peanut butter massacre! Powdered sugar clouds erupted, chocolate ended up on the ceiling, and my poor grandma found red splatters in places you wouldn’t believe. We laughed until we cried, ate the slightly terrifying results, and a tradition was born.
That messy, joyful disaster taught me something important: Halloween treats don’t need perfection. They need personality, fun, and maybe a little controlled chaos! Now, every year when I make these buckeyes, I remember that sugar-dusted kitchen, my grandma’s patient smile, and the simple magic of creating something together. Making these spooky versions feels like carrying on that legacy of laughter and slightly messy creativity – just with fewer ceiling chocolates these days (usually!).
Your Ghoulish Grocery List
Gather your cauldron… I mean, ingredients! Here’s what you’ll need to conjure up these hauntingly delicious bites. Don’t stress – substitutions are totally cool in this kitchen!
- 1 1/2 cups creamy peanut butter: The heart and soul! Use standard jarred PB (like Jif or Skippy) for the perfect texture – natural peanut butter can be too oily. Chef’s Hack: Give the jar a good stir before measuring!
- 1/2 cup unsalted butter, softened: This adds richness and helps bind everything. Sub Tip: Salted butter works in a pinch, just skip any added salt later. Make sure it’s SOFTENED (leave it out for 30-60 mins) – cold butter is the enemy of smooth dough!
- 1 tsp vanilla extract: Pure vanilla is best! It rounds out the flavors beautifully. Fun Twist: Try almond extract for a subtly different vibe!
- 3 cups powdered sugar: Sweetens and thickens the filling. Chef’s Insight: Sift it if it’s lumpy for ultra-smooth centers. Measure by spooning into the cup and leveling off – don’t pack it down!
- 12 oz semi-sweet chocolate chips: My go-to for dipping. The slight bitterness balances the sweet filling. Sub Tip: Dark chocolate chips or candy melts work great too! Candy melts set harder and faster.
- 1 tbsp coconut oil (optional): The SECRET for glossy, smooth chocolate that melts like a dream and sets with a beautiful snap. Chef’s Must-Do: Seriously, don’t skip this! Any neutral oil works, but coconut oil is magic.
- Candy eyeballs, colored icing, sprinkles: Unleash your inner monster-maker! Get creative – gel icing in tubes makes easy veins or monster mouths. Pro Tip: Hit the cake decorating aisle for the best spooky finds!
Conjuring Your Creepy Creations: Step-by-Step
Ready to make some edible magic? Let’s get rolling (literally!). Follow these steps, and you’ll have a legion of delicious little monsters in no time.
- Mix the Filling (aka The “Peanut Butter Cloud”): Grab your trusty stand mixer (or a large bowl and a sturdy wooden spoon – channel that arm strength!). Beat the softened butter and peanut butter together on medium speed until it’s completely smooth, creamy, and looks like a dreamy peanut butter cloud. This should take about 2 minutes. Scrape down the sides! Add the vanilla and beat for another 30 seconds until incorporated. Chef’s Hack: Feeling fancy? Add a tiny pinch of sea salt here to make the flavors pop!
- Gradually Add the Sweet Stuff: Reduce the mixer speed to LOW. Slowly add the powdered sugar, about 1 cup at a time. Let each addition incorporate fully before adding the next. The mixture will go from wet to crumbly to finally forming a thick, slightly stiff dough that holds together when pinched. Watch Out!: If you add the sugar too fast, you’ll create a powdered sugar mushroom cloud (been there, inhaled that!). If it seems too dry and crumbly, add a tiny splash (1/2 tsp) of milk. Too sticky? Add a bit more powdered sugar, a tablespoon at a time.
- Roll & Chill (The Patience Pays Off Step): Line a baking sheet with parchment paper. Scoop out dough by the tablespoon (a small cookie scoop is PERFECT for uniform balls). Roll them into smooth 1-inch balls between your palms. Place them on the sheet, not touching. Pop the whole tray into the FREEZER for at least 30 minutes. Critical Tip: FREEZER, not fridge! This makes them rock solid for easy dipping without falling apart. Set a timer!
- Melt the Chocolate Magic: When the balls are almost frozen, combine chocolate chips and coconut oil in a microwave-safe bowl. Microwave in 30-second bursts on 50% power, stirring vigorously in between bursts. Stop when it’s *almost* fully melted – the residual heat will finish the job. Stir until perfectly smooth and glossy. Chef’s Golden Rule: DO NOT OVERHEAT! Burnt chocolate is tragic. Low and slow wins the race. Keep the melted chocolate over a bowl of warm water (not simmering!) if it starts to thicken.
- Dip & Decorate (The FUN Part!): Working quickly with 4-5 balls at a time (keep the rest frozen!), insert a toothpick firmly into the top of a ball. Dip it 3/4 of the way into the melted chocolate, swirling gently to coat evenly. Lift it out, let excess chocolate drip off for a second, then gently slide it off the toothpick onto the parchment paper. Immediately decorate! Press on candy eyeballs, pipe spooky red veins with gel icing, add sprinkle “warts,” or let your imagination run wild. Hack: Use a second toothpick to gently help slide the buckeye off the first one. Smooth over the toothpick hole with a fingertip or a dab of extra chocolate.
- Set & Serve (The Hardest Part – Waiting!): Once decorated, pop the tray back into the fridge for at least 15 minutes to let the chocolate set completely. Storage Tip: Store them layered between parchment in an airtight container in the fridge for up to 2 weeks… if they last that long!
Plating Your Spooky Spectacle
Presentation is key for maximum “Ooooh!” factor! Arrange your Halloween Buckeyes on a dark slate platter for eerie contrast, or pile them high in a vintage glass apothecary jar. Scatter edible black glitter, orange and black sprinkles, or even plastic spider rings around them. For a party, label them with spooky names like “Monster Eyeballs” or “Bat Bites” on little tags. They look fantastic nestled in mini cupcake liners on a tray – easy for grabbing! Serve them straight from the fridge; that cool, creamy center is pure bliss.
Spooky Swaps & Ghoulish Twists
Don’t be afraid to play mad scientist with these!
- Nut-Free Nightmares: Swap peanut butter for sunflower seed butter (like SunButter)! The flavor is fantastic and works perfectly. Just ensure it’s smooth and not too runny.
- Vegan Vampires: Use vegan butter sticks and ensure your chocolate chips are dairy-free (many semi-sweet brands are!). Coconut oil is already vegan. Boom!
- Flavor Frights: Add 1/4 cup cocoa powder to the filling for chocolate peanut butter monsters! Or, mix in 1/2 cup crushed Oreos for a cookies-and-cream graveyard vibe.
- Color Chaos: Use white chocolate candy melts dyed orange, purple, or green for the dip! Add a drop of oil-based food coloring to melted white chocolate.
- Creepy Creature Features: Instead of eyeballs, use small pretzel sticks poked in for bat wings before chilling, or pipe on white chocolate fangs!
Beau’s Boo-tiful Notes
Oh man, these little guys have come a long way since my red-splattered kitchen disaster! The biggest evolution? Definitely embracing the coconut oil trick. Early batches had chocolate that cracked or looked dull – total heartbreak! Now, they’re glossy and perfect every time. One year, I tried using natural peanut butter on a whim… let’s just say I ended up with peanut butter soup instead of dough. Lesson painfully learned! Stick with the classic jarred stuff.
My favorite memory now? Last Halloween, my nephew declared them “zombie eyeballs” and insisted we make some with mismatched candy eyes – one big, one small. They were hilariously ugly and utterly perfect. That’s the spirit! Don’t aim for Pinterest perfection. Embrace the wonky eyes, the slightly messy icing veins, the chocolate drips. It’s those little imperfections that make them charming and full of homemade love. The real magic isn’t just in the taste; it’s in the laughter and creativity you stir in along the way.
Spooky Snack SOS: Your Questions Answered
Ran into a ghoulish glitch? Don’t panic! Here’s the fix:
Q: Why is my filling so sticky? I can’t roll balls!
A: Ah, the classic sticky situation! This usually means either your peanut butter was too warm/oily or you didn’t add quite enough powdered sugar. Pop the mixture in the fridge for 20-30 minutes to firm up. If it’s still sticky, work in more powdered sugar, a tablespoon at a time, until it’s manageable. Dusting your hands lightly with powdered sugar while rolling also helps!
Q: My chocolate coating cracked! What happened?
A: Temperature shock is the likely culprit! If your peanut butter balls aren’t COLD enough (straight from the freezer!) when dipped, the cold center makes the warm chocolate contract and crack as it sets. Ensure balls are frozen solid for 30+ minutes. Also, adding that coconut oil helps the chocolate stay flexible!
Q: Can I freeze Halloween Buckeyes?
A: Absolutely! They freeze like champs. Place completely set buckeyes in a single layer on a parchment-lined tray, freeze until solid (about 1 hour), then transfer to an airtight freezer bag or container. They’ll keep for up to 3 months! Thaw in the fridge overnight before serving.
Q: My chocolate seized or got lumpy when melting. Help!
A: Seized chocolate usually means a tiny drop of water got in, or it got too hot. Prevention is key: ensure bowls and utensils are COMPLETELY dry. If it seizes, try stirring in a teaspoon of coconut oil or shortening (NOT butter or water!) off the heat. Sometimes it rescues it, sometimes… it’s chocolate sauce time! Melt slowly on low power next time.

Halloween Buckeyes
- Total Time: 1 hr 15 mins
Description
These no-bake peanut butter & chocolate bites get a ghoulish makeover for Halloween! Imagine creamy peanut butter centers cloaked in glossy chocolate, then decorated into eyeballs or silly monsters with candy eyes and icing. They’re fun to make, insanely delicious, and way easier than they look. Perfect for parties, school treats, or just a spooky night in.
Ingredients
-
1 ½ cups creamy peanut butter (not natural)
-
½ cup unsalted butter, softened
-
1 tsp vanilla extract
-
3 cups powdered sugar, sifted
-
12 oz semi-sweet chocolate chips
-
1 tbsp coconut oil (for glossy coating)
-
Candy eyeballs, colored icing, sprinkles (for decoration)
Instructions
-
Mix the Filling: Beat peanut butter + softened butter until smooth. Add vanilla. Gradually mix in powdered sugar until a thick dough forms.
-
Shape & Chill: Scoop 1-inch balls, roll smooth, and place on a parchment-lined tray. Freeze 30+ mins.
-
Melt Chocolate: Microwave chocolate chips + coconut oil in 30-sec bursts at 50% power, stirring until silky.
-
Dip & Decorate: Insert toothpick into each ball, dip ¾ into chocolate, let excess drip, and place back on tray. Add candy eyes, icing veins, or sprinkles immediately.
-
Set & Serve: Chill 15 mins until firm. Store in fridge up to 2 weeks (or freeze up to 3 months).
Notes
Pile them in a cauldron-shaped bowl or line them on a slate tray with fake spider webs for a spooky “monster eyeballs” display!
- Prep Time: 30 mins
Nutrition
- Calories: 110 Cal
- Fat: 7g
- Carbohydrates: 9g
- Protein: 2g
Quick Bite Breakdown
Per Serving (1 buckeye): ~110 calories | 2g protein | 7g fat | 9g carbs
Note: Nutritional info is approximate and can vary based on specific ingredients and decoration amounts. Enjoy them as a fun treat!
Final Thoughts: The Magic of Halloween Treats
There’s something truly special about Halloween baking. It’s not just about the flavors—it’s about the fun, the creativity, and the memories you make along the way. These Halloween Buckeyes are more than just a dessert; they’re a chance to laugh, experiment, and share something delightfully spooky with the people you love.
Whether you’re making them for a party, a school event, or just because, remember: perfection is overrated. The best Halloween treats are the ones made with joy, a little mess, and maybe a few candy eyeballs stuck to your fingers.
So grab your ingredients, turn up the Monster Mash, and let’s make this Halloween unforgettable—one deliciously creepy buckeye at a time!