
Your New Favorite Kitchen Rescue: 3-Ingredient Banana Oat Cookies
Hey friends, Beau here! Let me paint a picture I know you’ve seen before. You’re standing in your kitchen, staring down a bunch of bananas that have… let’s just say, seen better days. They’re lounging in the fruit bowl, sporting more brown spots than a Dalmatian, looking a little too soft for your morning cereal. Your first instinct might be to toss them, but wait! Hold that thought.
Because what if I told you those spotty, super-ripe bananas are actually the golden ticket to one of the easiest, healthiest, and most satisfying treats you can whip up in under 20 minutes? I’m talking about my legendary 3-Ingredient Banana Oat Cookies. Yes, you read that right. Just three simple, real-food ingredients are all that stand between you and a warm, chewy, downright delicious cookie that feels like a treat but fuels your body like a champion.
This isn’t just a recipe; it’s a kitchen revolution. No fancy mixer, no sifting flour, no creaming butter and sugar. If you can mash a banana with a fork and stir a bowl, you are officially a cookie-baking pro. We’re keeping it simple, soulful, and seriously satisfying. Whether you need a quick breakfast on-the-go, a lunchbox surprise for the kids, or a midnight snack that doesn’t come with a side of guilt, these little guys have got your back. So, let’s rescue those bananas and turn them into a warm hug you can eat. Ready? Let’s get mixing!
The Happy Accident That Started It All
I have to confess, this recipe was born out of a beautiful, messy, and slightly chaotic kitchen moment. Picture a much younger Beau, a college student with more ambition than groceries. It was a late night, and a serious study-snack craving was hitting hard. My wallet was empty, but my counter held two very sad-looking bananas and a nearly empty canister of oats. Desperation, as they say, is the mother of invention.
I mashed those bananas with a fervor usually reserved for final exams, stirred in the oats, and for a little pizzazz, I threw in the last handful of chocolate chips from the back of the pantry. I dolloped the sticky, dubious-looking mixture onto a baking sheet, crossed my fingers, and popped it in the oven. What emerged 15 minutes later wasn’t just a snack; it was a revelation. They were soft, they were sweet, they were chewy, and they were mine. I felt like a kitchen wizard. That simple, improvisational bake taught me one of my core cooking philosophies: the best food doesn’t have to be complicated. It just has to be made with a little love and a willingness to experiment. Every time I make these cookies, I’m transported right back to that tiny kitchen, reminded that the simplest things often bring the most joy.
Gather Your A-Team: Just 3 Ingredients!
Here’s the beautiful part. You probably have everything you need already. This is about celebrating simple, wholesome ingredients and letting them shine.
- 2 Ripe Bananas, Mashed – This is our superstar, our natural sweetener, and our binding agent all in one! The spottier and browner the banana, the better. Why? Because as bananas ripen, their starches convert into simple sugars, making them incredibly sweet and easy to mash. Don’t even think about using a firm, yellow banana here—it won’t have the same sweetness or moisture content. Chef’s Insight: No ripe bananas? You can quickly ripen them by placing yellow bananas on a baking sheet in a 300°F (150°C) oven for 15-20 minutes, until the skins turn black.
- 1 Cup Rolled Oats (Old-Fashioned) – These are the heart and soul of our cookie, providing structure and a wonderful, chewy texture. I highly recommend rolled oats (also called old-fashioned oats) because they hold their shape better than quick oats, giving you a more substantial bite. Substitution Tip: If you only have quick oats, that’s okay! The texture will just be a bit softer and less defined. Avoid using steel-cut oats, as they won’t soften enough during baking.
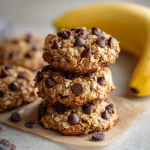
- ⅓ Cup Chocolate Chips or Raisins – This is your chance to customize! Chocolate chips create melty, gooey pockets of joy, while raisins offer a classic, chewy sweetness. Chef’s Insight: For a truly next-level experience, try a mix of both! Or, venture out with chopped nuts, dried cranberries, or even a sprinkle of cinnamon. This is your canvas—paint it with your favorite flavors.
Let’s Make Some Magic: The Foolproof Method
Get ready for the easiest baking session of your life. I’ll walk you through every step with a few of my favorite kitchen hacks to ensure cookie perfection.
- Preheat & Prep. Fire up your oven to 350°F (175°C). This is the perfect temperature to cook the cookies through without burning the bottoms. Now, line a baking sheet with parchment paper. Chef’s Hack: This isn’t just for easy cleanup (though that’s a huge bonus!). The parchment paper prevents the cookies from sticking without needing any added oil or butter, keeping our wholesome treat, well, wholesome.
- The Great Mash. Peel your super-ripe bananas and plop them into a medium-sized mixing bowl. Now, get mashing! You can use a fork, a potato masher, or even the back of a sturdy whisk. You’re aiming for a relatively smooth, pudding-like consistency with just a few small lumps for character. Chef’s Commentary: This is a fantastic step to hand off to any little helpers in the kitchen. It’s satisfying, simple, and sets the stage for everything else.
- The Big Stir. Dump your one cup of rolled oats and your ⅓ cup of mix-ins right into the banana mash. Now, grab a spatula or a wooden spoon and stir everything together until it’s fully combined. You’ll have a thick, somewhat sticky dough. Chef’s Tip: Let the mixture sit for about 5-10 minutes after you stir it. This gives the oats a chance to soak up some of the banana moisture, which helps the cookies hold their shape better and results in a perfect, chewy texture.
- Scoop & Shape. Using a tablespoon or a small cookie scoop, drop portions of the dough onto your prepared baking sheet. You should get about 12 cookies. Now, here’s a crucial step: gently flatten each mound with the back of a spoon or your fingers. Chef’s Hack: These cookies don’t contain any leavening agents, so they won’t spread or rise in the oven. Flattening them ensures they cook evenly and gives you that perfect cookie shape, rather than a baked dough ball. Don’t be shy—press them down to about ½-inch thickness.
- Bake to Perfection. Slide your baking sheet into the preheated oven and bake for 12-15 minutes. You’re looking for the edges to be lightly golden brown and the tops to look set and dry to the touch. Chef’s Insight: Oven temperatures can vary, so start checking at the 12-minute mark. If you prefer a slightly crispier cookie, you can leave them in for a minute or two longer. Just keep a close eye on them!
- The (Brief) Patience Phase. Once they’re out of the oven, transfer the entire parchment paper with the cookies onto a wire rack. This is important! Let them cool for at least 10 minutes. Chef’s Tip: They will be very soft and fragile straight out of the oven, but they firm up beautifully as they cool. This waiting period is the final step in setting their structure. I know it’s hard, but try to wait. Your patience will be rewarded with the perfect chewy texture.
How to Serve & Savor Your Masterpiece
Okay, the cookies are cooled. Now for the best part—eating them! These cookies are incredibly versatile. Here are a few of my favorite ways to enjoy them:
The Classic: Grab one (or two!) straight from the cooling rack with a tall glass of cold milk or a hot cup of coffee. It’s a timeless combo for a reason.
Breakfast of Champions: Pair two cookies with a yogurt parfait or a smoothie for a balanced, on-the-go breakfast that actually feels like a treat. You’re starting your day with whole grains and fruit—how awesome is that?
Dress Them Up: Feeling fancy? Right before serving, drizzle a little melted peanut butter or a light smear of almond butter over the top. For a real dessert vibe, a tiny dusting of cinnamon or a dip in melted dark chocolate takes them to a whole new level.
Kid-Friendly Fun: Let the kids build their own “cookie sundae” with a dollop of Greek yogurt and a few fresh berries on the side. It’s a fun, interactive, and healthy snack.
Get Creative: 5 Tasty Twists on the Classic
Once you’ve mastered the basic recipe, the kitchen playground opens up! Here are a few of my favorite ways to mix things up.
- The Tropical Vacation: Swap the chocolate chips for ¼ cup of chopped dried pineapple and 2 tablespoons of unsweetened shredded coconut. It’s like a healthy pina colada in cookie form!
- The Apple Pie Spice: Stir in ½ teaspoon of cinnamon and ¼ cup of finely chopped dried apples. The warm, cozy spice makes your kitchen smell incredible and tastes like fall, any day of the year.
- The Protein Powerhouse: Add 2 scoops of your favorite vanilla or chocolate protein powder to the mix. You may need to add a tablespoon of milk or water if the dough gets too thick. This is my go-to variation for a post-workout refuel.
- The Nutty Professor: Fold in ¼ cup of chopped walnuts or pecans along with your raisins. The added crunch and nutty flavor make these cookies feel incredibly decadent.
- The “Everything” Cookie: Feeling bold? Combine 2 tablespoons of chocolate chips, 2 tablespoons of raisins, and 2 tablespoons of chopped nuts. It’s the ultimate flavor explosion in every single bite.
Beau’s Kitchen Chronicles: A Few Parting Thoughts
This recipe has been with me for years, and it’s evolved in the most wonderful ways. I’ve made these cookies on bleary-eyed mornings, for last-minute potlucks, and as a “I love you” gesture for friends feeling down. They are my culinary security blanket. One of my favorite kitchen memories is of my niece, who was about four at the time, “helping” me make a batch. She was covered in mashed banana from wrist to elbow, proudly declaring herself the “Mash Master.” That’s the spirit of this recipe—it’s not about perfection; it’s about the joy of creating something delicious with your own two hands. Don’t stress if your cookies aren’t perfectly round or if you accidentally add a few extra chocolate chips (is that even a mistake?). Embrace the process. That’s where the real magic happens.
Your Questions, Answered!
Over the years, I’ve gotten a lot of questions about these little cookies. Here are the answers to the most common ones.
Q: My cookies turned out a bit soggy. What happened?
A: This usually means your bananas were very large and extra juicy, or the oats didn’t have enough time to hydrate. No worries! Next time, try adding an extra 2-3 tablespoons of oats to the dough to soak up the extra moisture. Also, make sure you let them cool completely on a wire rack—this allows steam to escape and helps them firm up.
Q: Can I make these gluten-free or vegan?
A> Absolutely! To make them gluten-free, simply ensure you’re using certified gluten-free rolled oats. They are naturally vegan as written, so you’re all set! Just double-check your chocolate chips to ensure they’re dairy-free if that’s a concern.
Q: How should I store these, and how long do they last?
A: These are best stored in an airtight container at room temperature for 2-3 days. Because they have fresh fruit and no preservatives, they are best enjoyed fresh! For longer storage, I highly recommend freezing them. They freeze beautifully for up to 3 months.
Q: Can I add an egg to make them firmer?
A> You can, but it changes the recipe! Adding one egg will give you a more cake-like, muffin-top texture. It’s delicious, but it’s a different beast. I encourage you to try the original no-egg version first to appreciate its unique, dense chewiness.
3-Ingredient Banana Oat Cookies : Healthy, Easy & Naturally Sweet
Description
Hey friends! Ever look at a bunch of overripe bananas and think, “These are done for”? Hold up—those spotty bananas are actually a goldmine for a quick, healthy treat. These 3-Ingredient Banana Oat Cookies are chewy, naturally sweet, and come together in under 20 minutes. No fancy equipment, no butter, no refined sugar—just wholesome, simple ingredients. Perfect for a breakfast-on-the-go, a guilt-free snack, or a last-minute dessert.
Ingredients
-
2 ripe bananas, mashed (the browner, the sweeter)
-
1 cup rolled oats (old-fashioned)
-
⅓ cup chocolate chips or raisins (optional: nuts, dried cranberries, or a sprinkle of cinnamon)
Instructions
-
Preheat oven & prep pan: Preheat to 350°F (175°C) and line a baking sheet with parchment paper.
-
Mash bananas: In a medium bowl, mash the bananas until mostly smooth.
-
Mix ingredients: Add oats and chocolate chips (or other mix-ins) to the bananas and stir until combined.
-
Shape cookies: Scoop tablespoons of dough onto the baking sheet and flatten slightly to about ½-inch thickness.
-
Bake: 12–15 minutes, until edges are lightly golden.
-
Cool: Let cookies cool on the baking sheet for 10 minutes before transferring to a wire rack.
Notes
-
If your bananas aren’t ripe enough, bake them at 300°F (150°C) for 15–20 minutes until skins turn black.
-
Let the dough sit for 5–10 minutes before baking; this helps the oats absorb moisture for a chewy texture.
-
Flatten each cookie before baking—they won’t spread on their own.
The Wholesome Lowdown
Now, I’m not a nutritionist, but I am a chef who cares about what goes into my body. Here’s a general look at why these cookies are such a feel-good choice. Remember, this is an estimate and can vary based on your specific ingredients.
These cookies are a fantastic source of natural energy. The bananas provide potassium and natural sugars, while the oats deliver complex carbohydrates and soluble fiber, which helps keep you full and satisfied. By skipping the added sugar and flour, we’re avoiding empty calories and processed ingredients. The chocolate chips or raisins add a little burst of sweetness, but it’s all within a balanced framework. Think of these not as a decadent dessert, but as a nourishing snack that satisfies your sweet tooth without the crash. They’re proof that eating well doesn’t have to mean sacrificing flavor or fun.
Final Thoughts
And there you have it, friends! Your complete guide to the simplest, most satisfying cookie in your future repertoire. This recipe is more than just a list of ingredients; it’s an invitation to be a little playful in the kitchen, to not take things too seriously, and to create something wonderful with what you have on hand.
I hope these 3-Ingredient Banana Oat Cookies become a staple in your home, just like they are in mine. They’re a testament to the fact that the best things in life—and in the kitchen—are often the simplest. So, the next time you see those bananas getting spotty, don’t you dare think about the compost bin. Think about the warm, chewy, happiness-filled cookies that are just 20 minutes away.
I’d love to hear how your batch turns out! Tag me on social @FeasticalBeau or leave a comment below with your favorite variation. Happy baking!
With a full heart and an empty mixing bowl,
Beau