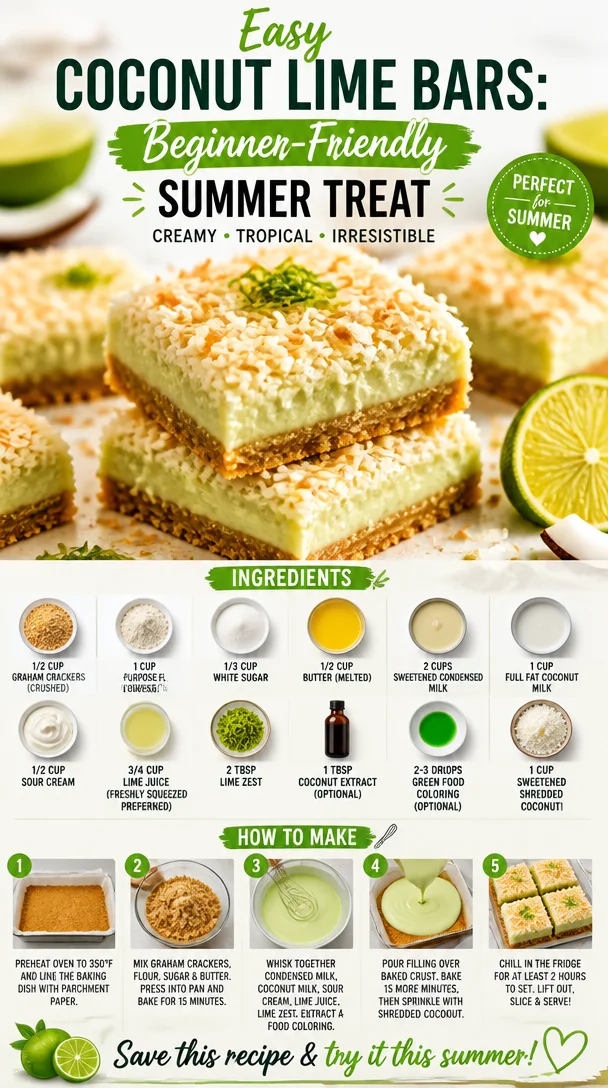
Easy Coconut Lime Bars: Beginner-Friendly Summer Treat
Coconut Lime Bars: A Slice of Sunshine!
Hey there, fellow food lovers! If you’re looking for a treat that brings a splash of summer into your kitchen all year round, then grab your mixing bowl and get ready to whip up some Coconut Lime Bars. These little squares of bliss are perfect for any occasion, be it a sunny picnic, a cozy gathering, or just because you deserve something sweet in your life. With their buttery graham cracker crust and a zesty lime coconut filling, these bars are sure to make your taste buds dance.
As I sit here typing with a warm mug of coffee in hand, I can’t help but reminisce about the first time I made these heavenly bars. It was a lazy Saturday afternoon, and I was craving something tropical. I recalled my childhood on those sun-soaked beaches, playing in the sand, and sipping on coconut drinks. I decided that what I needed was a little bit of that nostalgia in edible form. After a round of trial and error (who knew bars could be so tricky?), I finally got it just right—and let me tell you, it was worth every minute! The moment these bars came out of the oven, the kitchen filled with the irresistible aroma of lime and coconut, and I knew I had stumbled upon something special.
These Coconut Lime Bars are super easy to make—even if you’re more of a novice in the kitchen. With just a handful of ingredients and a few simple steps, you can create a refreshing dessert that will have your friends and family raving. So, put on your apron, grab a spatula, and let’s dive into this festive recipe!
Personal Story: A Slice of Nostalgia
The inspiration for Coconut Lime Bars came from fond memories of summer vacations spent with my family. My grandmother had a little beach house where we would spend long, sun-drenched days playing in the surf and hunting for seashells. Every evening, she would whip up something sweet for us to enjoy after dinner. I remember one trip when she surprised us with a coconut key lime pie she made from scratch. The combo of tangy lime and rich coconut was pure magic. Those flavors have stuck with me, and they often lead my culinary journey.
Years later, as I started experimenting in the kitchen, I aimed to recreate that same feeling of joy and nostalgia—a dessert that captures the essence of summer but in a bar form. That’s how Coconut Lime Bars came to life in my kitchen. The first bite transported me back to those sandy shores, bringing with it a wave of sweet memories. And now, I’m thrilled to share this recipe with you, so you can create your own beachy memories with each delicious bite!
Ingredients:
Here’s what you need to whip up these delightful Coconut Lime Bars:
-
1/2 cup graham crackers (crushed): Essential for the crust, they add that sweet, crumbly base. Want a gluten-free option? Use gluten-free graham crackers!
-
1 cup all-purpose flour: This provides structure to the filling. If you’re looking for a healthier option, swap it with almond flour for a nutty flavor.
-
1/3 cup white sugar: To balance the tartness of the lime. Coconut sugar or brown sugar can also be used for a deeper flavor.
-
1/2 cup butter (melted): This binds everything together. Use vegan butter if you’re looking for a dairy-free alternative.
-
2 cups sweetened condensed milk: The star of the filling! It makes everything wonderfully creamy. For a lighter version, you can use coconut cream.
-
1 cup full-fat coconut milk: Adds richness and a tropical flavor. Light coconut milk works too, but you’ll lose some creaminess.
-
1/2 cup sour cream: Incorporates a bit of tang. Greek yogurt can be a great substitute!
-
3/4 cup lime juice (freshly squeezed preferred): Fresh lime juice is essential for that zesty punch. Bottled lime juice works in a pinch but taste test for any differences.
-
2 tbsp lime zest: It’s all about the zing! Buy a zester or grater to incorporate every bit of that bright flavor.
-
1 tbsp coconut extract (optional): For super coconut flavor! It’s not necessary, but if you love coconut, go for it.
-
2-3 drops green food coloring (optional): Just a fun little addition to make it look extra pretty.
-
1 cup sweetened shredded coconut: Topping off the filling with a bit of shredded coconut adds texture and sweetness.
Step-by-Step Instructions:
Now that we have our ingredients ready, let’s jump into the cooking process! Follow these steps, and you’ll be on your way to Coconut Lime Bar glory.
-
Preheat the Oven: First things first, preheat your oven to 350°F (175°C). An adequately preheated oven helps the crust become perfectly golden.
-
Prepare the Crust: In a mixing bowl, combine the crushed graham crackers, flour, sugar, and melted butter. Keep mixing until the mixture resembles wet sand. A little tip: If the mixture is too dry, add a splash of coconut milk until you reach the right consistency!
-
Press It Down: Take that sweet graham cracker mixture and press it firmly into the bottom of an 8×8-inch baking dish. I like to use the back of a measuring cup to ensure it’s nice and even. Pop it in the oven for 8-10 minutes, just until it’s golden brown.
-
Meanwhile, Whisk the Filling: In another bowl, whisk together the sweetened condensed milk, full-fat coconut milk, sour cream, lime juice, lime zest, and coconut extract (if using). If you want a touch more lime zest, feel free to add it here! And don’t be shy with the whisking—make it airy!
-
Add the Food Coloring: If you want to add those fun green food coloring drops, this is the moment! Just a few drops will do—you want a subtle hint of color. Just be cautious, or you might end up with green bars that look more suited for Halloween!
-
Pour the Filling: Once your crust is out of the oven and slightly cooled, pour the coconut-lime filling over the crust. Spread it evenly using a spatula.
-
Sprinkle the Coconut: Top with sweetened shredded coconut, covering the surface. The coconut will toast beautifully as it bakes.
-
Bake Again: Return everything to the oven for 20-25 minutes. Keep an eye on it; you’ll know it’s ready when the edges are set, and the center has a little jiggle, similar to a cheesecake.
-
Cool Down: Allow them to cool at room temperature first, and then transfer them to the refrigerator for at least 2 hours. This helps the filling to firm up nicely.
-
Cut and Serve: Once chilled, cut into squares and serve! A little dusting of powdered sugar on top adds a nice touch!
Serving Suggestions
These Coconut Lime Bars are versatile when it comes to serving! Here’s how I like to present them:
-
On a Platter: Arrange the bars on a colorful platter, garnished with lime wedges and maybe a sprinkle of coconut for an eye-catching display.
-
With Whipped Cream: For an extra indulgence, serve with a dollop of whipped cream on top. A scoop of coconut whipped cream? Yes, please!
-
Tea Time Treat: Pair these bars with a refreshing cup of iced tea or lemonade for a delightful snack. Trust me; the flavors really complement each other!
Recipe Variations
Want to take your Coconut Lime Bars to the next level? Here are a few fun twists:
-
Mango Madness: Replace some of the lime juice with mango puree for a tropical mango twist—think beach vibes!
-
Berry Burst: Add a layer of fresh raspberries or blueberries in the filling for a fruity explosion.
-
Choco-Coconut Delight: Drizzle some melted dark chocolate on top for a decadent finish.
-
Nutty Delights: Toss in some chopped macadamia nuts into the filling or on top for that crunchy texture contrast.
-
Vegan Version: Swap out dairy for all coconut alternatives—use coconut yogurt and vegan sweetened condensed milk. Perfect for plant-based friends!
Chef’s Notes
As a chef and home cook, I can tell you that recipes are often just the beginning of your culinary adventure. This Coconut Lime Bars recipe has evolved over time; I’ve tried it with different fruit combinations, crust types, and even different sweetness levels. What really matters is that you have fun with it! Don’t be afraid to get creative—this is your kitchen, after all.
And speaking of fun, I remember one time I added a bit too much lime juice and ended up with a very tangy batch. It became a running joke in my family, and we laughed about the “super sour squares.” I learned to balance it out with a hint more sugar in the next round!
FAQs and Troubleshooting
1. Why did my bars turn out too watery?
If your filling is runny, it could be due to too much lime juice. Make sure you’re measuring accurately, especially with the liquid ingredients. Remember, lime juice can vary in tartness, so start with a little less and add to taste!
2. Can I freeze these bars?
Absolutely! Once fully cooled and cut, wrap them in plastic wrap and store them in an airtight container. They freeze well for up to a month—just thaw them overnight in the fridge when you’re ready to indulge again.
3. What can I use instead of sour cream?
Greek yogurt is a fantastic substitute! It will yield a similar texture and a slight tang, keeping your bars delicious.
4. How can I tell when the bars are done?
You’re looking for a firm edge and a slightly jiggly center. If you insert a toothpick, it should come out with a few moist crumbs but not wet batter.
Nutritional Info
If you’re curious about the nutritional values, here’s a rough breakdown per serving (assuming 16 servings):
- Calories: 220
- Protein: 3g
- Fat: 10g
- Carbohydrates: 30g
- Fiber: 1g
- Sugar: 16g
Keep in mind these values can vary based on specific brands and measurements. Adjust your ingredients according to your dietary needs, and remember that balance is key!
Final Thoughts
Coconut Lime Bars are much more than just a dessert; they’re a celebration of flavors and family memories, a little sunshine on a plate! Whether you’re crafting them for a gathering or treating yourself to a little sweet indulgence, these bars embody the heartwarming nature of cooking.
So, as we tie this all together, don’t forget to add your personal touch, share them with loved ones, and create even more beautiful memories around the kitchen table. I can’t wait to hear how your Coconut Lime Bars turn out—tag me in your delicious pictures and let’s keep the foodie love spreading! Until next time, keep cooking with passion and love!
Print
Coconut Lime Bars
- Total Time: 45 minutes
- Yield: 16 servings 1x
- Diet: Vegetarian
Description
Delight in these zesty Coconut Lime Bars, featuring a buttery graham cracker crust and a creamy lime coconut filling – the perfect treat to brighten any day.
Ingredients
- 1/2 cup graham crackers (crushed)
- 1 cup all-purpose flour
- 1/3 cup white sugar
- 1/2 cup butter (melted)
- 2 cups sweetened condensed milk
- 1 cup full-fat coconut milk
- 1/2 cup sour cream
- 3/4 cup lime juice (freshly squeezed preferred)
- 2 tbsp lime zest
- 1 tbsp coconut extract (optional)
- 2–3 drops green food coloring (optional)
- 1 cup sweetened shredded coconut
Instructions
- Preheat the oven to 350°F (175°C).
- Combine the graham crackers, flour, sugar, and melted butter until it resembles wet sand.
- Press the mixture into the bottom of an 8×8-inch baking dish.
- Bake for 8-10 minutes until golden brown.
- Whisk together sweetened condensed milk, coconut milk, sour cream, lime juice, lime zest, and coconut extract in a bowl.
- Add food coloring if using and mix until combined.
- Pour the filling over the crust once cooled.
- Sprinkle shredded coconut on top.
- Bake again for 20-25 minutes until set.
- Cool at room temperature, then chill in the refrigerator for at least 2 hours.
- Cut into squares and serve.
Notes
Feel free to experiment with different fruits and toppings. Enjoy with whipped cream or iced tea!
- Prep Time: 15 minutes
- Cook Time: 30 minutes
- Category: Dessert
- Method: Baking
- Cuisine: American
Nutrition
- Serving Size: 1 serving
- Calories: 220
- Sugar: 16g
- Sodium: 100mg
- Fat: 10g
- Saturated Fat: 6g
- Unsaturated Fat: 3g
- Trans Fat: 0g
- Carbohydrates: 30g
- Fiber: 1g
- Protein: 3g
- Cholesterol: 30mg
Keywords: Coconut, Lime, Bars, Dessert, Summer, Sweet
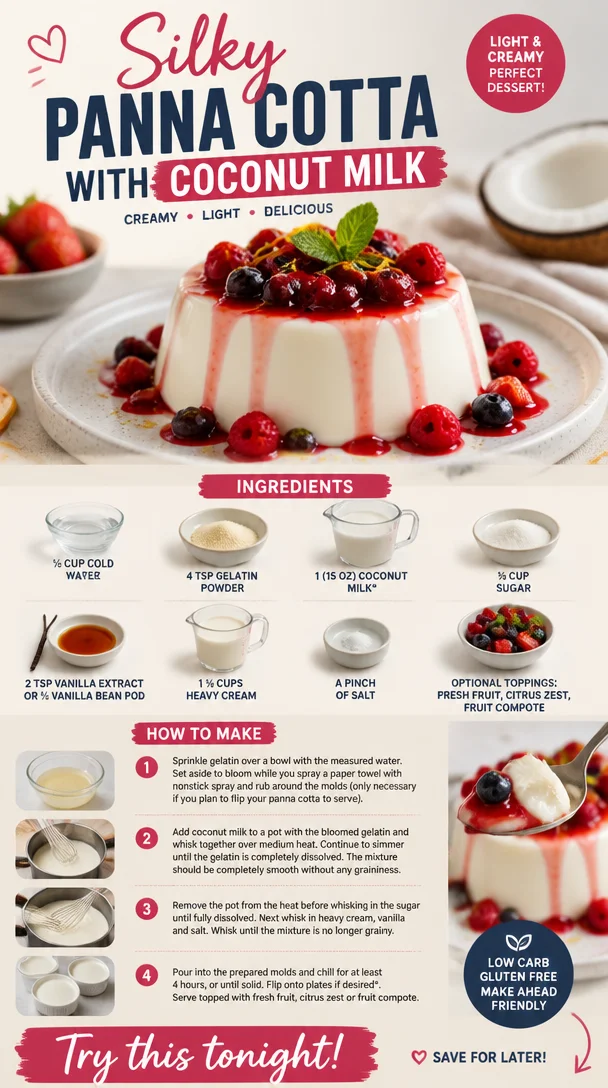
Silky Panna Cotta with Coconut Milk
Silky Panna Cotta with Coconut Milk: A Sweet Escape to Paradise
Hey, foodies! 🍽️ It’s Beau Collier here, and today we’re diving into a luscious dessert that dances on your palate and feels like a dreamy retreat to a tropical island—Silky Panna Cotta with Coconut Milk. Now, if you’ve never tried panna cotta, let me tell you, you’re in for a treat! This Italian classic is a staple in the dessert world—and for good reason. It’s creamy, sweet, and oh-so-versatile, making it a fantastic base for all sorts of flavor adventures.
Picture this: a smooth, silky custard that just jiggly enough to tease you, flavored with the exotic essence of coconut. It’s almost like a mini vacation in every spoonful! And the best part? It’s surprisingly easy to make, even for those of you who might not consider yourselves kitchen wizards yet. I’m a firm believer that cooking should be an enjoyable ride, not a chore, and panna cotta fits that bill perfectly.
One of my favorite memories tied up with this dessert goes way back to a sunny afternoon spent in the kitchen with my grandma. She taught me how to make traditional Italian panna cotta, sharing her tips and tricks while we whisked the cream and gelatin together. The laughter, the tunes playing in the background, and that sweet fragrance wafting through the kitchen were pure magic. Since then, I’ve fallen in love with experimenting, and that’s how this coconut milk version was born.
So grab your spatula, your favorite mug of coffee, and let’s whip up this tropical delight that truly satisfies the soul. Let’s get those taste buds ready for an adventure—they won’t regret it!
Personal Story
As I mentioned, my love affair with panna cotta began in my grandma’s cozy kitchen. She was a fabulous cook—not just a whiz with her herb garden, but a magician when it came to desserts. We spent lazy Sunday afternoons crafting sweets that would make anyone weak in the knees, but nothing resonated with me quite like her panna cotta.
I remember the first time we made it together; it was a warm summer day, and we used fresh strawberries from the garden as a topping. The sound of the gelatin blooming in cold water was so fascinating! She explained to me how it was like magic, turning a powder into something luxurious. The way it melted in my mouth left a lasting impression. Fast forward a few years, and I found myself wanting to give this dish a new twist by swapping out the traditional dairy with coconut milk.
That journey wasn’t just about making a dessert; it was also about keeping those cherished moments alive and infusing them with my own creativity. Every time I make this coconut panna cotta, I channel that sunny kitchen and the love that went into each spoonful. It feels like a secret handshake with memories, and I can’t wait for you to create your version of this warm hug in dessert form!
Ingredients
Here’s what you’ll need to whip up this delightful Silky Panna Cotta with Coconut Milk:
-
½ cup cold water
This is where the gelatin blooms, adding that silky texture without the need for eggs. Just remember: cold water is key! -
4 tsp gelatin powder
This magical ingredient thickens the panna cotta. If you’re after a plant-based alternative, agar-agar is a great substitute! Just adjust the quantity accordingly, as it can vary. -
1 (15 oz) can coconut milk
Rich in flavor, this brings a tropical twist that’s hard to resist! For a lighter version, you can use light coconut milk or even almond milk for a variation in taste. -
⅓ cup sugar
Sweetness to balance the creaminess. If you’re looking to reduce sugar, feel free to substitute with honey or a sugar alternative like stevia—just remember to adjust according to taste! -
2 tsp vanilla extract or ½ vanilla bean pod
This is where the magic happens! Using a whole vanilla bean pod will elevate the flavor. Scrape out those tiny seeds and watch your panna cotta shine with tiny specks of goodness. -
1 ½ cups heavy cream
This is what gives panna cotta its rich and creamy texture. For a lighter dessert, you could swap half for milk, but the richness may take a hit. -
A pinch of salt
This helps to amplify the flavors and balance sweetness. Don’t skip it! -
Optional toppings:
Fresh fruit, citrus zest, or fruit compote add that finishing touch. Go wild with your choice – tropical fruits like mango or kiwi work wonders!
Step-by-Step Instructions
Ready to make some magic? Let’s get started on our silky panna cotta!
-
Bloom the Gelatin:
In a small bowl, combine the cold water and gelatin. Let it sit for about 5–10 minutes until the mixture becomes thick and gelatinous. This step is crucial for achieving that smooth texture!Chef Tip: If your kitchen is warm, pop the bowl in the fridge to help the gelatin set quicker.
-
Heat the Coconut Milk:
In a saucepan over medium heat, pour in the coconut milk, sugar, and a pinch of salt. Stir regularly to dissolve the sugar completely, and make sure it doesn’t boil!Chef Hack: For an extra burst of flavor, you could toss in citrus zest while heating up the milk. Just strain it out before combining with other ingredients.
-
Incorporate the Gelatin:
Once your coconut milk mixture is warm and sugary bliss, remove it from heat and add the bloomed gelatin. Stir until completely dissolved—this should only take a minute or so.Pro Hint: If you find any lumps in the gelatin, don’t panic—just give it a quick blitz with an immersion blender to smooth it out.
-
Add the Cream and Vanilla:
Slowly whisk in the heavy cream and your choice of vanilla extract or the scraped vanilla bean. Keep whisking until the mixture is completely uniform.Chef Insight: The cream enhances the richness, while the vanilla brings warmth and balance to the dish.
-
Pour and Chill:
Divide the mixture evenly into serving cups or ramekins, allowing it to cool slightly at room temperature (15–20 minutes). Then, cover them with plastic wrap and place them in the refrigerator. Let them chill for at least 4 hours, or preferably overnight, until they’re firm and set.Tip: If you’re not a fan of waiting, you can speed up the cooling process by placing them in the freezer for about an hour, but make sure to keep a close eye on them!
-
Serve:
Once your panna cotta has set, remove them from the fridge, and get creative with your toppings. Fresh berries or a drizzle of fruit compote adds that final touch that takes it over the top!
Final Note: If the panna cotta gets stuck, dip the cups briefly in warm water, then invert on a plate. It should slide right out!
Serving Suggestions
Presentation is everything, my friends! For this panna cotta, we want to keep it elegant and inviting. You can serve it straight in the cups for a rustic feel or flip them out onto plates for that restaurant-quality touch.
Here are a few ideas for plating:
- Fresh fruit: Arrange vibrant slices of mango, kiwi, or strawberries around your panna cotta for a color pop.
- Citrus zest: Lightly sprinkle some lime or orange zest for a zesty touch that enhances the coconut flavor.
- Drizzle: You can add a drizzle of honey or a delicate fruit sauce on top for that sweet gloss.
Serve it up with forks or spoons, and watch as your guests dive right into this tropical indulgence!
Recipe Variations
Why stop at the classic panna cotta when you can put your own spin on it? Here are some fun variations to try:
-
Chocolate Coconut Panna Cotta:
Melt ½ cup of dark chocolate into the coconut milk for a decadent twist. Perfect for chocoholics! -
Mango Coconut Delight:
Puree ripe mango and layer it atop your panna cotta right before serving for that burst of tropical flavor. -
Almond Joy Version:
Add 1 tsp of almond extract and top with toasted almonds for that nutty flair reminiscent of the famous candy bar. -
Matcha Coconut Bliss:
Stir in a teaspoon of matcha powder for a green tea-infused panna cotta. Pair with sweetened red bean paste for an Asian dessert twist. -
Lemon-Basil Infusion:
Infuse the coconut milk with lemon zest and fresh basil while heating; this brightens up the entire dessert in a refreshing way!
Chef’s Notes
To me, this panna cotta recipe is a canvas for creativity! What started as a grandmother’s traditional treat has morphed into something that reflects my personality and love for culinary experimentation. I think of it as a conversation starter—a way to share not just food, but stories.
Over time, I’ve learned to play with different flavor profiles, and each new ingredient brings back memories of fun kitchen experiments and family gatherings. Every time I whip it up, I find joy in the simplicity and accessibility of the recipe. Anyone can master this dessert as long as you’ve got patience and love in your heart.
FAQs and Troubleshooting
1. Why did my panna cotta not set?
First off, no worries! If it didn’t set, it’s likely due to not enough gelatin or not being heated properly. Make sure you’re using fresh gelatin and following the blooming process correctly.
2. Can I make panna cotta in advance?
Absolutely! In fact, panna cotta tastes better after chilling. Make it a day ahead, and it will be even more delightful when you serve it.
3. What can I use instead of coconut milk?
If you prefer a different flavor, try almond milk or dairy milk, but you may need to adjust the quantity of sugar depending on sweetness.
4. How do I store leftovers?
Store any leftover panna cotta in an airtight container in the refrigerator for up to 3 days. Just keep toppings separate until serving!
Nutritional Info
{Nutritional information usually depends on specific measurements and brands used. Below is an estimate for our panna cotta.}
This delightful panna cotta serves about four and gives you a satisfying dessert experience. Each serving (without toppings) is approximately:
- Calories: 350
- Protein: 3g
- Fat: 25g
- Carbohydrates: 30g
- Sugars: 26g
While it’s indulging, remember moderation is key! You could always tone down the portions and sweeteners as needed.
Final Thoughts
So there you have it! Silky Panna Cotta with Coconut Milk is not just a recipe; it’s a delightful experience waiting to happen in your kitchen. Whether you’re looking for the perfect dessert to impress your friends or a cozy treat for yourself, this panna cotta has got your back.
I hope this little journey inspires you to experiment in your own kitchen and spark some magical memories just like those sunny afternoons I spent with my grandma. Dive into the world of panna cotta, explore, and most importantly, enjoy!
Now, it’s time for you to grab those ingredients and get creating! Don’t forget to share your creations with me on social media—I’d love to see your spin on this tropical delight. Happy cooking, foodies! 🚀✨
Print
Silky Panna Cotta with Coconut Milk
- Total Time: 4 hours 25 minutes
- Yield: 4 servings 1x
- Diet: Vegetarian
Description
A luscious dessert that combines the creamy goodness of panna cotta with the tropical essence of coconut milk.
Ingredients
- ½ cup cold water
- 4 tsp gelatin powder
- 1 (15 oz) can coconut milk
- ⅓ cup sugar
- 2 tsp vanilla extract or ½ vanilla bean pod
- 1 ½ cups heavy cream
- A pinch of salt
- Optional toppings: Fresh fruit, citrus zest, or fruit compote
Instructions
- Bloom the Gelatin: In a small bowl, combine the cold water and gelatin. Let it sit for about 5–10 minutes until the mixture becomes thick and gelatinous.
- Heat the Coconut Milk: In a saucepan over medium heat, pour in the coconut milk, sugar, and a pinch of salt. Stir regularly to dissolve the sugar completely, and make sure it doesn’t boil!
- Incorporate the Gelatin: Once your coconut milk mixture is warm, remove it from heat and add the bloomed gelatin. Stir until completely dissolved.
- Add the Cream and Vanilla: Slowly whisk in the heavy cream and your choice of vanilla extract or the scraped vanilla bean.
- Pour and Chill: Divide the mixture evenly into serving cups or ramekins, allow to cool slightly, then refrigerate for at least 4 hours, or preferably overnight.
- Serve: Once set, remove from the fridge and add your desired toppings.
Notes
For a lighter version, use light coconut milk or almond milk.
- Prep Time: 15 minutes
- Cook Time: 10 minutes
- Category: Dessert
- Method: Chilling
- Cuisine: Italian
Nutrition
- Serving Size: 1 serving
- Calories: 350
- Sugar: 26g
- Sodium: 50mg
- Fat: 25g
- Saturated Fat: 22g
- Unsaturated Fat: 3g
- Trans Fat: 0g
- Carbohydrates: 30g
- Fiber: 0g
- Protein: 3g
- Cholesterol: 100mg
Keywords: panna cotta, coconut milk, dessert, Italian dessert, creamy dessert, tropical dessert