
Tanghulu translates to “candied hawthorn” in English.
Tanghulu: A Sweet Dive into Tradition
Hello, fellow food lovers! It’s Beau Collier here, ready to take you on a sweet journey with one of my favorite treats—Tanghulu! If you’ve never heard of this delightful candied hawthorn, buckle up; you’re in for a treat! This traditional Chinese snack is an absolute show-stopper: a crispy, sugary coat that elevates the tartness of fresh hawthorn berries. It’s not just a dish; it’s a celebration of flavor, texture, and nostalgia in every bite.
Tanghulu translates to “candied hawthorn” in English, and is often found lining streets during Chinese festivals and markets. The first time I tasted Tanghulu, it was at a bustling night market in Beijing. Picture this: the air thick with the scent of sizzling street food, laughter bubbling like freshly brewed tea, and the neon glow of bright signs beckoning with promises of deliciousness. I was stumbling through the stalls when something caught my eye—a vendor expertly dipping skewers of vibrant hawthorn berries into a shimmering sugar syrup. Intrigued, I approached, and after a quick exchange of my coins, I took my first bite. The crunch of the shell gave way to the tart juiciness of the fruit inside, and I was instantly transported back to my childhood, where my grandmother would make candy apples on special occasions, coating them in glossy caramel that had just the right amount of bite.
That memory stayed with me, and it inspired me to recreate Tanghulu right in my own kitchen. Once you master this recipe, you can easily transform it into a charming dessert for gatherings or a delightful treat for yourself. Trust me; your tastebuds will be doing a happy dance! So, let’s dive into the world of Tanghulu—your kitchen is about to become a mini sweet shop!
Ingredients
Here’s what you’ll need to whip up your own Tanghulu at home:
-
Hawthorn berries: The stars of the show! These tart little gems are rich in flavor and nutrition. You can find them fresh or dried in most Asian grocery stores. If hawthorn berries aren’t available, try using strawberries, cherries, or even small apples, but note that the final taste will vary.
-
Sugar: The key to that satisfying crunch! Use white granulated sugar for the classic version. For a healthier twist, you can substitute coconut sugar or even a sugar alternative like stevia; however, the taste will change.
-
Water: This acts as a base to dissolve the sugar. It’s essential for achieving the right syrup consistency. Feel free to infuse the water with a splash of lemon juice if you’d like to add a citrus twist to the syrup.
These simple ingredients create a beautifully sweet and tangy treat—no frills, just good, clean fun!
Step-by-Step Instructions
Ready to get cooking? Let’s make some magical Tanghulu! Here’s how you do it:
-
Prep the Hawthorn Berries: Rinse the fresh hawthorn berries under cool water and gently pat them dry with a paper towel. If they have stems, remove those, but leave them on skewers. This not only helps with dipping but also adds some rustic charm!
-
Make the Sugar Syrup: In a small saucepan, combine 1 cup of sugar and ½ cup of water. Place it over medium heat. Stir gently until the sugar dissolves. Here’s a pro tip: Don’t stir once the mixture starts boiling, or it may crystallize! You’re aiming for a syrup consistency, which should take about 5-7 minutes. Keep an eye on it!
-
Prepare Your Skewers: While the syrup is cooking, it’s a great time to get your skewers ready. Using bamboo skewers is perfect; just thread the hawthorn berries on them, leaving a little space between each one.
-
Dip the Berries: Once your sugar syrup is bubbling and has reached that glossy, candy-like appearance (about 300°F if you have a candy thermometer), remove it from the heat. Carefully dip each skewer of hawthorn berries into the syrup, ensuring they are fully coated. Now, here’s my secret: as you pull the skewer out, give it a slight twist to drip off any excess syrup—it prevents a build-up of gooeyness!
-
Cool and Harden: Lay the dipped skewers on a parchment-lined baking sheet. Let them sit for a few minutes until the syrup hardens and the candies get that beautiful, glassy finish.
-
Enjoy!: Your homemade Tanghulu is ready to be devoured! These are best enjoyed fresh, but you can store leftovers (if there are any!) in an airtight container at room temperature for a day or two.
While you’re cooking, don’t hesitate to taste-test that syrup. A little dip with your finger never hurt anyone!
Serving Suggestions
Serving Tanghulu is all about the presentation! Place the skewers upright in a jar or a mug, like a beautiful bouquet of sweetness! Dust some edible glitter on top for that extra sparkle, or serve them alongside a scoop of vanilla ice cream for a delightful contrast of temperatures. You could also create a fun dessert platter with assorted fruits and a few Tanghulu skewers sprinkled around. It’s like a fruit party that everyone will want to join!
For a quirky touch, consider serving them in a decorative candy dish at your next gathering. Not only will they look stunning, but you’ll also become the talk of the town for bringing the feel-good vibes with this nostalgic treat.
Recipe Variations
Feeling adventurous? Here are a few creative twists on the classic Tanghulu recipe:
-
Spiced Tanghulu: Give your syrup a little kick by adding a pinch of cayenne pepper or ground ginger while it’s warming. This will add a delightful warmth that contrasts beautifully with the tart berries.
-
Chocolate-Covered Twist: After coating the berries with syrup, once they’ve hardened, dip them in melted dark chocolate for an indulgent treat!
-
Flavor Infusions: Get imaginative with your sugar syrup! Add a splash of vanilla extract or a few fresh mint leaves during the syrup-making process for a refreshing twist.
-
Nutty Crunch: Once the Tanghulu has cooled slightly, roll them in crushed nuts or sesame seeds before the syrup hardens. This adds texture and a nutty flavor that complements the tangy berries.
-
Mini Tanghulu: Instead of hawthorn, try using other bite-sized fruits like blueberries, grapes, or pineapple chunks for a fun variation that caters to different taste preferences.
The beauty of Tanghulu is its flexibility—get creative, and you’ll discover delicious combinations that are uniquely yours!
Chef’s Notes
Tanghulu holds a special place in my heart as it’s become a fun project to share with friends and family. I remember hosting a gathering where we turned making Tanghulu into a fun event: everyone got to choose their favorite fruits and create their own personalized skewers. The laughter, the sweet aroma, and the beautiful creations made the evening truly memorable.
Over time, I’ve experimented with different fruits and flavors—my favorite being the refreshing mint-infused syrup! Sometimes, I even add a dash of food coloring to make things more festive—perfect for celebrations.
FAQs and Troubleshooting
-
Why did my Tanghulu not harden?
- This often happens if the syrup didn’t reach the right temperature. Make sure you’re hitting that 300°F mark. If you’re unsure, a candy thermometer can be a great investment for your kitchen!
-
Can I use frozen berries instead?
- Fresh berries work best for Tanghulu since frozen ones may release too much moisture while dipping, making it difficult for the syrup to adhere. If you only have frozen berries, consider thawing, draining, and patting them dry before proceeding.
-
What if my sugar crystallizes?
- If this happens, don’t panic! You can reheat the mixture while stirring gently until it melts back down to a syrup. Just be careful not to let it boil for too long again!
-
How long can I store leftover Tanghulu?
- For best results, enjoy them fresh! However, you can store them in an airtight container at room temperature for about 1-2 days. After that, humidity might make the candy lose its crispiness.
Nutritional Info
Tanghulu packs a unique punch with hawthorn berries boasting plenty of health benefits! They’re low in calories and a good source of dietary fiber, vitamin C, and antioxidants. This dish largely consists of sugar, so moderation is key when indulging.
Here’s a quick breakdown per serving (1 skewer of Tanghulu):
- Calories: Approximately 120
- Fat: 0g
- Carbohydrates: 30g
- Sugar: 28g
- Fiber: 4g
Though it may not be the healthiest treat, it certainly brings joy to the palate! And let’s not forget—happiness from a sweet treat feeds the soul, too.
Final Thoughts
There you have it, my fellow food enthusiasts—your ultimate guide to making Tanghulu! It’s more than just a dessert; it’s a journey into nostalgia, creativity, and delight. As you enjoy these delicious candies, I hope you feel inspired to create your own sweet experiences and share them with loved ones.
Whether it’s a cozy evening making Tanghulu in your kitchen, delicious snacks for gatherings, or simply indulging on your own, know that each bite is filled with warmth and joy. So, what are you waiting for? Grab your ingredients, get that sugar bubbling, and start a new tradition of your own! Happy cooking! 🍭✨
PrintTanghulu
- Total Time: 25 minutes
- Yield: 4 servings 1x
- Diet: Vegetarian
Description
A traditional Chinese sweet treat made with candied hawthorn berries, featuring a crispy, sugary coat that contrasts with the tartness of the fruit.
Ingredients
- 1 cup of sugar
- ½ cup of water
- Hawthorn berries (or strawberries, cherries, or small apples)
Instructions
- Prep the hawthorn berries: Rinse the fresh hawthorn berries under cool water and gently pat them dry. Remove stems if necessary.
- Make the sugar syrup: In a saucepan, combine sugar and water over medium heat. Stir until the sugar dissolves without stirring once it starts boiling.
- Prepare your skewers: Thread hawthorn berries onto bamboo skewers, leaving space between each.
- Dip the berries: Once the syrup reaches a glossy consistency, dip each skewer into the syrup, coating them thoroughly.
- Cool and harden: Lay skewers on a parchment-lined baking sheet and let them sit until the syrup hardens.
- Enjoy: Serve your Tanghulu fresh or store in an airtight container at room temperature for a couple of days.
Notes
Experiment with different fruits or add spices to the syrup for variations. Serve in decorative jars or mugs for a fun presentation.
- Prep Time: 15 minutes
- Cook Time: 10 minutes
- Category: Dessert
- Method: Candying
- Cuisine: Chinese
Nutrition
- Serving Size: 1 skewer
- Calories: 120
- Sugar: 28g
- Sodium: 0mg
- Fat: 0g
- Saturated Fat: 0g
- Unsaturated Fat: 0g
- Trans Fat: 0g
- Carbohydrates: 30g
- Fiber: 4g
- Protein: 0g
- Cholesterol: 0mg
Keywords: Tanghulu, candied hawthorn, Chinese dessert, sweet treat, nostalgia

Dark Chocolate and Sea Salt Nut Bars
Dark Chocolate and Sea Salt Nut Bars: A Sweet & Savory Adventure
Hey there, fellow food lovers! I’m Beau Collier, and today we’re diving into a deliciously nutty world with my Dark Chocolate and Sea Salt Nut Bars. If you’re someone who enjoys a delightful snack that balances sweet and savory, you’re in for a treat! Whether you need a quick breakfast, a pick-me-up during your day, or a satisfying after-dinner treat, these little bars have got you covered.
The beauty of this recipe is in its simplicity and the wholesome ingredients that come together to create something truly special. I’ve always believed that food is a way to connect with those we love, and this recipe is no exception. It’s perfect for sharing with friends or savoring alone while curled up on the couch watching your favorite show. Plus, they pack a nutritional punch—full of healthy fats, protein, and fiber that leaves you feeling good!
What I love most about these bars is that they are totally customizable. You can mix and match nuts, adjust sweetness levels, and really make this recipe your own. You’ll have the power to create a snack that’s as unique as you are! So, let’s roll up our sleeves and dive into this adventure in the kitchen together.
Personal Story
Now, let me take you on a little trip down memory lane. I can vividly remember the first time I experimented with nut bars. I was in my college years, juggling classes and a part-time job while trying to maintain some semblance of a social life. One late-night study session, I found myself rummaging through my pantry, searching for something to munch on. I stumbled upon a bag of mixed nuts, a half-eaten bag of dark chocolate chips, and a packet of pitted dates. Intrigued by the combination, I decided to throw it all into a bowl with some cocoa powder and sweetener.
What emerged was something unpredictable and wonderfully delicious. I took a bite and was instantly transported! It felt like a satisfying hug for my taste buds. The crunch of the nuts, the rich chocolate, and just the right hint of sea salt turned into fuel for my late-night cramming sessions and, probably more importantly, the foundation for these nut bars we’re making today! Those long nights in the kitchen led to countless variations over the years, and I’m thrilled to finally share this delightful recipe with you. It’s simple, it’s nostalgic, and most importantly—it tastes AMAZING!
Ingredients
Here’s what you’ll need to whip up your own Dark Chocolate and Sea Salt Nut Bars:
-
1 cup mixed nuts (almonds, cashews, walnuts)
*A variety of nuts will give your bars extra flavor and texture. Feel free to use your favorites or whatever you have on hand! -
1/2 cup pitted dates
Dates add natural sweetness and are great as a binding agent. If you don’t have dates, you can substitute with dried figs or prunes for a similar texture. -
1/4 cup unsweetened cocoa powder
This gives a rich chocolate flavor. If you prefer a sweeter taste, consider using cacao powder instead. -
1/4 cup honey or maple syrup
Both options work beautifully as sweeteners. Maple syrup will add a hint of caramel flavor, while honey offers floral notes. Vegan? Go for maple! -
1/4 teaspoon sea salt
This is your magic ingredient! It enhances the flavors and balances the sweetness. You might want to sprinkle a little extra on top for that finishing touch. -
1 teaspoon vanilla extract
Vanilla ties everything together with its warm flavor. Pure vanilla extract is the best for an authentic taste, but you can also use vanilla essence. -
2 tablespoons dark chocolate chips
These are for that extra chocolatey goodness! You can use vegan chocolate chips for a dairy-free version. -
Optional: Additional sea salt for topping
Just a sprinkle on top will elevate your bars from good to sublime!
Step-by-Step Instructions
Ready to make some magic happen in the kitchen? Let’s break down the steps to create these glorious nut bars:
Step 1: Prep Your Ingredients
Before diving in, you’ll want to prepare all your ingredients. Make sure your dates are pitted and soft—if they’re a bit stiff, soak them in warm water for 10-15 minutes and then drain. Roughly chop your mixed nuts into smaller pieces. This helps them distribute evenly throughout the bars, ensuring every bite is delightful!
Step 2: Blend Those Dates
In a food processor (or a strong blender), add your pitted dates and pulse them until they break down into a paste. You’ll want a sticky consistency that acts like glue for your nut bars. If you find them hard to blend, adding a splash of water or honey will help.
Step 3: Combine the Dry Ingredients
In a separate bowl, sift together your cocoa powder and sea salt. This little step helps break up any clumps in the cocoa powder and ensures even distribution throughout the bars. It also saves you from that chalky bite that can happen if it’s not mixed well!
Step 4: Mix it All Together
Now, toss your mixed nuts into the bowl with your cocoa mixture. Make sure they’re coated well! Then, add your date paste, honey (or maple syrup), and vanilla extract. This is where you get to get your hands dirty—mix everything together until well combined! You want a sticky yet firm mixture that holds together when pressed.
Step 5: Add the Chocolate Chunks
Next up, fold in the dark chocolate chips—this is where the magic happens! Feel free to reserve a few chips to press into the top of your mixture before refrigerating for that extra aesthetic appeal.
Step 6: Press Into the Pan
Line an 8×8-inch baking dish with parchment paper, leaving some overhang to make removing the bars easier. Transfer your nut mixture into the prepared dish, and press it down firmly using a spatula or your hands (dampening your fingers with water will keep them from sticking). The firmer it’s packed, the less likely it is to crumble later.
Step 7: Chill Out
Pop your baking dish into the fridge for at least 1-2 hours to set—it’s the hardest part of the process! The chilling allows the bars to firm up, so they are easier to cut. If you’re really impatient (I get it!) 30 minutes will suffice, but more time is always better.
Step 8: Slice & Serve
Once your bars have set, take them out of the fridge and lift them out using the parchment paper. Slice the block into squares or rectangles, whatever floats your boat, and enjoy! Sprinkle a little additional sea salt on top for that ultimate sweet-and-salty finish.
Serving Suggestions
These nut bars can stand alone, but a few presentation tips can really elevate the experience! Arrange them on a rustic wooden board or a vibrant plate with a smear of nut butter or yogurt for dipping on the side. You could even pair them with a fresh fruit compote or some juicy berries to contrast their rich flavors. And let’s not forget about coffee or tea—these bars make a delightful afternoon snack alongside your favorite warm drink!
Recipe Variations
Here are a few fun twists to consider for your nut bars:
-
Tropical Crunch: Swap out half of the nuts for unsweetened shredded coconut and add dried pineapple or mango for a tropical vibe.
-
Nut-Free Version: If you’re heading into nut-free territory, use seeds like pumpkin and sunflower seeds instead. They’ll add a different yet equally delicious crunch!
-
Spiced Chocolate: Add a pinch of cinnamon or cayenne pepper for a spiced kick. It adds warmth and elevates the chocolate flavor!
-
Protein Power-Up: Mix in a scoop of your favorite protein powder to give these bars an extra boost.
-
Flavor Infusion: Consider adding a tablespoon of almond or coconut extract for an extra layer of flavor that pairs beautifully with chocolate!
Chef’s Notes
From my fun kitchen story back in college to experimenting with textures and flavors, this recipe has evolved quite beautifully over the years. I’ve had my fair share of oops moments—like forgetting to add the sweetener and ending up with a bitter chocolate disaster! Embrace the journey and understand it’s all about finding the right balance.
I still whip up these bars when I’m diving into a new project or need a snack for road trips. They never disappoint! Each batch brings a fresh sense of creativity, and I can’t wait to hear how yours turn out.
FAQs and Troubleshooting
-
Can I make these bars ahead of time?
Absolutely! These bars can be made up to a week in advance. Just make sure to store them in an airtight container in the fridge. -
Why did my bars crumble?
This can happen if the mixture wasn’t pressed down firmly enough or if there wasn’t enough sweetener to hold things together. Try adding a little extra honey or dates next time. -
How do I store the nut bars?
Keep them in the fridge in an airtight container. You can also freeze them for up to three months—just make sure to wrap them well! -
What can I serve these with?
These bars go wonderfully with yogurt, coffee, or even on their own. They’re perfect for any time of the day!
Nutritional Info
These Dark Chocolate and Sea Salt Nut Bars not only satisfy your sweet tooth but also pack a nutritional punch. Each bar provides:
- Approx. 200 calories (depending on the size and specific ingredients)
- Healthy fats from nuts
- Natural sweetness from dates
- Fiber that keeps you full
- Antioxidants from dark chocolate
They’re a fantastic option for a quick snack, pre-workout energy boost, or a post-lunch pick-me-up!
Final Thoughts
And there you have it, folks—my Dark Chocolate and Sea Salt Nut Bars! I hope you enjoy making these as much as I do. They’re perfect for any occasion, easy to customize, and loaded with flavors that will keep you coming back for more.
Remember, cooking should always be fun and creative. So mix it up, make it your own, and share it with those you love. Now, go grab those ingredients and let’s get to snacking! Happy cooking, friends! 🍫🥜
Print
Dark Chocolate and Sea Salt Nut Bars
- Total Time: 120 minutes
- Yield: 10 servings 1x
- Diet: Vegetarian
Description
Satisfy your sweet tooth with these deliciously nutty bars that balance sweet and savory flavors, perfect for breakfast or a snack.
Ingredients
- 1 cup mixed nuts (almonds, cashews, walnuts)
- 1/2 cup pitted dates
- 1/4 cup unsweetened cocoa powder
- 1/4 cup honey or maple syrup
- 1/4 teaspoon sea salt
- 1 teaspoon vanilla extract
- 2 tablespoons dark chocolate chips
- Optional: Additional sea salt for topping
Instructions
- Prep your ingredients: Ensure dates are pitted and soft. Chop mixed nuts into smaller pieces.
- Blend those dates: Pulse pitted dates in a food processor until they form a paste.
- Combine the dry ingredients: Sift together cocoa powder and sea salt in a separate bowl.
- Mix it all together: Add the mixed nuts to the cocoa mixture, followed by date paste, honey (or maple syrup), and vanilla extract.
- Add the chocolate chunks: Fold in dark chocolate chips.
- Press into the pan: Line an 8×8-inch baking dish with parchment paper and firmly press the mixture down.
- Chill out: Refrigerate for at least 1-2 hours to firm up.
- Slice & serve: Remove from the fridge, lift out using parchment, and slice into bars.
Notes
These bars can be made ahead of time and stored in an airtight container for up to a week. Add extra toppings or flavors to customize!
- Prep Time: 15 minutes
- Cook Time: 0 minutes
- Category: Snacks
- Method: No Bake
- Cuisine: American
Nutrition
- Serving Size: 1 bar
- Calories: 200
- Sugar: 10g
- Sodium: 50mg
- Fat: 10g
- Saturated Fat: 2g
- Unsaturated Fat: 8g
- Trans Fat: 0g
- Carbohydrates: 20g
- Fiber: 3g
- Protein: 5g
- Cholesterol: 0mg
Keywords: nut bars, snack recipe, chocolate, healthy snack, no bake bars
Low-Calorie No-Bake Cheesecake for One
How to Make a Delectable Low-Calorie No-Bake Cheesecake for One
Hey there, fellow foodies! Welcome back to Feastical, where we whip up feel-good recipes that warm the heart and satisfy the palate! Today, we’re diving into a delightful treat that’s perfect for those quiet evenings when you want something sweet but don’t want to go overboard—a Low-Calorie No-Bake Cheesecake for One. Yes, you heard that right! This recipe is simple, nutritious, and absolutely scrumptious, making it the perfect indulgence for anyone counting calories or just testing the waters of guilt-free dessert options.
Let me tell you why this recipe holds a special place in my heart. Back in my early cooking days, I discovered a love for cheesecakes while attempting to impress a date. You see, cheesecakes were often associated with elaborate dinner parties and sophisticated tastes. The idea of creating one myself was daunting, especially since I didn’t have the first clue about baking, beyond the occasional cookie. But my fascination with the creamy, dreamy texture led me to experiment in the kitchen. And after countless failed attempts—seriously, you have no idea how many times I’ve watched a cheesecake deflate or crack—I stumbled upon this no-bake gem.
This dessert isn’t just about the flavor; it embodies my philosophy of comfort food—easy, joyous, and deeply satisfying. Plus, it’s a great option for anyone looking to treat themselves without feeling weighed down. So, grab your favorite mixing bowl and let’s get started on this delightful journey toward crafting a lovely cheesecake for one!
Personal Story
Let me take you back to a summer evening years ago. I was hanging out with my best friend and her little sister, who had just returned from a baking camp. She was buzzing with excitement, flaunting her new skills—baking soufflés and pastries while whipping up batch after batch of cookies. Inspired by her youthful enthusiasm, we decided to create our version of a classic cheesecake.
Now, my friend wasn’t the most patient cook and ended up whisking the cream cheese like it owed her money! The batter flew everywhere—on the walls, the floor, and yes, even on the cat. However, the outcome was surprisingly delicious! We topped it with strawberries from the farmer’s market and managed to salvage what was supposed to be a simple dessert into a beautiful, albeit chaotic, culinary experience.
Years later, I look back with fondness at that moment—laughter surrounded by flour and sugar. It was that spirit that inspired this no-bake cheesecake. It’s not just a dessert; it’s a reminder that in the kitchen, mistakes often lead to the most cherished memories. Plus, this simplified version means no more anxiously babysitting a cheesecake in the oven!
Ingredients
To whip up this delightful low-calorie no-bake cheesecake, you’re going to need just a handful of ingredients. Here’s what you’ll be grabbing:
-
1/2 cup Greek yogurt: Thick, creamy, and packed with protein, Greek yogurt is the base of this cheesecake. It gives that creamy texture while staying light. If you’re dairy-free, you can swap this out with a plant-based yogurt, but it might affect the flavor slightly.
-
1 tablespoon honey or sweetener of choice: Honey adds natural sweetness along with a touch of earthiness. If you’re looking for zero-calorie options, feel free to use stevia or erythritol instead. Just adjust the amount to your taste!
-
1/4 teaspoon vanilla extract: The essence of cheesecake often lies in its flavorings, and vanilla is a classic. It adds warmth and depth. If you’re feeling adventurous, you could try almond extract for a unique twist.
-
1/2 teaspoon lemon juice: This little powerhouse brightens up the tartness of the yogurt and gives that signature cheesecake zing! If you’re out of fresh lemon, lemon juice from a bottle works fine too!
-
1 tablespoon graham cracker crumbs (optional for crust): This ingredient is for those of us who love that classic cheesecake crust. If you’re avoiding carbs, you can skip this altogether, or use almond flour for a gluten-free crust!
-
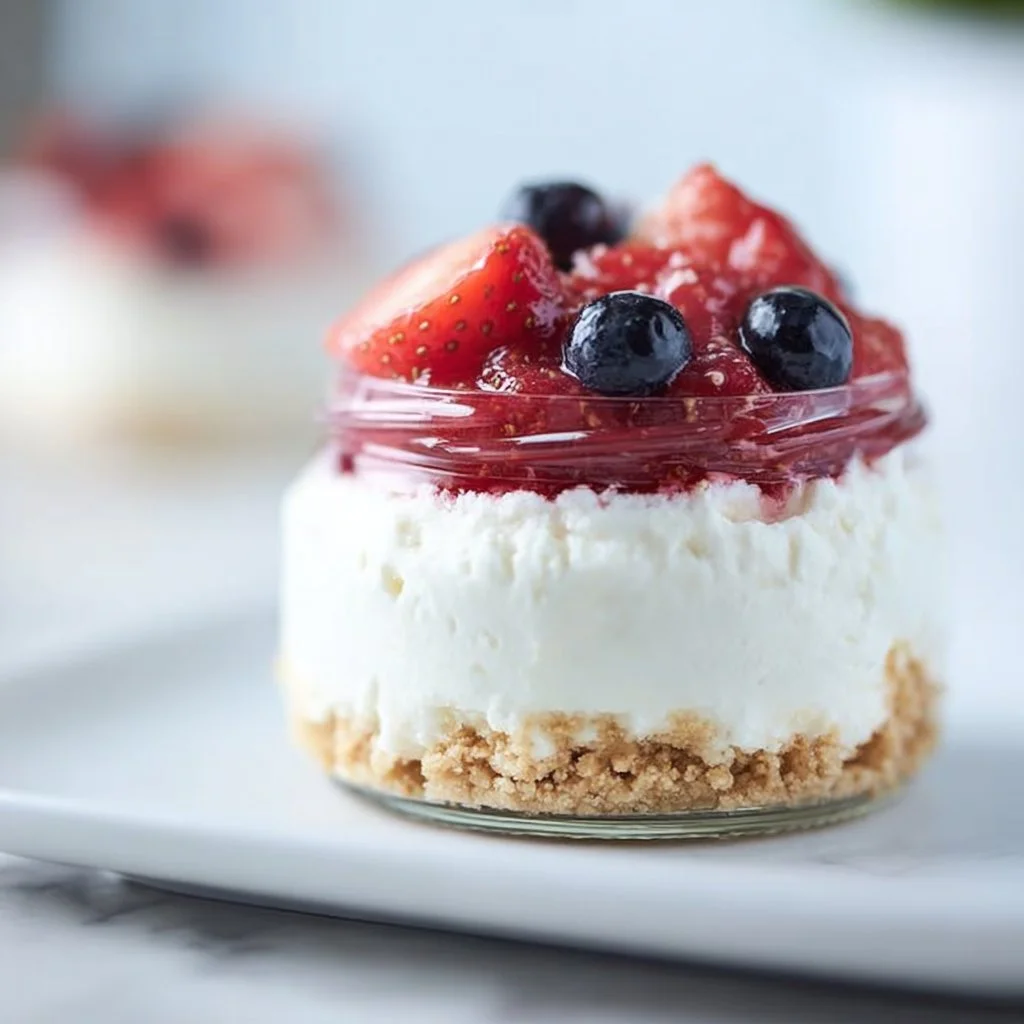
Fresh strawberries for topping: Not only do they look gorgeous, but they add a refreshing flavor to balance the creaminess. Any berries will work—blueberries, raspberries, or even a delightful fruit medley would do the trick!
Step-by-Step Instructions
Alright, foodies, let’s get cooking! Follow these steps, and soon you’ll be indulging in your very own low-calorie cheesecake.
Step 1: Gather Your Supplies
Before you start, make sure you’ve got everything you need: a mixing bowl, a whisk (or, if you’re feeling fancy, a hand mixer), and a small serving dish or jar to hold your cheesecake. A good setup makes all the difference!
Step 2: Mix the Greek Yogurt and Sweetener
In your mixing bowl, combine the 1/2 cup of Greek yogurt and 1 tablespoon of honey (or your sweetener of choice). Use a whisk to blend them until smooth. If you’re using a granular sweetener, make sure to whisk a bit longer so that it dissolves fully. This is the base of your cheesecake, so give it some love!
Step 3: Add Flavor
Next, add the 1/4 teaspoon of vanilla extract and 1/2 teaspoon of lemon juice to the yogurt mixture. Whisk it together. You should start to smell that delicious aroma, hinting at the creamy dreams to come. Taste it at this stage! If it lacks sweetness, add a bit more honey—everyone’s palate is different!
Step 4: Chill the Mixture
Once you’re satisfied with the flavor, place the bowl in the refrigerator for about 10–15 minutes. This allows the mixture to thicken up a tad, making it easier to scoop later. Plus, it’s nice to work with colder mixtures.
Step 5: Create the Crust (Optional)
If you’re using graham cracker crumbs, now is the time to prepare that crust. Lay down your graham crackers in a zip-lock bag and crush them with a rolling pin or use a food processor until you have fine crumbs. In a small bowl, mix the crumbs with just a hint of melted butter (about 1 teaspoon if you want a light crust) until they hold together a bit. Spoon this into the bottom of your serving dish if you desire a crust base.
Step 6: Assemble Your Cheesecake
Take your chilled yogurt mixture from the refrigerator and spoon it over the crust (if you’re using one). Level it off with a spatula or the back of a spoon. If you’re going crust-free, just spoon the mixture into your dish and spread it evenly.
Step 7: Top with Fresh Strawberries
Finally, wash and slice your fresh strawberries (or any other berries you fancy) and arrange them on top of your cheesecake. Feel free to be artistic about it! A little drizzle of honey over the top can elevate it—even though it’s already a star.
Step 8: Chill and Enjoy
Pop your cheesecake in the refrigerator for an additional 30 minutes to allow it to set a little more. Yeah, I know the waiting is tough, but think of the deliciousness that awaits! When you’re ready to dive in, just grab your spoon and dig right!
Serving Suggestions
This low-calorie no-bake cheesecake for one isn’t just amazing by itself; it can be dressed up beautifully too! Serve it in a cute mason jar for an adorable touch or in any adorable dish you have. A sprinkle of lemon zest over the top enhances both presentation and flavor, while a dollop of whipped cream could take it next level—though that will add calories, so you can save that for a treat day!
Pair it with a cup of herbal tea or a refreshing glass of sparkling water for a wonderfully balanced snack or dessert that’s good anytime! And, if you’re feeling generous, you can always make an extra serving for a friend—or keep it all to yourself!
Recipe Variations
Feeling adventurous? Here are some tasty suggestions to put a spin on your low-calorie cheesecake:
-
Chocolate Lover’s Delight: Stir in 1 tablespoon of cocoa powder or sugar-free chocolate syrup into the yogurt mixture for a chocolate cheesecake that’ll make your heart skip!
-
Nutty Addition: Mix 1 tablespoon of nut butter (like almond or peanut) into the yogurt for an incredibly flavorful and protein-packed treat!
-
Coffee Kick: For a coffee-flavored treat, add a teaspoon of instant coffee or espresso powder into the mixture. It’ll be a pick-me-up you can’t refuse!
-
Citrus Burst: Instead of lemon juice, try lime juice or even orange juice for a fresh citrus twist. These brighten the flavor beautifully!
-
Berry Fusion: Instead of strawberries, use pureed or mashed berries into the yogurt for an equally delicious fruity twist. Just remember to adjust sweetener if your chosen fruit is more tart!
Chef’s Notes
This recipe has evolved over the years as I’ve experimented with different flavors and toppings. Initially, I only made it with strawberries, keeping it simple. But as I brought in different fruits, nuts, and even spices (yes, cinnamon can be heavenly), I discovered just how versatile this little treat can be! And who knows, maybe I’ll end up with a whole series of single-serving cheesecakes—watch out world!
This low-calorie cheesecake serves as a reminder that indulgence doesn’t have to come with guilt, and I love pulling it together on those nights when I crave simple comfort.
FAQs and Troubleshooting
-
My cheesecake isn’t setting properly; what did I do wrong?
No worries—we all have those moments! If the mixture didn’t thicken, try chilling it for longer or using a thicker yogurt. Make sure you’re using full-fat Greek yogurt for the best results! -
Can I freeze this cheesecake?
Absolutely! Just remember to cover it tightly. If you freeze it, let it sit out for 10-15 minutes at room temperature to soften before digging in. -
How can I add more flavor to the crust?
Adding a pinch of cinnamon or even a couple of tablespoons of cocoa powder to your graham cracker crumbs can elevate the flavor! -
What if I don’t have Greek yogurt?
You can swap it out with any kind of creamy yogurt; just understand the texture and taste will change slightly. For a lactose-free option, go for coconut or almond yogurt!
Nutritional Info
This low-calorie no-bake cheesecake is not only delicious, but it’s also friendly on the waistline! Here’s a rough breakdown of the nutritional information per serving:
- Calories: Approximately 150 calories
- Protein: 10g
- Carbohydrates: 20g
- Fat: 2g (most coming from yogurt)
- Sugar: 7g (if using honey; check labels on sweeteners!)
These numbers are approximate and can vary based on specific ingredient brands and types you use. Always a good idea to double-check if you’re tracking your macros!
Final Thoughts
You’ve made it to the end of this delightful journey, and now it’s time to enjoy your creation! This Low-Calorie No-Bake Cheesecake for One is not just a recipe; it’s a little piece of joy you’ve crafted yourself. Whether you savor it on a quiet evening or share it with a friend, remember that dessert should always be a celebration.
As you indulge, think of the stories you’ll create in your kitchen—those cherished memories that come alive when you whip up something wonderful. Thanks for hanging out with me today at Feastical, and I can’t wait to see what creations you come up with in your own kitchen. Until next time, keep cooking with love!
Happy munching, foodies! 🍓🥳
Print
Low-Calorie No-Bake Cheesecake for One
- Total Time: 45 minutes
- Yield: 1 serving 1x
- Diet: Low-Calorie, Vegetarian
Description
A delightful low-calorie no-bake cheesecake that’s perfect for a guilt-free indulgence.
Ingredients
- 1/2 cup Greek yogurt
- 1 tablespoon honey or sweetener of choice
- 1/4 teaspoon vanilla extract
- 1/2 teaspoon lemon juice
- 1 tablespoon graham cracker crumbs (optional for crust)
- Fresh strawberries for topping
Instructions
- Gather Your Supplies: Have a mixing bowl, whisk, and a small serving dish ready.
- Mix the Greek yogurt and sweetener in the bowl until smooth.
- Add the vanilla extract and lemon juice, then whisk together.
- Chill the mixture in the refrigerator for about 10–15 minutes.
- Create the crust by crushing graham crackers and mixing with melted butter, if desired.
- Assemble your cheesecake by spooning the yogurt mixture over the crust.
- Top with sliced fresh strawberries.
- Chill for an additional 30 minutes before serving.
Notes
For added flavor, consider using almond extract or adding a drizzle of honey on top. You can also use different fruits for topping.
- Prep Time: 15 minutes
- Cook Time: 0 minutes
- Category: Dessert
- Method: No-Bake
- Cuisine: American
Nutrition
- Serving Size: 1 serving
- Calories: 150
- Sugar: 7g
- Sodium: 50mg
- Fat: 2g
- Saturated Fat: 1g
- Unsaturated Fat: 1g
- Trans Fat: 0g
- Carbohydrates: 20g
- Fiber: 1g
- Protein: 10g
- Cholesterol: 5mg
Keywords: cheesecake, no-bake, low-calorie, dessert, Greek yogurt
Healthy No-Bake Oreo Cheesecake Bites Recipe
Healthy No-Bake Oreo Cheesecake Bites Recipe
Hey there, fellow food lovers! I’m Beau Collier, and I’m thrilled you’re here at Feastical! Today, we’re diving into a recipe that’s not only a crowd-pleaser but also super easy to whip up—Healthy No-Bake Oreo Cheesecake Bites. Yep, you heard that right! These little gems pack all the flavors of a classic cheesecake but without the guilt. Plus, they require zero baking, which means more time for you to kick back with a cold drink while indulging your sweet tooth!
Now, before we get into the nitty-gritty of the recipe, let’s chat about what makes these cheesecake bites so special. First off, who doesn’t love cookies and cream? The rich, velvety texture of cream cheese, combined with the tanginess of Greek yogurt, creates a deliciously smooth filling that’s just begging to be devoured. And with the added crunch from those delightful Oreo Thins, you get the perfect balance of creamy and crunchy. The best part? These bites are healthier than traditional cheesecake, making them a fabulous choice for dessert lovers who want to stay on the lighter side.
Picture this: It’s a sunny Sunday afternoon, and you’re hosting a get-together with friends and family. You’ve spent the day laughing, reminiscing, and sharing stories, and just when you think everyone is full from the savory dishes you’ve laid out, you present these delightful cheesecake bites. The moment you see those smiles of delight as your guests sink their teeth into them is nothing short of magical. You might even hear “wow” repeated more times than you can count.
So grab your mixing bowl and let’s jump into this no-bake adventure that will leave your taste buds dancing and your heart full!
Personal Story
Ah, desserts have always held a special place in my heart. Growing up, my family had a tradition of Sunday dinners followed by something sweet. My grandmother, bless her heart, was the reigning queen of cheesecakes. She introduced me to the world of creamy delights and taught me the magic of blending flavors. I can still picture her in the kitchen, apron on, whisking away while I stood on a stool beside her, my little hands eager to help.
One of my fondest memories involves a particularly hot summer day. We’d spent the afternoon by the pool, and the idea of a heavy, baked cheesecake felt overwhelming. That’s when Grandma decided to get creative. She tossed together a no-bake version that became the star of our summer gatherings. Inspired by her genius, I’ve continued to play around with different flavors and ingredients, blending nostalgia with a modern twist.
When I recently discovered how to craft a healthier version of this childhood favorite—and I settled on these Healthy No-Bake Oreo Cheesecake Bites—I couldn’t help but feel like I was channeling Grandma’s spirit. This recipe brings me joy every time I create it, and I can’t wait for you to share that same experience.
Ingredients
Here’s what you’ll need for these scrumptious cheesecake bites:
-
8 oz. Fat-Free Cream Cheese
This provides a rich, creamy texture without loading on unnecessary calories. Low-fat cream cheese can work as a substitute, but it may alter the texture. -
1/2 cup Non-Fat Vanilla Greek Yogurt
Great for adding protein and a smooth consistency! If you want to switch things up, plain Greek yogurt works too—though it’ll be less sweet. -
1 tsp. Vanilla Extract
This little ingredient brings warmth and depth to all your desserts. Feel free to experiment with almond extract for a unique flavor twist! -
1/4 tsp. Salt
Don’t skip this! A touch of salt intensifies sweetness and balances flavors perfectly. If you’re watching your sodium, you can omit this, but it does enhance the overall taste. -
8 oz. Tub Low-Fat Cool Whip
This will give your cheesecake bites that airy, whipped texture. You can use whipped coconut cream for a dairy-free option, or make your own whipped cream if you prefer that fresh taste. -
24 Oreo Thins
These are key for crust and crunch! If you’re looking for a gluten-free option, there are gluten-free chocolate sandwich cookies available that work beautifully.
Now that we have our ingredients all lined up, it’s time to get cooking (well, kinda)!
Step-by-Step Instructions
Alright, let’s roll up our sleeves and get to work! Here’s how to create these fantastic no-bake cheesecake bites:
-
Prep Your Ingredients:
- Before anything, make sure your cream cheese is softened. Pull it out of the fridge about 30 minutes before you start mixing; room temperature cream cheese will blend seamlessly.
-
Mix Cream Cheese and Yogurt:
- In a large mixing bowl, combine the softened cream cheese and the Greek yogurt. Use an electric mixer on medium speed for about 2 minutes, just until it’s creamy and smooth. Here’s the chef hack: mixing these ingredients well will ensure there are no lumps—and we want a velvety texture!
-
Add Vanilla and Salt:
- Next up, add the vanilla extract and salt. Beat for another 30 seconds until fully incorporated. I always say this step is what truly elevates the flavor profile—it’s those small details that make all the difference!
-
Fold in the Cool Whip:
- Now gently fold in the Low-Fat Cool Whip using a spatula. This is where things get fluffy! Make sure to take your time with this step; stirring too vigorously can deflate the goodness we want. Your mixture should be light and airy.
-
Crush the Oreo Thins:
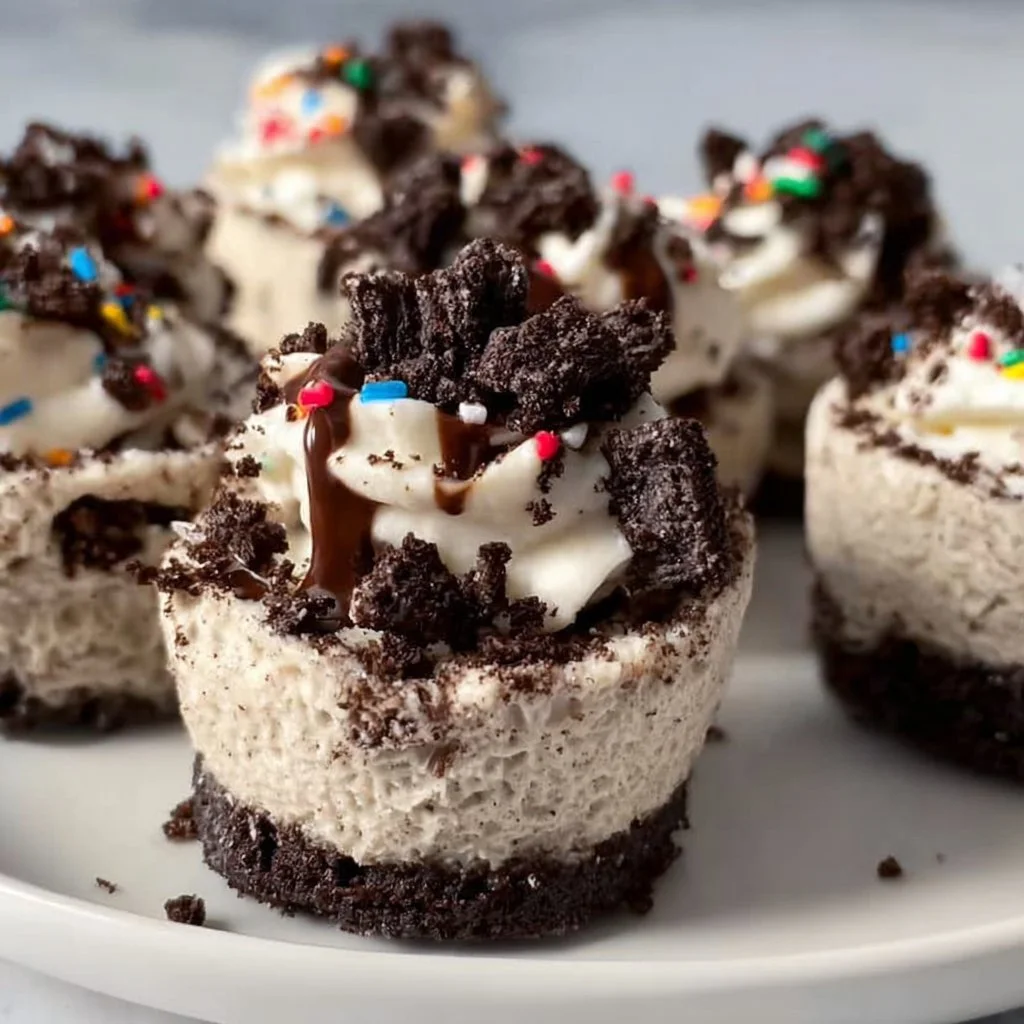
- Grab those Oreo Thins and crush them into fine crumbs. You can do this by placing them in a resealable plastic bag and giving them a whack with a rolling pin or by using a food processor if you have one handy. Just make sure they’re finely crushed for the best texture in your bites!
-
Combine Crumbs and Filling:
- Here’s a fun part: take about 1 cup of the crushed Oreo mixture and fold it into your cheesecake mixture. This adds that chocolatey goodness right into the filling! Set aside the remaining crumbs for topping.
-
Portion Out the Mixture:
- Now, using a cookie scoop (or just a spoon if you’re feeling adventurous), portion out the mixture into small, bite-sized rounds. The charm of these bites is all about the perfect size, so aim for around 1 inch in diameter.
-
Chill to Set:
- Place your cheesecake bites on a baking sheet lined with parchment paper. Once you’ve portioned all of them out, pop them in the fridge for at least 1 hour to let them firm up. Trust me, the wait is totally worth it!
-
Serve and Enjoy:
- Once they’ve chilled and set, serve them cold! If you want to make them extra special, sprinkle the reserved crushed Oreos on top just before serving to add a little crunch!
Serving Suggestions
These cheesecake bites are fantastic on their own, but let’s take it up a notch for presentation. Try arranging them on a charming platter, and drizzle some chocolate sauce around the edges. You could even dab a bit of whipped cream on the plate alongside the bites for a fun, restaurant-style aesthetic. Want to wow your guests? Use mini dessert cups and layer them—first a layer of the cheesecake mixture, followed by a sprinkle of crushed Oreo, then another layer of cheesecake, and top it off with whipped cream and a dusting of Oreos. It’s an impressive but easy way to elevate dessert!
Recipe Variations
Now, while these bites are undeniably delicious as is, let’s sprinkle in some ideas to give a fun twist or cater to different dietary needs:
-
Peanut Butter Chocolate Oreo Bites: Mix in 1/4 cup of creamy peanut butter into the cream cheese mixture for a nutty flair.
-
Minty Fresh Twist: Add a few drops of peppermint extract to the filling for a refreshing version. Perfect for mint lovers!
-
Fruit-Filled Delight: Fold in some fresh strawberries or raspberries into the cream cheese mix for a fruity contrast. This add-in also brightens up the flavor profile!
-
Sugar-Free Alternative: If you’re looking to cut down on sugar, opt for sugar-free cream cheese and a no-sugar-added Cool Whip. Just keep an eye on the sweetness—you may need to adjust it!
-
Cocoa Powder Add-In: For an extra chocolate kick, sift in a bit of cocoa powder into the batter. It’ll add depth and a beautiful richly dark color without being overwhelming.
Chef’s Notes
Let me tell you, creating this recipe has been quite the delightful journey! I’ve played around with different versions over the years, even experimenting with mix-ins like crushed nuts or toppings of fresh fruit. One of the funniest moments was when I made these bites for a potluck and accidentally grabbed the salt instead of sugar—I can still hear the collective “oops” when everyone tasted that first bite. Thankfully, everyone had a good laugh, and it gave me the idea for the salt in the recipe!
These bites have evolved from my grandma’s no-bake cheesecake into something uniquely mine, showcasing flavors while keeping it healthy. Just goes to show you, food is all about creativity and memories!
FAQs and Troubleshooting
-
Can I make these bites ahead of time?
Absolutely! These cheesecake bites can be made a day or two in advance. Just keep them in an airtight container in the fridge, and they’ll be ready when you are! -
What if my cream cheese isn’t soft enough?
If you forget to take it out of the fridge in advance, simply cut it into smaller cubes and microwave it for about 15 seconds—just be sure not to melt it! -
Can I use regular Oreos instead of Oreo Thins?
You can, but the texture and calorie content will change slightly. Regular Oreos are thicker and will give you a more substantial crust, but they’ll still taste incredible! -
What should I do if my filling is too runny?
If you find that your mixture is too soft, try chilling it for longer. If that doesn’t work, you can fold in a bit more crushed Oreo and/or a spoonful of Greek yogurt to help it set.
Nutritional Info
Here’s a rough breakdown of the nutritional info for one cheesecake bite (assuming you make 24 bites):
- Calories: 63
- Protein: 2g
- Fat: 2g
- Carbohydrates: 9g
- Fiber: 1g
- Sugar: 4g
These bites are not only less caloric than traditional cheesecake slices, but they’re also packed with some protein, thanks to the Greek yogurt and cream cheese. It’s a sweet way to indulge without the burden of excess calories!
Final Thoughts
There you have it! Your guide to whipping up delicious Healthy No-Bake Oreo Cheesecake Bites that will impress your friends, family, and even your stubborn sweet tooth. I hope you’ve enjoyed this culinary journey with me! Feel free to experiment, make this recipe your own, and let the memories flow. Food is more than just ingredients; it’s about connection, nostalgia, and making moments deliciously unforgettable.
So, next time you need a quick and delightful dessert, remember these bites. They’re perfect for any occasion—be it a casual family dinner or a fabulous summer soirée. I’m excited for you to savor every delicious bite!
Now, go grab those ingredients, and let’s make some magic happen in the kitchen. Happy cooking!
Print
Healthy No-Bake Oreo Cheesecake Bites
- Total Time: 75 minutes
- Yield: 24 bites 1x
- Diet: Vegetarian
Description
Delicious and healthier no-bake Oreo cheesecake bites that offer all the flavors of classic cheesecake without the guilt.
Ingredients
- 8 oz. Fat-Free Cream Cheese
- 1/2 cup Non-Fat Vanilla Greek Yogurt
- 1 tsp. Vanilla Extract
- 1/4 tsp. Salt
- 8 oz. Tub Low-Fat Cool Whip
- 24 Oreo Thins
Instructions
- Prep your ingredients: Soften the cream cheese by taking it out of the fridge 30 minutes before mixing.
- Mix cream cheese and yogurt in a large mixing bowl with an electric mixer on medium speed for 2 minutes until creamy.
- Add vanilla extract and salt; beat for an additional 30 seconds to incorporate.
- Fold in the Low-Fat Cool Whip gently with a spatula.
- Crush the Oreo Thins into fine crumbs using a resealable plastic bag or food processor.
- Combine about 1 cup of crushed Oreos into the cheesecake mixture, setting aside the rest for topping.
- Portion the mixture into small, bite-sized rounds using a cookie scoop.
- Chill the bites on a baking sheet lined with parchment paper for at least 1 hour.
- Serve cold and top with reserved crushed Oreos if desired.
Notes
These bites can be made ahead of time and stored in an airtight container in the fridge for a day or two.
- Prep Time: 15 minutes
- Cook Time: 0 minutes
- Category: Dessert
- Method: No-Bake
- Cuisine: American
Nutrition
- Serving Size: 1 bite
- Calories: 63
- Sugar: 4g
- Sodium: 100mg
- Fat: 2g
- Saturated Fat: 1g
- Unsaturated Fat: 1g
- Trans Fat: 0g
- Carbohydrates: 9g
- Fiber: 1g
- Protein: 2g
- Cholesterol: 10mg
Keywords: cheesecake, no-bake, dessert, Oreo, healthy

Low Calorie Frozen Banana Snickers
Low Calorie Frozen Banana Snickers: A Sweet Treat with a Healthy Twist
Hey there, fellow food lovers! Beau Collier here, excited to bring you one of my favorite feel-good recipes that’s sure to have you grinning from ear to ear. Today, we’re diving into the world of frozen treats with a twist that combines the delightful flavors of bananas, peanut butter, and chocolate – and guess what? It’s a low-calorie version of a classic favorite: the Snickers bar!
Now, I don’t know about you, but a Snickers bar has always been my go-to when that sweet tooth strikes. Those layers of nougat, caramel, nuts, and chocolate are simply irresistible, right? But let’s be honest, sometimes our cravings clash with our health goals. That’s where my Low Calorie Frozen Banana Snickers come to the rescue!
Think of this treat as a healthy alternative that still satisfies your sweet cravings while keeping calories in check. Plus, it’s super easy to make and requires no fancy kitchen gadgets. Just a bit of chopping, some mixing, and a little time in the freezer, and you’re golden.
As we whip up this delicious frozen treat, you’ll get a sneak peek into my kitchen life, a few fun stories, and tips along the way. So, grab your spatula (and maybe some friends to impress), and let’s create a mouthwatering masterpiece that’ll make your taste buds do the happy dance!
Personal Story
You know, food has this magical way of taping together memories and feelings. For me, one of my fondest memories comes from my childhood, where summer afternoons were filled with laughter and ice cream trucks rumbling down my street. Every time that jingle rang in the air, I’d grab a handful of coins and race out the door, hoping for my favorite treat: a frozen Snickers bar!
My mom would often make homemade versions, loading up on fresh ingredients and getting us involved in the kitchen. I recall one particularly sunny day; we decided to experiment by freezing bananas and layering the chocolate and peanut butter on top.
What emerged from our little kitchen adventure wasn’t just a dessert; it was a way to bond. Those sweet moments spent laughing over spilled chocolate and peanut butter remnants became cherished memories, reminding me that cooking is all about love. Today, I’m excited to share a spin on that childhood favorite, so we can create new memories in our kitchens with this frozen delight!
Ingredients
Let’s gather our ingredients! Making these Low Calorie Frozen Banana Snickers is super simple, and here’s what you’ll need:
-
2 large firm, ripe bananas (about 240g total)
Bananas are not just tasty; they’re a great natural sweetener! Look for firm ones to ensure they hold their shape after freezing. No ripe bananas in sight? No worries! You can use a plantain as a substitute, though the flavor will be different. -
2-3 tablespoons natural creamy peanut butter (unsweetened)
Creamy, dreamy peanut butter is essential for that Snickers flair. Opt for natural peanut butter without added sugars or oils. Feel free to swap for almond or cashew butter for a nutty twist! -
2 tablespoons roasted unsalted peanuts, roughly chopped
These crunchy little nuggets amp up the texture and flavor. If you’re nut-free, try sunflower seeds or toasted coconut flakes for that satisfying crunch! -
1/4 cup (40g) dark chocolate chips (70% cacao or higher)
Dark chocolate brings the richness! Look for a high-percentage cacao for a healthier option. You can also use dairy-free chocolate for a vegan version. -
1 teaspoon coconut oil
This little gem helps the chocolate melt smoothly and gives it a lovely sheen. If you’re out of coconut oil, a neutral-flavored oil like grapeseed will do the trick. -
Sea salt flakes (optional)
A little sprinkle of salt can really bring out the chocolatey flavor. It’s optional, but trust me, it’s worth it! If you don’t have sea salt, regular table salt works too. -
Optional add-ins: mini pretzel pieces, shredded coconut, chopped dates
Get creative! Toss in some mini pretzel pieces for added crunch, shredded coconut for a tropical flair, or chopped dates for extra sweetness. The sky’s the limit!
Step-by-Step Instructions
Alright, let’s get cooking! Grab your apron, and let’s get into the nitty-gritty of making these delightful frozen banana Snickers.
Step 1: Slice the Bananas
Start by peeling the bananas and slicing them into thick coins, about 1/4 inch each. Make sure your knife is sharp to avoid squishing those lovely bananas!
Chef Tip: If your bananas are too ripe, they might get mushy when sliced. Choose bananas that are firm but ripe for the best texture.
Step 2: Prepare the Peanut Butter Mixture
In a microwavable bowl, warm the creamy peanut butter slightly (for about 15-20 seconds). It should just be softened enough to make it easy to spread.
Chef Hack: Stir in a pinch of sea salt into the peanut butter for that extra flavor boost!
Step 3: Assemble the Banan-Nickers
Lay half of the banana slices on a baking sheet lined with parchment paper. Spread a thin layer of warm peanut butter over each slice. Sprinkle with the chopped roasted peanuts, and gently press them into the peanut butter.
Step 4: Top with the Chocolate
In a small saucepan, melt the dark chocolate chips with the coconut oil over low heat. Stir occasionally until smooth.
Once melted, drizzle the chocolate over the banana slices, ensuring you cover them nice and evenly.
Chef Insight: If you prefer dipping instead of drizzling, you can dip each slice directly into the chocolate mixture, though you may need a bit more chocolate.
Step 5: Freeze
Carefully transfer the baking sheet to the freezer and let these sit until frozen solid, which should take about 1-2 hours.
Chef’s Note: You can make these in batches; simply store any leftover peanut butter or chocolate in the fridge for your next batch!
Step 6: Enjoy!
Once they’re frozen, you can serve them immediately or store them in an airtight container for a quick snack. Sprinkle a pinch of sea salt over the top just before serving if desired.
Serving Suggestions
Now that your low-calorie frozen banana Snickers are ready, how do you serve them? You can go classic and simply plate them on a nice serving dish.
Garnish with fresh mint leaves for a pop of color and a hint of freshness. You can also add a few extra roasted peanuts or a drizzle of melted chocolate on top for that extra touch of indulgence.
For a fun twist, place them on a skewer and serve as mini frozen treats at parties or gatherings. They’re perfect finger foods!
Recipe Variations
Feeling adventurous? Here are a few fun variations to mix up your frozen banana Snickers:
-
Caramel Drizzle: Drizzle some homemade or store-bought caramel sauce over the chocolate before freezing for a sweet caramel layer.
-
Nutty Cocoa: Replace the peanut butter with almond butter and sprinkle some cocoa powder over the bananas before adding the chocolate.
-
Tropical Bliss: Add shredded coconut and a drizzle of honey for a tropical twist. You can even dip them in coconut before the final freeze.
-
Oreo Crunch: Crush up some Oreo cookies and sprinkle them over the peanut butter layer for a cookie-crusted version!
-
Vegan Delight: Replace the chocolate with dairy-free options and use maple syrup instead of honey to keep it 100% plant-based.
Chef’s Notes
As a self-proclaimed kitchen experimenter, I love to play around with flavors! This recipe has truly evolved over the years. The first version I made was a wild mashup of what I had on hand. Every time I’d adjust the toppings or change the chocolate percentage, I’d discover something new and exciting. Just think, if I hadn’t taken my mom’s advice to mix things up, I might never have created these wonderful frozen bites!
Remember, the kitchen is your playground—never hesitate to experiment. I’ve had my fair share of “oops” moments, like when I mistakenly melted white chocolate instead of dark chocolate. Spoiler alert: it made for an interesting combination!
FAQs and Troubleshooting
Q1: Can I make these banana Snickers ahead of time?
Absolutely! These treats can be stored in an airtight container in the freezer for up to a month. They make great grab-and-go snacks!
Q2: What if the chocolate is too thick?
If you find your melted chocolate is too thick to drizzle, simply add a smidgen more coconut oil and stir until it loosens up.
Q3: How do I know when my bananas are ripe enough?
Look for bananas that are firm yet have a few speckles. Too green, and they won’t be sweet; too brown, and they may turn mushy.
Q4: Are there any alternatives if I’m allergic to peanuts?
Of course! You can swap out peanut butter for sunflower seed butter or even a cashew spread to achieve that delightful nutty flavor.
Nutritional Info
Let’s talk numbers! Each frozen banana Snickers is low in calories and high in flavor!
- Calories: About 70-80 calories per piece
- Protein: Approximately 2-3 grams, thanks to the peanut butter
- Fat: Around 4-5 grams, primarily from healthy fats in the peanut butter and chocolate
- Carbs: About 10-12 grams, mainly from the bananas and natural sugars
These stats can vary based on the specific brands and quantities used, but you’ll definitely be enjoying a guilt-free treat!
Final Thoughts
There you have it, my sweet friends: a scrumptious low-calorie frozen banana Snickers recipe that’s not just easy to make but also jam-packed with nostalgia and joy. I hope you thoroughly enjoyed exploring this recipe with me.
Remember, cooking is all about community and sharing love, whether you’re in the kitchen alone or with friends and family. So, the next time you whip up this treat, don’t be afraid to share your stories or even create new ones—because food is meant to be shared, savored, and celebrated!
So, get out there, make some frozen banana Snickers, and let your taste buds thank you! Happy cooking, and see you next time at Feastical! 🍌🍫
Print
Low Calorie Frozen Banana Snickers
- Total Time: 120 minutes
- Yield: 8 servings 1x
- Diet: Vegetarian
Description
A guilt-free twist on the classic Snickers bar, these frozen treats combine bananas, peanut butter, and dark chocolate for a satisfying sweet fix.
Ingredients
- 2 large firm, ripe bananas (about 240g total)
- 2–3 tablespoons natural creamy peanut butter (unsweetened)
- 2 tablespoons roasted unsalted peanuts, roughly chopped
- 1/4 cup (40g) dark chocolate chips (70% cacao or higher)
- 1 teaspoon coconut oil
- Sea salt flakes (optional)
- Optional add-ins: mini pretzel pieces, shredded coconut, chopped dates
Instructions
- Slice the bananas into thick coins, about 1/4 inch each.
- Prepare the peanut butter mixture by warming the creamy peanut butter in a bowl.
- Assemble the banana slices on a baking sheet, spreading peanut butter on each slice and sprinkling with peanuts.
- Top with the melted dark chocolate mixed with coconut oil.
- Freeze the baking sheet until the banana Snickers are solid, about 1-2 hours.
- Enjoy immediately or store in an airtight container in the freezer.
Notes
Feel free to get creative with additional toppings and variations!
- Prep Time: 15 minutes
- Cook Time: 0 minutes
- Category: Dessert
- Method: Freezing
- Cuisine: American
Nutrition
- Serving Size: 1 piece
- Calories: 75
- Sugar: 5g
- Sodium: 50mg
- Fat: 5g
- Saturated Fat: 2g
- Unsaturated Fat: 3g
- Trans Fat: 0g
- Carbohydrates: 10g
- Fiber: 1g
- Protein: 3g
- Cholesterol: 0mg
Keywords: frozen dessert, healthy snacks, low calorie, peanut butter banana, quick treats