
Royal Egg Curry
Royal Egg Curry: A Journey of Flavor and Comfort
Hey there, fellow food lovers! Today, we’re diving into a dish that effortlessly blends comfort and elegance—Royal Egg Curry. This delightful dish, with its rich and creamy sauce, will transport you to a world of tantalizing flavors and aromatic spices. Whether you’re gathering around the dinner table with loved ones or enjoying a cozy night in, this curry is an ultimate mood booster. So let’s lace up our aprons, roll up our sleeves, and make something truly special!
A Whisk of Nostalgia: My Personal Story
Growing up, my kitchen was my safe haven, filled with the scent of spices and the laughter of my family. One of my fondest memories is helping my grandmother prepare her famous egg curry for Sunday dinners. I remember standing on a stool, trying to reach the counter as she guided me through the process. The sizzle of onions hitting hot oil would send a wave of excitement through me, and as I stirred in the spices, I felt a connection to generations of cooks before me.
Egg curry was more than just dinner; it was love served on a plate. My grandmother always said that food is a celebration, and every meal is an opportunity to bring people together. Her take on egg curry was simply divine—each bite was a burst of flavor, and I could never get enough. Now, every time I whip up this dish, I’m reminded of those cherished moments, which makes me even more excited to share it with you!
Ingredients
Here’s what you’ll need to bring this Royal Egg Curry to life:
-
6 Hard-Boiled Eggs
A protein-packed star of the dish! You can substitute with tofu for a vegetarian option, or skip it altogether for a vegan version. -
1 Cup Plain Yogurt (Dahi)
This adds creaminess and tang; for a dairy-free version, try using coconut yogurt. Make sure to whisk it well to prevent curdling! -
2 Onions, Finely Sliced
Use sweet onions for a milder flavor, or red onions for a more robust taste. You can also caramelize them for extra sweetness! -
2 Tomatoes, Pureed
These contribute to the base of our gravy. Fresh tomatoes are great, but canned tomatoes in puree work just as well if you’re short on time! -
1/4 Cup Cashews, Ground
They add nuttiness and creaminess to the curry. Almonds can be a great alternative if you have a nut allergy. -
1/4 Cup Cream
For that luxurious finish! You can swap it with coconut cream or omit it entirely for a lighter dish. -
1 tsp Ginger-Garlic Paste
This is essential for flavor depth. If you’re in a pinch, fresh grated ginger and minced garlic both work perfectly! -
1 tsp Cumin Seeds
They add an earthy flavor! If they’re too strong for your taste, ground cumin can be used, but remember to adjust the quantity! -
1 tsp Coriander Powder
This balances the spices beautifully. If you’re feeling adventurous, you can also add fresh coriander stalks for extra zing! -
1/2 tsp Turmeric Powder
Besides its health benefits, it gives a warm color. Fresh turmeric can be used if you happen to have it on hand! -
1/2 tsp Garam Masala
A must for that aromatic finish! You can get creative and blend your own garam masala with your favorite spices. -
Salt to Taste
Essential for bringing all the flavors together! Remember to taste as you go for the best results! -
2 tbsp Cooking Oil or Ghee
Ghee adds a rich flavor but feel free to use any cooking oil of your choice—olive or canola work great too! -
Fresh Coriander Leaves for Garnish
They brighten up the dish! If you’re not a fan of coriander, fresh parsley can work nicely as a substitute!
Step-by-Step Instructions
Let’s get cooking! Here’s how we’ll bring this Royal Egg Curry to life:
Step 1: Prepare the Ingredients
Get everything ready before you start cooking. Chop the onions, puree the tomatoes, and grind the cashews. This will save you from frantic searching mid-cooking!
Step 2: Hard-Boil the Eggs
Place your eggs in a pot of cold water and bring them to a boil. Once boiling, lower the heat and let them simmer for about 9-12 minutes. Afterward, plunge them in ice water for a few minutes. This not only halts the cooking but also makes peeling easier. A little chef hack: tap the eggs gently on a hard surface to get a clean peel.
Step 3: Sauté the Onions
In a large skillet, heat up the oil or ghee over medium heat. Add the sliced onions and sauté them until golden brown and caramelized—about 10-12 minutes. Trust me; you want to take your time here. Those sweet, deep flavors are so worth it!
Step 4: Add Ginger-Garlic Paste
Mix in the ginger-garlic paste and sauté for another 2-3 minutes until fragrant. This will perfume your kitchen in the most delightful way!
Step 5: Incorporate the Spices
Sprinkle in the cumin seeds, coriander powder, turmeric, and salt. Stir them together, allowing the spices to toast slightly—this helps to enhance their flavors and aromas. Your kitchen is now officially in ‘heavenly scent’ territory!
Step 6: Pour in the Pureed Tomatoes
Next, add the pureed tomatoes to the skillet. Cook this mixture for about 5-7 minutes until the oil separates from the sauce—a great sign that your base is ready.
Step 7: Add Ground Cashews and Yogurt
Stir in the ground cashews, which will make the sauce rich and creamy. Then, reduce the heat and gently mix in the yogurt, stirring continuously to avoid curdling. You want a silky, smooth sauce that hugs the eggs beautifully.
Step 8: Finish with Cream and Garam Masala
Pour in the cream and sprinkle over the garam masala. Simmer the sauce for a few minutes to meld all those glorious flavors together. If you want a thinner sauce, feel free to add a bit of water or broth until you reach your preferred consistency.
Step 9: Place the Eggs
Carefully cut the hard-boiled eggs in half and place them, cut side up, into the sauce. Let them soak up those lovely flavors for a few minutes. You can optionally add a few sprigs of fresh coriander here for a fresh touch!
Step 10: Serve and Garnish
Remove the skillet from heat and transfer the curry to a beautiful serving dish. Garnish generously with fresh coriander leaves. Your Royal Egg Curry is ready to impress!
Serving Suggestions
For an authentic experience, serve your Royal Egg Curry alongside fluffy basmati rice or warm naan. You could even whip up a quick cucumber raita to cool down the spice and add a refreshing touch. Presentation makes a difference, so use your finest dishware and enjoy the vibrant colors of this delightful curry—your food loves a good spotlight, too!
Recipe Variations
Here are a few creative twists you can experiment with while making this Royal Egg Curry:
- Spicy Addition: For the heat lovers, toss in finely chopped green chilies when sautéing the onions to bring an extra zing.
- Vegetarian Delight: Substitute the hard-boiled eggs with paneer or potatoes for a vegetarian variation that holds its own!
- Herbal Twist: Add fresh mint along with the coriander for a refreshing herbal flavor. It’s unique and delightful!
- Coconut Curry: Swap the cream with coconut milk, giving the curry a tropical twist rich in flavor.
- Roasted Vegetables: Throw in some roasted veggies like bell peppers, eggplant, or zucchini for added texture and nutrition.
Chef’s Notes
This recipe has evolved over time—what started with simple eggs and spices in my grandmother’s kitchen has now transformed into this creamy, royal dish that feels festive. I remember a time when dinner guests raved about the curry, and I reluctantly had to share the recipe! And let’s not even mention the time I accidentally swapped sugar for salt—let’s just say it was a memorable meal.
FAQs and Troubleshooting
1. Why did my eggs crack when boiling?
Don’t worry; this can happen! Next time, try adding salt to the water; it can help prevent cracking. Also, use eggs at room temperature for better results!
2. What can I do if my curry is too thick?
If your curry is on the thicker side, simply add a splash of water or broth while simmering. Stir until you achieve your desired thickness.
3. My sauce curdled; how can I prevent that?
To prevent curdling, always reduce the heat when adding yogurt and stir continuously. Using room temperature yogurt instead of cold also helps!
4. Can I make this dish ahead of time?
Absolutely! In fact, the flavors deepen over time. Just reheat gently on the stove before serving, adding a splash of water if needed.
Nutritional Info
While the exact nutritional content can vary based on specific ingredients used, here’s a general breakdown per serving:
- Calories: 400-450
- Protein: 18-20g (depending on eggs)
- Fat: 25-28g
- Carbohydrates: 10-15g
- Fiber: 2-3g
This meal is rich in protein from the eggs and offers healthy fats from the cream and nuts. Adding vegetables can further enhance fiber content!
Final Thoughts
Cooking is a wonderful journey filled with stories, flavors, and cherished moments—and this Royal Egg Curry embodies all of that. As you replicate this dish in your kitchen, I hope it fills your home with delightful aromas and happy memories.
There’s something magical about a dish that feels both comforting and extravagant at the same time. So as you gather around the table to share your creation, remember that every bite carries the love and warmth that food brings us all closer.
Let’s keep the joy of cooking alive, friends! Don’t forget to share your own kitchen stories and variations in the comments below—let’s inspire each other. Until next time, happy cooking! 🍳✨
Print
Royal Egg Curry
- Total Time: 50 minutes
- Yield: 4 servings 1x
- Diet: Vegetarian
Description
A delightful dish of hard-boiled eggs in a rich and creamy sauce, blending comfort and elegance with aromatic spices.
Ingredients
- 6 Hard-Boiled Eggs
- 1 Cup Plain Yogurt (Dahi)
- 2 Onions, Finely Sliced
- 2 Tomatoes, Pureed
- 1/4 Cup Cashews, Ground
- 1/4 Cup Cream
- 1 tsp Ginger-Garlic Paste
- 1 tsp Cumin Seeds
- 1 tsp Coriander Powder
- 1/2 tsp Turmeric Powder
- 1/2 tsp Garam Masala
- Salt to Taste
- 2 tbsp Cooking Oil or Ghee
- Fresh Coriander Leaves for Garnish
Instructions
- Prepare the Ingredients: Get everything ready before you start cooking. Chop the onions, puree the tomatoes, and grind the cashews.
- Hard-Boil the Eggs: Place your eggs in a pot of cold water, bring to a boil, then simmer for 9-12 minutes. Submerge in ice water for easy peeling.
- Sauté the Onions: Heat oil or ghee and sauté onions until golden brown (10-12 minutes).
- Add Ginger-Garlic Paste: Mix and sauté for another 2-3 minutes until fragrant.
- Incorporate the Spices: Add cumin seeds, coriander powder, turmeric, and salt; stir to toast slightly.
- Pour in the Pureed Tomatoes: Cook this for 5-7 minutes until oil separates.
- Add Ground Cashews and Yogurt: Stir in cashews, reduce heat, then gently mix in yogurt.
- Finish with Cream and Garam Masala: Pour in cream and sprinkle garam masala, simmer to blend flavors.
- Place the Eggs: Cut boiled eggs in half and place them in the sauce.
- Serve and Garnish: Transfer to a serving dish and garnish with fresh coriander leaves.
Notes
For a vegetarian option, substitute hard-boiled eggs with paneer or potatoes. Serve with basmati rice or naan.
- Prep Time: 15 minutes
- Cook Time: 35 minutes
- Category: Main Course
- Method: Simmering
- Cuisine: Indian
Nutrition
- Serving Size: 1 serving
- Calories: 425
- Sugar: 6g
- Sodium: 500mg
- Fat: 28g
- Saturated Fat: 10g
- Unsaturated Fat: 12g
- Trans Fat: 0g
- Carbohydrates: 14g
- Fiber: 3g
- Protein: 20g
- Cholesterol: 300mg
Keywords: egg curry, Indian recipe, comfort food, vegetarian dish
Asian Spicy Cucumber Salad
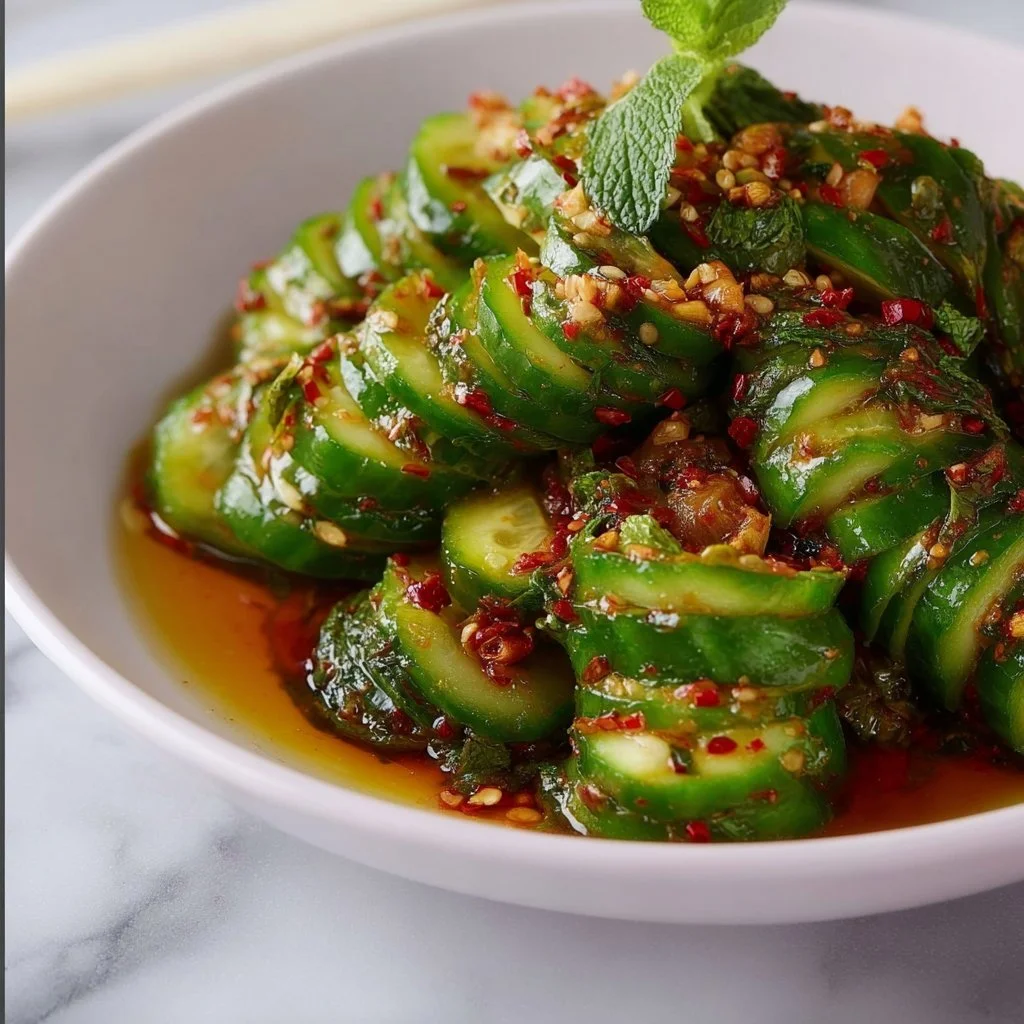
A Refreshing Twist: Asian Spicy Cucumber Salad Recipe
Welcome, food enthusiasts! Today, we’re diving into a dish that’s always a crowd-pleaser — the Asian Spicy Cucumber Salad! If you’re looking for something that’s not only light and refreshing but also packs a punch, you’ve hit the culinary jackpot with this one. Cucumbers, with their crisp texture, are like the perfect summer day in a salad, while the spicy kick from Sriracha brings in an exhilarating flavor that dances across your taste buds.
Picture this: it’s a warm afternoon, and you have family or friends gathered around. There’s laughter in the air, and the table is adorned with summer dishes that bring out the vibrant colors of the season. This salad isn’t just a side dish; it’s a joyful addition that complements any meal, whether you’re grilling outdoors or hosting a cozy indoor dinner.
One of the best parts? This salad is effortless to whip up! With just a handful of ingredients that you probably already have lying around in your kitchen, you can transform simple cucumbers into a vibrant, zesty salad that’s sure to impress. Play with the flavors or stick to the classic recipe; the choice is yours! So, roll up your sleeves, and let’s create something delicious.
Personal Story
I vividly remember the first time I tasted a cucumber salad like this. It was at my aunt’s house during a summer barbecue, and it was love at first bite! She tossed it together in moments and said it was a recipe she picked up while traveling internationally. I was captivated by her effortless kitchen style, and more so by how such simple ingredients could create so much flavor.
For me, that moment was more than just about food; it was about the joy of sharing and connecting over delicious dishes. We delved into countless stories, each bite igniting laughter, reminiscing about past summer adventures and the creative twists we all brought to our meals. This Asian Spicy Cucumber Salad became a staple in my own kitchen since that day. It reminds me to keep things simple, flavorful, and most importantly, to invite others into the joy of cooking together!
Ingredients
Let’s gear up for some culinary magic! Here’s what you’ll need for this delightful salad:
-
2 large cucumbers
The stars of the show! Choose firm, crisp cucumbers for the best texture. If you can find Persian or English cucumbers, they pack a sweeter flavor and are less bitter. Feel free to peel them if you prefer a milder taste! -
1 tablespoon salt
Salt serves two purposes: it enhances the flavor and helps draw out moisture from the cucumbers. If you’re watching your sodium, just sprinkle a little less or swap it out for a low-sodium alternative. -
1 tablespoon sesame oil
This oil adds a rich, nutty flavor that’s iconic in Asian cuisine. If you’re in a pinch, avocado oil can be a great substitute while still maintaining healthy fats. -
2 tablespoons rice vinegar
This gives our salad a tangy kick and balances out the heat. If you’re out of rice vinegar, apple cider vinegar is a fantastic alternative, bringing a subtly different, yet enjoyable flavor. -
1 tablespoon soy sauce
Ah, the umami factor! Soy sauce adds depth. For a gluten-free option, tamari works beautifully, too. -
1 tablespoon Sriracha or chili garlic sauce
Here’s where the fun begins! Adjust the heat to your liking here. If you’re feeling adventurous, go for a couple of tablespoons for an extra spicy kick! -
1 tablespoon sugar
A little sweetness brings everything together. If you prefer, you can swap this with honey or a sugar substitute for a low-calorie option. -
2 green onions, chopped
Adds a fresh, oniony crunch. Feel free to use chives for a milder taste if that’s your preference. -
Sesame seeds for garnish
Not just for decoration but for a lovely crunch! You can also toast the seeds for added flavor.
Step-by-Step Instructions
Ready to whip up this refreshing salad? Follow these easy steps, and you’ll have a bowl full of deliciousness in no time!
-
Prepare the Cucumbers
Start by slicing your cucumbers. For added flair, try cutting them into half-moon shapes or even julienne strips! Keep the skin on for extra color and nutrients or peel if you prefer a milder taste. -
Salting the Cucumbers
Place the sliced cucumbers in a bowl and sprinkle them with salt. Give them a gentle toss and let them sit for about 10-15 minutes. This step helps remove excess moisture and concentrates their flavor. The result is crisp, flavorful cucumber slices! -
Make the Dressing
In a separate bowl, whisk together sesame oil, rice vinegar, soy sauce, Sriracha (or chili garlic sauce), and sugar. Mix until the sugar is fully dissolved! This dressing is where the real magic happens — feel free to taste and adjust according to your spice preference. Do you want it sweeter? Add a bit more sugar. Need more heat? Go bold with the Sriracha! -
Combine and Toss
Once the cucumbers have drained and you’ve given them a squeeze to remove excess water, add the cucumber slices back into your mixing bowl. Pour your flavorful dressing over the cucumbers and toss everything together. Get your hands in there for the best mix! This is where the vibrant colors start to shine. -
Garnish and Serve
Right before serving, sprinkle the chopped green onions and sesame seeds on top for that finishing touch. Not only does this look appealing, but the seeds also add a delightful crunch! -
Enjoy!
This salad is best enjoyed fresh, but it can also be stored in the fridge for a short time if you need it to sit for a while. Just remember, the sassy crunch is best straight out of the mixing bowl!
Serving Suggestions
Now that you’ve got your salad ready, let’s talk about how to plate or serve it! Here are a few tips:
-
Serve in Bowls: For a casual gathering, serve the salad in a beautiful bowl and let everyone help themselves!
-
On Top of Protein: This salad acts as a refreshing side or topping for proteins like grilled chicken, shrimp, or tofu. The spicy kick complements the savory flavors beautifully.
-
Let It Shine: You can also layer it on a bed of greens like baby spinach or arugula to create a light, refreshing main dish!
-
Pair with Drinks: Consider serving this salad alongside light beverages, like iced green tea or a citrusy cocktail. The refreshing nature of both will mesh beautifully!
Recipe Variations
This salad is versatile, and there are countless ways to put your spin on it! Here are a few fun variations to consider:
-
Spicy Avocado Addition: Chop up some ripe avocado and toss it in for a creamy texture that balances the heat.
-
Add Fruits for Sweetness: Try adding slices of mango or pineapple for a tropical twist! They’ll pair perfectly with the cucumber and give it an unexpected sweet balance.
-
Herbs Galore: Toss in fresh herbs like cilantro or mint for an even more vibrant flavor.
-
Add Noodles: Want to bulk it up? Add in cooked vermicelli noodles! Just make sure to adjust the dressing accordingly so everything is balanced.
-
Pickled Cucumbers: For a tangy alternative, marinate your cucumbers in the rice vinegar for a couple of hours before proceeding. The flavors will deepen, and you’ll have a whole new delicious dish!
Chef’s Notes
Over the years, this recipe has really become a beloved favorite in my kitchen and at gatherings. I’ve seen my friends and family add their own creative twists, and that’s the beauty of cooking—each person can make a dish uniquely theirs. I laugh when I think of the time I hastily made this and accidentally grabbed red wine vinegar instead of rice vinegar. It turned out surprisingly delicious, proving that sometimes “mistakes” can yield beautiful results!
I always say that recipes are just a guide; feel free to explore flavors and find what feels right for you. Whether you choose to keep it straightforward or dance around with flavors, this salad will deliver satisfaction every time.
FAQs and Troubleshooting
Q: My cucumbers are still too salty, what can I do?
A: If your cucumbers are salty after using salt to draw moisture, rinse them under cold water before mixing in your dressing to tone down the saltiness.
Q: What if I don’t have Sriracha?
A: No worries! You can use any hot sauce or even crushed red pepper flakes for spiciness. Always taste as you go to find your ideal heat!
Q: Can I make this salad ahead of time?
A: It’s best enjoyed fresh, but you can certainly prepare the cucumbers and dressing in advance. Just combine them right before serving for optimal crunch!
Q: How long will leftovers last?
A: Enjoy your salad within 2-3 days for the best texture. After this time, the cucumbers may start to lose their crunch.
Nutritional Info
This Asian Spicy Cucumber Salad is not only tasty but also nutritious! Here’s a rough breakdown of the key nutrients per serving (based on 4 servings):
- Calories: 60 (without optional additions)
- Carbohydrates: 9g
- Fat: 4g (mostly from sesame oil)
- Protein: 1g
- Fiber: 1g
- Sugar: 3g
It’s low in calories, high in hydration, and thanks to the cucumbers, excellent for digestion. Plus, with the variety of flavors from the sauces and spices, you get a delightful experience without feeling heavy!
Final Thoughts
Creating this Asian Spicy Cucumber Salad is not just about the beautiful end product; it’s about the joy of combining fresh ingredients to forge connections and create happy memories. I’ve found that cooking is much like life—it’s all about finding balance, embracing flavors, and sharing with those you care about.
So whether you’re hosting a summer barbecue, enjoying a quiet evening, or needing a quick lunch fix, this salad embraces that warm hug of comfort food while keeping things refreshing and vibrant!
Try it out, make it yours, and remember to celebrate each bite! Happy cooking, my fellow foodies! 🍽️
Print
Asian Spicy Cucumber Salad
- Total Time: 15 minutes
- Yield: 4 servings 1x
- Diet: Vegetarian
Description
A light and refreshing cucumber salad with a spicy kick from Sriracha, perfect for summer gatherings.
Ingredients
- 2 large cucumbers
- 1 tablespoon salt
- 1 tablespoon sesame oil
- 2 tablespoons rice vinegar
- 1 tablespoon soy sauce
- 1 tablespoon Sriracha or chili garlic sauce
- 1 tablespoon sugar
- 2 green onions, chopped
- Sesame seeds for garnish
Instructions
- Prepare the cucumbers by slicing them. Cut into half-moon shapes or julienne strips.
- Salting the cucumbers: Place slices in a bowl, sprinkle with salt, toss gently, and let sit for 10-15 minutes.
- Make the dressing: In a separate bowl, whisk together sesame oil, rice vinegar, soy sauce, Sriracha, and sugar until dissolved.
- Combine and toss: Drain cucumbers and add back to the bowl. Pour dressing over and mix well.
- Garnish and serve: Sprinkle with green onions and sesame seeds before serving.
Notes
This salad is best enjoyed fresh but may be stored in the fridge for a short time.
- Prep Time: 15 minutes
- Cook Time: 0 minutes
- Category: Salad
- Method: Mixing
- Cuisine: Asian
Nutrition
- Serving Size: 1 serving
- Calories: 60
- Sugar: 3g
- Sodium: 400mg
- Fat: 4g
- Saturated Fat: 0.5g
- Unsaturated Fat: 3g
- Trans Fat: 0g
- Carbohydrates: 9g
- Fiber: 1g
- Protein: 1g
- Cholesterol: 0mg
Keywords: cucumber salad, spicy salad, refreshing salad, summer salad, Asian cuisine