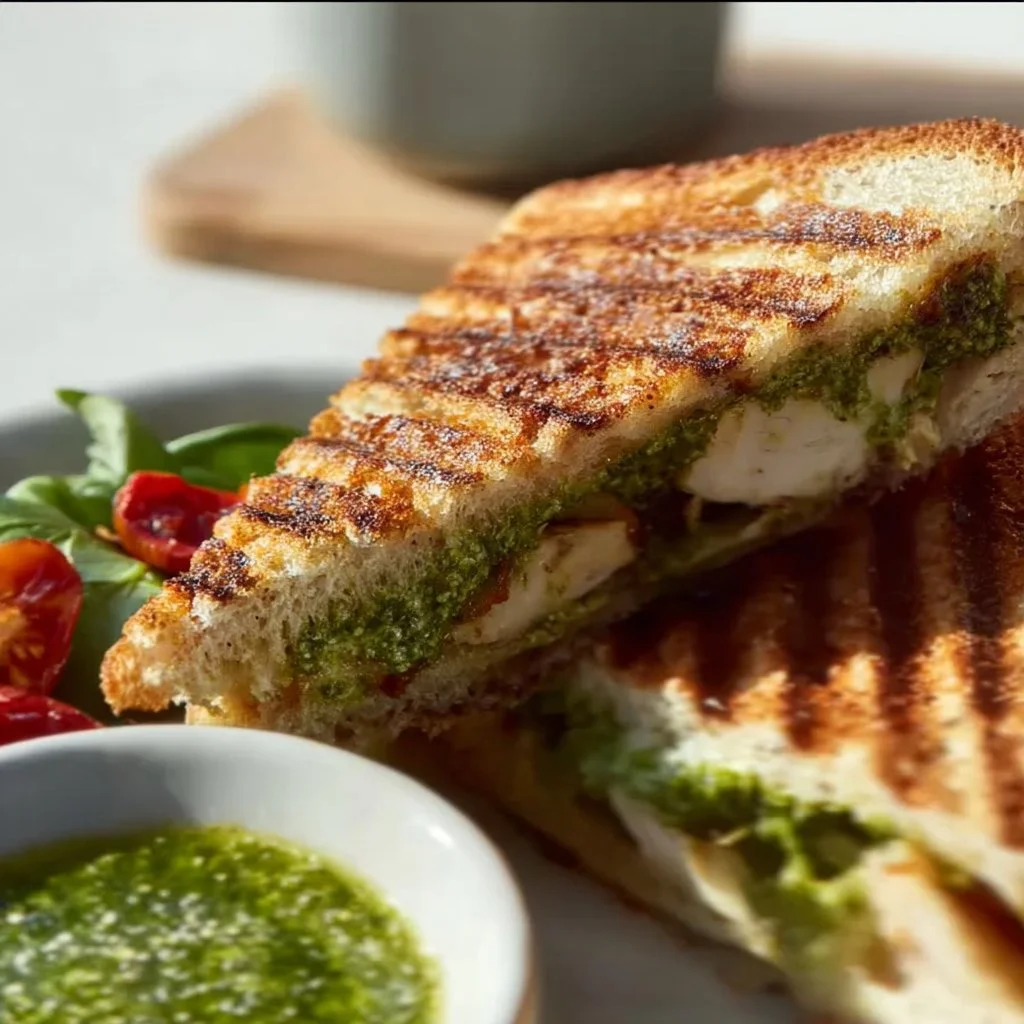
Loaded Chicken Pesto Panini
# Loaded Chicken Pesto Panini: A Slice of Flavor

## Introduction

Hey there, fellow food lovers! It’s Beau Collier, and today we're diving into a delicious recipe that’s sure to tickle your taste buds and warm your heart—my Loaded Chicken Pesto Panini! With just the right amount of crunch, creaminess, and zesty flavor, this panini is perfect for those days when you crave comfort food but still want to feel good about what you're eating.

When you think about a panini, what pops into your mind? For some, it might be a cozy café on a rainy afternoon; for others, maybe a nostalgic memory of family gatherings centered around kitchen creations. For me, it conjures up times spent in my childhood kitchen, where the air was always fragrant with herbs and spices, and anyone who walked through the door was treated to whatever was sizzling on the stove.

As with many of my recipes, this Loaded Chicken Pesto Panini was born out of a desire to share the love of good food that brings people together. It's the kind of dish that wraps you in a comforting embrace and makes you want to gather around the table with loved ones. Plus, it’s super customizable; you can toss in your favorite ingredients or leave out the ones you’re not a fan of. Make it your own! So grab your apron, and let’s get cooking!

---

## Personal Story

Growing up, my mom had this thing about sandwiches—she believed they were the ultimate way to bring a meal together. I remember her making sandwiches for childhood picnics, slapping together layers of whatever we had on hand and calling it 'an adventure in flavor.' One summer, we decided to host a little picnic in our backyard. My mom prepped her famous sandwiches using homemade pesto, which was legendary at our family gatherings.

As I took a bite, the combination of fresh basil, nutty flavors, and juicy fillings brought me back to sunny afternoons spent laughing and sharing stories. Fast-forward to now, and here I am, incorporating that same feeling of warmth and togetherness into this panini. It’s a recipe that honors those memories while still being flexible enough to evolve with the seasons and your own culinary journey.

---

## Ingredients

Now let’s get to the good stuff – here’s what you’ll need to whip up this delightful Loaded Chicken Pesto Panini!

- **1/4 cup extra virgin olive oil**: This liquid gold adds richness and a beautiful depth of flavor. If you're looking to make it a bit lighter, you can swap it out for avocado oil.

- **1/3 cup mixed nuts** (I love walnuts and pine nuts!): Nuts bring an earthy crunch to your pesto. You can replace them with sunflower seeds for a nut-free version!

- **1/2 tsp sea salt**: Essential for balancing flavors. Adjust based on your taste and dietary needs.

- **Juice of 1 lemon**: Brightness in a dish is key, and lemon juice elevates flavors. If you don't have lemon, vinegar can work in a pinch.

- **2 handfuls fresh basil leaves**: The star of the show! Fresh basil brings that aromatic punch. Swap it for spinach or arugula if you're in a pinch.

- **1 tbsp nutritional yeast**: This adds a cheesy flavor without dairy. You can leave it out if you prefer, or use grated Parmesan cheese for a more traditional taste.

- **1/2 tsp minced garlic**: Garlic is a flavor powerhouse. Use roasted garlic for a mellower touch, or omit it if you're not a fan.

- **1/4 tsp ground pepper**: Fresh cracked pepper enhances the dish with warmth. You may use a bit more if you like a spicy kick.

- **2 tbsp water**: This helps smooth out your pesto.

- **2 slices of your favorite bread** (I used Organic Rosemary Sourdough): Bread choice can make or break a panini. Any hearty bread will do, but try ciabatta or whole grain for fun variations!

- **1 tbsp ghee**: This adds a buttery flavor and helps with that glorious golden crust. Butter or olive oil can be used instead.

- **3 tbsp pesto**: You can use store-bought or homemade! Be adventurous—swap in sun-dried tomato pesto for an extra zing.

- **Calabrian peppers**: These are optional but add a delightful heat. Feel free to omit if heat isn’t for you!

- **1/2 avocado, thinly sliced**: Creamy goodness! You can substitute with hummus for a different texture.

- **1 jar marinated roasted sweet red peppers**: These bring a sweet and tangy flavor. If you don’t have them, fresh red bell peppers will work too!

- **2-4 slices cheese** (I went with goat cheese): For creaminess! Feta or provolone are also great here.

- **4 artichokes, quartered**: These provide a nice tangy bite. Canned or jarred works well if fresh isn’t available!

- **6 slices organic deli chicken**: A lean protein to fill you up. You can replace this with turkey or go vegetarian by adding mushrooms!

- **1 cup arugula**: For that peppery kick! Spinach or mixed greens can easily take its place.

- **Fresh cracked pepper**: To taste! It's all about those finishing touches.

- **Sea salt**: Again, adjust to taste.

---

## Step-by-Step Instructions

Alright, folks, now we’re ready to get cooking! Let’s create this panini in a few easy steps. Preheat that trusty panini press or skillet, and let’s do this.

1. **Make the Basil Pesto**: In a food processor, combine your walnuts, pine nuts, salt, lemon juice, basil leaves, nutritional yeast, garlic, and ground pepper. Blend until smooth. Drizzle in that olive oil while blending until it’s creamy. Add water as needed to get the right consistency. Feel free to taste and adjust the salt level. Chef Hack: If your pesto is too thick, a little extra water or oil can work wonders!

2. **Prep the Bread**: Spread the ghee evenly on one side of each slice of bread. This will help toast the bread beautifully and give it that golden-brown crunch we all love.

3. **Layer It Up**: Flip your slices over! Start by spreading 1.5 tablespoons of pesto onto each slice. Layer on the deli chicken, avocado slices, roasted red peppers, artichokes, and cheese. Top it off with a handful of arugula and a sprinkle of sea salt and pepper for that extra oomph.

4. **Press and Toast**: Place the other slice of bread on top (pesto side up!) and gently press down. If you're using a skillet, let it get nice and hot, then add the whole panini to toast both sides. Cook for about 3-4 minutes per side, or until golden and crispy. If using a panini press, follow the manufacturer's instructions for perfect results.

5. **Slice and Serve**: Once your panini is beautifully toasted and the cheese is wonderfully melty, remove it from the heat. Allow it to cool for a minute, then slice it in half. Nothing beats that satisfying crunch when you do!

---

## Serving Suggestions

Now that you’ve got your Loaded Chicken Pesto Panini looking scrumptious, let’s talk presentation. Serve it with a side of crispy sweet potato fries, a fresh salad, or even some crunchy pickles for that delightful contrast.

To elevate the experience, I like to drizzle a bit of balsamic glaze over the top for that added sweetness, or a sprinkle of fresh herbs to make it pop visually! Pair it with your favorite beverage—maybe a crisp white wine or a refreshing iced tea—and you’ve got yourself a meal that’s fantastic for lunch, dinner, or whenever the craving strikes.

---

## Recipe Variations

Feeling adventurous? Here are some ways to put your twist on this Loaded Chicken Pesto Panini:

1. **Mushroom Magic**: Swap out those slices of deli chicken for sautéed mushrooms for a savory vegetarian option. The umami flavor will blow your mind!

2. **Spiced Up**: Add roasted jalapeños along with your other toppings for a spicy kick. Spice lovers, this one's for you!

3. **Caprese Style**: Replace the chicken with mozzarella slices, tomatoes, and fresh basil for a classic Caprese twist.

4. **Mediterranean Flair**: Use feta cheese, olives, and artichokes with a spread of hummus instead of pesto for a unique medley of Mediterranean flavors.

5. **Breakfast Panini**: Add scrambled eggs and spinach for a great breakfast twist! Who says paninis can only be for lunch?

---

## Chef’s Notes

This Loaded Chicken Pesto Panini has evolved quite a bit over time. Initially, it was simple—the classic pesto, grilled chicken, and some cheese. But once I started playing with textures and flavors, it became a canvas for creativity!

I’ve had some kitchen flops too—like the time I didn’t realize my pesto had gone a bit off, and I awakened everyone’s taste buds to a disaster. Lesson learned: fresh ingredients are key! Over the years, I’ve come to appreciate the importance of incorporating seasonal produce, which adds an entirely new layer of flavor.

---

## FAQs and Troubleshooting

**1. My panini isn’t getting crispy enough; what do I do?**
If your panini isn’t crisping up, make sure your cooking surface is hot enough before you place your sandwich down. Additionally, if you’re using a skillet, weight it down with another pan to promote even cooking.

**2. Can I make this ahead of time?**
Absolutely! You can prep the ingredients and assemble it, then wrap it in foil and store it in the fridge. Just pop it onto the heat when you’re ready to enjoy.

**3. What if I don’t like basil? Is there an alternative?**
Not a fan of basil? No problem! Substitute with spinach or kale for a different kind of green flavor in your pesto.

**4. What else can I use instead of ghee?**
Ghee works great for that buttery taste and high smoke point; however, you can easily use butter or olive oil as a substitute based on your preference.

---

## Nutritional Info (if applicable)

A Loaded Chicken Pesto Panini serves as a balanced meal with healthy fats from the avocado and olive oil, lean protein from the chicken, and plenty of nutrients from all the fresh veggies. On average, each panini contains:

- Calories: Approximately 600-700 (depending on bread and cheese choice)
- Protein: Around 35g
- Carbohydrates: About 50g
- Fats: Approximately 30g

Keep in mind that nutritional values may vary based on the specific brands you use and any substitutions made.

---

## Final Thoughts

And there you have it—your very own Loaded Chicken Pesto Panini! This dish wraps up childhood memories, love for fresh ingredients, and a dash of creativity in one delicious sandwich. Whether you're making it for a cozy lunch date, a quick dinner fix, or just because it sounds too good to pass up, this panini won't disappoint.

Don't forget, cooking is about experimenting, so feel free to adjust, swap, and have fun along the way. Remember, every time you step into the kitchen, you’re creating new memories—just like I did back in my mom's kitchen. So grab those ingredients, unleash your inner chef, and let’s create a feast that warms hearts alongside our bellies. Until next time, happy cooking!

Loaded Chicken Pesto Panini
- Total Time: 25 minutes
- Yield: 2 servings 1x
- Diet: Gluten-Free, Dairy-Free (if using appropriate substitutes)
Description
A delightful panini packed with the flavors of homemade basil pesto, tender chicken, and fresh vegetables, perfect for a comforting meal.
Ingredients
Scale
- 1/4 cup extra virgin olive oil
- 1/3 cup mixed nuts (walnuts, pine nuts)
- 1/2 tsp sea salt
- Juice of 1 lemon
- 2 handfuls fresh basil leaves
- 1 tbsp nutritional yeast
- 1/2 tsp minced garlic
- 1/4 tsp ground pepper
- 2 tbsp water
- 2 slices of hearty bread (e.g., Organic Rosemary Sourdough)
- 1 tbsp ghee
- 3 tbsp pesto
- Calabrian peppers (optional)
- 1/2 avocado, thinly sliced
- 1 jar marinated roasted sweet red peppers
- 2–4 slices cheese (e.g., goat cheese)
- 4 artichokes, quartered
- 6 slices organic deli chicken
- 1 cup arugula
- Fresh cracked pepper to taste
- Sea salt to taste
Instructions
- Make the Basil Pesto: In a food processor, combine your walnuts, pine nuts, salt, lemon juice, basil leaves, nutritional yeast, garlic, and ground pepper. Blend until smooth. Drizzle in that olive oil while blending until it’s creamy. Add water as needed to get the right consistency. Taste and adjust the salt level.
- Prep the Bread: Spread the ghee evenly on one side of each slice of bread.
- Layer It Up: Flip your slices over and spread 1.5 tablespoons of pesto onto each slice. Layer on the deli chicken, avocado slices, roasted red peppers, artichokes, and cheese. Top with arugula and sprinkle sea salt and pepper.
- Press and Toast: Place the other slice of bread on top and gently press down. Cook in a hot skillet or panini press until golden and crispy, about 3-4 minutes per side.
- Slice and Serve: Once toasted and the cheese is melted, remove from heat, cool slightly, then slice in half.
Notes
Serve with sweet potato fries, salad, or pickles for contrast. Drizzle with balsamic glaze for added sweetness.
- Prep Time: 15 minutes
- Cook Time: 10 minutes
- Category: Sandwich
- Method: Grilling
- Cuisine: Italian
Nutrition
- Serving Size: 1 panini
- Calories: 650
- Sugar: 2g
- Sodium: 600mg
- Fat: 35g
- Saturated Fat: 10g
- Unsaturated Fat: 20g
- Trans Fat: 0g
- Carbohydrates: 50g
- Fiber: 5g
- Protein: 35g
- Cholesterol: 70mg
Keywords: panini, chicken, pesto, sandwich, Italian, quick meal
Japanese Egg Sandwich (Tamago Sando)
# Discovering the Joy of Tamago Sando: Japanese Egg Sandwich Magic
Hey there, food lovers! Today, we’re diving into a crowd-pleaser that has earned its rightful place in the hearts of many around the world: the Japanese egg sandwich, or **Tamago Sando**. If you’ve never had the pleasure of indulging in this fluffy and creamy delight, you’re in for a treat! Just imagine a perfectly seasoned egg filling nestled between slices of pillowy soft milk bread. Sounds tempting, right? So let’s not waste any time—grab your apron and let’s get cooking!
## A Slice of Nostalgia
Let me take you back to my first encounter with Tamago Sando. Picture this: I was exploring the bustling streets of Tokyo, surrounded by vibrant neon lights, delicious scents wafting from every corner, and the hum of excited chatter. I stumbled upon a tiny corner shop, almost hidden from sight, with a line of locals eagerly waiting outside. Intrigued, I decided to join the queue.
Once I reached the counter, the friendly owner handed me a freshly wrapped Tamago Sando. My first bite was magical—the creaminess of the egg filling complemented by the subtle sweetness of the mayo and the fluffy texture of the milk bread was pure bliss. In that moment, I understood why this humble sandwich has captured the hearts of many. It was like a cozy hug in sandwich form, and I knew then that I wanted to recreate this comforting delight in my own kitchen.
That experience not only sparked my love for Japanese cuisine but also inspired me to share this enchanting dish with you. So, are you ready to bring a little bit of that Tokyo magic into your own kitchen? Let’s go!
## Ingredients
Here’s what you’ll need to make the perfect Tamago Sando:
### For the Filling
- **6 large Pete and Gerry’s Organic Eggs**
These eggs are not only rich in flavor but also come from birds raised in humane conditions. For a plant-based version, you can substitute with scrambled tofu.
- **1/4 teaspoon sugar**
This adds a subtle sweetness that balances out the savory aspects of the dish. If you prefer less sweetness, feel free to skip it!
- **1/4 teaspoon salt**
Essential for bringing out the flavors. Sea salt works wonders, but regular table salt will do just fine.
- **1/4 teaspoon ground black pepper**
A pinch of this adds depth to your egg filling. You can use white pepper for a milder flavor if preferred.
- **1 to 2 teaspoons milk (or plant milk - Optional)**
This makes the egg filling creamier. Dairy or plant-based milk like almond or oat milk works well!
- **4 tablespoons Japanese mayonnaise**
A key ingredient that gives Tamago Sando its signature taste! If you’re in a pinch, regular mayo will suffice, but it might not have that delightful umami kick.
### For Assembly
- **4 slices Japanese milk bread**
This bread is super soft and slightly sweet, making it the perfect vessel for our egg filling. Don’t worry if you can’t find it; use a soft white bread instead!
- **2 tablespoons unsalted butter (softened)**
For that perfect toasty exterior! You can swap this for olive oil if you're looking for a dairy-free option.
- **Chives (sliced - for garnish, Optional)**
A sprinkle of chives adds freshness and a pop of color. Feel free to use scallions or leave them out altogether!
## Step-by-Step Instructions
Now that we’ve gathered our ingredients, let’s put this Tamago Sando together. Ready? Here we go!
### Step 1: Perfectly Boil Your Eggs
Start by placing your eggs in a medium saucepan and covering them with cold water. Bring the water to a rapid boil over medium heat. Once boiling, cover the pot with a lid and turn off the heat. Let the eggs sit for 9-12 minutes depending on how firm you like your yolks.
#### Chef Hack:
If you’re aiming for that perfect, creamy yolk that’s not too dry, shoot for the 10-minute mark. Trust me; it’s magic!
### Step 2: Ice Bath Time!
As soon as your eggs are done sitting, transfer them to a bowl of ice water to cool. This stops the cooking process and makes peeling easier.
### Step 3: Peel and Chop
Once cool, gently tap your eggs on the counter to crack the shell and peel under running water to help remove the shell. After peeling, chop the eggs into small pieces.
### Step 4: Mix the Filling
In a medium bowl, combine the chopped eggs, sugar, salt, pepper, milk, and Japanese mayonnaise. Mix gently until creamy and well-combined. We want the eggs to be fluffy, so don’t overmix!
#### Chef Insight:
Using a fork to mix allows you to maintain a nice texture without turning it into a paste. The goal is to have soft chunks of egg peeking out!
### Step 5: Toast Your Bread
Lightly butter one side of each slice of Japanese milk bread. Heat a pan over medium heat and toast the bread, butter side down, until perfectly golden brown. Remove the bread from the heat and let it cool slightly.
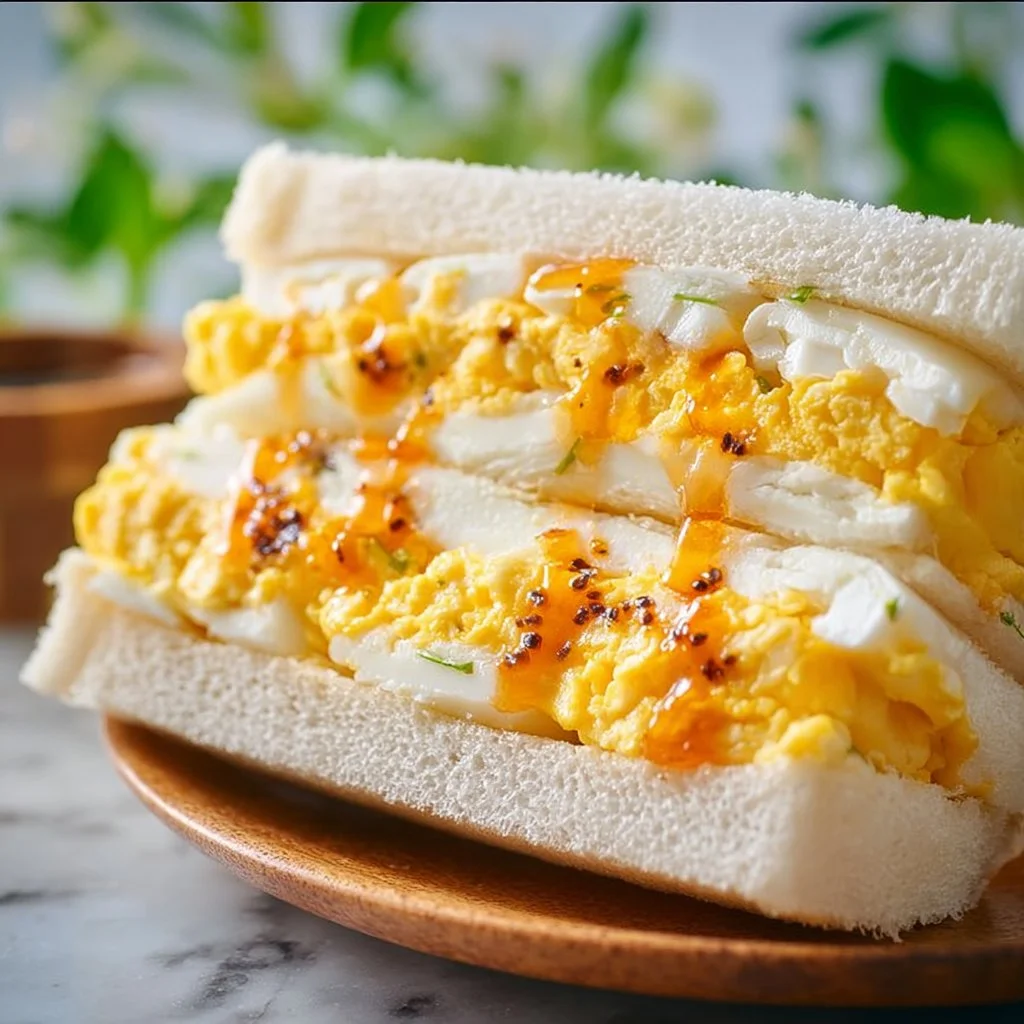
### Step 6: Assemble Your Sandwich
Spread a generous amount of the egg filling on the unbuttered side of one slice of bread, then top it with another slice, butter side up. Gently press down to help everything stick together.
### Step 7: Slice and Serve
Slice your sandwich into quarters or halves—whatever shape makes your heart happy! If desired, garnish with sliced chives for a lovely presentation.
#### Chef Tip:
To keep that pristine sandwich look, use a sharp knife and make clean, swift cuts. You’ll impress your friends with your professional slicing skills!
## Serving Suggestions
What’s a sandwich without a little style, right? Serve your Tamago Sando with a side of lightly pickled cucumbers or a small salad for a refreshing crunch. If you’re feeling fancy, you can even present it with some sweet potato fries or homemade potato chips for extra fun!
### Pro Tip:
Wrap your sandwich tightly in parchment paper or wax paper for a rustic, café-style presentation. It also helps keep everything secure while you indulge!
## Recipe Variations
Here are a few creative twists and flavor options to keep your Tamago Sando exciting:
1. **Avocado Twist**: Mash half an avocado and fold it into your egg filling for a creamy texture with a hint of earthiness.
2. **Spicy Kick**: Add a dash of sriracha or a sprinkle of red pepper flakes to your egg mixture. Perfect for those who love a bit of heat!
3. **Herb Infusion**: Mix in finely chopped fresh herbs like dill or parsley to the egg filling for a refreshing twist.
4. **Sweet-Style**: Swap out the egg for a sweetened banana filling mixed with cream cheese for a dessert-style sandwich.
5. **Protein Boost**: Mix in some finely diced cooked ham or bacon bits for an extra protein punch—delicious and hearty!
## Chef’s Notes
Ah, Tamago Sando has a special place in my heart! Over the years, I’ve modified the recipe to suit my taste and the ingredients readily available at my local market. Often, I reminisce about that quaint little shop in Tokyo—what I wouldn’t give to teleport for a mini lunch date there! Sometimes, I even make a sweetened version for breakfast, adding a hint of cinnamon to the egg mixture; it’s a delightful treat you wouldn’t want to miss.
Remember, cooking is all about experimentation and personalization. Don’t hesitate to put your spin on it!
## FAQs and Troubleshooting
### 1. **What if my eggs are hard to peel?**
This can happen if they’re not fresh. Next time, try using eggs that are a few days old for easier peeling!
### 2. **Can I make this sandwich ahead of time?**
Absolutely! Just store the egg mixture in an airtight container and keep the bread separate until you’re ready to serve to avoid sogginess.
### 3. **Why does my sandwich look flat?**
If your sandwich becomes flat, it may be from too much filling. Try reducing the egg mixture or using thicker bread!
### 4. **Can I use regular mayo instead of Japanese mayo?**
While traditional Japanese mayo adds a unique flavor, regular mayo will work! Just add a few drops of rice vinegar for an extra kick.
## Nutritional Info
While every sandwich can differ in nutrition based on ingredients and portions, here’s a rough estimate of the nutritional value for one Tamago Sando, assuming standard ingredients and serving sizes:
- **Calories**: Approximately 350 calories
- **Protein**: 16 grams
- **Fat**: 24 grams
- **Carbohydrates**: 24 grams
- **Fiber**: 2 grams
- **Sugar**: 2 grams
Tamago Sando is a great option for a satisfying lunch or snack, loaded with protein and deliciousness!
## Final Thoughts
And there you have it, my food-loving friends! A delightful journey into the world of Tamago Sando. Whether you choose to follow my recipe to the letter or put your own unique spin on it, I promise this sandwich will warm your heart just like it did for me on that fateful day in Tokyo. Food is all about sharing experiences and creating memories, and I hope this dish adds a little warmth to your kitchen. So go on, gather your ingredients, and get ready to enjoy this cozy comfort food that’s become a favorite in my home.
Happy cooking, and catch you next time on Feastical!

Tamago Sando: Japanese Egg Sandwich
- Total Time: 30 minutes
- Yield: 2 servings 1x
- Diet: Vegetarian
Description
A fluffy and creamy Japanese egg sandwich featuring perfectly seasoned egg filling nestled between slices of soft milk bread.
Ingredients
Scale
- 6 large Pete and Gerry’s Organic Eggs
- 1/4 teaspoon sugar
- 1/4 teaspoon salt
- 1/4 teaspoon ground black pepper
- 1 to 2 teaspoons milk (or plant milk – Optional)
- 4 tablespoons Japanese mayonnaise
- 4 slices Japanese milk bread
- 2 tablespoons unsalted butter (softened)
- Chives (sliced – for garnish, Optional)
Instructions
- Start by placing your eggs in a medium saucepan and covering them with cold water. Bring the water to a rapid boil over medium heat.
- Once boiling, cover the pot with a lid and turn off the heat. Let the eggs sit for 9-12 minutes.
- As soon as your eggs are done sitting, transfer them to a bowl of ice water to cool.
- Once cool, gently tap your eggs on the counter to crack the shell and peel under running water.
- In a medium bowl, combine the chopped eggs, sugar, salt, pepper, milk, and Japanese mayonnaise. Mix gently until creamy.
- Lightly butter one side of each slice of Japanese milk bread.
- Heat a pan over medium heat and toast the bread, butter side down, until perfectly golden brown.
- Spread a generous amount of the egg filling on the unbuttered side of one slice of bread, then top with another slice, butter side up.
- Slice your sandwich into quarters or halves and garnish with sliced chives if desired.
Notes
For a twist, add mashed avocado, sriracha, or fresh herbs to the egg mixture. Can be made ahead of time!
- Prep Time: 15 minutes
- Cook Time: 15 minutes
- Category: Sandwich
- Method: Boiling & Toasting
- Cuisine: Japanese
Nutrition
- Serving Size: 1 sandwich
- Calories: 350
- Sugar: 2g
- Sodium: 500mg
- Fat: 24g
- Saturated Fat: 10g
- Unsaturated Fat: 10g
- Trans Fat: 0g
- Carbohydrates: 24g
- Fiber: 2g
- Protein: 16g
- Cholesterol: 370mg
Keywords: Japanese egg sandwich, Tamago Sando, comfort food, easy lunch, vegetarian sandwich