
Your New Favorite Loaf: The Soft Sourdough Sandwich Bread of Your Dreams
Hey friends, Beau here! Let’s have a little heart-to-heart about bread. I’m talking about the kind of bread that makes your kitchen smell like a cozy bakery on a Saturday morning. The kind that’s so soft and pillowy you can’t resist tearing off a warm, steamy chunk the second it’s out of the oven. You might be thinking, “Beau, that sounds amazing, but sourdough? That’s for the pros with their fancy starters and perfect, crusty boules.”
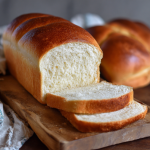
Well, I’m here to tell you that this sourdough sandwich bread is a whole different beast. It’s your gateway to the world of natural fermentation, but in the most approachable, forgiving, and downright delicious way possible. This isn’t a crusty, hole-riddled artisan loaf (though I love those, too!). This is the fluffy, buttery, slightly sweet sandwich bread you grew up loving, but with the incredible depth of flavor that only a sourdough starter can provide. It’s a game-changer for your toast, your PB&J, and your turkey club. It’s the loaf that will make you feel like a kitchen wizard, and I am so excited to guide you through it. So, tie on your apron, grab your bubbly starter, and let’s bake some bread that tastes like a warm hug.
The Loaf That Started It All: A Nod to Nana’s Kitchen
This recipe takes me right back to my grandmother’s linoleum-floored kitchen. Nana Collier was a no-nonsise woman who could make a feast out of what seemed like thin air. She didn’t have a fancy “sourdough starter” living in a jar on her counter; she had what she called her “ferment,” a simple mix of flour and water that she’d use to make the most incredible, soft sandwich bread. I remember watching her gnarled, flour-dusted hands work the dough, feeling the rhythm of her kneading. She never used a timer; she’d just press a finger into the dough and just *know* it was ready. The smell of that bread baking was the smell of love, of patience, of a home well-lived in.
My version is a slight homage to hers, updated with a little more precision (and a stand mixer, God bless it) but with the same soul. It’s that feeling of creating something timeless and fundamental that I want to share with you. Every time I bake this bread, I feel that connection, that thread of culinary love passed down through generations. It’s more than flour and water; it’s a story in every slice.
Gathering Your Ingredients: The Dream Team for a Perfect Loaf
Here’s the all-star cast that’s going to come together to create your new favorite bread. Using quality ingredients here makes a real difference, so let’s break it down.
- 1 stick (113g) butter, softened – This is our secret weapon for a soft, tender crumb and that rich, buttery flavor. Using it softened, not melted, helps it incorporate evenly into the dough. Chef’s Tip: For a dairy-free version, a neutral oil like avocado or a vegan butter works beautifully.
- 2 tablespoons honey – Honey adds a subtle, floral sweetness that balances the tang of the sourdough. It also gives the yeasties in your starter a little extra food to get them excited! Substitution: Maple syrup or agave nectar are fantastic alternatives.
- 1 tablespoon salt – Don’t be shy with the salt! It’s crucial for flavor and for strengthening the gluten structure. I prefer fine sea salt for its pure, clean taste.
- 1 cup (227g) active, bubbly sourdough starter – This is the heart of the operation! Make sure your starter is “active” – meaning it’s been fed 4-8 hours prior and has doubled in size, is full of bubbles, and has a pleasantly sour aroma. If it’s fallen and liquidy (hooch on top), it’s past its peak. Stir it in, give it a fresh feed, and wait for those bubbles!
- 2 ½ cups warm water – The warmth helps wake up the wild yeast. Think baby-bottle warm, not hot. Too hot, and you’ll harm your starter. A good test is that it should feel warm on your wrist, not sting.
- 8 cups all-purpose flour – I use good old, reliable all-purpose flour for this loaf. It gives us that classic, soft sandwich bread texture. Chef’s Insight: You can substitute up to 2 cups with whole wheat flour for a heartier flavor and more fiber, but be prepared to add a touch more water as whole wheat is thirstier.
Let’s Get Baking: The Step-by-Step Magic
Okay, team, this is where the fun begins. I’ll walk you through every step. Remember, bread baking is a feel, not just a formula. Trust your instincts!
- The Mix-Up. In the bowl of your stand mixer fitted with the dough hook, add the softened butter, honey, salt, active starter, and warm water. Give it a quick stir with a spatula just to combine. Now, add the flour last. Chef’s Hack: I like to hold back half a cup of flour at first. Different flours and humidities absorb liquid differently. You can always add more in, but you can’t take it out! Start mixing on low speed until a shaggy dough forms.
- The Knead for Speed. Once the flour is incorporated, crank that mixer up to medium speed and let it knead for a solid 8-10 minutes. You’re looking for the dough to become smooth, elastic, and to pull away cleanly from the sides of the bowl. It might still stick a little to the bottom—that’s okay! If it seems excessively sticky after 5 minutes, add that reserved flour a tablespoon at a time. My Commentary: This is a great time to put on some music and just watch the gluten develop. You’ll see the dough transform from a shaggy mess into a smooth, supple ball.
- The Long, Slow Rise (Bulk Fermentation). This is the secret to incredible flavor. Lightly oil a large bowl, place your beautiful dough ball inside, and turn it over to coat. Cover the bowl with a damp kitchen towel or plastic wrap. Now, find a warm, draft-free spot in your kitchen and let it rise for 10-12 hours. Overnight is perfect. Chef’s Tip: Don’t look for it to double or triple like commercial yeast bread. It will rise, but the magic is happening on a microscopic level as the wild yeast and bacteria work their slow, flavorful fermentation.
- Shaping Your Loaves. The next morning, your dough should look puffy and alive. Lightly flour your counter and gently turn the dough out. We don’t want to punch it down aggressively—just a gentle deflation. Divide the dough into two equal parts. Take one piece and flatten it into a rough rectangle, about 9×12 inches. Now, starting from a short end, roll it up tightly, like a jelly roll, pinching the seam closed as you go. Pinch the final seam and tuck the ends under. This creates surface tension for a beautiful rise in the pan.
- The Final Proof. Place your shaped loaves into two parchment-lined loaf pans. Cover them lightly with that damp towel again. Now, let them rise for another 2-4 hours. They’re ready when the dough has crested about 1-2 inches above the rim of the pan. It should hold a gentle indent when you poke it softly. This second rise is where you see the real volume develop.
- Bake to Golden Perfection. While the loaves are proofing, preheat your oven to 375°F (190°C). Once ready, slide those pans into the oven and bake for 45 minutes. You’ll know it’s done when the top is a deep, golden brown and the loaf sounds hollow when you tap the bottom. Pro Tip: For an extra-soft crust, brush the top with a little melted butter as soon as it comes out of the oven.
- The Hardest Part: Waiting. I know, I know. You want to dive in. But you must let the loaves cool in their pans for about 10 minutes, then turn them out onto a wire rack to cool completely. Slicing into warm bread is tempting, but it will be gummy! The structure is still setting. I promise, the wait is worth it.
Sharing the Love: How to Serve Your Masterpiece
Now for the best part—eating it! This bread is the ultimate all-rounder. For the perfect slice, use a serrated bread knife and a gentle sawing motion.
For breakfast, it makes the most incredible toast. It gets crispy on the outside but stays miraculously soft on the inside. Slather it with good butter and your favorite jam. For lunch, it’s the undisputed champion of the sandwich world. It’s sturdy enough to hold a mountain of turkey, avocado, and sprouts without falling apart, but soft enough not to scrape the roof of your mouth. And for a simple snack, there’s nothing better than a thick slice with a drizzle of honey or a smear of almond butter. Honestly, sometimes I just stand over the cutting board and tear into it, savoring the simple, wholesome flavor.
Make It Your Own: Delicious Recipe Twists
Once you’ve mastered the basic loaf, the fun really begins. Here are a few of my favorite ways to mix it up:
- Everything Bagel Loaf: Before the final proof, brush the top of the loaf with an egg wash (1 egg + 1 tbsp water) and sprinkle generously with everything bagel seasoning. Savory, seedy, and absolutely addictive.
- Honey Whole Wheat: Substitute 2 cups of the all-purpose flour with whole wheat flour. You’ll get a heartier, nuttier loaf that’s fantastic for breakfast.
- Herb & Garlic Swirl: Mix 2 tablespoons of softened butter with 1 minced garlic clove and a tablespoon of your favorite chopped herbs (rosemary and thyme are classic). After flattening the dough for shaping, spread the herb butter mixture evenly over the rectangle before rolling it up. You’ll get a gorgeous, flavorful swirl in every slice.
- Cinnamon Raisin: A family favorite! During the kneading process, add 1 tablespoon of cinnamon and 1 cup of raisins (soak them in warm water for 10 minutes first to plump them up). It’s like dessert for breakfast.
- Vegan Version: It’s easy! Simply swap the butter for an equal amount of vegan butter or coconut oil, and use maple syrup instead of honey. The result is just as soft and delicious.
Beau’s Kitchen Chronicles: A Few Parting Thoughts
This recipe has been a living, breathing thing in my kitchen for years. It’s evolved from a dense brick (my first attempt was… educational) to the fluffy cloud it is today. The biggest lesson I’ve learned? Temperature is your secret weapon. In the winter, my kitchen is cold, and my rise times can stretch to 14 hours. In the summer, it might be ready in 8. Don’t be a slave to the clock; watch the dough, not the timer. And one funny story: I once forgot the salt. Just completely spaced it. The resulting loaf was bland, pale, and weirdly tough. A total facepalm moment! So, learn from my mistake—salt is non-negotiable, friends.
Your Questions, Answered: Sourdough Sandwich Bread FAQ
I’ve gotten a lot of questions about this loaf over the years. Here are the most common ones to help you troubleshoot!
Q: My bread is too dense. What happened?
A: This is usually one of three things: 1) Your starter wasn’t active and bubbly enough. Always do the float test (drop a teaspoon of starter in a glass of water; if it floats, it’s ready!). 2) You killed the yeast with water that was too hot. 3) You didn’t let it proof long enough. Be patient and wait for that dough to rise properly.
Q: Can I make this by hand without a stand mixer?
A: Absolutely! It’s a great arm workout. Mix everything in a large bowl with a wooden spoon until it comes together, then turn it out onto a floured surface and knead by hand for 12-15 minutes, until smooth and elastic.
Q: The dough is too sticky to handle! Help!
A: Don’t panic! Wet or oil your hands instead of adding more flour. Adding too much flour is a common mistake that leads to a dry loaf. The dough should be tacky, but not unmanageably sticky. If it’s truly a mess, sprinkle a *little* flour on while kneading.
Q: My kitchen is cold. How can I help it rise?
A: I love this hack! Turn your oven on to the “warm” setting for just one minute, then turn it OFF. Place the covered bowl of dough inside the warm (not hot!) oven. It creates the perfect little proofing box.
Soft Sourdough Sandwich Bread : Fluffy, Buttery, and Naturally Leavened
Description
Soft Sourdough Sandwich Bread
Fluffy, tender, and naturally fermented—your new favorite loaf!
Ingredients
-
1 stick (113g) unsalted butter, softened (or neutral oil/vegan butter)
-
2 tbsp honey (or maple syrup/agave)
-
1 tbsp salt
-
1 cup (227g) active, bubbly sourdough starter
-
2 ½ cups warm water (baby-bottle warm, ~95°F / 35°C)
-
8 cups all-purpose flour (swap up to 2 cups for whole wheat; adjust water if needed)
Optional Flavor Twists:
-
Everything Bagel Loaf: Egg wash + everything bagel seasoning
-
Honey Whole Wheat: 2 cups whole wheat flour
-
Herb & Garlic Swirl: Softened butter + garlic + herbs
-
Cinnamon Raisin: 1 tbsp cinnamon + 1 cup soaked raisins
-
Vegan Version: Vegan butter + maple syrup
Instructions
-
Mix Ingredients:
-
In stand mixer bowl (dough hook), combine butter, honey, salt, starter, and warm water. Stir to combine. Add 7 ½ cups flour, reserving ½ cup. Mix on low until shaggy dough forms.
-
-
Knead Dough:
-
Knead on medium for 8–10 min until smooth, elastic, and pulling from sides. Add reserved flour 1 tbsp at a time if excessively sticky.
-
-
Bulk Fermentation (First Rise):
-
Lightly oil a large bowl, place dough inside, turn to coat, cover with damp towel or plastic wrap. Let rise 10–12 hours at room temp (overnight).
-
-
Shape Loaves:
-
Gently turn out dough onto floured surface. Divide in two. Flatten each piece into ~9×12 inch rectangle. Roll from short end, pinching seam and tucking ends under.
-
-
Final Proof:
-
Place loaves in parchment-lined pans, cover lightly. Rise 2–4 hours until dough crests 1–2 inches above pan and gently springs back when poked.
-
-
Bake:
-
Preheat oven to 375°F (190°C). Bake 45 min until golden and hollow-sounding when tapped. Optional: brush tops with melted butter for extra softness.
-
-
Cool:
-
Let loaves cool in pans 10 min, then turn out onto wire rack. Cool completely before slicing to avoid gummy texture.
-
Notes
-
Dense bread? Ensure starter is active, water isn’t too hot, and proof dough fully.
-
No stand mixer? Knead by hand 12–15 min until smooth and elastic.
-
Sticky dough? Wet or oil hands; avoid adding too much flour.
-
Cold kitchen? Warm oven for 1 min, turn off, place covered dough inside to proof.
Breaking It Down: A Peek at the Nutrition
Now, I’m all about feel-good food, and that includes knowing what’s going into your body. This bread is a wholesome, real-food alternative to store-bought versions that are often packed with preservatives. Here’s a rough nutritional breakdown per slice (assuming about 20 slices per loaf). Remember, this is an estimate and can vary based on your exact ingredients.
Per Slice (approx.):
Calories: ~180 | Protein: 5g | Carbohydrates: 28g | Fat: 5g | Fiber: 1g | Sugar: 2g
The natural fermentation process in sourdough can help pre-digest some of the starches and may make the bread easier on the digestive system for some people. Plus, you control the sugar and salt, making it a truly wholesome choice for your family.
Final Thoughts: You’ve Got This!
Well, my friend, we’ve reached the end of our bread-baking journey together. I hope you feel empowered and excited to bake this soft sourdough sandwich bread. Remember, every loaf is a learning experience. Don’t get discouraged if it’s not perfect the first time. The simple act of mixing flour and water and transforming it into a nourishing, delicious loaf is a small miracle in itself.
This bread is more than just food; it’s a connection to tradition, a lesson in patience, and a truly satisfying creation. So, go forth and bake! Fill your home with that incredible aroma, and share the love, one warm, buttery slice at a time. I can’t wait to hear how it turns out. Tag me on social with #Feastical so I can see your beautiful bakes!
Until next time, keep it simple, soulful, and satisfying.
– Beau