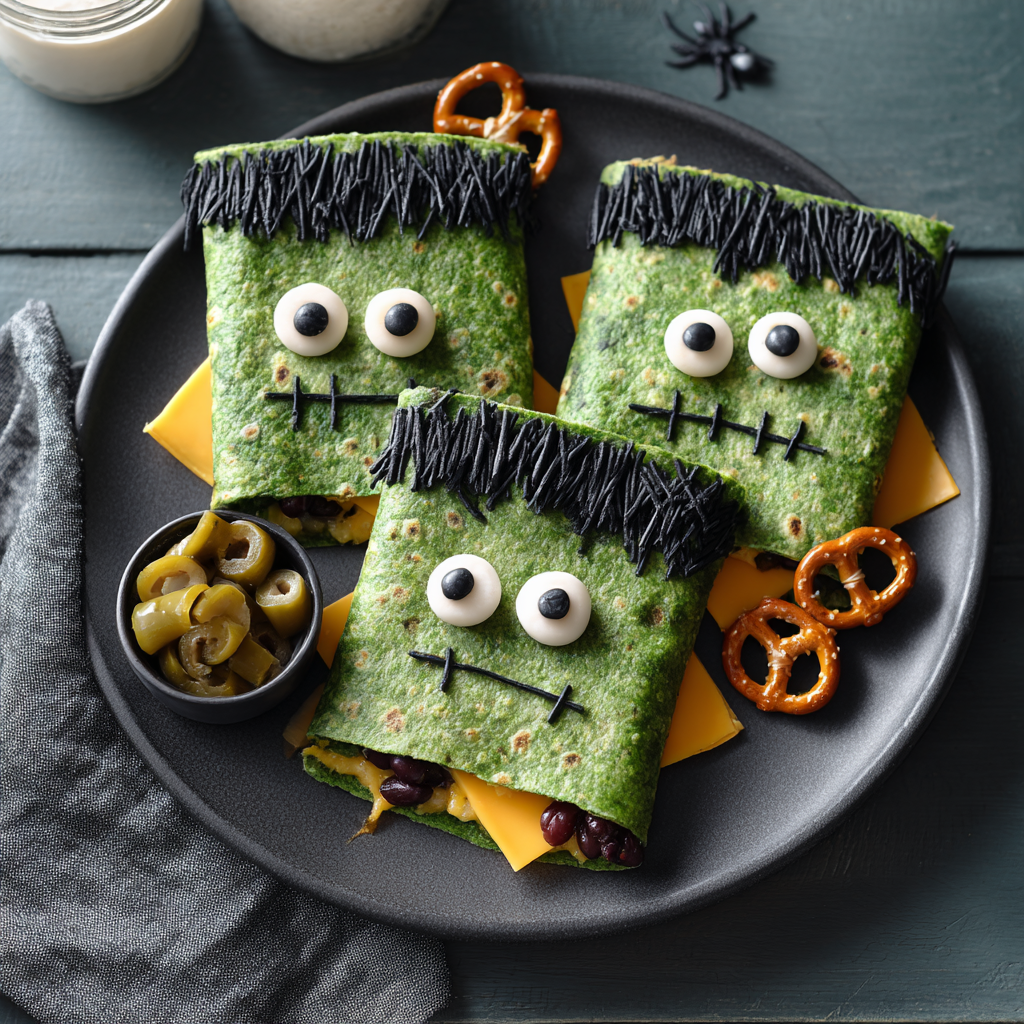
It’s Alive! Introducing the Frankenstein Quesadilla
Hey there, Feastical family! Beau here, coming at you from a kitchen that’s seen more than its fair share of… well, experiments. Some glorious, some not-so-much (we don’t talk about The Great Cupcake Flood of ‘18). But today, we’re whipping up something that’s an absolute monster hit – and I mean that in the best way possible. We’re making Frankenstein Quesadillas!
Now, I know what you might be thinking. “Beau, quesadillas are for Tuesday nights, not for Halloween.” And to that I say, why can’t Tuesday night be Halloween? Life’s too short for boring food, especially when you have little monsters of your own running around the house, begging for something fun to eat. This recipe is the perfect solution. It’s a quick, easy, and downright hilarious way to turn a simple lunch or snack into a spooky celebration. They’re packed with gooey cheese and protein-rich beans, so they’re secretly wholesome, but the green tortillas and silly olive faces make them an instant kid-magnet. The best part? You don’t need a culinary degree or a lab full of mysterious equipment. Just a skillet, a few simple ingredients, and a willingness to play with your food. So, grab your favorite spatula (let’s hope you can find it!) and let’s create a meal that’s so fun, it’s scary. Well, almost.
The Monster Mash in My Kitchen
This recipe always takes me back to my nephew Leo’s first “real” Halloween. He was about four, and he was absolutely obsessed with monsters—but only the friendly, funny-looking ones. His favorite was, you guessed it, Frankenstein’s monster. That year, I offered to handle lunch for my sister and her little crew of pint-sized ghosts and goblins. I wanted to make something that would make them giggle, something that felt like part of the party. I stared into the fridge, saw tortillas, cheese, and a bag of spinach, and a mad scientist idea was born. I blitzed that spinach into a puree, slathered it on a tortilla to make it green, and threw together a quesadilla. A few olive slices and a dollop of sour cream later, and a monster stared back at me from the plate. When Leo saw it, his eyes got huge. He pointed a tiny, chocolate-stained finger and yelled, “FRANKEN-YINE!” before devouring the entire thing. The sound of those kids laughing and chomping down on their “monster heads” was better than any treat. It was a reminder that the best meals aren’t always the fanciest; they’re the ones made with a pinch of creativity and a whole lot of love.
Gathering Your Monster-Making Supplies
The beauty of this recipe is its simplicity. You probably have most of this hanging out in your fridge and pantry right now! Here’s what you’ll need to bring your culinary creature to life.
- 4 Spinach Tortillas: These are the foundation of our monster’s iconic green complexion. No spinach tortillas? No problem! You can easily make your own by blending a handful of fresh spinach with a teaspoon of water and brushing it onto regular tortillas. Whole wheat or gluten-free tortillas work great here too.
- 1 Cup Shredded Cheddar or Mexican Blend Cheese: The “glue” that holds our monster together and gives us that epic, gooey cheese pull. I’m a fan of a good Mexican blend for a little extra flavor kick, but sharp cheddar is a classic for a reason. For a healthier twist, low-fat cheese works perfectly.
- 1/2 Cup Black Beans (or Refried Beans): This is our secret weapon for adding protein and making these quesadillas actually filling. I like using whole black beans for a bit of texture, but smooth, creamy refried beans are an awesome alternative, especially for younger kids. Pinto beans work too!
- 1/4 Cup Sliced Black Olives: These aren’t just a garnish; they’re the star of the show! We use them for the spiky hair and the eyes. Their salty, briny flavor is the perfect contrast to the rich cheese and beans.
- 1/4 Cup Sour Cream: The perfect canvas for our monster’s scars and stitches. If you’re not a sour cream fan, Greek yogurt is a fantastic, protein-packed substitute. For a dairy-free version, a thinned-out guacamole or vegan sour cream will do the trick.
- 4-6 Pretzel Sticks: The all-important “neck bolts.” This is optional, but it’s the detail that really sells the Frankenstein vibe. If you don’t have pretzel sticks, you can use broken pieces of spaghetti or even slim breadsticks.
Building Your Edible Monster: A Step-by-Step Guide
Alright, team! Let’s fire up the skillet and get creating. This process is half cooking, half arts and crafts, and I’m here for it.
Step 1: The Assembly Line
Lay two of your green spinach tortillas flat on your cutting board. This is your monster’s foundation. Sprinkle a layer of cheese on each one, but leave about a half-inch border around the edge. This prevents the cheesy lava from erupting out the sides when it melts. Next, spoon your beans evenly over the cheese. If you’re using whole black beans, I like to give them a gentle mash with a fork first—it helps everything stick together. Now, top each with another spinach tortilla, pressing down gently to create your quesadilla “sandwiches.”
Step 2: The Transformation (Aka Cooking!)
Heat a large, non-stick skillet or griddle over medium heat. No need for oil or butter if your skillet is non-stick; the natural fats in the cheese will do the work for you. Carefully place one quesadilla in the pan. Now, the chef’s key to a perfectly crispy, non-soggy quesadilla? DON’T PEEK for a full 2-3 minutes. Let that heat work its magic. You’ll know it’s ready to flip when the bottom is golden brown with a few darker spots and the cheese on the bottom layer is visibly melted. Use a large spatula to confidently flip it over. It’s a bit of a wrist action, but you’ve got this! Cook for another 2-3 minutes on the second side until equally golden and delightfully crispy. Repeat with the second quesadilla.
Step 3: The Signature Shape
Move your cooked quesadillas back to the cutting board and let them cool for just a minute. This is crucial—if you cut into them while they’re nuclear hot, all the filling will ooze out. Using a sharp knife or a pizza cutter, slice each quesadilla into a rectangle shape. I usually just trim off the rounded edges to create a classic, boxy Frankenstein head. (P.S. Don’t you dare throw those trimmings away! That’s the cook’s treat. Dip them in the leftover sour cream.)
Step 4: Bring Him to Life! (The Decorating Stage)
This is where the fun really begins. Let the kids take the lead here!
- Hair: Press sliced black olives along the top edge to create his iconic spiky, crazy hair.
- Eyes: Use two olive slices or whole black beans for the eyes.
- Scars & Stitches: Spoon your sour cream into a small plastic baggie, snip a tiny corner off, and pipe it on to create scars, a mouth, and those iconic forehead stitches. If you have a piping tip, even better!
- Neck Bolts: Gently press two pretzel sticks into the sides of the rectangle for the final, electrifying touch.
And just like that… IT’S ALIVE!
How to Serve Your Masterpiece
Presentation is everything with a dish this fun! Serve your Frankenstein Quesadillas right on the cutting board for a rustic, family-style feel, or plate them individually. I love putting each one on a dark-colored plate—it makes the green tortilla and white sour cream really pop. A little bowl of salsa for “blood” dip or a side of guacamole “monster snot” (kids love gross names!) on the side makes for a complete and hilarious meal. Pair it with a simple side of “witch’s finger” carrot sticks or apple slices for a balanced spooky spread.
Monster Mash-Ups: Creative Twists
Feel like experimenting? Here are a few ways to customize your monster:
- The Mummy: Use strips of tortilla to wrap a hot dog or a cheese stick, bake until crispy, and add edible eyes for a classic mummy dog!
- Vampire Bat: Use whole wheat tortillas. Cut into bat wing shapes with cookie cutters, fill with cheese and black bean spread, and use two small red pepper pieces for the eyes.
- Spicy Monster: Add a kick by mixing some diced green chiles or a sprinkle of chili powder into the cheese filling. Perfect for grown-ups!
- Pizza Monster: Swap the beans for a layer of pepperoni and use marinara sauce for the scars instead of sour cream.
- Breakfast Monster: Use scrambled eggs and breakfast sausage as the filling for a spooky and satisfying morning meal.
Beau’s Chef Notes
This recipe has evolved so much since that first Halloween. I’ve learned a thing or two, like the importance of letting the quesadilla cool for a minute before cutting—a lesson learned after a string of cheese-related burns. One of my favorite kitchen fails was the year I tried to use blue corn tortillas to make a “Blue Frankenstein.” It looked less like a classic monster and more like a sad, bruised swamp creature. We ate it anyway, of course. The real magic of this dish is that it doesn’t have to be perfect. Crooked stitches, wobbly eyes, and a missing bolt just give your monster more personality! The goal is to have fun, laugh, and create something together. That’s what Feastical is all about.
Frankenstein Quesadilla FAQs
Q: My quesadilla is oozing cheese everywhere in the pan! What did I do wrong?
A: Ah, the classic cheese volcano! This usually means you’ve overfilled it or your heat was too high. Next time, make sure to leave a clear border around the edge of the tortilla when you add your filling, and keep that heat at a steady medium. A well-sealed edge is your best friend.
Q: Can I make these ahead of time for a party?
A: You absolutely can! Cook and cut the quesadillas into rectangles ahead of time and keep them warm in a 200°F oven on a baking sheet. I’d hold off on the decorations until just before serving, though, so the sour cream doesn’t get runny and the pretzel bolts stay crunchy.
Q: My tortillas are burning before the cheese melts! Help!
A> This is a sign your heat is too high. Dial it back to medium-low and be patient. Cooking low and slow is the key to a perfectly melted interior and a crispy, but not burnt, exterior. You can also cover the skillet with a lid for a minute to help trap heat and melt the cheese faster.
Q: Any tips for getting the perfect rectangle shape?
A> A large, sharp chef’s knife or a pizza wheel is your best tool. Press down firmly and use a gentle sawing motion. Trimming the curved edges off is the easiest way to get that classic square-headed look. Remember, it doesn’t have to be geometrically perfect—Frankenstein’s monster was stitched together, after all!
Frankenstein Quesadillas
Description
Hey there! Today we’re bringing a little Halloween fun to the table with Frankenstein Quesadillas. These are not just your regular quesadillas—they’re packed with gooey cheese, protein-rich beans, and decorated to look like everyone’s favorite friendly monster. Perfect for a quick lunch, snack, or party treat, they’re easy to make, fun to assemble, and guaranteed to make kids (and adults!) giggle.
Ingredients
-
4 Spinach Tortillas (or brush regular tortillas with spinach puree)
-
1 cup shredded cheddar or Mexican blend cheese
-
½ cup black beans (whole or refried)
-
¼ cup sliced black olives
-
¼ cup sour cream (or Greek yogurt)
-
4–6 pretzel sticks (optional, for “neck bolts”)
Instructions
1. Assemble the Monster
-
Lay two tortillas flat.
-
Sprinkle cheese over each, leaving a ½-inch border.
-
Spread beans evenly on top; mash whole beans slightly.
-
Top with the remaining tortillas and gently press down.
2. Cook the Quesadilla
-
Heat a non-stick skillet over medium heat.
-
Place a quesadilla in the pan and cook 2–3 minutes without peeking.
-
Flip carefully and cook another 2–3 minutes until golden and crispy.
3. Shape the Monster
-
Let the quesadilla cool for 1 minute.
-
Trim rounded edges with a sharp knife or pizza cutter to form a rectangle.
4. Decorate
-
Hair: Line sliced olives along the top.
-
Eyes: Use two olive slices or whole beans.
-
Scars & Stitches: Pipe sour cream in small lines.
-
Neck bolts: Gently press in pretzel sticks.
Notes
-
-
Leave a border around the tortilla to prevent cheese overflow.
-
Cook on medium heat; too high will burn the tortilla.
-
Let the quesadilla cool slightly before cutting to avoid filling spills.
-
Decorations can be added by kids for a fun interactive activity.
-
Nutrition
- Calories: 300 Cal Per Serving
- Fat: 16g
- Carbohydrates: 28g
- Protein: 12g
Nutritional Information (Per Serving)
Calories: ~300 | Protein: 12g | Carbohydrates: 28g | Fat: 16g
*Note: This is an estimate and can vary based on specific ingredients and portion sizes. Using low-fat cheese and beans can lower the calorie and fat content.
Final Thoughts from Beau’s Kitchen
And there you have it! You’ve just successfully brought a delicious, gooey, and slightly silly monster to life right on your stovetop. This Frankenstein Quesadilla is proof that you don’t need a complicated recipe or a full day in the kitchen to create a moment of pure, spooky joy.
The real magic of this dish isn’t just in the melty cheese or the crispy tortilla—it’s in the giggles it inspires. It’s in the proud look on your kid’s face when they take a bite out of their own creation. It’s about turning an ordinary Tuesday into a mini Halloween celebration and finding the fun in the everyday.
So, embrace the messy stitches and the lopsided smiles. Celebrate the cheese that oozes out the sides (that’s just your monster’s personality showing through!). This recipe is a launchpad for your own creativity, so make it your own.