Bakery-Style Oatmeal Raisin Cookies: Your New Comfort Food Hero
Hey friends, Beau here! Let’s talk about a universal truth: there are cookies, and then there are COOKIES. You know the kind I mean. The ones you find in a glass-domed jar at a real-deal bakery—the ones that are somehow impossibly chewy, perfectly spiced, and so substantial they feel like a edible hug. For too long, the humble oatmeal raisin cookie has been the underdog of the cookie platter, but I’m here to tell you that when it’s done right, it’s an absolute showstopper.
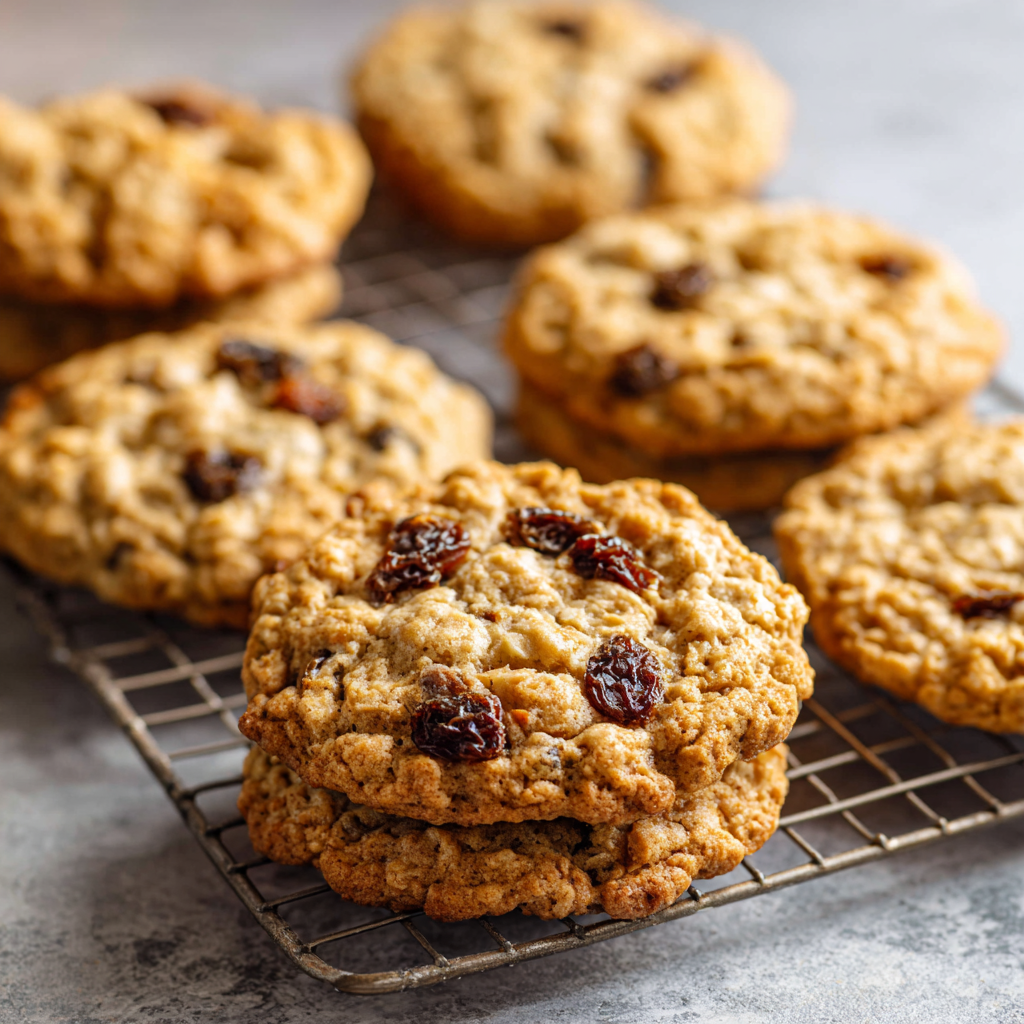
Today, we’re not just making oatmeal raisin cookies. We’re crafting giants. We’re creating those thick, craggy-topped, golden-brown masterpieces that are soft and tender in the center with just the right amount of crisp around the edges. This recipe is my go-to for a reason. It’s a bit of a legend in my family and friend circle, and it’s about to become one in yours. We’re packing them with plump, juicy raisins, a double hit of warm cinnamon and nutmeg, and an optional (but highly recommended) crunch from toasted nuts. We’re even adding a secret ingredient—a splash of molasses—for a depth of flavor that will have people asking, “What is that amazing taste?”
So, tie on your apron, dig out that trusty mixing bowl, and preheat your oven. We’re about to fill your kitchen with the most incredible aroma and your cookie jar with the kind of treats that disappear faster than you can say, “Just one more!”
The Cookie That Built a Fort
I can trace my love for these cookies back to my grandma’s kitchen, a place that always smelled like cinnamon and unconditional love. She didn’t just make cookies; she built edible architecture. Her oatmeal raisin cookies were the size of a child’s palm and just as comforting. My cousin and I would sneak them, still warm and slightly bendy, and build literal forts out of the couch cushions, munching on our spoils as we planned our imaginary adventures.
For me, that’s what this recipe is all about. It’s not just a list of ingredients; it’s a vessel for memory. It’s the taste of rainy afternoons, of laughter echoing in the living room, and of the simple, profound joy that comes from a truly great homemade cookie. Every time I bake a batch, that warm, spiced smell transports me right back to that fort. My goal today is to help you create that same magic in your own kitchen, building new memories one delicious, chewy bite at a time.
Gathering Your Cookie Crew: The Ingredients
This is a big-batch recipe, perfect for gifting, potlucks, or stocking the freezer for future cravings. Don’t let the quantity scare you—the process is just as simple as any other cookie recipe. Here’s the lineup, with a few of my chef-y insights to guide you.
- 3 cups Crisco (or butter): Crisco is our secret weapon for a cookie that stays soft and chewy for days. It creates a higher, more cake-like texture. If you’re a butter purist, go for it! Just know your cookies will be a bit flatter, crispier, and have that classic buttery flavor. Both are fantastic, it just depends on your texture preference.
- 4 cups packed brown sugar & 2 cups granulated sugar: This is a sweet cookie, friends! The brown sugar brings that iconic molasses-y moisture and chew, while the white sugar helps with spreading and that lovely crisp edge.
- 4 large eggs: Our binders. They provide structure and richness. Make sure they’re at room temperature for a smoother, more emulsified dough.
- 1 cup water: This might seem unusual, but it’s the key to hydrating all those oats and ensuring the cookies don’t become dry. Trust the process!
- 4 teaspoons vanilla extract: Don’t be shy! Vanilla is the backbone of flavor in so many baked goods. Use the good stuff if you have it.
- 1 tablespoon molasses (optional): My pro-tip for depth! It amplifies the brown sugar flavor and gives the cookies a beautiful, warm color. Highly recommended!
- 12 cups quick oats: The star of the show! Quick oats blend into the dough more seamlessly than old-fashioned, giving us a more uniform, tender chew.
- 5 cups all-purpose flour: The structural foundation. It gives the cookies their body.
- 2 teaspoons cinnamon & ½ teaspoon nutmeg: The warm, cozy soul of this cookie. The nutmeg is optional, but it adds a wonderful, subtle complexity.
- 4 teaspoons salt & 2 teaspoons baking soda: Salt is a flavor enhancer—it makes the sweet and spice pop. Baking soda is our leavening agent, helping the cookies rise and spread.
- 2 cups raisins: I like to plump mine up by soaking them in hot water for 10 minutes, then draining them thoroughly. This makes them incredibly juicy in the final cookie.
- 1½ cups chopped walnuts or pecans (optional): For texture and a nutty richness. Toasting them first in a dry skillet for a few minutes takes their flavor to a whole new level.
Let’s Get Baking: The Step-by-Step Magic
Ready to make some magic? This is where the fun begins. I’ll walk you through each step, sharing all my little hacks to ensure cookie perfection.
- Preheat and Prep. Fire up your oven to 350°F (175°C). Line your baking sheets with parchment paper. This is a non-negotiable for me—it prevents sticking and makes cleanup an absolute dream. No parchment? A light greasing will do in a pinch.
- Cream the Good Stuff. In a very large bowl (I’m not kidding, this is a big batch!), cream together the Crisco (or butter), brown sugar, and granulated sugar. Use an electric mixer on medium speed for a good 2-3 minutes. We’re not just mixing; we’re creaming. This incorporates air into the fat and sugar, which is what gives our cookies a lovely, light texture. You’ll know it’s ready when the mixture turns pale and fluffy.
- Combine the Wet Team. Beat in the eggs, one at a time, letting each one fully incorporate before adding the next. This ensures a smooth, emulsified dough. Now, mix in the water, vanilla extract, and that secret weapon—the molasses. The dough might look a little curdled at this point, but don’t panic! It will all come together when we add the dry ingredients.
- Whisk the Dry Team. In a separate, equally large bowl, whisk together the flour, salt, baking soda, cinnamon, and nutmeg. Whisking is crucial here—it evenly distributes the baking soda and spices so you don’t get a bitter bite in one cookie and a bland one in the next.
- The Grand Union. Gradually add the dry ingredients to the wet ingredients, mixing on low speed until just combined. My number one tip here: DO NOT OVERMIX. Overworking the flour develops gluten, which can lead to tough cookies. A few streaks of flour are okay—we’ll finish mixing by hand.
- Fold in the Fun Bits. Switch to a sturdy wooden spoon or spatula. Stir in the quick oats, followed by the plump raisins and toasted nuts (if using). Mix until everything is evenly distributed. You’ll have a very thick, hearty dough—exactly what we want for our bakery-style cookies!
- Scoop with Confidence. Using a cookie scoop (a #20 or 3-tablespoon scoop is perfect for large cookies), portion the dough onto your prepared baking sheets. Leave about 2 inches between each one because these beauties will spread. For an extra-professional look, roll the scooped dough into a rough ball and slightly flatten the top with your palm.
- Bake to Perfection. Bake for 10-12 minutes. We’re looking for golden brown edges and centers that look just barely set. The secret to a chewy cookie? Take them out when they still look a tiny bit underdone in the middle. They will continue to cook on the hot baking sheet. Over-baking is the enemy of chewiness!
- The Cool Down. This is the hardest part: patience. Let the cookies cool on the baking sheet for a full 5 minutes. This allows them to set up properly. Then, transfer them to a wire rack to cool completely. This step ensures the bottom doesn’t get soggy.
How to Serve These Golden Gems
Sure, you can just pile these on a plate and call it a day (a perfectly wonderful day, I might add). But if you want to elevate the experience, here are a few of my favorite ways to serve them.
The Classic Combo: Serve a platter of these cookies alongside a tall, ice-cold glass of milk. It’s a timeless pairing for a reason. For the adults, a mug of strong black coffee or a latte makes for a sublime afternoon break.
À La Mode Extravaganza: Warm a cookie for 10 seconds in the microwave and top it with a scoop of high-quality vanilla bean ice cream. The contrast of warm, spiced cookie and cold, creamy ice cream is nothing short of divine.
The Gift of Good Taste: These cookies are incredible gifts! Let them cool completely, then stack them in a cellophane bag tied with a rustic ribbon, or arrange them in a festive tin. A homemade gift from the kitchen is always a winner.
Make It Your Own: Delicious Recipe Variations
This recipe is a fantastic canvas for your creativity. Feel free to play and adapt it to your heart’s content! Here are a few of my favorite twists.
- Chocolate Chip Oatmeal: Can’t decide between an oatmeal raisin and a chocolate chip cookie? Don’t! Swap the raisins for 2 cups of semi-sweet chocolate chips. It’s a crowd-pleasing classic.
- Cranberry White Chocolate: For a tangy, sweet twist, use dried cranberries instead of raisins and fold in 1 ½ cups of white chocolate chips. The red and white makes them especially pretty around the holidays.
- Gluten-Free Goodness: You can easily make these gluten-free! Simply replace the all-purpose flour with your favorite 1:1 gluten-free flour blend. The oats are naturally gluten-free, but be sure to use certified gluten-free oats if you have a sensitivity.
- “Kitchen Sink” Power Cookies: Go all out! Add a mix of raisins, chocolate chips, shredded coconut, and your favorite nuts. It’s a hearty, energy-packed cookie perfect for an on-the-go snack.
- Spice It Up: If you love warmth, add an extra teaspoon of cinnamon or a ¼ teaspoon of ground cloves or ginger to the dry ingredients.
Beau’s Chef’s Notes & Kitchen Confessions
This recipe has been through many iterations in my kitchen. I once, in a moment of sheer distraction, accidentally used baking powder instead of baking soda. The result was puffy, cake-like cookies with no spread—not terrible, but not the chewy dream we’re after! It was a good reminder to always label my pantry jars. Over the years, I’ve landed on this version as the absolute gold standard. The molasses tip came from a baker friend of mine, and the water addition was a happy accident that turned into a game-changer. Don’t be afraid to make this recipe your own. That’s the beautiful thing about cooking—it’s a living, breathing art form.
Your Cookie Questions, Answered!
Q: My cookies spread too much and became flat. What happened?
A: This is usually a temperature issue. Your dough was likely too warm when it went into the oven. If you feel your dough is very soft, pop the bowl in the refrigerator for 20-30 minutes before scooping and baking. Also, double-check that you used baking soda, not baking powder.
Q: Can I freeze the cookie dough?
A: Absolutely! This is one of my favorite meal prep tricks. Scoop the dough into balls and freeze them on a parchment-lined sheet. Once solid, transfer them to a freezer bag. You can bake them straight from the freezer—just add 1-2 minutes to the baking time. Hello, fresh cookies anytime!
Q: My cookies are dry. How can I prevent that?
A: The most common culprit is over-baking. Remember, take them out when the edges are golden and the centers look slightly underdone. Also, be sure to measure your flour correctly. Spoon it into your measuring cup and level it off; don’t scoop directly from the bag, as this can pack in too much flour.
Q: Can I use old-fashioned oats instead of quick oats?
A> You can, but the texture will be different. Old-fashioned oats are larger and heartier, which will give your cookies a more robust, chewy texture. The cookies may also be a bit more crumbly. I prefer quick oats for their uniform blend, but it’s a matter of personal taste!

Bakery-Style Oatmeal Raisin Cookies : Chewy, Golden & Packed with Flavor
Description
Bakery-Style Oatmeal Raisin Cookies
Ingredients
-
1 cup (230 g) unsalted butter, softened
-
1 ¼ cups (250 g) brown sugar, packed
-
½ cup (100 g) granulated sugar
-
2 large eggs
-
2 tsp pure vanilla extract
-
1 ½ cups (190 g) all-purpose flour
-
1 tsp baking soda
-
1 ½ tsp ground cinnamon
-
½ tsp salt
-
3 cups (270 g) old-fashioned rolled oats
-
1 ½ cups (210 g) raisins
-
Optional: ½ cup (60 g) chopped walnuts or pecans
Instructions
-
Preheat oven to 350°F (175°C). Line two baking sheets with parchment paper.
-
Cream the butter and sugars together in a large bowl using a hand or stand mixer until light and fluffy (about 2–3 minutes).
-
Add eggs and vanilla. Beat until well combined.
-
In a separate bowl, whisk together flour, baking soda, cinnamon, and salt.
-
Add dry ingredients to the wet mixture. Mix just until combined — don’t overmix.
-
Stir in oats, raisins, and nuts (if using) with a wooden spoon or spatula until evenly distributed.
-
Scoop dough using a 2-tablespoon cookie scoop and place on the prepared baking sheets, leaving about 2 inches between each cookie.
-
Bake for 10–12 minutes, until edges are golden and centers still look slightly soft.
-
Cool on the baking sheet for 5 minutes before transferring to a wire rack to cool completely.
Notes
-
For chewier cookies, slightly underbake and let them finish setting on the tray.
-
For crispier cookies, bake 1–2 minutes longer.
-
You can soak raisins in warm water or rum for 10 minutes before adding for extra plumpness.
Nutritional Information (A Quick Bite-Sized Look)
Hey, I’m all about balance! While these are definitely a treat, it’s always good to know what you’re enjoying. Here’s a rough estimate per cookie (based on a yield of 65 cookies, using Crisco and including nuts). Remember, these values can vary based on your specific ingredients and portion sizes.
- Calories: ~180
- Carbohydrates: 26g
- Fat: 7g
- Fiber: 2g (Thank you, oats and raisins!)
- Protein: 3g
These cookies get a good amount of their energy from complex carbohydrates in the oats, providing a more sustained release of energy than a cookie made with just white flour. Everything in moderation, friends!
Final Thoughts from My Kitchen to Yours
Well, there you have it—my heart and soul baked into one, big, beautiful batch of oatmeal raisin cookies. This recipe is more than just a list of instructions; it’s an invitation to slow down, to create, and to share something made with love. The smell of cinnamon and toasting oats wafting through your home is one of life’s simplest and greatest pleasures.
I truly hope this recipe becomes a staple in your home, a source of joy for your people, and a reason to gather around the table. Now, I’d love to hear from you! Did you add your own twist? Did your kitchen smell like heaven? Snap a picture and share your Feastical creations with me on social by tagging @Feastical!
Happy baking, friends!
Beau