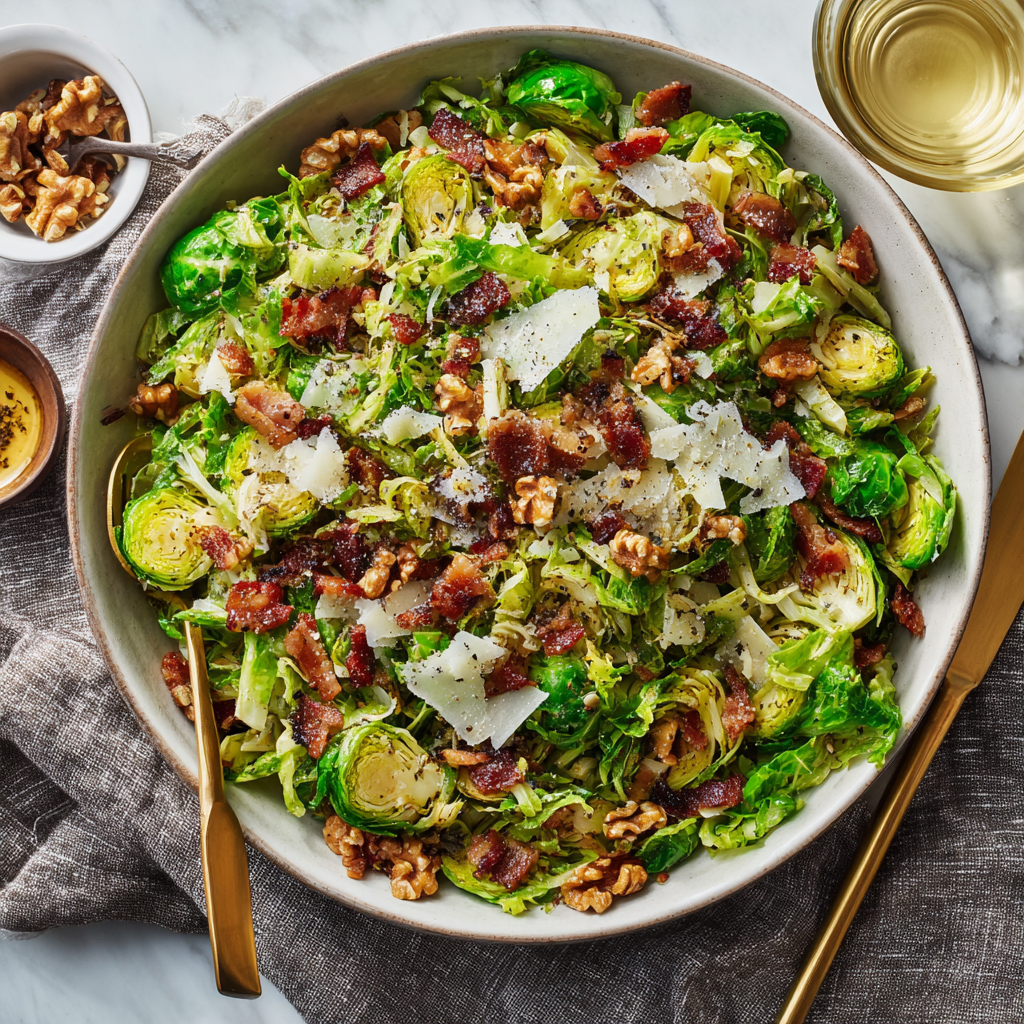
Warm Brussels Sprouts & Bacon Salad
Forget Everything You Thought You Knew About Brussels Sprouts
Hey friends, Beau here from Feastical! Let’s have a real talk for a second. When I say “Brussels sprouts,” what’s the first thing that comes to mind? If you’re picturing a sad, mushy, boiled-to-death veggie that haunted your childhood dinner plate, I am here to officially change your mind. I’m on a mission to convert every sprout skeptic into a full-blown believer, and this Warm Brussels Sprouts & Bacon Salad is my secret weapon.
This isn’t just a side dish; it’s a full sensory experience. Imagine tender, shaved sprouts quickly sautéed until they’re just perfectly bright and a little crispy on the edges. Now, pair that with the smoky, salty crunch of crispy bacon, the deep, sweet melody of slowly caramelized onions, and the rich, toasty crunch of walnuts. We bring it all together with a warm, sharp mustard vinaigrette that seeps into every nook and cranny, and finish it with a shower of salty Parmesan shavings. It’s bold, savory, and deeply satisfying—a cozy, elevated twist on everyday greens that feels like a warm hug in a bowl.
This recipe is the ultimate crowd-pleaser, perfect for a busy weeknight that needs a flavor upgrade or a show-stopping side for your next holiday gathering. It’s simple, soulful, and guaranteed to make your kitchen smell absolutely incredible. So, grab your favorite skillet and let’s turn those dreaded sprouts into the star of the show!
The Thanksgiving That Changed Everything
I have to share a quick story about why this salad holds a special place in my heart. A few years back, I was tasked with bringing a vegetable side dish to a friend’s massive Thanksgiving potluck. I wanted to create something that would stand out in a sea of green bean casseroles and creamed corn. I remembered my grandma always frying up bacon and onions together, and the idea just clicked.
I decided to go for it, shaving sprouts by hand (before I knew the food processor trick!) and caramelizing those onions low and slow. The moment I tossed it all together with the warm dressing, I knew it was something special. I’ll never forget the sight of my notoriously veggie-averse friend, Mark, going back for a third helping. He looked at me, completely shocked, and said, “I can’t believe I’m saying this, but this is the best thing on the table.” That was the moment I knew this recipe was a keeper. It’s a dish that bridges generations and converts skeptics, one delicious bite at a time.
Gathering Your Flavor Dream Team
This salad is all about the quality and harmony of its ingredients. Each one plays a crucial role in building that incredible depth of flavor. Here’s what you’ll need:
For the Salad Base
- 6 cups shaved Brussels sprouts (about 1½ lbs): Look for firm, bright green sprouts with tight leaves. Chef’s Insight: Don’t fear the bag of pre-shaved sprouts from the store! It’s a fantastic time-saver. If you’re shaving them yourself, a food processor with the slicing disk is your best friend. No processor? Just trim the stem end and slice them thinly with a sharp knife.
- 1 tbsp olive oil: For sautéing. A good extra virgin olive oil adds a lovely fruitiness.
For Those Incredible Toppings
- 6 slices bacon, cooked until crispy and crumbled: The smoky, salty backbone of the dish. Substitution Tip: For a lighter version, use turkey bacon. For a vegetarian twist, skip it and add a teaspoon of smoked paprika to the dressing for that smoky flavor.
- 1 large onion, thinly sliced and caramelized: Sweet yellow or Vidalia onions are perfect here. Caramelizing is key—it brings out their natural sugars and adds a deep, sweet complexity. Chef’s Hack: Be patient! This step can’t be rushed. Low and slow is the only way.
- ½ cup toasted walnuts: Toasting is non-negotiable! It wakes up their oils and gives them an incredible crunchy, nutty flavor. Substitution Tip: Pecans or almonds would also be delicious here.
- ½ cup shaved Parmesan cheese: Use a vegetable peeler to get those beautiful, delicate shavings. They melt slightly from the warm salad, creating little pockets of salty, umami goodness.
For the Warm Mustard Vinaigrette
- ¼ cup olive oil: The base of our dressing.
- 1½ tbsp apple cider vinegar: Provides the necessary tang to cut through the richness. Substitution Tip: White wine vinegar or even a fresh squeeze of lemon juice works great in a pinch.
- 2 tsp Dijon mustard: My secret weapon! It adds sharpness and helps emulsify the dressing, making it smooth and creamy.
- 1 tsp honey: Just a touch to balance the acidity and complement the caramelized onions. Substitution Tip: Maple syrup is a fantastic alternative, especially with the bacon and walnuts.
- Salt & pepper to taste: Season as you go! Taste, taste, taste.
Let’s Build Some Magic: Step-by-Step
Okay, team! Let’s fire up the skillet and create some culinary magic. This comes together quickly once your prep is done, so I always recommend having everything measured and ready to go (that’s your mise en place, making you feel fancy already!).
- Cook the Bacon: In a large, heavy-bottomed skillet (cast iron is perfect here!), cook your bacon over medium heat until it’s beautifully crispy. Transfer the bacon to a paper towel-lined plate to drain, but leave that glorious bacon fat in the pan! Once the bacon is cool, crumble it into bite-sized pieces. Chef’s Hack: That leftover bacon fat is liquid gold. We’ll use it to cook our sprouts for an extra layer of insane flavor.
- Caramelize the Onions: Using the same skillet with the bacon fat (see? flavor!), add your thinly sliced onions. Reduce the heat to medium-low. Cook them slowly, stirring occasionally, for about 15-20 minutes. You’re not frying them; you’re coaxing out their sweetness. They’re done when they’re a deep golden brown and incredibly fragrant. Transfer them to a bowl. Chef’s Tip: Don’t rush this step! If they start to burn or stick, add a tiny splash of water to deglaze the pan and scrape up those tasty browned bits.
- Toast the Walnuts: While the onions are working their magic, spread your walnuts on a small baking sheet and toast them in a 350°F (175°C) oven for 5-7 minutes, or until fragrant. Watch them closely—they go from perfectly toasted to burnt in a flash! You can also toast them in a dry skillet over medium heat for a few minutes, shaking the pan often.
- Sauté the Sprouts: Back to our favorite skillet! Add one tablespoon of olive oil to the pan (there’s still residual bacon flavor in there!). Increase the heat to medium-high and add your shaved Brussels sprouts. Sauté them for 3-4 minutes, just until they turn bright green and are tender but still have a bit of crunch. You want texture! Remove from heat and set aside.
- Make the Warm Vinaigrette: In a small saucepan, whisk together the ¼ cup olive oil, apple cider vinegar, Dijon mustard, and honey. Warm it gently over low heat for just a minute or two, whisking constantly until it’s slightly warmed through and beautifully combined. Season with a good pinch of salt and pepper. Chef’s Insight: Warming the dressing is a game-changer. It wilts the sprouts just slightly and helps the salad absorb all the flavors perfectly.
- The Grand Finale – Toss It All Together! In a large serving bowl, combine the warm sautéed sprouts, caramelized onions, most of the crumbled bacon, and most of the toasted walnuts. Drizzle the warm vinaigrette over everything. Toss gently but thoroughly to ensure every single strand is coated in that delicious dressing.
- Serve Immediately: Transfer to plates or a serving platter. Top with the generous shavings of Parmesan cheese and the remaining bacon and walnuts for a gorgeous presentation. This salad is best enjoyed warm, right away, while the flavors are vibrant and the textures are on point!
How to Serve This Stunning Salad
This salad is versatile enough to be the star of a simple lunch or the supporting actor to a fantastic main course. Here’s how I love to serve it:
As a Main Attraction: For a light yet satisfying meal, pile a generous portion into a bowl and top with a soft-poached or fried egg. The runny yolk creates the most incredible extra sauce. Add a slice of crusty, buttered bread to soak up every last bit.
As the Ultimate Side Dish: This is its true calling. It pairs phenomenally with roasted chicken, a perfectly seared steak, pork chops, or even a hearty roast. It brings a bright, savory, and crunchy element that balances richer meats beautifully.
For Your Holiday Table: Looking to impress? This salad is your answer. It’s a modern, flavorful upgrade from traditional steamed vegetables. Serve it in a beautiful wide, shallow bowl to show off all those gorgeous textures and colors.
Make It Your Own: Delicious Twists & Swaps
The beauty of this recipe is its flexibility. Don’t be afraid to play with the ingredients based on what you have or what you’re craving!
- Apple & Gouda Twist: Add one crisp apple (like Honeycrisp or Granny Smith), thinly sliced or chopped, when you toss the salad. Swap the Parmesan for sharp shredded white cheddar or smoked Gouda. The sweet, crisp apple with the smoky cheese is a fall dream.
- Sweet & Tart with Cranberries: For a pop of color and chewy sweetness, add ¼ cup of dried cranberries or cherries when tossing. They play wonderfully off the salty bacon and sharp Parmesan.
- Vegetarian Powerhouse: Omit the bacon. Use 2 tbsp of olive oil for cooking. To get that smoky depth, add ½ tsp of smoked paprika and a pinch of red pepper flakes to the warm vinaigrette.
- Poultry-Free Zone: For a different protein, swap the bacon for pan-seared halloumi cheese cubes or crispy chickpeas. The salty, firm halloumi is an incredible substitute.
- Nut-Free Option: Simply leave out the walnuts! For crunch, try toasted pumpkin seeds (pepitas) or sunflower seeds instead.
Beau’s Kitchen Notes & Stories
This recipe has evolved so much since that first Thanksgiving. I’ve learned a few things along the way! First, I used to chop my sprouts, but shaving them truly makes for a better texture and mouthfeel. Second, I once tried to caramelize onions on high heat to save time. Big mistake. I ended up with burnt, bitter onions and had to start all over. Patience is not just a virtue here; it’s the law.
One of my favorite kitchen memories is of my nephew, who is a notoriously picky eater, tentatively trying a bite because he saw the bacon. His eyes got wide, and he said, “This is actually good.” Victory! That’s what Feastical is all about—creating food that brings people together and creates happy, delicious memories.
Your Questions, Answered!
Q: Can I make this salad ahead of time?
A: You can do some prep ahead! You can shave the sprouts, cook and crumble the bacon, caramelize the onions, toast the nuts, and make the dressing (store it in a jar). Keep everything separate in the fridge. When you’re ready to serve, quickly sauté the sprouts, warm the dressing and onions, and toss it all together. It’s best served immediately after assembling.
Q: My salad turned out a bit soggy. What happened?
A: The most common culprit is overcrowding the pan when sautéing the sprouts. If you pile them all in, they’ll steam instead of sauté. Work in batches if your skillet isn’t large enough to hold them in a fairly even layer. Also, make sure to serve it right away—the longer it sits after adding the dressing, the more it will wilt.
Q: Is there a way to make this vegan?
A> Absolutely! Skip the bacon and use olive oil. For the Parmesan, use a vegan parmesan alternative or a sprinkle of nutritional yeast for a cheesy, umami flavor. For the honey in the dressing, use maple syrup or agave nectar. You’ll still have an incredibly flavorful and satisfying dish!
Q: My family doesn’t like vinegar. Can I substitute the dressing?
A> Of course! The dressing is very adaptable. You can use fresh lemon juice instead of vinegar for a different, but still bright, acidity. Start with the juice of half a lemon and adjust to your taste.

Warm Brussels Sprouts & Bacon Salad
- Total Time: 40 minutes
Description
Brussels sprouts just got a glow-up! Forget the soggy childhood version—this dish is smoky, crunchy, and downright irresistible. Crispy bacon, caramelized onions, toasted walnuts, and a warm mustard vinaigrette transform sprouts into a cozy, flavor-packed salad. Whether for weeknight dinners or holiday tables, this recipe is a true crowd-pleaser that even veggie skeptics can’t resist.
Ingredients
For the salad
-
6 cups shaved Brussels sprouts (about 1½ lbs)
-
1 tbsp olive oil
-
6 slices bacon, cooked crispy & crumbled
-
1 large onion, thinly sliced & caramelized
-
½ cup toasted walnuts (or pecans/almonds)
-
½ cup shaved Parmesan
For the warm vinaigrette
-
¼ cup olive oil
-
1½ tbsp apple cider vinegar (or lemon juice)
-
2 tsp Dijon mustard
-
1 tsp honey (or maple syrup)
-
Salt & black pepper to taste
Instructions
-
Cook bacon in a skillet until crispy. Remove, crumble, and reserve the bacon fat.
-
Caramelize onions in the same pan over medium-low heat, 15–20 minutes, until golden and sweet.
-
Toast walnuts in oven at 350°F (175°C) for 5–7 minutes.
-
Sauté Brussels sprouts in skillet with 1 tbsp olive oil + leftover bacon fat, 3–4 minutes, until bright green and slightly crispy.
-
Whisk vinaigrette ingredients in a saucepan over low heat until smooth and warm.
-
Assemble salad: Toss sprouts, onions, bacon (save some for garnish), and walnuts with vinaigrette.
-
Finish & serve: Top with Parmesan and remaining bacon + walnuts. Enjoy warm!
Notes
Use pre-shaved sprouts to save time. For a vegetarian twist, skip the bacon and add smoked paprika. Serve as a side with roast meats or top with a poached egg for a hearty main dish.
- Prep Time: 15 min
- Cook Time: 25 min
A Note on Nutrition
While we’re all about flavor first at Feastical, it’s great to know what’s fueling our bodies! This Warm Brussels Sprouts & Bacon Salad is not only delicious but also packs a nutritional punch. Brussels sprouts are a fantastic source of Vitamin K and Vitamin C, and they’re full of fiber and antioxidants. The walnuts add healthy omega-3 fats, and the bacon provides protein. The olive oil and nuts contribute healthy monounsaturated fats.
Approximate Nutritional Information (per serving, based on 6 servings):
Calories: 320 | Fat: 24g | Saturated Fat: 5g | Carbohydrates: 12g | Fiber: 4g | Sugar: 4g | Protein: 11g | Sodium: 480mg
Remember, these are estimates and can vary based on specific ingredients and portion sizes. This salad is a nourishing, balanced side that celebrates whole foods!
Final Thoughts from My Kitchen to Yours
Well, friends, there you have it—my all-time favorite way to enjoy Brussels sprouts. This recipe is more than just a list of ingredients; it’s a formula for creating a moment of pure comfort and joy around the table. It’s about taking a humble, often misunderstood vegetable and transforming it into something truly spectacular.
I hope this Warm Brussels Sprouts & Bacon Salad finds its way into your regular recipe rotation and becomes a new favorite for you and your loved ones. If you make it (and I really hope you do!), I’d love to hear about it. Tag me on social with #FeasticalEats so I can see your beautiful creations!
Remember, cooking isn’t about being perfect; it’s about having fun, trying new things, and sharing the love, one delicious bite at a time. Until next time, keep your spatula close and your appetite closer!
With love and good food,

Roasted Butternut & Quinoa Harvest Salad
Your New Favorite Autumn Salad is Here to Stay
Hey friends, Beau here! Can you feel it? That crisp, cool snap in the air that makes you want to pull on your favorite worn-in sweater and actually *enjoy* turning on your oven? Autumn is my absolute favorite season for so many reasons—the vibrant colors, the cozy vibes, and of course, the incredible, soul-warming food that comes with it.
I’m a firm believer that eating with the seasons isn’t just a trend; it’s a way to connect with the world around us and enjoy ingredients when they’re at their absolute peak of flavor. And nothing says “peak autumn flavor” to me quite like a sweet, caramelized butternut squash. But let’s be real, sometimes you want more than just a side of roasted veggies. You want a meal that feels nourishing, vibrant, and utterly satisfying without weighing you down.
That’s exactly why I’m so excited to share my Roasted Butternut & Quinoa Harvest Salad with you today. This isn’t just a salad; it’s a hearty, textural masterpiece on a plate. We’re talking warm, roasted squash, fluffy nutty quinoa, creamy tangy goat cheese, sweet pops of cranberry, and the most incredible crunchy pecans, all brought together by a maple-balsamic vinaigrette that you’ll want to put on literally everything. It’s the perfect main dish for a meatless Monday, a stunning side for your holiday table, or a make-ahead lunch that will have your coworkers green with envy. So, let’s get our chop on and make something beautiful together!
A Salad That Tastes Like a Cozy Fall Afternoon
This recipe always takes me back to my first autumn after moving out of the city. I was living in this little cabin-style house with a fireplace I didn’t quite know how to use yet and a kitchen that became my sanctuary. One weekend, a huge group of friends drove out for a “leaf-peeping” visit. I wanted to make a lunch that felt special and seasonal but wouldn’t keep me trapped in the kitchen while everyone was having fun.
I raided my fridge and pulled out everything that felt like fall: a lone butternut squash, some quinoa, a bag of cranberries, and the last bit of goat cheese from a local farm stand. I threw it all together somewhat haphazardly, crossing my fingers. The moment we all sat down at the big wooden table, digging into this colorful, hearty salad with the fire crackling in the background, I knew it was a winner. It was the taste of that perfect, crisp afternoon—of laughter, good friends, and the simple joy of a meal made with love and a little bit of improvisation. That’s the magic I hope you find in this dish.
Gathering Your Autumn Bounty: The Ingredients
This salad is all about balance and texture. Here’s what you’ll need to bring it to life. Don’t stress if you need to make a swap or two—I’ve got you covered with my chef insights!
For the Salad Base:
- 3 cups arugula: I love the slight peppery kick arugula adds; it cuts through the sweetness of the squash and dressing beautifully. Chef’s Tip: No arugula? Baby kale or mixed spring greens work great too!
- 3 cups baby spinach: This adds a soft, mild base that everyone loves. It wilts just slightly when the warm squash hits it, which is pure heaven.
For Those Incredible Toppings:
- 2 cups roasted butternut squash (cubed): The star of the show! Look for a squash that feels heavy for its size with a matte, beige skin. Chef’s Hack: To save time, many grocery stores now sell it pre-cubed!
- 1 cup cooked quinoa: I use tri-color quinoa for a pretty look, but any color works. This is our protein-packed powerhouse that makes the salad a meal. Pro Tip: Cook your quinoa in vegetable broth instead of water for an extra layer of flavor.
- ½ cup dried cranberries: Their chewy sweetness is non-negotiable for that classic harvest flavor. Craisins work perfectly here.
- ½ cup crumbled goat cheese (chèvre): The creamy, tangy contrast is everything. Substitution: For a vegan version, a good vegan feta or a handful of creamy avocado slices works wonders.
- ½ cup toasted pecans (roughly chopped): Toasting is KEY! It unlocks their rich, nutty flavor and adds that essential crunch. Allergy Alert: Sunflower seeds or pepitas are a fantastic swap.
For the Maple-Balsamic Vinaigrette:
- 3 tbsp extra virgin olive oil: The base of our dressing. Use the good stuff here—you’ll taste the difference.
- 1½ tbsp balsamic vinegar: Provides a sweet, complex acidity. A aged balsamic will be less sharp and more syrupy.
- 1 tbsp pure maple syrup: Not the pancake stuff! The real maple syrup complements the squash and balances the vinegar. Insight: You can adjust this to taste—add more if you like it sweeter.
- 1 tsp Dijon mustard: This is our emulsifier! It helps bind the oil and vinegar together and adds a subtle zip.
- Salt & pepper to taste: Season as you go! I start with a pinch of each and adjust at the end.
Let’s Build This Beauty: Step-by-Step Instructions
Alright, team, let’s fire up the oven and get cooking. This process is simple, relaxing, and oh-so-rewarding.
- Roast the Squash to Perfection. Preheat your oven to 400°F (200°C). Toss your cubed butternut squash with a tablespoon of olive oil, a good pinch of salt, and a few cracks of black pepper on a parchment-lined baking sheet. Chef’s Hack: Spread it in a single layer! Crowding the pan will steam the squash instead of roasting it. We want those beautiful caramelized edges. Pop it in the oven for 25-30 minutes, giving it a stir halfway through. You’ll know it’s done when you can easily pierce a cube with a fork and the edges are golden brown. Let it cool slightly—this keeps our greens from wilting too much when we assemble.
- Toast Those Pecans. While the squash is roasting, let’s toast the pecans. You can do this in a dry skillet over medium-low heat for 3-5 minutes, shaking the pan often until they’re fragrant. Watch them like a hawk! They can go from perfectly toasted to burnt in seconds. Alternatively, you can pop them on a small baking sheet in the oven for the last 5-7 minutes of the squash’s cooking time.
- Whisk the Magic Dressing. In a small bowl or a jar with a tight-fitting lid, combine the olive oil, balsamic vinegar, maple syrup, Dijon mustard, salt, and pepper. Whisk vigorously until it’s smooth and slightly thickened, or shake that jar like you’re winning a maraca contest! Taste it. Does it need more maple? More salt? Adjust it until it sings. Set it aside.
- The Grand Assembly. In a large, beautiful serving bowl or on a wide platter, create your base layer with the arugula and baby spinach. Now, artfully scatter the cooled quinoa over the greens. Next, arrange the still-warm roasted butternut squash cubes over the top. Pro Tip: I like to gently toss the quinoa with the greens first so every forkful gets a bit of everything.
- Finish with the Good Stuff. Now for the fun part! Sprinkle the dried cranberries, crumbled goat cheese, and toasted pecans over the entire salad. This is where it gets its gorgeous, confetti-like look.
- Dress and Serve Immediately. Right before you’re ready to serve, drizzle that gorgeous maple-balsamic vinaigrette over the top. Give it one very gentle toss to distribute the dressing, or just serve it as is for a stunning presentation. Dig in!
How to Serve Your Harvest Masterpiece
This salad is incredibly versatile. Here’s how I love to serve it up:
As a Standalone Main: This is a perfectly balanced and satisfying meal on its own. I love to scoop a big portion into a wide, shallow bowl. Pair it with a slice of crusty, warm sourdough bread for dipping into any leftover dressing that pools at the bottom. Yes, it’s that good.
The Ultimate Holiday Side Dish: Looking to impress at Thanksgiving or Friendsgiving? This salad is your secret weapon. It’s a vibrant, fresh counterpoint to all the rich, heavy dishes on the table. Serve it on a large platter so everyone can see how beautiful it is before it’s devoured.
Meal Prep Champion: Pack this salad for lunch like a pro! Keep the dressing separate in a small container. Pack all the salad components together (greens, cooled squash, quinoa, toppings) in your lunch container. At mealtime, just drizzle the dressing on, give it a shake, and enjoy a restaurant-quality lunch at your desk.
Make It Your Own: Delicious Recipe Variations
One of the best things about a salad like this is how easily you can adapt it. Play with your food! Here are a few of my favorite twists:
- Protein Power-Up: Add grilled chicken breast, pan-seared shrimp, or even some flaked roasted salmon right on top to make it even more hearty.
- Go Fully Vegan: It’s easy! Simply swap the goat cheese for creamy avocado slices or a vegan feta alternative. Just double-check that your maple syrup is certified vegan (most are, but some processing methods vary).
- Apple a Day: For an extra crunch and burst of freshness, add a thinly sliced crisp apple (like Honeycrisp or Pink Lady) when you assemble the salad.
- Spice It Up: Toss the butternut squash with a pinch of cayenne pepper or smoked paprika before roasting for a warm, smoky kick.
- Grain Swap: Not a quinoa fan? Farro or wheat berries would be a fantastic, chewy substitute that still holds up well to the other ingredients.
Beau’s Chef Notes & Kitchen Stories
This recipe has evolved so much since that first haphazard throw-together in my cabin kitchen. I’ve learned that salting the squash adequately before roasting is the difference between good and “can I have the recipe?!” great. I also used to put the dressing on too early, turning my vibrant greens into a wilted mess by the time my guests arrived. Lesson learned: always dress right before serving!
One funny fail: I once tried to toast the pecans in the oven alongside the squash but got distracted by my friends arriving. Let’s just say we had *very* well-done, borderline-charcoal pecans that day. We laughed it off and used sunflower seeds instead. The moral of the story? Don’t be afraid to pivot in the kitchen. It’s all part of the fun.
Your Questions, Answered: FAQs & Troubleshooting
Q: Can I make this salad ahead of time?
A: Absolutely! You can roast the squash and toast the pecans up to 2 days in advance. Store them separately in airtight containers in the fridge (squash) and pantry (pecans). Cook the quinoa ahead of time too. Whisk the dressing and keep it in a jar in the fridge. Assemble everything *except* the greens, cheese, and dressing. Keep the components separate and combine them all just before you’re ready to serve for the best texture.
Q: My dressing isn’t emulsifying (staying mixed). What did I do wrong?
A> Don’t worry, this is common! The key is the Dijon mustard—it’s a natural emulsifier. Make sure you’re whisking vigorously or shaking the jar extremely well. If it’s still separating, just give it another good shake right before you drizzle it. It’ll still taste amazing.
Q: What’s the easiest way to cube a butternut squash?
A> It can be a beast to tackle! My method: carefully slice off the top and bottom so it sits flat on the cutting board. Use a sharp peeler to remove the skin. Slice it in half crosswise, separating the bulbous bottom from the longer neck. Scoop out the seeds from the bottom half with a spoon. Then, cube all the pieces. Or, again, buy it pre-cubed—no shame in that game!
Q: Can I use a different type of squash?
A> Of course! Acorn squash, delicata squash (you don’t even have to peel it!), or even sweet potato would be delicious alternatives. Just adjust the roasting time as needed.
Roasted Butternut & Quinoa Harvest Salad
Description
This isn’t just a salad—it’s fall in a bowl. Roasted butternut squash, fluffy quinoa, tart cranberries, creamy goat cheese, and toasted pecans come together over a bed of greens, all tied with a maple-balsamic vinaigrette you’ll want to drizzle on everything. Perfect as a hearty main, a stunning holiday side, or a make-ahead lunch that feels like a cozy sweater for your soul.
Ingredients
Salad Base
-
3 cups arugula
-
3 cups baby spinach
Toppings
-
2 cups roasted butternut squash, cubed
-
1 cup cooked quinoa
-
½ cup dried cranberries
-
½ cup crumbled goat cheese (or vegan feta/avocado)
-
½ cup toasted pecans (or pepitas/sunflower seeds)
Maple-Balsamic Vinaigrette
-
3 tbsp olive oil
-
1½ tbsp balsamic vinegar
-
1 tbsp pure maple syrup
-
1 tsp Dijon mustard
-
Salt & pepper, to taste
Instructions
-
Roast squash: Preheat oven to 400°F (200°C). Toss cubed squash with olive oil, salt, and pepper. Roast 25–30 mins, stirring halfway, until golden. Cool slightly.
-
Toast pecans: Heat in a dry skillet 3–5 mins (or bake during last 5–7 mins of squash roasting).
-
Make dressing: Whisk or shake olive oil, balsamic, maple syrup, Dijon, salt & pepper until smooth.
-
Assemble: Layer arugula + spinach, then quinoa, roasted squash, cranberries, goat cheese, and pecans.
-
Finish: Drizzle with dressing just before serving.
Notes
-
Pair with crusty sourdough for a cozy dinner.
-
Serve on a platter at Thanksgiving for a pop of color.
-
Pack for lunch (store dressing separately until ready to eat).
Nourishment That Feels as Good as It Tastes
This salad isn’t just a treat for your taste buds; it’s packed with nutrients to fuel your body. Butternut squash is loaded with Vitamin A (great for vision and immunity) and fiber. Quinoa is a complete protein, meaning it contains all nine essential amino acids, making this a fantastic plant-based meal option. The greens offer a dose of vitamins K and C, while the nuts and olive oil provide healthy fats that are great for heart health. It’s a meal that truly satisfies on every level.
Approximate Nutrition Per Serving (based on 4 servings): Calories: 290, Fat: 18g, Carbohydrates: 25g, Fiber: 4g, Sugar: 9g, Protein: 8g
Final Thoughts from My Kitchen to Yours
Well, friends, there you have it—my go-to recipe for embracing all the glorious flavors of fall in one big, beautiful bowl. This Roasted Butternut & Quinoa Harvest Salad is more than just a recipe; it’s a reminder to slow down, savor the season, and share something wonderful with the people you care about.
I hope this recipe finds its way into your regular rotation and becomes a new tradition in your home. If you make it (and I really hope you do!), tag me on Instagram @feastical or leave a comment below. I love seeing your creations and hearing your stories. Now, go forth and roast some squash! Until

Homemade Spiced Apple Cider
The Heartwarming Magic of Homemade Spiced Apple Cider
Hey friends, Beau here! Is there anything in the world that smells more like pure, unadulterated autumn than a big pot of homemade spiced apple cider bubbling away on the stove? That sweet, spicy aroma just seems to wrap its arms around your entire home, whispering promises of cozy sweaters, crackling fires, and the simple joy of gathering with your favorite people. While grabbing a jug from the store is easy, I’m telling you, making it from scratch is a whole different kind of kitchen magic. It’s richer, more nuanced, and honestly, it just feels better. This recipe is my ultimate love letter to fall. We’re doubling down on that deep, nostalgic flavor but adding a few of my signature twists—a hit of bright citrus and a sneaky bit of ginger—to create a cider that’s complex, perfectly spiced, and utterly soul-warming. So, let’s ditch the pre-made stuff and create something truly special together. Your kitchen is about to become the most popular room in the house.
A Cider-Stained Memory
This recipe always takes me right back to my grandparents’ farm. Every October, without fail, my Grandpa Joe would declare it “Cider Weekend.” We’d spend a chilly Saturday afternoon gathering the last of the wonky, imperfect apples from their old trees—the ones too bruised or oddly shaped for pie but absolutely perfect for cider. My job, as the youngest and most eager, was to wash them while my grandma, Nana Marie, would whiz around the kitchen gathering spices, her apron pockets filled with cinnamon sticks and little jars of cloves. The entire house would steam up from the giant pot simmering on their ancient stove, and the smell was nothing short of incredible. The real reward came hours later, when we’d all huddle on the porch, our hands wrapped around warm mugs, sipping the first batch of the season. It wasn’t just a drink; it was a ritual, a signal that the busy, joyful holiday season was just around the corner. That feeling of warmth, family, and home is what I’ve tried to bottle up in this very recipe.
Gathering Your Cider Crew: The Ingredients
Here’s the beautiful part: you don’t need any fancy equipment or obscure ingredients. The magic is in the simplicity and the quality of what you use. This is a double batch because, trust me, you’ll want leftovers (it freezes beautifully!).
- 16 to 20 apples (a mix of sweet and tart, like Fuji + Granny Smith): This is the secret to a well-balanced cider! The sweet apples (Fuji, Gala, Honeycrisp) give you that classic, sugary base, while the tart ones (Granny Smith, Pink Lady) provide a necessary sharpness that keeps the cider from being one-note. Chef’s Hack: Don’t you dare peel them! The peels add incredible color and a ton of pectin, which gives the cider a lovely, slightly thicker body. And just toss ’em in quarters—cores, seeds, and all. We’ll strain it all out later.
- 2 tbsp ground cinnamon + 2 cinnamon sticks: We’re hitting the spice from two angles. The ground cinnamon infuses the liquid deeply and evenly, while the sticks simmer away, giving you those beautiful, whole spice visuals for serving.
- 1 tsp allspice: Don’t let the name fool you; it’s not a blend! It’s its own berry, and it tastes like a warm, aromatic combination of cinnamon, nutmeg, and cloves all by itself. It’s the ultimate cozy spice.
- 1 cup brown sugar: I prefer brown sugar over white for its deep, molasses-like flavor. It adds a caramel-like richness that pairs perfectly with the apples. Start with this, but you can always add more to taste at the end!
- Twist: ½ tsp cloves (whole or ground): Cloves are powerful, so a little goes a long way! They bring an intense, warm, and slightly medicinal depth that is absolutely essential to that classic cider flavor. If using whole, you can tie them in a cheesecloth bundle for easy removal.
- Twist: Peel of 1 orange + juice of 1 lemon: This is my favorite trick! The citrus brightens the entire drink, cutting through the heavy sweetness and spice. It adds a layer of complexity that makes people go, “Wow, what is that?” It’s the secret weapon.
- Optional: 1-inch piece of fresh ginger, sliced: For those who like a little kick! Ginger adds a peppery, warming heat that builds with every sip. It’s incredibly soothing.
- Water (enough to cover apples by 2 inches): Simple as that! Use cold, fresh water. The apples will release their own juices, so you’re essentially creating an apple tea.
Brewing Up Some Joy: The Step-by-Step Guide
Okay, team, let’s get cooking! This process is mostly hands-off, a classic “set it and forget it” situation that rewards patience with incredible flavor.
Step 1: Grab your biggest, heaviest-bottomed stockpot. Give all your apples a good rinse to get rid of any dirt. Now, channel your inner lumberjack and quarter them. No need for pretty, uniform cuts—rustic is best! Pile all those chunks right into the pot, peels, cores, seeds, and all. This is where all the flavor lives.
Step 2: Time for the spice party! Sprinkle in the ground cinnamon, allspice, and cloves (if using ground). Drop in your cinnamon sticks. Add the brown sugar. Now, using a vegetable peeler, peel off large strips of the orange peel, avoiding the bitter white pith. Throw those in, too. Squeeze the juice from your lemon and that fresh orange you just peeled (waste not, want not!), and add it to the pot. If you’re using ginger, scatter those thin slices over the top.
Step 3: Now, pour in enough cold water to submerge your apple mountain by about two inches. You don’t want to drown them, but you need enough liquid to extract all that goodness.
Step 4: Crank the heat to high and bring this beautiful mess to a rolling boil. Once it’s bubbling away, reduce the heat just enough to maintain a steady, active boil. Let it go, uncovered, for a full hour. This initial hard boil is what starts breaking down the apples and releasing their juice into the water.
Step 5: After an hour, your kitchen will already smell insane. Now, pop the lid on your pot, reduce the heat to low, and let it simmer gently for another two hours. This long, slow, quiet simmer is where the real magic happens. The flavors meld, the apples become completely mushy and spent, and the liquid transforms from cloudy water to a deep, amber-hued cider.
Step 6: Turn off the heat and let it cool for about 30 minutes—it’ll still be plenty warm. Now, take a potato masher or the back of a large wooden spoon and gently mash all those softened apples against the side of the pot. You’re helping to squeeze out every last drop of flavor.
Step 7: This is the only slightly tedious part, but it’s so worth it. Place a fine-mesh strainer over a large bowl or another clean pot. Ladle the apple and spice mixture into the strainer, letting the liquid drain through. For super-clear cider, line the strainer with a double layer of cheesecloth or a thin kitchen towel. Let it drip until most of the liquid has passed through. Pro Tip: Don’t press on the solids too hard, or you’ll force through pulp and make the cider cloudy. For crystal-clear cider, be patient and let gravity do its work. I sometimes strain it a second time to be sure.
Step 8: Give your finished cider a taste. Want it sweeter? Add a touch more brown sugar and stir until dissolved. Prefer more spice? You can add a pinch more cinnamon. Your house, your rules! Now, it’s ready to serve.
How to Serve Your Liquid Gold
You’ve done it! Now, let’s talk presentation because we eat (and drink) with our eyes first. For a classic cozy night, ladle it piping hot into your favorite mugs. A fresh cinnamon stick makes the perfect stirrer and garnish. A thin slice of orange or a few apple slices floating on top looks gorgeous. If you’re feeling extra, a dollop of fresh whipped cream with a tiny sprinkle of cinnamon on top turns it into an decadent dessert drink. For a festive gathering, let it cool completely and serve it over ice in a tall glass with a citrus wedge. It’s incredibly refreshing chilled! And don’t forget the adults: a splash of dark rum, bourbon, or spiced whiskey in a hot mug of this cider is the ultimate autumn cocktail.
Make It Your Own: Delicious Variations
The beauty of this recipe is its flexibility. Once you’ve mastered the base, the world is your cider oyster!
- Crockpot Cider: Perfect for parties! Dump everything into your slow cooker and cook on HIGH for 4-5 hours or on LOW for 7-8 hours. Mash and strain as directed. It will keep your whole house smelling amazing all day long.
- Pear & Apple Cider: Substitute about a quarter of the apples for very ripe pears. They add a wonderful, floral sweetness and a velvety texture.
- Sugar-Free Version: Want to cut the sugar? Simply omit the brown sugar! The apples provide plenty of natural sweetness. You can add a natural sweetener like maple syrup at the end to taste if you find it needs it.
- Super-Spiced Cider: For true spice lovers, add a star anise pod and a few black peppercorns to the brew. They add a wonderful licorice note and a subtle heat.
- Vanilla Bean Cider: After straining, pour the hot cider back into a clean pot. Split a vanilla bean pod lengthwise and scrape the seeds into the cider, throwing the pod in too. Let it steep off the heat for 15 minutes for a beautiful, creamy vanilla aroma.
Beau’s Chef’s Notes
This recipe has evolved more times than I can count. I once, in a frantic attempt to impress a date, tried to speed up the process by blending the cooked apples instead of straining them. Friends, do not do this. I created a thick, cloudy applesauce tea that was… not romantic. The slow strain is non-negotiable! Another time, I misread tsp for tbsp and added a whopping tablespoon of cloves. Let’s just say we had a very well-spiced kitchen for a week and cider that could wake the dead. The recipe below is the perfected version of all those happy (and not-so-happy) kitchen accidents. It’s a labor of love, but most of that labor is just waiting, which gives you plenty of time to enjoy the smell and maybe bake some cookies to go with it.
Your Cider Questions, Answered!
Q: My cider turned out a bit cloudy. What did I do wrong?
A: Absolutely nothing! Cloudy cider is still delicious cider. Cloudiness usually means a little extra apple pulp made it through, which is just more fiber! For clarity next time, use cheesecloth and resist the urge to squeeze the pulp. A second strain through a fresh cheesecloth always does the trick.
Q: Can I make this in advance?
A> You bet. This is a fantastic make-ahead drink. Let it cool completely and store it in an airtight container in the fridge for up to 5 days. The flavors actually get better as they mingle! You can also freeze it for up to 3 months. Just thaw in the fridge overnight and reheat gently on the stove.
Q: Is there a way to make this without straining?
A> If you want to avoid straining altogether, you can use a juice steamer if you have one. Otherwise, straining is key. But you can make it easier by using a nut milk bag—it’s less messy than cheesecloth!
Q: My cider isn’t sweet enough. Can I fix it?
A> Of course! Sweetening is always done at the end, after straining. Simply stir in more brown sugar, honey, or maple syrup to your taste while the cider is still warm so it dissolves easily.

Homemade Spiced Apple Cider
Description
Nothing says autumn quite like a pot of spiced apple cider simmering on the stove. This version doubles down on nostalgic flavor with apples, warm spices, a bright hit of citrus, and a sneaky bit of ginger. Rich, soul-warming, and endlessly adaptable, it’s comfort in a mug and the perfect way to gather loved ones.
Ingredients
-
16–20 apples (mix of sweet + tart, quartered, peels & cores on)
-
2 tbsp ground cinnamon + 2 cinnamon sticks
-
1 tsp allspice
-
½ tsp cloves (whole or ground)
-
1 cup brown sugar (adjust to taste)
-
Peel of 1 orange + juice of 1 lemon
-
Optional: 1-inch piece fresh ginger, sliced
-
Cold water (enough to cover apples by ~2 inches)
Instructions
-
Add quartered apples, spices, brown sugar, citrus peel & juice, and ginger (if using) to a large stockpot. Cover with water by 2 inches.
-
Bring to a rolling boil. Cook uncovered 1 hour.
-
Reduce to low, cover, and simmer 2 hours.
-
Mash softened apples gently with a potato masher.
-
Strain liquid through a fine mesh strainer lined with cheesecloth (for clear cider). Discard solids.
-
Taste and adjust sweetness or spice. Serve warm or chilled.
Notes
-
Garnish mugs with a cinnamon stick, orange slice, or apple wedge.
-
Add whipped cream + cinnamon for a dessert-style drink.
-
Serve over ice for a refreshing twist.
-
Adult upgrade: splash of dark rum, bourbon, or spiced whiskey.
Nutrition
- Calories: 120 Cal
- Sugar: 25g
- Carbohydrates: 30g
A Note on Nutrition (Because We Care!)
Now, I’m a firm believer that food is about joy first, but it’s always good to know what you’re enjoying! Because we’re straining out the solid pulp, most of the fiber from the apples is removed, leaving behind the natural sugars, vitamins, and minerals that seep into the water. This homemade version is a world away from store-bought, which often contains added sugars and preservatives. You control the sugar here. The vitamin C from the apples and citrus remains, and the spices aren’t just for flavor—they’re packed with antioxidants. It’s a naturally sweet, comforting treat that feels good from the inside out. The approximate nutritional info per cup is a guide, but it will vary based on your apples and how much sugar you add.
Final Sips of Wisdom
Well, that’s it, my friends—my go-to recipe for a perfect autumn day. This homemade spiced apple cider is more than just a recipe; it’s an experience. It’s about slowing down, embracing the season, and creating something wonderful with your own two hands. It’s the taste of crisp air, falling leaves, and shared moments. I hope this recipe finds its way into your own family traditions and creates warm memories for years to come. Now, I’d love to hear from you! Did you add a special twist? How did it turn out? Share your stories and photos with me over on Instagram by tagging @feastical. Happy cooking!

Cheesy Pumpkin Quesadillas
Fall’s Coziest Handheld: Cheesy Pumpkin Quesadillas!
Hey there, friend! Beau here, from Feastical. Can we just take a moment to appreciate the magic of autumn? The crisp air, the cozy sweaters, and of course, the incredible food. It’s the season where we all seem to collectively agree that it’s perfectly acceptable to put pumpkin in just about everything. And you know what? I am 100% here for it. But today, we’re not talking about your standard latte or pie. Nope. We’re taking that gorgeous, orange-hued gourd on a little trip south of the border to create something truly spectacular: Cheesy Pumpkin Quesadillas.
Now, I know what you might be thinking. “Pumpkin? In a quesadilla? Beau, have you finally lost it?” Trust me, I get it. It sounds a little out there. But stick with me. Imagine this: a warm, flour tortilla, griddled to golden-brown perfection, giving way to a molten, savory, and subtly spiced filling. The creamy pumpkin purée melds with sharp, melted cheese in a way that feels both utterly comforting and excitingly new. It’s a hug from the inside out, my friends. This isn’t just a recipe; it’s your new secret weapon for a crazy-fast weeknight dinner, a show-stopping game day appetizer, or a fun, Halloween-themed meal that’ll have everyone at the table asking for seconds. So, let’s ditch the complicated recipes and dive into something simple, soulful, and seriously satisfying. Grab your favorite skillet and let’s get cooking!
The Happy Accident That Started It All
This recipe, like so many of the best things in life, was born from a beautiful kitchen mishap. A few years back, I was hosting a big “Friendsgiving” potluck at my place. I’d gone a little overboard, as I tend to do, and made a massive batch of my from-scratch pumpkin purée for pies. Well, as the evening wound down, I found myself staring at a half-empty bowl of this gorgeous purée and a fridge full of leftover party snacks—mostly cheeses, tortillas, and salsas. The midnight munchies hit hard, and a classic cheese quesadilla was calling my name.
As I was grating the cheese, my eyes kept drifting to that bowl of pumpkin. A wild thought crossed my mind: “What if…?” I stirred a big spoonful into my cheese mixture, added a pinch of the same spices I’d used in the pie filling, and slathered it on a tortilla. The second that cheesy-pumpkin fusion hit the hot buttered skillet, the most incredible aroma filled my kitchen—savory, cheesy, and warmly spiced. One bite and I was absolutely sold. My friends, who were still hanging around, descended on the kitchen like a pack of hungry wolves, and those experimental quesadillas were gone in 60 seconds flat. They’ve been a fall staple in my home ever since, a delicious reminder that the best creations often come from a little experimentation and a willingness to play with your food.
Gathering Your Pumpkin Quesadilla Squad
Here’s the beautiful part: you probably have most of this already in your pantry. This is about simple, feel-good food, remember? Let’s break it down.
- 1 cup pumpkin purée: This is our star! Chef’s Insight: Please, please make sure you’re using 100% pure pumpkin purée, not pumpkin pie filling. The pie mix is pre-sweetened and spiced, which would take our savory dish in a very wrong direction. If you’re feeling ambitious, homemade purée from a sugar pumpkin is incredible, but the canned stuff works perfectly here too.
- 1 ½ cups shredded sharp cheddar or pepper jack cheese: The glue that holds it all together. Substitution Tip: I love the boldness of sharp cheddar, but pepper jack adds a wonderful kick. A Monterey Jack would be mellower, or a smoked gouda would be absolutely divine for a deeper, autumnal flavor. For a great melt, always shred your own cheese from a block—the pre-shredded stuff has anti-caking agents that can make it a little grainy.
- ½ tsp garlic powder & ½ tsp smoked paprika: Our flavor agents. Chef’s Insight: Garlic powder distributes flavor more evenly than fresh garlic here. The smoked paprika is the secret weapon—it adds a subtle smokiness that makes the whole thing taste like it’s been cooking for hours.
- Salt and pepper to taste: Don’t you dare forget these! They wake up all the other flavors.
- 4 large flour tortillas: The vessel. Substitution Tip: Feel free to use whole wheat or your favorite gluten-free tortillas. The larger “burrito-size” ones are easiest to fold.
- 1 tbsp butter or oil: For that perfect, crispy, golden-brown exterior. Chef’s Insight: I’m Team Butter for the unmatched flavor, but a neutral oil like avocado or grapeseed works great too.
Let’s Make Some Magic: Step-by-Step
Alright, team! Let’s transform these simple ingredients into autumn’s most craveable handheld. This comes together in a flash, so have all your stuff ready to go (that’s your mise en place, if you want to be fancy).
Step 1: The Filling Mix-In. In a medium bowl, combine your pumpkin purée, shredded cheese, garlic powder, smoked paprika, a good pinch of salt, and a few cracks of black pepper. Now, get in there with a fork or spatula and mix it until it’s one happy, orange-and-white-speckled family. Chef’s Hack: Taste it! Yes, taste the raw filling. Does it need more salt? More smokiness? Adjust now. Remember, the cheese is salty, so go easy at first.
Step 2: The Assembly Line. Lay your tortillas out on a clean work surface. Spoon a generous quarter of the pumpkin-cheese mixture onto one half of each tortilla, spreading it out evenly but leaving a small border around the edge. This prevents the filling from oozing out too much when it melts. Fold the bare half of the tortilla over the filling to create a perfect half-moon shape. Give it a gentle press.
Step 3: Griddle to Perfection. This is where the magic happens. Heat a large skillet or griddle over medium heat. Add about half of your butter or oil. Once it’s shimmering (or the butter is foaming slightly), carefully place one or two quesadillas in the pan. Chef’s Hack: Don’t overcrowd the pan! We need room to flip. Cook for 2-3 minutes on the first side. You’re waiting for that gorgeous golden-brown color to appear on the tortilla and for the cheese to start melting audibly. Peek underneath with a spatula—if it’s beautifully tanned, it’s ready to flip.
Step 4: The Flip Side. Carefully flip your quesadilla. It should feel sturdy. Cook for another 2-3 minutes on the second side until it’s equally golden and the cheese inside is fully molten and glorious. If your pan looks dry, add the remaining butter/oil before adding the next batch. Transfer your finished quesadilla to a cutting board and repeat with the remaining ones.
Step 5: The Rest & The Slice. This is the hardest part: let them rest for just a minute before slicing. This allows the lava-hot cheese to set slightly so it doesn’t completely erupt when you cut into it. Use a sharp knife or a pizza wheel to slice each quesadilla into 3 or 4 wedges.
How to Serve These Golden Crescents of Joy
Presentation is part of the fun! You can absolutely just slide these onto a plate and dig in (no judgment here), but if you want to make it an event, here are my go-to moves.
I love serving a trio of these on a plate with little bowls of dipping sauces. It just feels special. A dollop of cool, tangy sour cream or Greek yogurt is a classic must. A spoonful of vibrant, creamy guacamole or even just some sliced avocado adds a fantastic fresh contrast. And my personal favorite? A quick chipotle mayo—just mix a tablespoon of adobo sauce from a can of chipotle peppers with a half cup of mayonnaise. It’s smoky, spicy, and the perfect partner for the sweet pumpkin.
For a full meal, turn it into a “quesadilla bar”! Serve them whole alongside a big, crisp green salad with a zesty lime vinaigrette, a pot of black beans, and some cilantro-lime rice. It’s a build-your-own feast that’s perfect for a casual dinner with friends.
Shake It Up: Delicious Variations
The basic recipe is a masterpiece, but cooks love to play! Here are a few of my favorite ways to mix things up.
- The Protein Power-Up: Stir in a half cup of rinsed black beans or some finely chopped, cooked chicken breast or shredded rotisserie chicken right into the filling mixture. It makes it even more hearty and satisfying.
- The “Green Goddess”: Add a pop of color and freshness by sprinkling some finely chopped spinach, kale, or even fresh cilantro into the filling before you fold the tortilla over.
- The Sweet & Savory Twist: Caramelized onions are a game-changer. Cook down a thinly sliced yellow onion in a little butter until soft, golden, and sweet, then let it cool and add a tablespoon or two to each quesadilla.
- Spice Lover’s Dream: Kick up the heat! Add a finely diced jalapeño (seeds removed for less heat, kept for more!) to the filling, or use a spicy pepper jack cheese. A dash of cayenne pepper works too.
- Fun Shapes for Kids:Skip the wedges! After cooking, use Halloween-themed cookie cutters (like pumpkins or bats) to cut fun shapes out of the whole quesadilla. It’s a guaranteed hit with the little ones.
Beau’s Kitchen Notebook
This recipe has evolved so much from that first late-night experiment. I’ve learned that a tiny pinch of ground cumin can add an incredible depth of flavor that makes people go, “Wait, what is that? It’s so good!” I’ve also found that letting the assembled quesadillas sit for a few minutes before cooking helps the tortilla seal a bit, preventing any filling escapees.
One of my favorite kitchen memories involving these was during a Halloween party. I made a giant batch of mini pumpkin-shaped ones using a cookie cutter, and my friend’s toddler, completely covered in a dinosaur costume, kept sneaking them off the platter and stuffing them into his mouth, declaring them “dino snacks.” It was the highest compliment. Food is about those moments, you know? The mess, the laughter, the shared joy. That’s what Feastical is all about.
Your Questions, Answered!
Q: My quesadilla is leaking filling everywhere! What did I do wrong?
A: Ah, the classic ooze. Two likely culprits: too much filling or filling spread too close to the edge. Remember to leave a ½-inch border around the edge when you’re spreading your mixture. Also, make sure your pan is at a true medium heat—too hot and the outside will burn before the cheese has a chance to melt and seal the deal.
Q: Can I make these ahead of time?
A: You can absolutely prep the filling ahead of time! Mix it up, stick it in an airtight container in the fridge for up to 2 days. When you’re ready, just give it a stir, assemble, and cook. I don’t recommend pre-assembling the quesadillas too far in advance as the tortillas can get soggy.
Q: Can I bake these instead of pan-frying?
A> For a lighter option, sure! Preheat your oven to 400°F (200°C). Place the assembled quesadillas on a parchment-lined baking sheet, lightly brush the tops with oil or melted butter, and bake for about 10 minutes, flipping halfway through, until golden and crispy. They won’t be *quite* as crispy as the pan-fried version, but still delicious!
Q: My family has different spice preferences. How can I accommodate everyone?
A> This is an easy one! Make the base filling without any spicy elements. After you’ve divided the filling among the tortillas, you can add custom mix-ins to each one. Sprinkle some diced jalapeños on one half, or add a dash of hot sauce before folding. Customizable meals are the best.

Cheesy Pumpkin Quesadillas
Description
Golden, melty, and just a little unexpected—these quesadillas are fall’s best-kept secret. Creamy pumpkin purée blends with sharp, gooey cheese and a whisper of smoky spice, all tucked inside crispy tortillas. Whether you’re feeding a crowd or making a quick weeknight dinner, they’re as comforting as they are fun.
Ingredients
-
1 cup pumpkin purée (100% pure, not pie filling)
-
1 ½ cups shredded sharp cheddar or pepper jack
-
½ tsp garlic powder
-
½ tsp smoked paprika
-
Salt & pepper, to taste
-
4 large flour tortillas
-
1 tbsp butter or neutral oil
Instructions
-
Mix filling: Stir pumpkin purée, cheese, garlic powder, smoked paprika, salt, and pepper until smooth. Taste and adjust seasoning.
-
Assemble: Spread ¼ of filling onto half of each tortilla, leaving a border. Fold into half-moons.
-
Cook: Heat butter/oil in skillet over medium. Cook quesadillas 2–3 mins per side, until golden and cheese is melty.
-
Rest & slice: Let rest 1 min before cutting into wedges.
Notes
-
Dip into sour cream, guacamole, or chipotle mayo.
-
Serve with black beans and a crisp salad for a full meal.
-
Cut into fun Halloween shapes for kids!
Nutritional Note (Approximate)
While we’re all about flavor first, it’s always nice to know what’s going into our bodies! Here’s a rough breakdown per serving (one quesadilla), based on the specific ingredients listed. Remember, this can vary based on the brands you use and any substitutions.
Calories: ~280 | Fat: 15g | Carbohydrates: 22g | Protein: 12g | Sodium: 420mg
This dish is a great source of Vitamin A (thanks, pumpkin!) and calcium from the cheese. Using whole wheat tortillas can add a bit of fiber, and adding black beans or chicken, as suggested in the variations, will significantly boost the protein content, making it a more balanced meal. As always, these are estimates for your informational pleasure!
Your New Fall Favorite Awaits
And there you have it! Your complete guide to making the most unexpectedly delicious, utterly cozy fall meal. These Cheesy Pumpkin Quesadillas are proof that the best food doesn’t have to be complicated. It’s about taking a chance on a fun flavor combination and creating something that brings a little bit of joy to your table.
I truly hope this recipe becomes a new tradition in your home, just like it has in mine. It’s a reminder to play, to experiment, and to always, always have fun in the kitchen. If you make them (and I really hope you do!), I’d love to hear about it. Tag me @Feastical on social media so I can see your beautiful creations! Now, go forth and get your quesadilla on. Happy cooking!

Blueberry Cheesecake Swirl Cookies
Your New Favorite Cookie Just Walked Into the Kitchen
Hey friends, Beau here! Let’s be real for a second. Is there anything better than the smell of cookies baking in the oven? It’s like a warm, buttery hug for your entire house. And while I’m a sucker for a classic chocolate chip, sometimes you just need a cookie that feels a little… extra. A cookie that looks like it flew straight out of a fancy bakery window but is secretly simple enough to whip up on a lazy Sunday afternoon.
That’s exactly why I’m so crazy about these Blueberry Cheesecake Swirl Cookies. Imagine this: a soft, buttery, chewy sugar cookie base. Now, picture a sweet-tart, creamy ribbon of blueberry cheesecake swirled right through the center. They bake up with golden, slightly crisp edges and these gorgeous, jammy pockets of flavor that will absolutely make your day. They’re the perfect marriage of two incredible desserts, all wrapped up in one handheld, totally irresistible treat.
Whether you’re prepping for a potluck, looking for a show-stopping gift for a neighbor, or just treating yourself after a long week (you deserve it!), these cookies are the answer. So, tie on your favorite apron, grab your mixing bowl, and let’s make some magic happen. I promise, this is one recipe you’ll come back to again and again.
A Sweet Slice of Nostalgia
This recipe always takes me right back to my grandma’s kitchen table. Every summer, we’d spend a day blueberry picking until our fingers were stained purple and our buckets were overflowing. The reward for our work was always her legendary blueberry cheesecake. It was a whole production—the careful water bath, the agonizing wait for it to chill—but that first creamy, fruity bite was pure bliss.
I wanted to capture that exact feeling in a cookie—something you could enjoy without the wait or the fuss. One day, I was messing around with my go-to cookie dough and a leftover tub of cream cheese from breakfast. I swirled in some of the blueberry jam I’d made from the previous summer’s haul, and voilà! A happy accident was born. They’re my little tribute to those sunny days and my grandma’s legendary desserts, but in a form that’s ready to enjoy in under 30 minutes. Now, every time I bake a batch, it feels like a sweet little visit to the past.
Gathering Your Cookie Crew: The Ingredients
Here’s the dream team of ingredients that’ll come together to create these heavenly cookies. Using quality stuff here makes a real difference!
Dry Ingredients
- 2½ cups all-purpose flour: The foundation of our cookie! It gives structure. For a slightly more tender cookie, you can swap in ½ cup of cake flour, but all-purpose works perfectly.
- 1 tsp baking soda: Our leavening agent. It helps the cookies puff up and get that perfect chewy-yet-soft texture. Make sure it’s fresh for the best rise!
- ½ tsp baking powder: A little extra lift never hurt anybody. This combo with baking soda is my secret for the ideal cookie crumb.
- ¼ tsp salt: Don’t you dare skip this! Salt is the flavor enhancer that makes all the sweet, buttery notes pop. It’s the unsung hero of baking.
Wet Ingredients
- 1 cup (2 sticks) unsalted butter, softened: The key to richness and that irresistible chewy texture. I insist on unsalted so we can control the salt level. Pro Chef Tip: “Softened” means cool to the touch but your finger can leave a gentle indent. Not melted and not cold! This is crucial for creaming.
- ¾ cup granulated sugar: Adds sweetness and helps create those delightfully crisp edges.
- ¾ cup packed brown sugar: My favorite for cookies! The molasses in brown sugar adds a deep, caramel-like flavor and ensures a wonderfully soft, moist center.
- 1 large egg: Binds everything together. Make sure it’s at room temperature to blend smoothly into the creamed butter and sugar.
- 1 tsp vanilla extract: Pure vanilla extract is always my go-to for the best flavor. It’s the warm, cozy background note that makes everything taste like home.
The Show-Stopping Filling
- ½ cup cream cheese, softened: Full-fat is the way to go for the truest cheesecake flavor and creamiest texture. Again, softening is key here so it blends smoothly without lumps.
- ¼ cup blueberry jam or preserves: I prefer preserves for the little bursts of real fruit, but a smooth jam works great too! Feel free to use homemade or a high-quality store-bought brand. This is where the big blueberry flavor comes from.
Let’s Get Baking: The Step-by-Step Guide
Alright, team, let’s do this! Follow these steps and you’ll be a cookie-swirling pro in no time.
Step 1: Preheat your oven to 350°F (175°C). Line your baking sheets with parchment paper. This isn’t just to prevent sticking; it also helps the bottoms of the cookies bake evenly without getting too dark. Trust me, it’s a game-changer.
Step 2: In a medium bowl, whisk together your dry ingredients—the flour, baking soda, baking powder, and salt. Whisking is better than sifting here because we’re not only combining them but also aerating the flour a little, which leads to a lighter cookie. Set this bowl aside.
Step 3: In a large bowl, cream together the softened butter, granulated sugar, and brown sugar. Now, “cream” means beat it until it’s light, pale, and fluffy. This should take a good 2-3 minutes with a hand mixer or stand mixer. This step is non-negotiable! It incorporates air into the dough, which is what gives your cookies that perfect texture. Don’t rush it!
Step 4: Beat in the egg and vanilla extract until they are fully incorporated. Scrape down the sides of the bowl to make sure everything is getting mixed in evenly.
Step 5: Gradually add your dry ingredients to the wet ingredients. Mix on low speed just until the flour disappears. Chef Hack: The second you don’t see any more dry flour, STOP MIXING. Overmixing at this stage is the number one cause of tough, dense cookies. We want tender!
Step 6: In a small bowl, mix the softened cream cheese and blueberry jam together until it’s smooth and beautifully swirled. You can do this with a spoon or a small whisk.
Step 7: Now for the fun part! Scoop the cookie dough into balls, about 2 tablespoons each (I use a medium cookie scoop for perfect uniformity). Use your thumb or the back of a small spoon to press a deep indent into the center of each dough ball. Spoon about a teaspoon of the blueberry cheesecake filling into that well.
Step 8: Gently fold the dough around the filling to seal it in, then place it seam-side down on your prepared baking sheet. You can just leave it like this for a more hidden center, or for that gorgeous marbled effect, use a toothpick to lightly swirl the filling into the top of the cookie dough. Don’t over-swirl, or the filling will bleed too much!
Step 9: Bake for 10-12 minutes. The cookies are done when the edges are a beautiful golden brown, but the centers still look slightly soft and underdone. They will continue to cook on the hot baking sheet out of the oven. Let them cool on the pan for at least 5 minutes—this is when they firm up and achieve chewy perfection. Then, transfer them to a wire rack to cool completely.
How to Serve These Beauties
Honestly, these cookies are stars all on their own, still slightly warm from the oven with a cold glass of milk. But if you want to take them to legendary status, here are a few ideas:
For a truly decadent dessert, crumble one over a scoop of vanilla bean ice cream. The contrast of warm cookie and cold ice cream is everything. They also look incredible on a dessert platter for a party. Stack them high on a cute cake stand so everyone can grab one. For a breakfast treat (hey, I won’t tell!), pair one with your morning coffee or tea—the blueberry cheesecake swirl makes it feel totally justified.
If you’re gifting them, let them cool completely first. Layer them in a cardboard gift box or a cute tin with sheets of parchment paper between the layers. They travel beautifully and are guaranteed to make someone’s day.
Mix It Up! Recipe Variations
The beauty of this recipe is its versatility. Once you master the basic swirl, a whole world of cookies opens up!
- Raspberry Lemonade: Swap the blueberry jam for raspberry and add a teaspoon of lemon zest to the cream cheese filling. Bright, tangy, and incredible.
- Strawberry Swirl: Use strawberry preserves for a classic cheesecake vibe. A drizzle of white chocolate on top after baking takes it over the top.
- Chocolate Hazelnut: Replace the jam with chocolate-hazelnut spread (like Nutella) mixed into the cream cheese. You’ve just created a cookie version of a fancy tart.
- Gluten-Free Friendly: Use a 1:1 gluten-free all-purpose flour blend. I’ve had great success with brands like Bob’s Red Mill or Cup4Cup.
- Double Berry Bliss: Fold ¼ cup of fresh or frozen blueberries into the cookie dough itself for an extra burst of berry in every single bite.
Beau’s Chef Notes
This recipe has seen a few iterations over the years. My first attempt? Let’s just say the filling completely melted out and created a blueberry lava flow all over my baking sheet. Delicious, but not exactly pretty. The key is making sure your cookie dough is thick enough to act as a barrier and not over-swirling. Chilling the filled dough balls for 15-20 minutes before baking can also help if your kitchen is particularly warm.
I also learned the hard way that using cold cream cheese leads to lumpy filling that’s impossible to swirl smoothly. Softening your ingredients is the simplest hack for a flawless result. Now, these cookies are my go-to for last-minute bake sales and picnics. They’re always the first to disappear!
FAQs & Troubleshooting
Q: My filling leaked everywhere! What did I do wrong?
A: This usually happens for one of two reasons: 1) The indent wasn’t deep enough, or the filling wasn’t sealed inside the dough properly. Make sure you’re really wrapping the dough around it. 2) The cookies were over-swirled, causing the filling to mix too much with the dough and thin out. A light hand with the toothpick is best!
Q: Can I make the dough ahead of time?
A: Absolutely! You can scoop and fill the dough balls, then store them in an airtight container in the fridge for up to 2 days. You may need to add a minute or two to the baking time since you’ll be putting them in the oven cold.
Q: My cookies spread too much and got flat.
A: This is almost always a butter problem. Was your butter too soft or melted? Make sure it’s just softened. Also, double-check that your baking soda and powder are fresh, as they provide the necessary lift. Chilling the dough for a bit can also prevent excess spreading.
Q: Can I freeze these cookies?
A> Yes, they freeze beautifully! Once baked and cooled completely, freeze them in a single layer on a baking sheet before transferring to a freezer bag. They’ll keep for up to 3 months. Thaw at room temperature… or my personal favorite, pop one frozen right into the microwave for 10 seconds for a gooey, almost-fresh-from-the-oven treat.

Blueberry Cheesecake Swirl Cookies
Description
A bakery-style treat made simple at home. These cookies bring together the best of both worlds: a buttery sugar cookie base and a creamy, tangy blueberry cheesecake swirl. Perfect for potlucks, gifting, or a well-deserved sweet break, they’re guaranteed to impress. Tie on that apron—it’s time for cookie magic!
Ingredients
Dry
-
2½ cups all-purpose flour
-
1 tsp baking soda
-
½ tsp baking powder
-
¼ tsp salt
Wet
-
1 cup (2 sticks) unsalted butter, softened
-
¾ cup granulated sugar
-
¾ cup brown sugar, packed
-
1 large egg (room temp)
-
1 tsp vanilla extract
Filling
-
½ cup cream cheese, softened
-
¼ cup blueberry jam or preserves
Instructions
-
Preheat oven to 350°F (175°C). Line baking sheets with parchment.
-
Whisk together flour, baking soda, baking powder, and salt. Set aside.
-
In a large bowl, cream butter, granulated sugar, and brown sugar until light and fluffy (2–3 mins).
-
Beat in egg and vanilla, scraping down sides.
-
Add dry mixture gradually, mixing until just combined. Don’t overmix.
-
In a small bowl, stir cream cheese and blueberry jam until smooth and swirled.
-
Scoop cookie dough (about 2 tbsp each). Press a deep indent in each and spoon in ~1 tsp filling. Fold dough over to seal or lightly swirl on top with a toothpick.
-
Place seam-side down on baking sheet.
-
Bake 10–12 mins, until edges are golden but centers look slightly soft. Cool 5 mins on sheet, then transfer to a rack.
Notes
-
Pair warm cookies with cold milk or coffee.
-
Crumble over vanilla ice cream for an instant dessert upgrade.
-
Gift in a cookie tin lined with parchment.
Nutritional Information (Approximate, Per Cookie)
Alright, let’s talk real numbers. Remember, this is a treat, and it’s all about balance! Each cookie is roughly:
- Calories: 210
- Fat: 11g
- Carbohydrates: 26g
- Sugar: 14g
- Protein: 2g
- Sodium: 95mg
This info is an estimate based on the specific ingredients I used. If you use low-fat cream cheese or a sugar-free jam, these numbers will change. But sometimes, your soul needs a delicious, homemade cookie, and that’s a kind of nourishment too!
Final Thoughts
Well, friends, there you have it—my all-time favorite cookie recipe that’s sure to become a new classic in your home. It’s more than just a list of ingredients and steps; it’s a chance to create a little moment of joy, to share something made with love, and to fill your kitchen with the most incredible aroma.
I hope you have as much fun making these Blueberry Cheesecake Swirl Cookies as I do. Don’t be afraid to make them your own! Tag me @Feastical on Instagram if you give them a try—I always love seeing your creations. Now, go preheat that oven and get ready for some serious compliments. Happy baking!

Easy No-Bake Pumpkin Cheesecake Balls
Your New Favorite Fall Treat: No-Bake Pumpkin Cheesecake Balls
Hey friends, Beau here! Can you feel it? That crisp, cool air, the leaves starting to turn, and that undeniable urge to cozy up with all things pumpkin. It’s officially that magical time of year, and my kitchen is smelling like a dream. But I get it—between holiday prep, gatherings, and just the general busyness of life, turning on the oven for a complicated dessert isn’t always on the menu. That’s exactly why I’m so excited to share this recipe with you today.
Imagine this: all the creamy, spiced, soul-warming flavor of your favorite pumpkin cheesecake, rolled into a perfect, pop-able bite. No water baths, no cracked tops, no fuss. Just a simple mix, roll, and dip situation that results in the most incredible little treats. These No-Bake Pumpkin Cheesecake Balls are here to be the star of your holiday cookie tray, the perfect homemade gift for neighbors, or just a secret little sweet treat tucked away in your fridge for when a cozy craving hits. They’re creamy, they’ve got a fantastic crunch from the crust, and that smooth white chocolate coating? Pure magic. So, grab your favorite mixing bowl and let’s make some no-bake memories together!
A Spoonful of Nostalgia: Where This Recipe Came From
This recipe takes me right back to my grandma’s kitchen table. She was the queen of “keeping it simple,” especially during the hectic holidays. Every year, without fail, she’d make her famous no-bake cheesecake. It was a glorious, jiggly masterpiece that we’d all dive into after Thanksgiving dinner. One year, I decided I wanted to take that same no-bake magic but make it portable—something we could share easily at our big family potluck.
After a little trial and (mostly delicious) error, I landed on the idea of rolling the filling into balls. The first batch was a bit soft, but adding the graham cracker and gingersnap crumbs was the game-changer. It gave them that classic “crust” texture and made them sturdy enough to dip. The moment I brought out that first platter, drizzled with a little extra chocolate, my grandma gave me that slow, knowing nod of approval. That’s the beauty of food, isn’t it? It’s not just about filling our bellies; it’s about taking those beloved traditions and adding our own chapter to the story. Now, every time I make these, it feels like she’s right there in the kitchen with me.
Gathering Your Pumpkin Cheesecake Ball Squad
Here’s the dream team of ingredients that’s going to come together to create something spectacular. The best part? You probably have a lot of this hanging out in your pantry already!
- 8 oz Cream Cheese, softened: This is the creamy, tangy heart of our cheesecake ball. Full-fat is best for flavor and structure, but reduced-fat will work in a pinch. The key word here is SOFTENED. Take it out of the fridge at least an hour before you start. This ensures a smooth, lump-free mixture.
- ⅓ cup Powdered Sugar: Sweetens everything up without the grittiness of granulated sugar. It also helps thicken the mixture slightly.
- ⅔ cup Pumpkin Purée: The star of the show! Make sure you’re using 100% pure pumpkin purée, NOT pumpkin pie filling, which is pre-sweetened and spiced.
- 1 tsp Pumpkin Pie Spice: That warm, cozy flavor we all crave. Feel free to adjust to your taste—add a pinch more if you’re a spice lover!
- 1½ cups Graham Cracker Crumbs: This gives us that classic cheesecake crust flavor and crucial texture. You can buy pre-crumbled or crush whole sheets in a zip-top bag with a rolling pin.
- 1½ cups Gingersnap Crumbs: My secret weapon! The ginger adds a wonderful, warm kick that pairs perfectly with the pumpkin. If you can’t find gingersnaps, you can use all graham cracker crumbs, but the gingersnap really takes it to the next level.
- 12 oz White Almond Bark (for coating): This is my coating of choice because it melts smoothly, sets firmly, and has a sweet, vanilla flavor that doesn’t overpower the pumpkin. You can also use white chocolate chips, but add a teaspoon of coconut oil to help them melt smoothly.
- Optional: 1 cup Orange Candy Melts (for drizzle): Purely for festive flair! A little drizzle makes these look professionally done and extra fun for Halloween or Thanksgiving.
Let’s Get Rolling: Your Step-by-Step Guide
Okay, team! Let’s do this. It’s an easy process, but a few chef-ly tips will make it absolutely foolproof.
Step 1: The Creamy Base
In a large mixing bowl, beat your softened cream cheese with an electric hand mixer (or a stand mixer with the paddle attachment) on medium speed until it’s completely smooth and creamy. This should only take about 30 seconds. Now, add in the powdered sugar, pumpkin purée, and pumpkin pie spice. Beat it all together until it’s beautifully combined and there are no streaks of cream cheese left. Pro Chef Hack: Scrape down the sides of the bowl with a spatula halfway through to ensure everything is evenly mixed.
Step 2: The Crunchy Add-In
Switch to a sturdy spatula or a wooden spoon. Dump in the graham cracker and gingersnap crumbs. Gently fold them into the wet mixture until a soft, somewhat sticky dough forms. It will look and feel like a thick, delicious paste—that’s exactly what you want!
Step 3: The Chill Session
This step is non-negotiable, my friends! Cover the bowl with plastic wrap and pop it into the refrigerator for at least 20-30 minutes. This firms up the fat in the cream cheese, making the dough MUCH easier to handle and roll. Trying to roll it right away is a sticky mess—trust me, I’ve learned the hard way so you don’t have to!
Step 4: Roll Call!
Line a baking sheet with parchment paper or a silicone baking mat. Using a small cookie scoop (about 1 tablespoon size) or a spoon, portion out the dough. Then, with clean, dry hands, roll each portion into a smooth, tight 1-inch ball. Place each ball on the prepared tray. Once they’re all rolled, slide the entire tray into the freezer for 15-20 minutes. This quick freeze is the second key to perfect dipping. A frozen ball means a firm center that won’t fall apart in the warm coating.
Step 5: The Coating Magic
Break the almond bark into chunks and place it in a microwave-safe bowl. Microwave in 30-second bursts, stirring vigorously between each burst, until it’s completely melted and smooth. Do not over-microwave! Now, remove a few balls from the freezer at a time (keeping the rest cold). Using a fork or a dipping tool, submerge a ball in the melted coating. Lift it out, tap the fork gently on the side of the bowl to let the excess drip off, and then place it back on the parchment-lined tray.
Step 6: The Finishing Touch (Optional)
If you’re using the orange candy melts, melt them the same way you did the almond bark. Transfer the melted candy to a small zip-top bag, snip a TINY corner off, and drizzle away over the set balls. Get creative with it!
Step 7: The Final Set
Let the coating set completely at room temperature, or for a faster set, pop them back in the fridge for 10 minutes. Then, it’s time to dig in!
How to Serve These Little Bites of Joy
Presentation is part of the fun! Here’s how to make these cuties shine:
For a casual family treat, simply pile them high on a cute plate or in a rustic wooden bowl. For a holiday party or cookie exchange, give them the star treatment. Arrange them on a elegant platter in a single layer, maybe with a few autumn leaves or cinnamon sticks for decoration. They look incredible nestled in mini paper candy cups—it makes them easy to grab and keeps the coating from sticking to the plate.
These also make the most heartfelt homemade gift. Package them in a clear cellophane bag tied with a pretty ribbon, or stack them in a festive holiday tin. I promise, anyone receiving these as a gift will be absolutely thrilled. They’re the perfect sweet bite with a cup of coffee after dinner, or a fun addition to a dessert charcuterie board!
Mix It Up! Delicious Recipe Variations
Once you’ve mastered the base recipe, the flavor world is your oyster! Here are a few of my favorite twists:
- The Chocolate Lover: Use chocolate graham cracker crumbs instead of regular, and dip the balls in melted dark or milk chocolate instead of white almond bark.
- The Nutty One: Roll the coated balls in finely chopped pecans or walnuts before the coating sets for a fantastic crunchy exterior.
- The Bourbon-Spiced: Add 1-2 tablespoons of bourbon or whiskey to the cream cheese mixture for a sophisticated adult twist. So good!
- Gluten-Free Friendly: Simply use certified gluten-free graham crackers and gingersnaps. The recipe works exactly the same!
- The Extra-Cozy: Add a tiny pinch of black pepper or cayenne pepper to the mix along with the pumpkin spice for a surprising and delicious warm kick.
Beau’s Chef Notes & Kitchen Stories
This recipe is a living thing in my kitchen—it’s evolved over the years! The first time I made them, I was so impatient I didn’t chill the mixture at all. Let’s just say I ended up with pumpkin cheesecake *soup* balls. It was a delicious mess, but a mess nonetheless. I’ve learned that patience with the chilling steps is the true secret ingredient.
Another fun story: I once brought these to a friendsgiving and a guy there, who claimed to “hate pumpkin,” ate about six of them before someone told him what they were. He just looked at me, shrugged, and went back for more. That’s the power of a good no-bake bite! Don’t be afraid to play around and make it your own. That’s what cooking is all about.
Your Questions, Answered!
Q: My mixture is too soft to roll, even after chilling! What did I do wrong?
A: This usually means the cream cheese wasn’t soft enough to incorporate fully, or you might have accidentally used pumpkin pie filling (which is wetter). Don’t panic! Just add more graham cracker crumbs, a tablespoon at a time, until the mixture is rollable.
Q: The coating is clumpy and thick. How can I fix it?
A: This means the almond bark might have been overheated. You can try stirring in a teaspoon of solid shortening (like Crisco) to help smooth it out. Next time, melt it more slowly using shorter bursts in the microwave.
Q: Can I make these ahead of time?
A: Absolutely! They are the perfect make-ahead dessert. Store them in a single layer in an airtight container in the fridge for up to 5 days, or you can freeze them for up to 2 months. Just thaw in the fridge before serving.
Q: Why do I have to freeze the balls before dipping?
A: Freezing them solidifies the fat, ensuring the ball doesn’t fall apart when you dip it into the warm coating. It also helps the coating set much faster and creates a satisfying snap when you bite into it.

Easy No-Bake Pumpkin Cheesecake Balls
Description
Fall flavors, no oven required. These little bites pack all the creamy, spiced goodness of pumpkin cheesecake into a poppable, shareable treat. Perfect for holiday trays, gifts, or a secret stash in your fridge, they’re easy to make and absolutely irresistible. Think cozy pumpkin spice, crunchy cookie crumbs, and a sweet chocolate shell—all in one bite-sized package.
Ingredients
-
8 oz cream cheese, softened
-
⅓ cup powdered sugar
-
⅔ cup pumpkin purée (100% pure, not pie filling)
-
1 tsp pumpkin pie spice
-
1½ cups graham cracker crumbs
-
1½ cups gingersnap crumbs
-
12 oz white almond bark (or white chocolate + 1 tsp coconut oil)
-
Optional: orange candy melts, for drizzle
Instructions
-
Beat cream cheese until smooth. Add powdered sugar, pumpkin, and pumpkin pie spice; mix well.
-
Fold in graham cracker and gingersnap crumbs until a thick dough forms.
-
Chill mixture 30 min, then roll into 1-inch balls. Freeze 15–20 min.
-
Melt almond bark in 30-sec bursts until smooth. Dip balls, let excess drip off, and place on parchment paper.
-
(Optional) Drizzle with melted orange candy melts for a festive finish.
-
Chill until coating sets. Enjoy!
Notes
-
Chill twice: once before rolling, once before dipping—this keeps them firm.
-
Too soft? Add extra crumbs, 1 tbsp at a time.
-
Swap coatings: dark or milk chocolate for a richer twist.
-
Perfect make-ahead: fridge 5 days or freeze up to 2 months.
Nutritional Information (Approximate)
Okay, let’s be real—these are a dessert, a treat, a moment of joy! But I know many of us like to have a general idea of what we’re enjoying. Here’s the approximate nutritional info per ball (based on a yield of 24 balls). Remember, these are estimates and can vary based on specific brands and ingredients used.
Per Serving: Calories: 130 | Fat: 7g | Saturated Fat: 4g | Carbohydrates: 15g | Fiber: 0g | Sugar: 11g | Protein: 2g | Sodium: 95mg
While they’re not a health food, they are a portion-controlled delight. Enjoying one or two is a perfect way to satisfy that sweet tooth without overdoing it!
Final Thoughts from My Kitchen to Yours
Well, friends, we’ve done it! We’ve created a ridiculously easy, incredibly delicious, and absolutely impressive fall treat without ever turning on the oven. I hope these No-Bake Pumpkin Cheesecake Balls bring as much joy to your kitchen and your people as they have to mine.
The real recipe here is more than the ingredients—it’s about taking a few moments to create something delightful to share. It’s about the laughter that happens while you’re rolling the balls, the satisfaction of that perfect drizzle, and the happy faces of everyone who gets to try one. So don’t stress about making them perfect. Just have fun with it! I’d love to see your creations. Tag me @Feastical on social media so I can cheer you on.
Now, go forth and make something Feastical! Until next time, happy cooking.

Split Pea Soup with Smoked Turkey (Hearty & Gluten-Free)
Your New Favorite Bowl of Cozy: Split Pea Soup with Smoked Turkey
Hey friends, Beau here from Feastical! Let’s talk about the ultimate culinary hug. You know the one. It’s that meal you crave when the wind is howling, the day has been a marathon, and your soul needs something deeply, profoundly comforting. For me, that’s a steaming, hearty bowl of split pea soup. But not just any split pea soup. We’re taking this classic to new, smoky, incredibly flavorful heights with a secret weapon: smoked turkey.
This isn’t a fussy, chef-y recipe. This is a one-pot wonder that practically makes itself while filling your kitchen with the most incredible aroma. It’s the kind of meal that gathers people around the table, sparks conversation, and leaves everyone feeling completely satisfied. The split peas break down into a luxuriously creamy, thick broth without a drop of cream, and the smoked turkey infuses every single spoonful with a rich, savory depth that is just… *chef’s kiss*.
Plus, it’s naturally gluten-free and packed with protein and fiber, so it’s as wholesome as it is delicious. Whether you’re a seasoned soup slinger or a kitchen newbie, this recipe is your ticket to comfort food glory. So, grab your favorite big pot, and let’s make a memory together.
A Pot of Soup and a Side of Nostalgia
This recipe always takes me right back to my Grandma Dot’s kitchen. She was a no-nonsense woman who believed strongly in two things: a well-stocked pantry and the healing power of a good soup. Every fall, without fail, a giant pot of split pea soup would appear on her stovetop, simmering for hours. Her version used a humble ham hock, and it was glorious.
But a few years ago, after a particularly successful Thanksgiving that left me with a colossal smoked turkey carcass, I had a lightbulb moment. I threw the whole thing into a pot with some split peas and water, thinking I was just making stock. What emerged was a revelation. The smoke from the turkey paired with the earthy peas created a flavor so complex and satisfying, it instantly dethroned my memory of the original. It became my new tradition—a little nod to Grandma Dot, but with a Feastical twist. It’s my go-to for using up holiday leftovers or for just conjuring that feeling of home, no special occasion needed.
Gathering Your Soup Squad: The Ingredients
One of the best things about this soup is its simplicity. You likely have most of this in your pantry right now! Here’s what you’ll need and why each ingredient is a key player:
- 2 tbsp olive oil: Our cooking fat to sauté our veggie base. Avocado oil or butter work great here too!
- 1 onion, chopped: The sweet, aromatic foundation of so many great dishes. Don’t rush cooking it!
- 2 carrots, diced: Adds a subtle sweetness and a beautiful pop of color.
- 2 celery stalks, diced: The classic third member of the “holy trinity” (mirepoix), providing an earthy, savory note.
- 2 garlic cloves, minced: Because what’s a savory dish without garlic? It adds a crucial layer of flavor.
- 1 lb dried green split peas, rinsed: The star of the show! Chef’s Insight: Always, always rinse them in a colander. You’d be surprised at the little bits of dust or tiny stones you might find. They are naturally creamy and thicken the soup all on their own.
- 6 cups low-sodium chicken broth or water: I prefer low-sodium broth so I can control the salt level myself. Using all water is totally fine—the turkey and veggies will create a fantastic broth!
- 2 cups smoked turkey, shredded: Our flavor MVP! You can use meat from a leftover smoked turkey breast or leg, or even find it pre-shredded at some grocery stores. Substitution Tip: A ham hock, diced ham, or even a couple of smoked turkey legs (which you can shred after cooking) are perfect substitutes.
- 1 tsp dried thyme: Herby, slightly floral, and a classic pairing with peas and poultry.
- 1 bay leaf: It adds a subtle, almost tea-like background note. Just remember to fish it out before serving!
- Salt & pepper, to taste: Seasoning is everything. We add this at the end so the salt doesn’t prevent the peas from softening.
- 1–2 tsp apple cider vinegar (to finish): This is non-negotiable, friends! It seems like a tiny amount, but it brightens the entire pot, cutting through the richness and making all the flavors pop. Think of it as the secret ingredient that makes people ask, “Wow, what is in this?”
Let’s Get Cooking: Building the Perfect Pot of Soup
Ready to work some magic? This process is simple, relaxing, and oh-so-rewarding. Follow these steps for a foolproof pot of perfection.
- The Sizzling Start: In a large Dutch oven or heavy-bottomed pot, heat your olive oil over medium heat. Add the chopped onion, carrots, and celery (your mirepoix!). Sauté for 6-8 minutes, stirring occasionally, until the onions are translucent and the veggies have started to soften. Chef’s Hack: Don’t crank the heat to high here. We’re not looking to brown them, just to sweat them and release their sweet, sweet flavors.
- Garlic Time! Add the minced garlic, dried thyme, and that trusty bay leaf. Cook for just 1 minute more until fragrant. Ah, smell that? That’s the sound of your kitchen winning.
- The Big Pour: Now, stir in your rinsed split peas, the broth (or water), and the shredded smoked turkey. Give it a good stir to combine everything.
- Simmer to Success: Bring the pot to a lively boil. Once it’s bubbling away, immediately reduce the heat to low, partially cover the pot with a lid (leave a small crack for steam to escape), and let it simmer gently for 45 to 60 minutes. Chef’s Tip: Stir it occasionally, especially towards the end, to prevent the peas from sticking to the bottom of the pot. You’ll know it’s done when the peas have completely broken down and the soup has thickened to a lovely, creamy consistency.
- The Finishing Touches: Carefully remove the bay leaf (it’s done its job!). Now, taste your masterpiece. Season with salt and freshly ground black pepper. Remember, the smoked turkey can be salty, so taste first! Finally, stir in that magical 1-2 teaspoons of apple cider vinegar. Taste again and be amazed at the transformation.
Bowl + Spoon = Happiness: How to Serve It Up
This soup is a complete meal in a bowl, but a few simple accompaniments can turn it into a feast. I love serving it piping hot in big, deep bowls.
For a little textural contrast, set out a few topping options for everyone to choose from: a dollop of plain Greek yogurt or sour cream, a sprinkle of fresh chopped chives or parsley, extra black pepper, or even some crunchy croutons (if you’re not strictly gluten-free).
On the side, you can’t go wrong with a thick, crusty slice of gluten-free bread for dipping, or a simple, crisp green salad with a tangy vinaigrette to balance the soup’s richness. It’s the perfect easy, satisfying weeknight dinner that feels anything but ordinary.
Make It Your Own: Delicious Recipe Variations
The beauty of this soup is its flexibility. Play around with these twists to keep it exciting!
- The “Clean Out the Fridge” Version: Toss in a handful of spinach or kale during the last 5 minutes of cooking. Got a potato? Dice it up and add it with the split peas for extra heartiness.
- Spice It Up: Add a pinch of red pepper flakes with the thyme for a gentle kick, or a dash of smoked paprika to double down on the smoky flavor.
- Herb Garden Refresh: Swap the dried thyme for a tablespoon of fresh chopped rosemary or tarragon for a different herbal profile.
- Vegan/Veggie Powerhouse: Easy! Omit the turkey and use water or veggie broth. To replace the smoky depth, add a teaspoon of liquid smoke or smoked paprika. You could also add a cup of diced potatoes for body.
- Instant Pot Speed Run: Use the sauté function for Step 1. Add all remaining ingredients (except the vinegar, salt, and pepper). Pressure cook on high for 15 minutes, then let the pressure release naturally for 10 minutes before doing a quick release. Finish with vinegar, salt, and pepper.
Beau’s Chef’s Notes & Kitchen Stories
This recipe has evolved so much from my first attempt! The first time I made it, I made the classic mistake of salting the broth at the beginning. The peas never quite softened, and I ended up with a slightly grainy, undercooked soup. Lesson learned: salt at the end, always!
Another funny story: I once convinced my nephew that the green color came from pureed leprechauns. He believed it for years and would demand “Leprechaun Soup” every time he visited. Whatever gets the kids to eat their veggies, right?
This soup is also a fantastic freezer meal. I almost always double the batch and freeze half for those nights when I just can’t even think about cooking. It thaws and reheats like an absolute dream.
Your Soup Questions, Answered!
Q: My soup is too thick! How can I thin it out?
A: No problem at all! Simply stir in a little more broth or water, a splash at a time, until it reaches your preferred consistency. It will thicken as it sits, so you may need to do this when reheating leftovers, too.
Q: Can I make this in a slow cooker?
A: Absolutely! Sauté your veggies on the stovetop first for the best flavor, then transfer everything to your slow cooker. Cook on LOW for 6-8 hours or on HIGH for 3-4 hours.
Q: I forgot to add the apple cider vinegar. Is it ruined?
A: Not ruined at all! It will still be tasty, but it might taste a little flat or one-dimensional. Just stir it in at the end when you’re reheating your bowl. You’ll notice the difference immediately.
Q: Where do I find smoked turkey?
A: Great question! Many grocery stores sell pre-cooked smoked turkey breasts or legs near the lunch meat or in the meat section. After holidays like Thanksgiving, it’s also easy to find. You can also use leftover turkey and add a ½ teaspoon of liquid smoke to the broth to mimic the flavor.

Split Pea Soup with Smoked Turkey (Hearty & Gluten-Free)
Description
If comfort had a flavor, this would be it. Creamy split peas melt into a silky, hearty broth while smoked turkey adds a savory depth that makes every spoonful feel like a hug. It’s cozy, nutrient-rich, and perfect for chilly nights or using up holiday leftovers. The best part? It’s simple, one-pot cooking that rewards you with big flavor and zero fuss.
Ingredients
-
2 tbsp olive oil
-
1 onion, chopped
-
2 carrots, diced
-
2 celery stalks, diced
-
2 garlic cloves, minced
-
1 lb dried green split peas, rinsed
-
6 cups low-sodium chicken broth or water
-
2 cups smoked turkey, shredded
-
1 tsp dried thyme
-
1 bay leaf
-
Salt & pepper, to taste
-
1–2 tsp apple cider vinegar (to finish)
Instructions
-
Heat olive oil in a large pot over medium heat. Sauté onion, carrots, and celery until softened (6–8 min).
-
Add garlic, thyme, and bay leaf; cook 1 min until fragrant.
-
Stir in split peas, broth, and smoked turkey. Bring to a boil.
-
Reduce heat, partially cover, and simmer 45–60 min, stirring occasionally, until peas break down and soup thickens.
-
Remove bay leaf, season with salt and pepper, then stir in apple cider vinegar before serving.
Notes
-
Rinse split peas well—sometimes tiny stones sneak in.
-
For a smoky kick, add smoked paprika.
-
If soup is too thick, stir in extra broth or water.
-
Freezes beautifully—double the batch for future comfort.
Nutritional Information (Per Serving)
This soup isn’t just good for the soul; it’s packed with nutritional goodness! Here’s a rough breakdown per serving (based on 6 servings):
- Calories: ~290
- Carbohydrates: 35g
- Fat: 8g
- Protein: 20g
- Fiber: 12g (That’s nearly half the recommended daily intake!)
This makes it a fantastic, balanced meal. The protein and fiber keep you full and satisfied, while the ingredients provide a great source of vitamins A and C (from the carrots), iron, and potassium. It’s proof that comfort food can be incredibly nourishing.
Final Thoughts from My Kitchen to Yours
Well, there you have it, my friends. My heartwarming, soul-soothing, incredibly delicious recipe for Smoked Turkey Split Pea Soup. It’s more than just a list of ingredients and steps; it’s a reminder that the best meals are often the simplest ones, made with a little patience and a whole lot of love.
I hope this recipe finds its way into your regular rotation and becomes a new tradition in your home, just like it is in mine. If you make it (and I really hope you do!), tag me on social @feastical so I can see your beautiful bowls! Nothing makes me happier than seeing you guys create and enjoy these recipes.
Now, go forth and get your soup on! Until next time, keep your spoons ready and your hearts full.
– Beau
Ham & White Bean Soup with Kale (Hearty & Gluten-Free)
Your New Favorite Bowl of Comfort: Ham & White Bean Soup with Kale
Hey friends, Beau here from Feastical! Can we talk about soup for a second? Not just any soup, but the kind of soup that feels like a warm, hearty hug from the inside out. The kind that simmers on your stove, filling the whole house with an aroma that somehow smells like comfort, home, and pure happiness. If you’re nodding along, then you and I are on the same delicious wavelength, and I am so excited to share this recipe with you today.
This isn’t just a recipe; it’s my go-to solution for chilly evenings, for using up that leftover holiday ham, and for packing a serious nutritional punch without sacrificing an ounce of flavor. We’re talking tender, creamy white beans, smoky bites of ham, and vibrant kale that holds its own in a rich, savory broth. A hint of rosemary and a sneaky spoonful of Dijon mustard create a depth of flavor that will have everyone asking for seconds. The best part? It’s naturally gluten-free, incredibly easy to make, and on the table in under an hour. So, grab your favorite soup pot, and let’s make something beautiful together.
The Story Behind the Soup: More Than Just Leftovers
This soup has roots, my friends. It all started the day after a seriously epic Friendsgiving a few years back. My fridge was a landscape of leftovers, dominated by a giant, beautifully glazed ham bone with plenty of meat still hanging on. Now, my grandma Collier, a woman who never let a single scrap of food go to waste, would have looked at that bone and seen pure potential. She believed a ham bone wasn’t the end of a meal; it was the glorious beginning of the next one.
Channeling her spirit, I threw that bone into a big pot with some water, letting it simmer away while I rummaged through the veggie drawer. An onion here, a couple of lonely carrots there, a can of beans from the pantry… before I knew it, I had created this soul-warming concoction. That first spoonful was a revelation—it tasted like resourcefulness, like comfort, and like a delicious secret handshake between cooks who know the magic of a good leftover. Now, I almost look forward to the ham more for the soup that follows. It’s a tradition that keeps my grandma’s savvy kitchen spirit alive in my own cooking, and I’m just thrilled to pass it on to you.
Gathering Your A-Team: The Ingredients
Simple, wholesome ingredients are the heart of this recipe. Here’s what you’ll need and why each one is a star player:
- 2 tbsp olive oil: Our cooking fat of choice! It adds a lovely fruitiness and helps sauté our veggies to perfection. Avocado oil works great too if that’s what you have.
- 1 small onion, diced: The sweet, aromatic foundation of so many great soups. No onion? A leek or a couple of shallots are fantastic stand-ins.
- 2 carrots, chopped: They bring a subtle sweetness and a gorgeous pop of color. Don’t stress about perfect chops—rustic chunks are part of this soup’s charm!
- 2 celery stalks, chopped: The third member of the classic “mirepoix” trio, adding essential earthy flavor and texture.
- 2 garlic cloves, minced: Because what’s a savory soup without garlic? Pro tip: smash the cloves with the flat of your knife first—the skins will slip right off!
- 1 tsp chopped fresh rosemary (or 1/2 tsp dried): This herb is a powerhouse friend to ham and beans. It’s woodsy and fragrant. If you’re using dried, rub it between your fingers as you add it to wake up the oils.
- 4 cups cooked ham, diced: The king of flavor! This is where you use up that leftover holiday ham. No leftovers? Most grocery stores sell pre-diced ham steak near the bacon, which works beautifully.
- 2 cans (15 oz each) white beans, drained and rinsed: I use canned for speed and convenience. Great Northern or Cannellini beans are perfect—they’re creamy and hold their shape. Rinsing them gets rid of any excess sodium and that starchy can liquid.
- 6 cups low-sodium chicken or vegetable broth: Using low-sodium is key here, as the ham will already add saltiness. You’re the boss of your broth, so you can control the seasoning at the end!
- 2 cups chopped kale, stems removed: A superfood that wilts down into tender, yummy goodness. I prefer curly kale for soup, but Lacinato (or dinosaur) kale works too. Chef’s Hack: Give the leaves a good massage after chopping to make them even more tender.
- 1 tbsp Dijon mustard: This is my secret weapon! It doesn’t make the soup taste like mustard; instead, it adds a incredible depth and tang that brightens the entire pot. Trust me on this one.
- Salt & pepper, to taste: Always season at the end, after the ham has had time to share its salty goodness with the broth.
Let’s Get Cooking: Building Your Soup, Step-by-Step
Okay, team! Let’s fire up the stove. This process is all about building layers of flavor. Follow these steps, and you’ll have a pot of gold (or, you know, soup) in no time.
Step 1: The Aromatic Base. In a large Dutch oven or heavy-bottomed pot, heat your olive oil over medium heat. Once it shimmers, add your onion, carrots, and celery. We’re not looking to brown them, just to sweat them out until they’re softened and the onion is translucent, about 5-7 minutes. This sweet, savory foundation is what makes the broth so incredible.
Step 2: Wake Up the Flavors. Add the minced garlic and rosemary to the pot. Now, lean in and take a big whiff—this is where the magic starts! Cook for just about 60 seconds, until incredibly fragrant. Be careful not to burn the garlic, or it’ll turn bitter. We’re just toasting its potential.
Step 3: The Main Event. Time for the ham and beans! Stir them into the veggie mixture, letting the ham get friendly with the heat and release some of its smoky flavor. This quick sear on the ham adds another fantastic layer of taste.
Step 4: Simmer to Perfection. Carefully pour in your broth and give everything a good stir. Crank the heat up to bring it to a lively simmer, then reduce the heat to maintain it. Let it bubble away, uncovered, for 20-25 minutes. This allows the flavors to meld, the broth to reduce slightly, and the carrots to become perfectly tender. Stir it occasionally and just enjoy the smell.
Step 5: The Grand Finale. Stir in your chopped kale and that secret weapon—the Dijon mustard. Let it simmer for another 5-7 minutes, just until the kale has wilted and turned a vibrant green. You want it tender but not mushy.
Step 6: Taste and Season. This is the most important step! Turn off the heat. Grab a spoon and taste your creation. Now, and only now, season with salt and black pepper to your liking. Remember, the ham is salty, so you might not need much! Give it one final stir, and you are DONE.
How to Serve It Up: Bowl & Beyond
Ladle this beautiful, steaming soup into deep, wide bowls. This is where you can make it your own! I love to finish each bowl with a generous crack of black pepper and maybe a drizzle of good olive oil. If you’re feeling fancy, a sprinkle of grated Parmesan or Pecorino Romano cheese adds a salty, umami kick that is just divine.
While this soup is a complete meal in a bowl, it’s also fantastic with a thick, crusty slice of gluten-free bread for dipping and sopping up every last drop. For a lighter option, a simple side salad with a bright vinaigrette helps cut through the richness perfectly. Don’t forget a big glass of iced tea or a crisp white wine like Sauvignon Blanc!
Make It Your Own: Delicious Twists & Swaps
This recipe is incredibly forgiving and easy to adapt. Here are a few of my favorite ways to switch it up:
- Smoky & Spicy: Add a pinch of red pepper flakes with the garlic, or stir in a teaspoon of smoked paprika for an extra layer of smokiness.
- The “Everything but the…” Version: Clean out your fridge! A handful of frozen corn, some diced potatoes, or even a cup of chopped green beans would be right at home in this pot.
- Turkey Twist: Have leftover turkey instead of ham? It works beautifully! The flavor will be a bit milder, so you might want to add a touch more rosemary or a splash of lemon juice at the end to brighten it up.
- Vegetarian/Vegan Delight: Simply omit the ham and use vegetable broth. To replicate that smoky depth, sauté 8 oz of sliced cremini mushrooms until brown and use a teaspoon of liquid smoke (use sparingly!) or smoked paprika.
- Creamy Dreamy: For a richer, creamier texture, stir in 1/2 cup of heavy cream or full-fat coconut milk during the last few minutes of cooking.
Beau’s Chef Notes & Kitchen Stories
This recipe has evolved so much from that first post-Friendsgiving experiment. The single biggest game-changer was adding the Dijon mustard. I was once making a vinaigrette next to the soup pot and a little splash of Dijon went rogue, landing right in the soup. Rather than panic, I tasted it. It was a revelation! It cut through the richness and made every other flavor pop. Now, it’s a non-negotiable ingredient.
Another lesson learned: always wait to salt! I once made this for a friend and salted at the beginning without thinking. The ham released its salt, and the broth reduced… let’s just say we drank a lot of water that night. Season at the end, folks. Your taste buds will thank you.
Your Questions, Answered: FAQs & Troubleshooting
Q: Can I use a ham bone instead of diced ham?
A: Absolutely! This is the classic way. Use a meaty ham bone and add it in with the broth. Let the soup simmer for at least an hour to extract all that glorious flavor from the bone. Then, remove the bone, shred the meat, and return it to the pot before adding the kale.
Q: My soup is too thin! How can I thicken it?
A: No problem! Take about 1 cup of the soup (mostly beans and a little broth) and blend it until smooth in a blender or with an immersion blender. Stir this puree back into the pot—it will thicken the broth beautifully without any flour.
Q: Can I make this in a slow cooker or Instant Pot?
A: You bet. For the Slow Cooker: Sauté the veggies first (this step is worth it for flavor!), then add everything except the kale and Dijon to the pot. Cook on LOW for 6-8 hours or HIGH for 3-4. Stir in kale and Dijon 30 minutes before serving. For the Instant Pot: Use the Sauté function for the veggies. Add everything except kale and Dijon. Cook on HIGH pressure for 10 minutes, then do a quick release. Stir in kale and Dijon and let it wilt using the residual heat.
Q: How long will leftovers last?
A: Stored in an airtight container in the fridge, this soup is even better the next day! It will keep for 3-4 days. You can also freeze it for up to 3 months. The beans may soften a bit upon thawing, but it will still taste amazing.

Ham & White Bean Soup with Kale (Hearty & Gluten-Free)
- Total Time: 45 min
Description
There’s nothing quite like a steaming bowl of soup that feels like a hug in every bite. This hearty dish brings together smoky ham, creamy white beans, and nutrient-packed kale in a rich, savory broth that’s comforting yet wholesome. With just a few simple steps, you’ll have a pot of cozy goodness ready in under an hour. Perfect for chilly nights, holiday leftovers, or anytime you crave comfort in a bowl.
Ingredients
-
2 tbsp olive oil
-
1 small onion, diced
-
2 carrots, chopped
-
2 celery stalks, chopped
-
2 garlic cloves, minced
-
1 tsp fresh rosemary (or ½ tsp dried)
-
4 cups cooked ham, diced
-
2 cans (15 oz) white beans, rinsed
-
6 cups low-sodium chicken or vegetable broth
-
2 cups kale, chopped, stems removed
-
1 tbsp Dijon mustard
-
Salt & black pepper, to taste
Instructions
-
Heat olive oil in a large pot. Sauté onion, carrots, and celery until softened (5–7 min).
-
Stir in garlic and rosemary; cook until fragrant (1 min).
-
Add ham and beans, stirring to coat.
-
Pour in broth, bring to a simmer, and cook uncovered 20–25 min.
-
Stir in kale and Dijon; simmer 5–7 min until kale is tender.
-
Taste, season with salt and pepper, and serve hot.
Notes
-
Massage kale leaves before adding—they’ll soften beautifully.
-
For extra creaminess, blend 1 cup of beans with broth and stir back in.
-
Vegetarian? Swap ham for mushrooms + smoked paprika.
- Prep Time: 15 min
- Cook Time: 30 min
Nutritional Info (Because Knowledge is Power!)
This soup isn’t just good for the soul; it’s packed with nutrients! Here’s a rough breakdown per serving (based on 6 servings):
Calories: ~320 | Protein: 22g | Carbohydrates: 25g | Fiber: 6g | Fat: 14g
This is a well-balanced meal! The ham and beans provide a powerhouse of protein to keep you full and satisfied. The fiber from the beans and kale is fantastic for digestion and heart health. Kale is a superstar, loaded with Vitamins A, K, and C, along with antioxidants. Using low-sodium broth and waiting to salt helps keep the sodium content in check. It’s a hearty, gluten-free meal that truly nourishes you from the inside out.
Final Thoughts from My Kitchen to Yours
Well, there you have it, my friends. My absolute favorite way to turn simple ingredients into a pot of pure comfort. This Ham & White Bean Soup with Kale is more than just a recipe; it’s a reminder that the best meals often come from a place of resourcefulness and love. They don’t have to be complicated to be incredible.
I hope this recipe finds its way into your regular rotation and becomes a story you tell in your own kitchen. Maybe it’ll be the soup you make after your next big holiday feast, or the quick fix for a busy weeknight. However you enjoy it, I’d love to hear about it! Tag me @feastical on social media so I can see your beautiful creations.
Now go forth, get cooking, and remember—food is meant to be shared. Until next time, keep your spoons handy and your hearts full.
Italian Wedding Soup (Hearty & Traditional)
Your New Favorite Bowl of Sunshine: Italian Wedding Soup
Hey friends, Beau here from Feastical! Let’s talk about that magical moment when you need a meal that feels like a warm, comforting hug from the inside out. You know the feeling—maybe there’s a slight chill in the air, or you’ve had one of those days that calls for a serious dose of cozy. That’s exactly when I find myself drifting toward my big, well-loved stockpot to whip up a batch of what I consider liquid sunshine: Hearty & Traditional Italian Wedding Soup.
Now, don’t let the name fool you. This soup isn’t just for nuptials! The “wedding” (or minestra maritata in Italian) actually refers to the beautiful marriage of flavors between the savory meatballs, the delicate greens, and the rich, parmesan-kissed broth. It’s a harmony in a bowl. This recipe is my absolute go-to because it’s surprisingly simple, endlessly satisfying, and packed with so much love and flavor. It’s light enough that you don’t feel weighed down, yet hearty enough to be a complete meal. So, tie on your favorite apron, and let’s create some magic together. I promise, your kitchen is about to smell incredible.
A Soup for the Soul (And My Nonna’s Table)
This soup always takes me right back to my friend Gina’s chaotic, loud, and incredibly warm family kitchen. I was maybe 19, and her Italian grandmother, Nonna Maria, was presiding over a giant pot of this simmering soup like it was her throne. I remember watching, completely mesmerized, as she effortlessly rolled dozens of tiny meatballs between her palms, all while arguing passionately in a mix of Italian and English about a soccer game on TV.
She handed me a spoon to taste the broth. It was life-changing. Deep, savory, with a hidden richness I couldn’t place. When I asked her secret, she just winked, pointed to a faded piece of Parmesan rind bubbling away in the pot, and said, “That’s the ghost, ragazzo mio. It gives its life for the flavor.” That moment stuck with me. It wasn’t just about the ingredients; it was about the soul. It was about feeding the people you love with something made entirely from the heart. That’s the spirit I try to bring to this recipe every single time.
Gathering Your Flavor All-Stars
Here’s the beautiful part: the ingredient list is humble and simple. It’s all about quality and a couple of chef secrets. Let’s break it down.
For the Meatballs:
- 1/2 lb ground beef: I like an 80/20 blend here. The little bit of fat keeps the meatballs juicy and flavorful. For a leaner option, ground chicken works too.
- 1/2 lb ground pork: This is the classic choice for incredible flavor. Chef’s Insight: If you want to lighten it up, ground turkey is a fantastic and delicious swap!
- 1/3 cup breadcrumbs: They act as a binder. Panko works great, or use gluten-free breadcrumbs if needed.
- 1/4 cup grated Parmesan: Please, for the love of all that is good, grate it fresh off the block! The pre-shredded stuff just doesn’t melt the same way.
- 1 egg: Our binding agent that holds this little flavor party together.
- 1 garlic clove, minced: Fresh is best! It gives a little punch that powdered garlic just can’t match.
- Salt & pepper to taste: Don’t be shy. Seasoning is key!
For the Soup:
- 1 tbsp olive oil: For sautéing our aromatic veggie base.
- 1 small onion, finely chopped: The sweet, foundational flavor.
- 2 carrots, diced: Adds a touch of natural sweetness and beautiful color.
- 2 celery stalks, diced: The third member of the “holy trinity,” adding essential earthy notes.
- 8 cups chicken broth: Use the best quality you can find! It makes a huge difference. Low-sodium is best so you can control the salt level.
- 1 Parmesan rind: This is the SECRET WEAPON! It infuses the broth with an unbelievable, deep, umami richness. Don’t throw your rinds away—freeze them for moments like this!
- 3/4 cup acini di pepe or other tiny pasta: The classic little “peppercorn” pasta. Orzo, pastina, or even ditalini work perfectly.
- 1 head escarole, chopped: The traditional green. It has a slight bitterness that balances the soup beautifully. Sub Tip: No escarole? Spinach, kale, or chopped endive are all great!
- Salt & pepper, to taste: Always taste and season at the end!
- Extra grated Parmesan (for serving): Because is there ever really enough cheese? I think not.
Let’s Get Cooking: Building the Perfect Bowl
Okay, team! Let’s do this. It’s all about building layers of flavor. Read through once, then just go for it—cooking is about feeling, not perfection!
- Make the Meatball Mix: In a medium bowl, combine the ground beef, ground pork, breadcrumbs, grated Parmesan, egg, minced garlic, and a good pinch of salt and pepper. Now, here’s my chef hack: Use your hands! Get in there and mix it until just combined. Don’t overwork it, or your meatballs can get a little tough.
- Form the Mini Meatballs: Pinch off small pieces of the mixture and roll them into tiny, bite-sized balls—about 1 inch in diameter. Pro tip: lightly wet your hands with water to prevent the mixture from sticking. You should get about 30-40 little guys. Set them on a plate or baking sheet.
- Sauté the Aromatics: In a large Dutch oven or heavy-bottomed pot, heat the olive oil over medium heat. Add the chopped onion, carrots, and celery (this trio is called a soffritto!). Sauté for about 5-7 minutes, until they become fragrant and the onion turns translucent. You’re building your flavor base right here!
- Simmer the Broth: Pour in the 8 cups of chicken broth and add that glorious Parmesan rind. Bring it all to a gentle simmer. This is where the magic starts. Let that rind bubble away and work its umami magic for a few minutes before the next step.
- Cook the Meatballs: Gently drop the meatballs into the simmering broth one by one. Don’t stir right away! Let them cook for about 10 minutes. They’ll float to the top when they’re mostly done. This poaching method keeps them incredibly tender.
- Add the Pasta: Stir in your tiny pasta and let it simmer for another 8-10 minutes, or until the pasta is perfectly al dente. Give it an occasional stir to prevent anything from sticking to the bottom.
- Wilt the Greens: Finally, stir in your chopped escarole. It will look like a lot at first, but it wilts down dramatically. Cook for just 2-3 more minutes until the greens are bright green and tender. Chef’s Note: If you’re using spinach, it will wilt in under a minute, so add it literally at the last second!
- Season and Serve: Taste the soup! This is the most important step. Does it need more salt? Pepper? Adjust accordingly. Fish out the Parmesan rind (its job is done, and you can discard it). Ladle the soup into bowls and finish with a generous shower of freshly grated Parmesan cheese.
How to Serve This Masterpiece
Presentation is part of the fun! Ladle this beautiful soup into deep, wide bowls so you get a little bit of everything in each spoonful—broth, pasta, veggie, and meatball. The grand finale is a hefty sprinkle of that extra Parmesan cheese. For the full Feastical experience, serve it with a thick, crusty slice of garlic bread or some warm, buttery breadsticks for dipping. A simple, bright arugula salad on the side helps cut through the richness perfectly. And don’t forget a lemon wedge on the side—a tiny squeeze right at the end can really make the flavors pop in a way you wouldn’t believe!
Make It Your Own: Delicious Twists & Swaps
The best recipes are templates for creativity. Here are a few ways to riff on this classic:
- Lemon-Herb Brightness: Add the zest of one lemon to the meatball mixture and a big handful of fresh chopped parsley or dill at the very end with the greens.
- Keep It Lean: Use all ground turkey or chicken for the meatballs and swap the pasta for a whole wheat or gluten-free variety. It’s just as comforting!
- Greens Galore: Not an escarole fan? Use kale (just add it a minute or two earlier to soften) or Swiss chard. Spinach is always a quick and easy winner.
- “Knot” Your Average Meatball: For an incredible texture, use ground sausage (mild or hot Italian) instead of plain pork. It’s already seasoned with those amazing fennel and herbs.
- White Bean Bliss: Want to make it even heartier? Stir a can of drained and rinsed cannellini beans in with the pasta. You’ll thank me later.
Beau’s Chef Notes & Kitchen Stories
This recipe has evolved so much in my kitchen over the years. I once, in a frantic pre-dinner party rush, tried to roll all the meatballs at once and ended up with one giant, soup-sized meatball. We still laugh about the “Italian Wedding Meatloaf Soup” incident. Lesson learned: take your time and enjoy the process!
The single best piece of advice I can give you is to SAVE YOUR PARMESAN RINDS. Keep a zip-top bag in your freezer and just toss them in whenever you finish a block of cheese. They are absolute gold for adding depth to any soup, stew, or sauce. This little habit will change your cooking forever.
Your Questions, Answered!
Q: Can I make this soup ahead of time?
A: Absolutely! You can make the entire soup, but I recommend keeping the pasta separate if you can. Pasta continues to absorb liquid and can get mushy. If you’ve already mixed it in, just know you might need to add a splash of extra broth when you reheat it. The flavor will still be amazing.
Q: My meatballs are falling apart in the soup! What did I do wrong?
A: No worries! This usually means the mixture needed a better binder. Next time, make sure your breadcrumbs are nice and fine, and that you’ve included the egg. Chilling the formed meatballs for 15-20 minutes before adding them to the soup can also help them firm up and hold their shape.
Q: I can’t find acini di pepe. What’s the best substitute?
A: Any small pasta will work wonderfully! Orzo, pastina, stelline (little stars), ditalini, or even broken-up pieces of angel hair pasta are all perfect in this soup.
Q: Is it really necessary to use both meats for the meatballs?
A> While the blend of beef and pork is traditional and gives the best flavor, you can absolutely use just one. All beef, all pork, all turkey—it will still be delicious. The soup police will not come knocking, I promise!
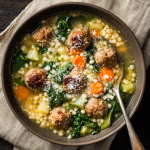
Italian Wedding Soup (Hearty & Traditional)
Description
Hearty & Traditional Italian Wedding Soup
A cozy, flavorful soup with tender meatballs, delicate greens, and a Parmesan-kissed broth. Serves 6.
Ingredients
Meatballs:
-
½ lb ground beef (80/20)
-
½ lb ground pork (or turkey/chicken for leaner option)
-
⅓ cup breadcrumbs (or gluten-free)
-
¼ cup freshly grated Parmesan
-
1 egg
-
1 garlic clove, minced
-
Salt & pepper, to taste
Soup:
-
1 tbsp olive oil
-
1 small onion, finely chopped
-
2 carrots, diced
-
2 celery stalks, diced
-
8 cups chicken broth (low-sodium recommended)
-
1 Parmesan rind
-
¾ cup acini di pepe (or orzo, pastina, ditalini)
-
1 head escarole, chopped (or spinach/kale/Swiss chard)
-
Salt & pepper, to taste
-
Extra grated Parmesan, for serving
Instructions
-
Make Meatballs: Combine all meatball ingredients in a bowl. Mix lightly with hands, form 1-inch balls (30–40). Chill 15–20 min for firmer texture.
-
Sauté Aromatics: Heat olive oil in a large pot over medium heat. Add onion, carrots, and celery. Cook 5–7 min until softened.
-
Simmer Broth: Add chicken broth and Parmesan rind. Bring to gentle simmer.
-
Cook Meatballs: Gently drop meatballs into simmering broth. Cook 10 min, do not stir immediately.
-
Add Pasta: Stir in tiny pasta; simmer 8–10 min until al dente.
-
Wilt Greens: Add escarole; cook 2–3 min until tender (spinach wilts in <1 min).
-
Season & Serve: Taste, adjust salt/pepper. Remove Parmesan rind. Ladle into bowls, top with extra Parmesan. Optional: serve with crusty bread or breadsticks.
Notes
-
Lemon-Herb Brightness: Add zest of 1 lemon to meatballs and fresh parsley or dill at the end.
-
Keep It Lean: Use all turkey/chicken and swap pasta for gluten-free or whole wheat.
-
Greens Galore: Kale or Swiss chard works; adjust cooking time.
-
Sausage Swap: Use mild or hot Italian sausage for extra flavor.
-
Extra Hearty: Stir in a can of rinsed cannellini beans with the pasta.
Nutrition
- Calories: 370 Calo
- Fat: 22g
- Fiber: : 3g
- Protein: 22g
Nutritional Information (Because We Care!)
Here’s a rough breakdown per serving (based on 6 servings). Remember, this is just an estimate and can vary based on your specific ingredients and substitutions!
Calories: ~370
Carbohydrates: 20g
Fat: 22g
Protein: 22g
Fiber: 3g
This soup is a wonderfully balanced meal! You’re getting a great dose of protein from the meatballs and broth, complex carbs from the pasta and veggies, and vitamins from the leafy greens. Using leaner meat or loading up on extra veggies are easy ways to tailor it to your nutritional goals.
Final Thoughts from My Kitchen to Yours
Well, there you have it, my friends. My heart-on-a-sleeve, tried-and-true recipe for the most comforting Italian Wedding Soup. It’s more than just a recipe; it’s a reminder that the best food is often the simplest, made with intention and shared with joy. I hope this soup finds its way to your table on a busy weeknight, a lazy Sunday, or whenever you need a little edible comfort.
If you make it (and I really hope you do!), tag me @feastical on social media so I can see your beautiful creations! Nothing makes me happier than seeing you guys in the kitchen. Now go forth, cook with confidence, and enjoy every last slurp.
With a full belly and a happy heart,
Beau

Turkey & Wild Rice Soup (Hearty & Gluten-Free)
Your New Favorite Bowl of Cozy: Turkey & Wild Rice Soup
Hey friends, Beau here from Feastical! Can we talk about that beautiful, slightly chaotic, and utterly delicious time after a big holiday feast? You know the scene: the table is cleared, the laughter has settled into a warm hum, and sitting proudly in the fridge is… The Turkey. We’ve all been there, staring at that magnificent bird and thinking, “Okay, glorious beast, round two begins now.” Sandwiches are a classic move, sure, but if you really want to win the post-holiday game, you transform those leftovers into something magical, comforting, and downright soul-warming.
That’s where this superstar recipe comes in. This isn’t just any soup; this is a Hearty & Gluten-Free Turkey & Wild Rice Soup that tastes like a warm hug in a bowl. We’re talking tender shreds of turkey and a rich, savory broth packed with earthy mushrooms and fragrant thyme. It’s the kind of meal that fills your kitchen with the most incredible aroma, promising comfort with every single spoonful. It’s nourishing without being pretentious, elegant in its simplicity, and it just so happens to be naturally gluten-free. Whether you’re using up holiday leftovers or just craving a cozy weeknight dinner, this soup is your answer. So, grab your favorite pot and let’s make something beautiful together.
The Soup That Started With a “Happy Accident”
This recipe has a special place in my heart because it was born from what I lovingly call a “happy accident.” A few years back, I hosted my first big Friendsgiving. I was so focused on nailing the perfectly brined, herb-roasted turkey (mission accomplished!) that I completely underestimated how many sides we’d need. We ended up with a mountain of leftover turkey and a serious case of the next-day lazies. No one wanted to cook, but we were all craving something satisfying.
I started pulling things out of the pantry and fridge: some wild rice blend from a pilaf I never got around to making, a handful of mushrooms starting to look a little lonely, and the last of the celery. I threw it all in a pot with the glorious turkey carcass I’d simmered into broth overnight. The result was this incredibly rich, hearty soup that had everyone hovering around the stove, bowls in hand. It was unplanned, imperfect, and absolutely perfect. It reminded me that the best meals aren’t always the ones you plan for days; sometimes, they’re the ones you create from a little bit of love and whatever you have on hand. That’s the spirit of Feastical, and it’s the spirit of this soup.
Gathering Your Soup Squad: The Ingredients
This recipe is wonderfully flexible, but each ingredient plays a key role in building that deep, comforting flavor. Here’s your shopping list and my chef-y insights on each one.
- 2 tbsp olive oil or butter: This is our cooking fat to build the foundation of flavor. I love the fruity depth of a good olive oil, but butter adds a classic, rich comfort. For a dairy-free version, stick with oil!
- 1 small onion, diced: The humble onion is our aromatic base, providing a sweet, savory backbone. No onion? A large shallot or even a leek (white and light green parts only, well-cleaned!) works beautifully.
- 2 garlic cloves, minced: Non-negotiable for me! Garlic adds that punch of aroma and flavor. Pro tip: press your garlic instead of mincing for an even more potent and integrated flavor.
- 2 cups mushrooms, sliced: These are our flavor bombs! They add a deep, earthy, umami richness. Cremini or baby bellas are my go-to, but use whatever you have. Even simple white buttons will work in a pinch.
- 1 cup uncooked wild rice blend (GF certified): The heart of the soup! A blend with wild rice, brown rice, and perhaps some other grains gives fantastic texture. Crucially, always check the package to ensure it’s certified gluten-free if that’s a concern, as some blends can be processed in facilities with wheat.
- 6 cups turkey or chicken broth (GF): The soul of the operation. Homemade broth from your turkey carcass is next-level amazing, but a good quality store-bought broth works wonderfully. Just double-check that label for gluten-free certification!
- 2 cups cooked turkey, shredded or diced: The star of the show! This is why we’re here. Use white meat, dark meat, or a mix. Rotisserie chicken is a fantastic year-round substitute.
- 1 tsp dried thyme (or 1 tbsp fresh): This herb is a match made in heaven with poultry and mushrooms. Dried is perfectly fine, but if you have fresh thyme, you’ll get a brighter, more vibrant note.
- Salt & pepper, to taste: Season as you go! Your broth will have salt, so taste before you add more at the end.
- 1/2 cup heavy cream or full-fat coconut milk (for dairy-free option): This is our finishing touch, adding a touch of luxurious creaminess and rounding out all the flavors. For dairy-free, full-fat coconut milk is a stellar substitute that won’t taste coconutty.
Let’s Get Cooking: Building Your Masterpiece
Now for the fun part! Making soup is a therapeutic process of building layers of flavor. Follow these steps, and you’ll have a pot of gold in under an hour.
Step 1: The Aromatic Base
In a large Dutch oven or heavy-bottomed pot, heat your olive oil or butter over medium heat. Once it shimmers (or the butter melts), add your diced onion. Sauté for about 4-5 minutes, until it becomes translucent and fragrant. Now, add the minced garlic and cook for just another 60 seconds—until you can smell that gorgeous garlicky perfume. Don’t let it brown! Chef’s Hack: Sautéing the onion until soft but not brown helps release its natural sugars, creating a sweet foundation that balances the savory elements.
Step 2: Unleashing the Umami
Add your sliced mushrooms and thyme to the pot. Here’s a key tip: don’t stir them immediately! Let them sit for a minute to get a little color on one side, then give them a good stir. Cook, stirring occasionally, until the mushrooms have released their moisture, shrunk in size, and taken on a beautiful golden-brown color, about 6-8 minutes. Chef’s Hack: This step is crucial for developing deep flavor. We’re not just softening the mushrooms; we’re browning them to create fond (those tasty browned bits) on the bottom of the pot.
Step 3: The Hearty Foundation
Stir in your uncooked wild rice blend, making sure to coat it in the oil and vegetable mixture. This toasts the grains just slightly, enhancing their nutty flavor. Now, pour in your gluten-free broth, scraping the bottom of the pot with your spoon to release all that delicious fond. This is where all the flavor lives! Bring the whole thing to a rolling boil. Chef’s Hack: Deglazing the pot by scraping up the browned bits is a simple step that adds a ton of complex flavor to your soup base.
Step 4: The Simmering Patience
Once boiling, reduce the heat to low, cover the pot with a lid, and let it simmer gently for 40-45 minutes. You’ll know it’s ready when the wild rice grains have split open and are tender to the bite. The broth will also have thickened slightly from the rice starch. Chef’s Hack: Resist the urge to lift the lid too often! Keeping it covered traps the heat and moisture, ensuring the rice cooks evenly and the broth doesn’t reduce too much.
Step 5: The Grand Finale
Once the rice is tender, stir in your cooked, shredded turkey. Let it heat through for about 5-10 minutes—this is just to warm the turkey and let it soak up some of that lovely broth. Finally, turn off the heat and stir in the heavy cream or coconut milk. This is your last step! Adding the cream off the heat prevents it from curdling. Give it a taste and season with salt and freshly ground black pepper until it’s just right for you.
Let’s Dish It Up: Serving Suggestions
This soup is a complete meal in a bowl, but a little presentation goes a long way! Ladle those steaming, hearty spoonfuls into deep, wide bowls. The contrast of the dark wild rice, creamy broth, and tender turkey is just beautiful. Now, let’s gild the lily a little, shall we?
I love to finish each bowl with a fresh garnish. A sprinkle of chopped fresh parsley or chives adds a pop of color and a bright, fresh flavor that cuts through the richness. If you’re feeling indulgent, a little extra crack of black pepper or a drizzle of a good quality olive oil on top is divine. For my friends who aren’t avoiding gluten, a warm, crusty slice of sourdough bread for dipping is non-negotiable. For a gluten-free option, my favorite pairing is a simple side salad with a tangy vinaigrette or even some gluten-free crackers or cornbread on the side. It’s all about that cozy, satisfying experience.
Make It Your Own: Delicious Recipe Variations
The beauty of this soup is its adaptability. Don’t be afraid to play around and make it work for you! Here are a few of my favorite twists:
- The “Kitchen Sink” Veggie Boost: Feel free to add other vegetables when you sauté the onions. Diced carrots and celery (a classic mirepoix) are a natural fit. Add them with the onions to give them time to soften. A handful of spinach or kale stirred in at the very end until wilted is also fantastic.
- Cozy Chicken & Wild Rice: No turkey? No problem! This is arguably just as popular in my house year-round. Simply substitute cooked, shredded rotisserie chicken for the turkey. It’s the ultimate easy weeknight dinner lifesaver.
- Creamy Dairy-Free Dream: As noted, full-fat coconut milk is a perfect one-to-one substitute for the heavy cream. It provides the same luxurious creaminess without a overpowering coconut flavor. For a richer broth without cream, you can also blend a cup of the cooked soup and stir it back into the pot to naturally thicken it.
- Herb Garden Refresh: While thyme is classic, other herbs work wonderfully. Try a teaspoon of dried tarragon or rosemary (use a light hand with rosemary, as it’s powerful!) for a different flavor profile. A bay leaf added during the simmering step and removed before serving adds a subtle, warm depth.
- Instant Pot Shortcut: Short on time? Use the sauté function for Steps 1-3. Add everything except the turkey and cream, seal the lid, and cook on high pressure for 25 minutes. Let the pressure release naturally for 10 minutes, then quick release. Stir in the turkey and cream, and you’re done!
Beau’s Chef Notes: A Few Parting Thoughts
This recipe has evolved from that first happy accident into a true Feastical staple. I’ve made it for sick friends, for frosty winter potlucks, and as my go-day-after-Thanksgiving lunch. One time, I accidentally used a triple amount of black pepper (note to self: the cap was not on tight), and we ended up calling it “Cracked Pepper Potion” – it was actually still delicious, just very, very spicy!
The biggest lesson this soup has taught me is to not be afraid of improvisation. Cooking isn’t about rigid rules; it’s about intuition and taste. Your broth might be saltier than mine, your turkey might be more plentiful—taste as you go and make it yours. The goal is a bowl that makes you and your people feel good. That’s always the goal.
FAQs & Soup Salvation
Q: My soup got really thick after sitting in the fridge. What happened?
A: Don’t worry! This is completely normal. The rice continues to absorb liquid as it sits. Just thin it out with a little extra broth or water when you reheat it on the stove, and it will be good as new.
Q: Can I freeze this soup?
A: You can, but with a caveat. Soups with dairy can sometimes separate or become grainy when frozen and thawed. For best results, freeze the soup before adding the cream. When you’re ready to eat, thaw it, reheat it, and then stir in the cream at the end.
Q: My wild rice is still crunchy after 45 minutes. Help!
A: Different wild rice blends can have varying cook times depending on the specific grains included. If it’s still too firm for your liking, just add a splash more broth and continue simmering, checking every 5-10 minutes until it reaches your desired tenderness.
Q: Is there a way to make this soup in a slow cooker?
A: Absolutely! Sauté the onions, garlic, and mushrooms on the stove first (this step is key for flavor). Then transfer them to your slow cooker and add the rice, broth, and thyme. Cook on LOW for 6-7 hours or on HIGH for 3-4 hours. Stir in the turkey and cream during the last 30 minutes of cooking.
Turkey & Wild Rice Soup (Hearty & Gluten-Free)
Description
Hearty & Gluten-Free Turkey & Wild Rice Soup
Comforting, creamy, and naturally gluten-free. Serves 6.
Ingredients
Soup Base:
-
2 tbsp olive oil or butter
-
1 small onion, diced
-
2 garlic cloves, minced
-
2 cups mushrooms, sliced
-
1 cup uncooked wild rice blend (GF certified)
-
6 cups turkey or chicken broth (GF)
-
2 cups cooked turkey, shredded or diced
-
1 tsp dried thyme (or 1 tbsp fresh)
-
Salt & pepper, to taste
-
½ cup heavy cream or full-fat coconut milk (optional, for creaminess)
Optional Add-Ins & Garnishes:
-
Diced carrots, celery, spinach, or kale
-
Fresh parsley or chives for topping
-
Olive oil drizzle or extra black pepper
Instructions
-
Sauté Aromatics: In a large pot, heat olive oil/butter over medium heat. Add onion, cook 4–5 min until soft. Add garlic, cook 1 min.
-
Cook Mushrooms: Add mushrooms and thyme. Let sit 1 min, then stir occasionally until golden and moisture released (~6–8 min).
-
Add Rice & Broth: Stir in wild rice to toast slightly. Pour in broth, scraping pot bottom to release flavorful bits. Bring to a boil.
-
Simmer: Reduce heat, cover, and simmer 40–45 min until rice is tender.
-
Add Turkey & Cream: Stir in cooked turkey; heat 5–10 min. Remove from heat, stir in cream or coconut milk. Season to taste.
-
Serve: Ladle into bowls. Garnish with parsley, chives, or a drizzle of olive oil. Optional: gluten-free bread or crackers on the side.
Notes
-
Veggie Boost: Add diced carrots, celery, or leafy greens.
-
Chicken Substitute: Rotisserie chicken works year-round.
-
Dairy-Free Creaminess: Use full-fat coconut milk or blend some soup to thicken naturally.
-
Herb Swaps: Tarragon, rosemary, or a bay leaf for different flavors.
-
Slow Cooker: Sauté aromatics first, then add rice, broth, and thyme; cook LOW 6–7 hrs or HIGH 3–4 hrs. Stir in turkey and cream last.
-
Instant Pot Shortcut: Sauté onions/mushrooms, add rice & broth, cook high pressure 25 min, natural release 10 min, then stir in turkey & cream.
Nutrition
- Calories: 330 Cal
- Carbohydrates: 25g
- Fiber: 3g
- Protein: 20g
Nourishment By The Bowl (Approximate)
While I’m all about flavor first, it’s nice to know what’s fueling that comfort! This nutritional information is per serving (assuming 6 servings) and is an estimate calculated using olive oil and heavy cream. Remember, values can vary based on your specific ingredients and portion sizes.
Calories: ~330 | Protein: 20g | Carbohydrates: 25g | Fiber: 3g | Fat: 17g
This soup is a fantastic source of lean protein from the turkey, keeping you full and satisfied. The wild rice provides complex carbohydrates and fiber for sustained energy, and the healthy fats from the olive oil and cream aid in nutrient absorption and add that satisfying mouthfeel. It’s a wonderfully balanced meal that truly nourishes from the inside out.
Final Thoughts: Share the Comfort
Well, friends, there you have it—my all-time favorite way to turn leftovers into a legendary meal. This Turkey & Wild Rice Soup is more than just a recipe; it’s a feeling. It’s the feeling of resourcefulness, of creating something incredible from simple ingredients, and of sharing a steaming, hearty bowl of comfort with people you love.
I truly hope this recipe becomes a trusted favorite in your kitchen, too. It’s earned its spot in my regular rotation, and I have a feeling it will in yours. If you make it (and I really hope you do!), tag me on social @feastical so I can see your beautiful creations. Nothing makes me happier than seeing you guys in the kitchen, creating your own stories and your own versions of comfort.
Until next time, keep your spoons ready and your hearts full. Happy cooking!