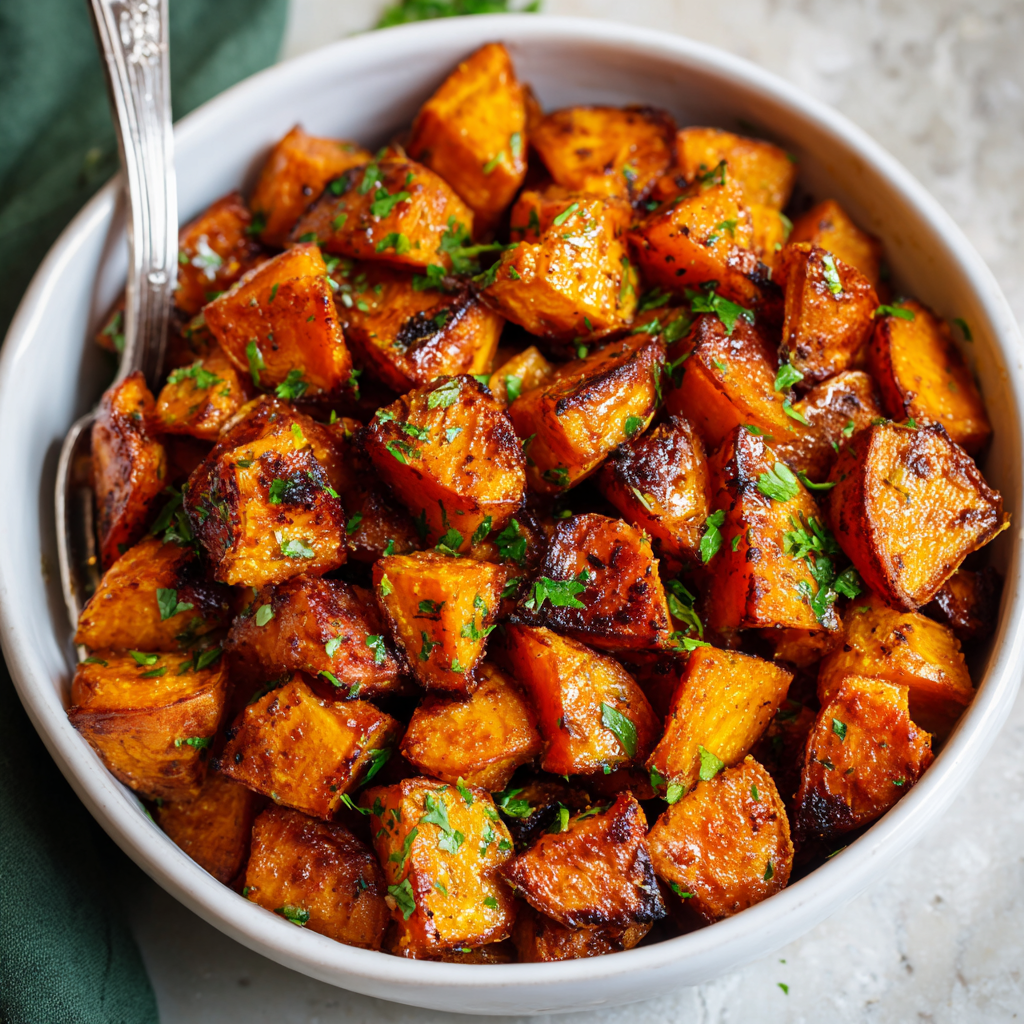
Easy Honey Roasted Sweet Potatoes
Your New Favorite Side Dish is Just an Oven Away
Hey friends, Beau here from Feastical! Let’s get real for a second. Ever stare into your pantry, willing something magical to appear for dinner? You want that “wow” factor, but your energy tank is hovering somewhere near empty. I’ve been there more times than I can count. That’s exactly why this recipe for Easy Honey Roasted Sweet Potatoes is my ultimate go-to, my culinary security blanket, and quite possibly the side dish that will steal the show at your next meal.
Imagine this: tender, creamy sweet potato cubes, each one glistening with a sticky-sweet honey glaze and boasting those irresistible, slightly crispy caramelized edges. The aroma of cinnamon and roasted goodness wafting from your oven is basically a warm hug for your entire house. This isn’t just a recipe; it’s a transformation. It takes a humble, nutritious root vegetable and turns it into a dish that feels indulgent, special, and downright delicious.
The best part? It’s incredibly simple. We’re talking about 10 minutes of hands-on prep and a handful of pantry staples. Whether you’re whipping up a quick Tuesday night dinner or rounding out a massive holiday feast, these honey-roasted sweet potatoes are the versatile, foolproof, and always-appreciated hero we all need in our back pockets. So, preheat that oven, grab your favorite baking sheet, and let’s make something truly spectacular together.
A Sweet Potato Memory: More Than Just a Side Dish
This recipe always takes me back to my first potluck dinner in my first real apartment. The place was… well, let’s call it “cozy with character.” I was determined to impress my new friends, but my chef skills were still on training wheels, and my budget was, let’s say, “creative.” I needed a dish that looked and tasted like a million bucks without costing it.
I spotted a lone sweet potato sitting on my counter, next to a nearly empty bottle of honey. It was a sign. I tossed them together with some oil and spices, crossed my fingers, and threw them in the oven. Twenty-five minutes later, I pulled out a tray of what looked like edible gold. They were a smash hit! That simple act of transforming one affordable ingredient into a dish that had everyone asking for the recipe was a lightbulb moment for me. It cemented my belief that great food isn’t about fancy techniques or expensive ingredients—it’s about heart, a little bit of love, and trusting the magic of roasting. Every time I make these, I get a little nostalgic for that tiny kitchen and the big dreams that started right there.
Gathering Your Kitchen Allies: The Ingredients
Here’s the beautiful lineup of ingredients that will create this symphony of flavor. Don’t be afraid to make it your own!
- 2 large sweet potatoes, peeled and diced – Look for firm potatoes with smooth, taut skin. Dicing them into uniform ¾-inch cubes is the KEY chef hack here! Same size = even cooking. No one gets a burnt piece while another is still crunchy.
- 2 tbsp olive oil – This is our roasting workhorse. It helps conduct heat, encourages browning, and prevents sticking. Avocado oil is a great high-heat substitute if you have it!
- 2 tbsp honey – The star of the glaze! It caramelizes beautifully and adds that deep, floral sweetness. For a vegan twist, pure maple syrup works perfectly and adds a lovely depth of its own.
- ½ tsp cinnamon (optional but highly recommended) – This is the flavor booster. It adds a warm, cozy note that makes the whole kitchen smell incredible. A pinch of nutmeg or pumpkin pie spice would also be fantastic here.
- Salt & pepper to taste – Never, ever skip seasoning! Salt is not the enemy; it’s the enhancer. It makes the sweet flavors pop and balances the dish perfectly. I start with ½ tsp of kosher salt and a few cracks of black pepper.
- Fresh parsley (for garnish) – This isn’t just for looks, I promise! The little bit of fresh, herbal greenness at the end cuts through the sweetness and makes the whole dish feel brighter and more complete. No parsley? Chives or a tiny bit of fresh thyme would be lovely.
Let’s Get Roasting: Your Step-by-Step Guide
Okay, team! Let’s fire up the oven and turn these simple ingredients into gold. Follow these steps, and you’ll be a roasting pro in no time.
Step 1: Preheat & Prep
Preheat your oven to 400°F (200°C). While it’s heating, line a large, rimmed baking sheet with parchment paper. This is my number-one kitchen hack for easy cleanup. Trust me, you’ll thank yourself later. No parchment? A good coating of non-stick spray will work too.
Step 2: The Dice is Right
Peel your sweet potatoes and dice them into those all-important ¾-inch cubes. Try to get them as even as possible. This isn’t about being perfect; it’s about making sure every single piece gets its moment to caramelize and soften at the same rate. Toss them into a large mixing bowl.
Step 3: The Flavor Toss
To the bowl of sweet potatoes, drizzle on the olive oil and honey. Then sprinkle over the cinnamon, salt, and pepper. Now, get your hands in there! Toss everything together until every single cube is evenly and lovingly coated. Using your hands is the best way to ensure no spot is left behind. The mixture will be glistening and smell amazing already.
Step 4: Single Layer is Key
Pour the coated sweet potatoes onto your prepared baking sheet and spread them out into a single, uncrowded layer. This is CRUCIAL. If the pan is too crowded, the potatoes will steam instead of roast, and we’ll miss out on those gorgeous caramelized edges we’re after. If things look tight, use two pans! It’s worth it.
Step 5: Roast to Perfection
Slide that pan into your preheated oven and let the magic happen. Set your timer for 15 minutes. When it goes off, pull the sheet out and use a spatula to flip and shuffle the potatoes. This ensures all sides get equally golden and happy. Pop them back in for another 10-15 minutes. They’re done when they are fork-tender and the edges have started to caramelize and darken beautifully.
Step 6: The Grand Finale
Once they’re out of the oven, let them rest on the pan for just a minute. This lets the glaze set a little. Then, transfer them to a serving dish and give them a fresh sprinkle of chopped parsley for that pop of color and freshness. Serve immediately and watch them disappear!
How to Serve These Golden Gems
These honey roasted sweet potatoes are the ultimate team player on your dinner plate. Here’s how I love to serve them:
The Weeknight Wonder: Pile them next to a simple roasted chicken breast or a pan-seared pork chop. They add a sweet and savory element that makes the whole meal feel thoughtfully curated with minimal effort.
The Holiday Hero: This is their time to shine! They are an absolute non-negotiable on my Thanksgiving table, sitting proudly beside the turkey and stuffing. They bring a vibrant color and a sweet flavor that complements all the rich, savory dishes perfectly.
The Bowl Builder: Let’s get trendy! Use them as the hearty, sweet base for a nourishing bowl. Add a grain like quinoa or farro, some sautéed greens like kale or spinach, a protein like chickpeas or black beans, and a drizzle of a creamy tahini or yogurt sauce. Instant restaurant-level meal at home.
The Unexpected Breakfast: Yes, really! Leftovers (if you have any!) are incredible reheated and served alongside scrambled eggs or folded into a breakfast hash. A delicious way to start the day.
Make It Your Own: Delicious Variations
Once you’ve mastered the basic formula, the world is your sweet potato! Here are a few of my favorite twists:
1. Spicy & Smoky: Add ¼ teaspoon of smoked paprika and a pinch of cayenne pepper to the seasoning mix. The sweet heat is incredibly addictive!
2. Herbaceous & Savory: Swap the cinnamon for dried herbs like rosemary or thyme. Add a couple of minced garlic cloves to the mix before roasting for a powerfully savory version.
3. Maple Pecan: Use pure maple syrup instead of honey. In the last 5 minutes of roasting, sprinkle over ⅓ cup of chopped pecans to toast them up and add a wonderful crunch.
4. Citrus Zest: Add the zest of one orange to the mixing bowl. The bright, citrusy flavor cuts through the richness and adds a beautiful, fragrant note.
5. Everything Bagel Twist: For a truly unique and savory take, toss the roasted potatoes in a tablespoon of everything bagel seasoning right after they come out of the oven. Unbelievably good.
Beau’s Chef Notes & Kitchen Stories
This recipe is a living thing in my kitchen! I’ve made it a hundred different ways. I once, in a moment of sheer curiosity (and perhaps desperation), tried it with diced butternut squash instead. Verdict? Also amazing. The recipe is a fantastic template.
A funny story: I once was talking to a friend on the phone while prepping these and completely zoned out. I accidentally used a full TABLESPOON of cinnamon instead of a teaspoon. Let me tell you, they were… potent. We still ate them, but we called them “Cinnamon Challenge Potatoes.” So, learn from my distracted mistake—measure your spices carefully!
Over time, I’ve learned that letting the potatoes sit for a minute after tossing them in the honey and oil helps the mixture adhere better. It’s a tiny step that makes a big difference in the final glaze. Little evolutions like that are what cooking is all about!
Your Questions, Answered
Q: My sweet potatoes came out soggy instead of crispy. What happened?
A: The most common culprit is overcrowding the pan! If the potatoes are too close together, they steam instead of roast. Always use a large enough baking sheet and spread them in a single layer. Also, make sure your oven is fully preheated before they go in.
Q: Can I make these ahead of time for a party?
A: Absolutely! You can peel and dice the potatoes up to a day in advance. Keep them stored in a bowl of cold water in the fridge to prevent browning (just pat them very dry before tossing with oil). You can also roast them completely, let them cool, and then reheat them in a 350°F oven for about 10-15 minutes before serving. They won’t be *quite* as perfect as fresh-from-the-oven, but they’ll still be delicious.
Q: Is the honey necessary? Can I skip it?
A: The honey is key for the signature sticky, caramelized glaze. However, if you prefer, you can omit it for a more savory roasted sweet potato. They’ll still be tasty! Just up the salt and pepper a bit. For a sugar-free option, a sugar-free maple syrup could work, though I haven’t tested it myself.
Q: My honey burned in the oven! How do I prevent that?
A> Honey has a lower burning point than sugar. If you notice the edges are getting too dark too fast, your oven might be running hot. Try reducing the temperature to 375°F (190°C) and keeping a closer eye on them. Lining your pan with parchment also helps prevent direct scorching.
Easy Honey Roasted Sweet Potatoes
Description
Easy Honey Roasted Sweet Potatoes
Your New Favorite Side Dish
Tender, caramelized sweet potato cubes with a sticky-sweet honey glaze and a hint of cinnamon. Perfect for weeknight dinners, holiday feasts, or any time you want a quick, show-stopping side.
Ingredients
Serves 2–4
-
2 large sweet potatoes, peeled and diced into ¾-inch cubes
-
2 tbsp olive oil (or avocado oil)
-
2 tbsp honey (maple syrup for a vegan version)
-
½ tsp cinnamon (optional)
-
Salt & pepper to taste
-
Fresh parsley, chopped (for garnish; optional)
Optional Flavor Twists:
-
Spicy & Smoky: ¼ tsp smoked paprika + pinch of cayenne
-
Herbaceous & Savory: Replace cinnamon with rosemary/thyme + 2 minced garlic cloves
-
Maple Pecan: Swap honey for maple syrup + ⅓ cup chopped pecans last 5 min
-
Citrus Zest: Add zest of 1 orange
-
Everything Bagel Twist: Toss with 1 tbsp everything bagel seasoning after roasting
Instructions
-
Preheat & Prep:
Preheat oven to 400°F (200°C). Line a rimmed baking sheet with parchment paper. -
Dice Potatoes:
Peel and cut sweet potatoes into ¾-inch cubes. Uniform size = even roasting. -
Coat with Flavor:
In a large bowl, toss potatoes with olive oil, honey, cinnamon, salt, and pepper until evenly coated. -
Spread & Roast:
Spread potatoes in a single layer on the baking sheet (don’t overcrowd). Roast 15 minutes, flip, then roast another 10–15 minutes until tender and edges caramelized. -
Finish & Serve:
Let rest 1 minute on the pan, transfer to a serving dish, and sprinkle with fresh parsley. Serve immediately.
Notes
-
Avoid soggy potatoes: Don’t overcrowd the pan; steam will replace roasting.
-
Make ahead: Peel and dice in advance, store in cold water, dry before roasting. Pre-roast and reheat 10–15 min at 350°F.
-
Honey too dark? Oven may be hot—reduce to 375°F and monitor closely.
-
Skipping honey: Increase salt/pepper for a savory option; sugar-free syrup works too.
A Note on Nutrition
I’m a firm believer that food should be both delicious and nourishing, and this dish thankfully checks both boxes! Sweet potatoes are a nutritional powerhouse. They’re loaded with Beta-Carotene, which our bodies convert into Vitamin A—essential for healthy vision, skin, and immunity. They’re also a great source of fiber (good for gut health!) and Vitamin C.
While we do add a little honey for flavor, it’s a relatively small amount per serving. Using olive oil adds healthy monounsaturated fats. So, while this dish tastes like a decadent treat, you can feel good about serving it to your family. It’s a perfect example of how healthy eating doesn’t have to be boring or restrictive!
Please note: The provided nutritional information is an estimate calculated using a third-party tool. Values can vary based on the exact ingredients you use and their specific quantities.
Final Thoughts from My Kitchen to Yours
Well, there you have it, my friends. My everything-you-need-to-know guide to the most perfect, easy, and downright delicious honey roasted sweet potatoes. This isn’t just a recipe; it’s a trusty tool for your cooking toolkit, a guaranteed crowd-pleaser, and a reminder that the best dishes are often the simplest.
I hope this recipe brings as much joy and ease to your kitchen as it has to mine. It’s a dish built on good memories, and I’d love to help you create your own. So tell me, when you make them, what will you be serving them with? Are you going classic or trying one of the fun variations? Tag me on social @feastical so I can see your beautiful creations!
Remember, cooking is an adventure. Don’t be afraid to play, to experiment, and to make a happy mess. Now, go preheat that oven and roast yourself something wonderful.
With love and good food,

Baked Sweet Potato
Baked Sweet Potato: Your New Favorite Cozy, Nutritious Side Dish
Hey friends, Beau here from Feastical! Let’s talk about one of the most underrated heroes of the produce aisle: the humble sweet potato. If your idea of baked sweet potatoes ends with a marshmallow-topped casserole at Thanksgiving, oh, are you in for a delicious surprise. I’m here to show you that this vibrant tuber is a year-round rockstar, a blank canvas waiting for your culinary creativity, and quite possibly the easiest, most satisfying side dish you’ll ever master.
There’s something almost magical about pulling a perfectly baked sweet potato out of the oven. The skin gets all crisp and caramelized, giving way to an impossibly fluffy, sweet, and steaming orange interior. It’s nature’s perfect comfort food, wrapped in its own edible package. Best of all? It’s a nutritional powerhouse packed with beta-carotene, fiber, and vitamins, making it a feel-good food in the truest sense. Whether you’re a kitchen newbie or a seasoned pro, mastering the art of the baked sweet potato is a non-negotiable life skill. So, preheat your oven, grab your favorite spuds, and let’s turn something simple into something spectacular together.
A Sweet Potato Memory: More Than Just a Side Dish
My love affair with baked sweet potatoes started long before Feastical was even a twinkle in my eye. It takes me back to crisp autumn afternoons at my grandma’s house. The moment you walked through the door, you were hit with this incredible aroma—a mix of roasting spices, something sweet in the oven, and that unmistakable cozy feeling of a home filled with love. Her kitchen was my first classroom, and her baked sweet potatoes were one of my earliest lessons.
I’d sit at the worn wooden table, my legs swinging, watching her pull these blackened, unassuming lumps from the oven. To a kid, they looked… questionable. But then she’d slice one open for me, and a cloud of sweet, steamy goodness would billow out. She’d add a generous pat of butter that would melt into rivers of gold and a tiny sprinkle of cinnamon sugar. That first bite was pure warmth. It wasn’t just food; it was a feeling of safety, of family, of being utterly and completely cared for. It’s that feeling I try to bake into every recipe I share with you all. It’s simple, soulful, and always, always satisfying.
Gathering Your Sweet Potato Symphony
Here’s the beautiful part: you only need one essential ingredient. Everything else is a delicious bonus! This is where you can truly make it your own.
- 2 medium sweet potatoes: Look for firm potatoes with smooth, taut skin and no major soft spots. Size matters here! Go for medium, similarly-sized potatoes so they cook evenly. The variety (Garnet, Jewel, Hannah) will change the flavor and texture slightly, but all are fantastic.
- 1 tbsp olive oil (optional): A light coating of a high-quality olive oil helps crisp the skin to a beautiful, edible perfection. If you’re skipping toppings and want a savory skin, this is your secret weapon. Chef’s Insight: Avocado oil works great too for its high smoke point!
- Kosher salt or flaky sea salt (optional): A pinch of salt right before serving, especially on the skin, is a game-changer. It enhances the natural sweetness and creates an incredible flavor contrast.
- Your Toppings of Choice! This is the fun part. Think of the potato as your base. Are you going sweet? Savory? Spicy? The world is your oyster (though maybe not that literally). We’ll talk more variations below!
Your Foolproof Roadmap to Baked Sweet Potato Perfection
Follow these steps, and I promise you’ll get a perfect baked sweet potato every single time. No more undercooked centers or rock-hard skins!
Step 1: Preheat and Prep. Crank that oven to 400°F (200°C). While it’s heating up, give your potatoes a good scrub under cool running water. We’re going to eat the skin (it’s the best part!), so we want it nice and clean. Dry them thoroughly with a kitchen towel. Chef’s Hack: Drying them well is key! A dry potato skin will get much crispier in the hot oven.
Step 2: Pierce the Potatoes. Grab a fork and stab each potato 4-5 times on each side. I know, it feels a bit dramatic, but this is the most important step! Those little holes are steam vents. Without them, the steam building up inside has nowhere to go, and you risk a messy potato explosion in your oven. Trust me, no one wants to clean that up.
Step 3: Oil & Salt (The Flavor Boost). This step is optional but highly recommended for next-level results. Rub the clean, dry potatoes lightly with olive oil. Then, give them a very light sprinkle of kosher salt. This will season the skin and help it transform into a delicious, crispy shell.
Step 4: Bake ‘Em Up! You have two great options here. For the absolute crispiest skin, place the potatoes directly on the oven rack. Place a baking sheet on the rack below to catch any potential drips. If you prefer, you can place them on a parchment-lined baking sheet. This makes them easier to handle. Bake for 45 to 60 minutes. The cooking time depends entirely on the size and thickness of your potatoes.
Step 5: The Doneness Test. You’ll know they’re done when the skin is dry and crisp in places, and the potatoes yield easily when you give them a gentle squeeze (use an oven mitt!). The ultimate test is piercing the thickest part with a fork or paring knife. It should slide in with absolutely zero resistance. If you meet any firmness, give them another 5-10 minutes.
Step 6: Rest and Serve. Once they’re perfectly soft, take them out and let them cool for just 5 minutes. This allows the flesh to set a little bit, making it easier to handle. Then, slice them open lengthwise, fluff the insides with a fork, and load them up with your favorite toppings!
How to Serve Your Masterpiece
Presentation is part of the fun! For a classic, homey feel, serve the potato right on a plate or in a shallow bowl. I love to slice it open and let the toppings spill out onto the plate. Fluffing the interior with a fork creates little nooks and crannies that perfectly catch melting butter, yogurt, or whatever saucy goodness you’re adding.
Think beyond the plate, too! A baked sweet potato can be the hearty base for an entire meal. Serve it alongside a simple green salad with a tangy vinaigrette to cut through the sweetness, or pair it with a perfectly seared chicken breast or black bean burger. For a fun, interactive meal, set up a “baked potato bar” with a bunch of topping options and let everyone build their own masterpiece. It’s a surefire way to bring people together and please a crowd.
5 Delicious Twists on the Classic Baked Sweet Potato
Don’t stop at butter and salt! Here are a few of my favorite ways to dress up this versatile veggie:
1. The Savory Herb: Fluff with a tablespoon of Greek yogurt or sour cream, a handful of sharp cheddar cheese, a sprinkle of chopped chives or green onions, and a few cracks of black pepper. Add some crispy bacon bits if you’re feeling fancy!
2. The Mediterranean: Top with a scoop of creamy hummus, a handful of chopped cucumber and tomato, a drizzle of tahini and lemon juice, and a sprinkle of fresh parsley and crumbled feta cheese.
3. The Sweet & Spicy: A dollop of coconut yogurt, a drizzle of peanut or almond butter, a sprinkle of red pepper flakes, and a few chopped roasted peanuts for crunch. This combo is unexpectedly incredible.
4. The Breakfast Spud: Yes, for breakfast! Split it open and top with a fried or scrambled egg, a slice of avocado, and a dash of hot sauce. The ultimate savory start to your day.
5. The Dessert Dupe: Keep it simple and classic. A pat of good butter, a generous dusting of cinnamon, and a tiny drizzle of pure maple syrup. It’s like dessert, but you’re actually eating a vegetable. It’s a win-win.
Beau’s Kitchen Notes
Over the years, I’ve baked enough sweet potatoes to fill a swimming pool (a small one, maybe). I’ve learned a few things! First, don’t wrap them in foil. I know some recipes call for it, but it steams the potato and gives you a soft, soggy skin. We want crispy! Second, if you’re really short on time, you can microwave them for 5-8 minutes to start the cooking process, then finish in a 400°F oven for 15-20 minutes to crisp up the skin. It’s not *quite* as good as the full bake, but it’s a solid weeknight hack. This recipe has evolved from my grandma’s simple butter-and-sugar version to a whole universe of flavors. The core technique remains the same, but the possibilities are truly endless. That’s the beauty of it.
Your Baked Sweet Potato Questions, Answered
Q: Why are my sweet potatoes still hard after an hour?
A: You likely had larger potatoes than the “medium” called for. Sweet potatoes can vary wildly in size! Just keep baking and testing every 10 minutes until the knife slides in effortlessly. Patience is key.
Q: Can I meal prep baked sweet potatoes?
A: Absolutely! Bake them as directed, let them cool completely, and store them (without toppings) in an airtight container in the fridge for up to 4 days. Reheat in the microwave or a 350°F oven until warmed through.
Q: The skin isn’t getting crispy. What did I do wrong?
A: The two biggest culprits are not drying the potatoes thoroughly before oiling them, or having the oven temperature too low. Make sure they’re bone-dry and that your oven is fully preheated. Placing them directly on the rack also promotes air circulation for a crispier skin.
Q: Is it safe to eat the skin?
A: Yes! In fact, that’s where a lot of the fiber and nutrients are. Just make sure you give them a good scrub first to remove any dirt.
A Look at the Goodness Inside
Let’s be clear: I’m a chef, not a nutritionist. But I love knowing that what I’m eating is also doing good things for my body. A plain, medium baked sweet potato (about 114 grams) is a nutritional superstar. It’s famously rich in beta-carotene, which your body converts to vitamin A—crucial for vision, immunity, and skin health. It’s also an excellent source of vitamin C, manganese, and potassium. With about 6 grams of fiber, it’s incredibly filling and great for digestive health. The natural sugars provide a steady source of energy. It’s a complex carbohydrate, meaning it digests slowly and won’t spike your blood sugar like a candy bar would. Of course, toppings will change the nutritional profile, but starting with such a wholesome, nutrient-dense base is always a win.
Print
Baked Sweet Potato
Description
Sweet, tender, caramelized cubes of sweet potato coated in honey, olive oil, and cinnamon—this side dish is simple, versatile, and guaranteed to steal the show at any meal.
Ingredients
Serves 3–4
-
2 large sweet potatoes, peeled and diced into ¾-inch cubes
-
2 tbsp olive oil (or avocado oil)
-
2 tbsp honey (or maple syrup for a vegan twist)
-
½ tsp cinnamon (optional, or substitute nutmeg/pumpkin pie spice)
-
Salt & pepper, to taste
-
Fresh parsley, chopped, for garnish
Optional Twists:
-
Spicy & Smoky: ¼ tsp smoked paprika + pinch of cayenne
-
Herbaceous: swap cinnamon for rosemary or thyme; add garlic cloves
-
Maple Pecan: use maple syrup and sprinkle ⅓ cup chopped pecans during last 5 min of roasting
-
Citrus Zest: add zest of 1 orange
-
Savory: toss with everything bagel seasoning after roasting
Instructions
-
Preheat & Prep: Preheat oven to 400°F (200°C). Line a baking sheet with parchment paper or lightly grease.
-
Dice & Toss: Place sweet potatoes in a large bowl. Add olive oil, honey, cinnamon, salt, and pepper. Toss with hands or a spatula until evenly coated.
-
Spread & Roast: Spread in a single, uncrowded layer on the baking sheet. Roast 15 minutes, then flip/spread the cubes. Continue roasting 10–15 minutes until tender and edges are caramelized.
-
Finish & Serve: Let rest 1–2 minutes, transfer to a serving dish, and garnish with chopped parsley. Serve immediately.
Notes
-
Crispy Edges: Don’t overcrowd the pan; use two sheets if necessary.
-
Advance Prep: Peel/dice a day ahead; store in water in the fridge. Pat dry before roasting.
-
Reheating: Reheat roasted potatoes at 350°F (175°C) for 10–15 minutes.
-
Honey Burn: If edges darken too fast, reduce oven to 375°F (190°C) and monitor closely.
Nutrition
- Calories: 180–200 Cal approx. per serving
- Carbohydrates: 35g
Your New Kitchen Staple Awaits
And there you have it! The humble baked sweet potato, demystified and ready to become your new go-to side dish, weeknight dinner savior, or even your favorite breakfast. It’s proof that the simplest foods, treated with a little care and knowledge, can be the most rewarding. I hope this guide gives you the confidence to whip up a perfect potato anytime the craving strikes.
Remember, cooking isn’t about perfection; it’s about connection. It’s about creating something delicious that makes you and the people you share it with feel good. So have fun with it! Experiment with those toppings, get that skin crispy, and make this recipe your own. I’d love to hear how it turns out. Tag me on social or drop a comment over on Feastical.com and tell me your favorite way to top a spud. Now, if you’ll excuse me, my oven timer is beeping…
Happy cooking,
Beau
Southwest Ground Beef and Sweet Potato Skillet
Your New Favorite Weeknight Hero is Sizzling in a Skillet
Hey there, friend! Beau here, welcoming you back to my kitchen. Ever have one of those days where you’re staring into the fridge, willing something delicious to magically appear? You want something hearty, something that feels like a celebration, but you absolutely do not have the energy for a complicated recipe or a mountain of dishes. I feel you. We’ve all been there.
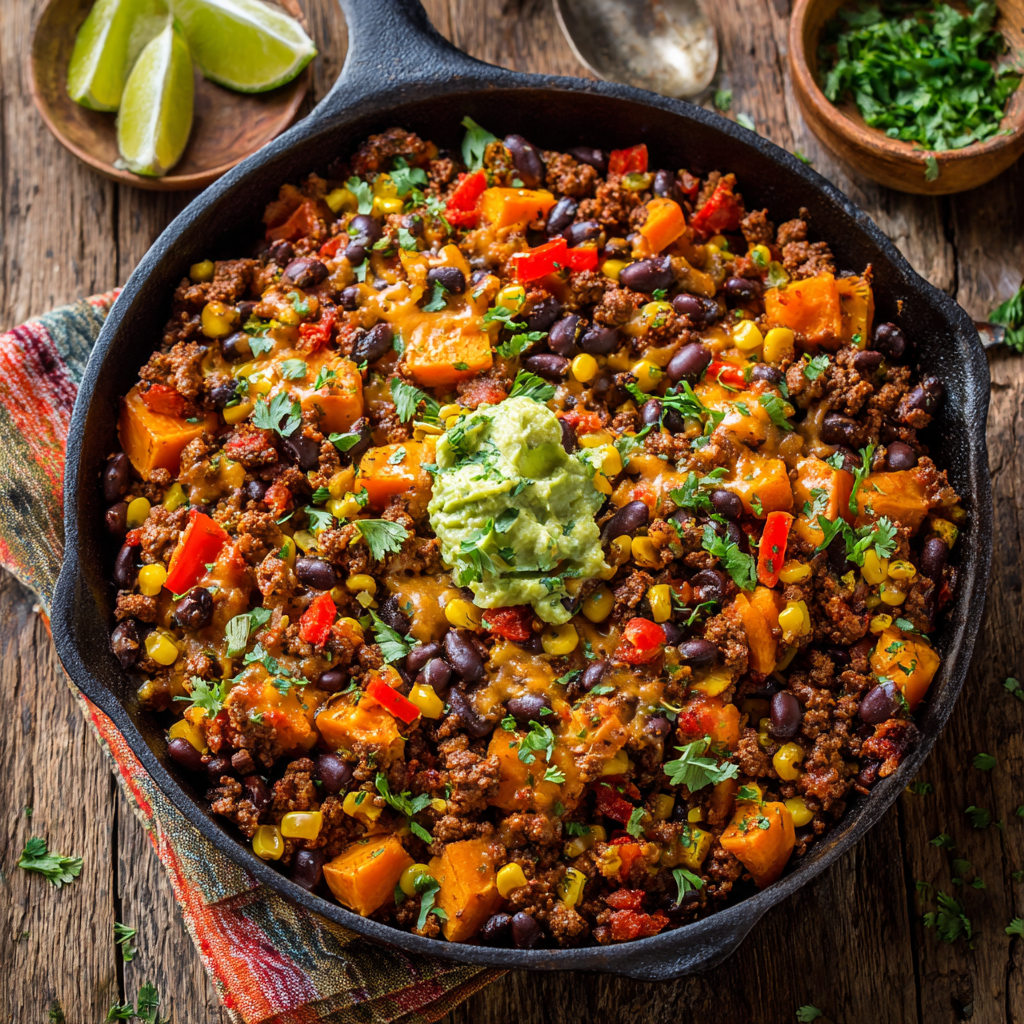
That’s exactly why this Southwest Ground Beef and Sweet Potato Skillet is my go-to, my weeknight MVP, my absolute hero dish. Imagine this: tender, sweet potatoes nestled in with savory, perfectly spiced ground beef, all kissed with smoky chili powder and cumin. We’re tossing in sweet corn and hearty black beans for good measure, and the whole glorious thing comes together in one single pan. I’m not kidding—one pan means maximum flavor and minimal cleanup. It’s the kind of meal that fills your kitchen with an aroma so incredible, your family will wander in asking, “What’s that amazing smell?” before you’ve even called them to the table. It’s cozy, it’s satisfying, and it’s packed with real, wholesome ingredients that taste like a warm hug from the inside out. So grab your favorite skillet, and let’s make something incredibly delicious together.
A Skillet Full of Sunshine and Memories
This recipe always takes me right back to my first apartment after culinary school. My kitchen was about the size of a postage stamp, with exactly one working burner and an oven that had… let’s call it ‘personality.’ Fancy French techniques weren’t an option, but creating big, bold flavors absolutely was. I started playing with cheap, hearty ingredients I could grab from the local market—ground beef, a lonely sweet potato, a can of beans.
One chilly autumn evening, I threw them all into my one decent skillet with the spices I had on hand. The result was nothing short of magic. My roommates and I gathered around our rickety table, scooping this hearty, smoky skillet straight from the pan with tortilla chips. We laughed, we ate, we went back for seconds. It was a simple meal, but it was ours. It taught me that the best food isn’t about being fancy; it’s about being together. That’s the spirit I’ve baked into this recipe ever since.
Gathering Your Flavor Dream Team
Here’s everything you’ll need to bring this Southwest skillet to life. Don’t stress about being exact—cooking is about playing and making it your own!
- 1 lb ground beef (85/15 lean/fat is perfect): This is our hearty base. The little bit of fat adds so much flavor! Chef’s Insight: For a leaner option, ground turkey or chicken works beautifully. For a plant-based twist, crumbled firm tofu or a plant-based ground “meat” are fantastic substitutes—just bump up the spices a bit!
- 2 medium sweet potatoes, peeled and diced: Nature’s candy! They add a wonderful sweetness that balances the smoky spices. Pro Tip: Dice them into ½-inch cubes so they cook evenly and quickly alongside the beef.
- 1 small onion, chopped: The unsung hero of flavor. It adds a subtle sweetness and depth. Yellow, white, or red onion all work great here.
- 2 cloves garlic, minced: Non-negotiable for that punch of savory goodness. Feel free to add an extra clove if you’re a garlic fiend like me!
- 1 tbsp olive oil: Just enough to get our sweet potatoes nicely browned and prevent sticking.
- 1 tsp chili powder: The cornerstone of our spice blend, giving that classic, mild Tex-Mex warmth.
- ½ tsp cumin: This is the secret weapon. Cumin adds an earthy, smoky note that makes the whole dish sing.
- ½ tsp smoked paprika: Don’t skip this! It gives a deep, smoky flavor that makes it taste like it’s been slow-cooked for hours.
- Salt & pepper to taste: Season as you go! Taste and adjust at the end.
- ½ cup canned black beans, drained and rinsed: For protein and a creamy, hearty texture. Pinto beans would also be delicious.
- ½ cup corn (fresh, canned, or frozen): A pop of sweetness and color. If using frozen, no need to thaw—just toss it in!
- Optional toppings: shredded cheese, avocado, cilantro, lime wedges: This is where the party starts! Toppings add freshness, creaminess, and a zesty finish.
Let’s Get Cooking: Your Foolproof Guide
Ready to make magic? Follow these steps for a flawless, flavor-packed skillet every single time.
- Heat the olive oil in a large skillet over medium heat. I love using my well-seasoned cast iron for this, but any sturdy, oven-safe skillet will do. Let the pan get nice and hot before adding the potatoes—you should hear a gentle sizzle when they hit the oil. This initial sear is key for getting golden-brown edges and not steamed potatoes.
- Add the diced sweet potatoes. Spread them out in an even layer and let them cook for 8-10 minutes, stirring only occasionally. Chef’s Hack: Resist the urge to stir constantly! Letting them sit for a minute or two at a time allows them to develop a beautiful caramelized crust, which equals more flavor.
- Add the onion and garlic. Push the sweet potatoes to the side to make a little well in the center of the pan. Add the onions and garlic there and let them cook for about 2 minutes, until they become fragrant and translucent. This technique prevents the garlic from burning while letting the onions soften perfectly.
- Push the veggie mixture to the side and add the ground beef. Crumble it apart with your spoon or a spatula as it cooks. Cook until it’s browned and no longer pink, about 5-7 minutes. Pro Tip: If there’s a lot of excess grease from the beef, you can drain it off at this point, but leaving a little adds incredible flavor.
- Stir in the chili powder, cumin, smoked paprika, salt, and pepper. Now the magic happens! Stir everything together—the beef, the potatoes, the onions—until it’s all evenly coated in those beautiful, aromatic spices. Your kitchen should smell absolutely incredible right now.
- Add the black beans and corn. Give everything one big, final stir to combine. Let it all cook together for another 5 minutes, or until the corn is heated through and the sweet potatoes are perfectly tender when pierced with a fork.
Dishing Up the Goodness
This skillet is a masterpiece on its own, but the toppings are what make it a celebration. Here’s how I love to serve it up:
I bring the whole steaming skillet right to the table (with a trivet, of course!) and let everyone build their own bowl. It’s fun, interactive, and means less work for you. I start with a big scoop of the skillet mixture, then go to town: a generous handful of sharp cheddar cheese, a few creamy slices of avocado, a sprinkle of fresh chopped cilantro for a burst of freshness, and a big squeeze of lime juice over the top to brighten all those rich, smoky flavors. For scooping, you can’t beat sturdy tortilla chips or warm, soft flour tortillas on the side. It’s also incredible served over a bed of fluffy cilantro-lime rice or a simple green salad for a complete meal.
Make It Your Own: Delicious Twists & Swaps
This recipe is incredibly flexible. Play around with these ideas to keep it exciting!
- Kick Up the Heat: Add a diced jalapeño (seeds and all for maximum fire!) along with the onions, or stir in a tablespoon of chipotle in adobo for a smoky, spicy kick.
- Go Green: Stir in a couple of big handfuls of fresh spinach or chopped kale right at the end of cooking. It wilts down perfectly and adds a great nutrient boost.
- Breakfast-for-Dinner Style: Top each serving with a perfectly fried egg. The runny yolk creates the most incredible sauce for the skillet.
- Pump Up the Veggies: Feel free to add diced bell peppers (any color!) or zucchini with the onions. It’s a great way to clean out the veggie drawer.
- Low-Carb / Keto Friendly: Simply swap the sweet potatoes for cauliflower florets! Chop them into small, bite-sized pieces and follow the same cooking instructions.
Beau’s Kitchen Notes
This recipe has evolved so much since that first tiny apartment experiment. I’ve learned that the smoked paprika is the true game-changer—it adds a depth that regular paprika just can’t match. One time, I was out of black beans and used a can of fire-roasted tomatoes (drained) instead. It created a saucier, almost chili-like version that was also a huge hit! The moral of the story? Don’t be afraid to experiment. The best family recipes often start with a happy accident. This skillet is forgiving, so make it work for you. It’s a dish that’s meant to be shared, adapted, and enjoyed without stress.
Your Questions, Answered!
Q: My sweet potatoes aren’t getting tender. What did I do wrong?
A: The most common culprit is dicing them too large. Aim for ½-inch cubes, no bigger! If they’re still a bit firm after following the recipe, add a couple tablespoons of water or beef broth to the skillet, cover it with a lid, and let it steam for 3-5 minutes. They’ll soften right up.
Q: Can I make this ahead of time?
A: Absolutely! This is a fantastic meal prep candidate. Let it cool completely, then store it in an airtight container in the fridge for up to 4 days. Reheat in the microwave or in a skillet on the stove over medium heat, adding a tiny splash of water if it seems dry.
Q: Can I freeze this skillet meal?
A> You can, but a heads-up: the texture of the sweet potatoes may become a little softer upon thawing. Freeze in a sealed container for up to 3 months. Thaw overnight in the fridge before reheating.
Q: Is there a way to make this in a slow cooker or Instant Pot?
A> For the Instant Pot: Use the Sauté function to brown the beef and soften the onions. Add everything else except the corn and beans. Pressure cook on high for 4 minutes, quick release, then stir in the corn and beans and let it heat through. For a slow cooker: Brown the beef first, then add everything to the pot and cook on low for 6-7 hours or high for 3-4 hours.
Southwest Ground Beef and Sweet Potato Skillet
Description
Hey friends! This one-pan wonder is hearty, flavorful, and ready in about 30–35 minutes. Sweet potatoes, savory ground beef, smoky spices, corn, and black beans all come together in a skillet for a meal that feels like a warm hug. Minimal dishes, maximum flavor, and endless topping possibilities make this your new weeknight MVP.
Ingredients
Serves 2–3
-
1 lb (450g) ground beef (85/15 lean/fat) – or turkey/chicken/plant-based alternative
-
2 medium sweet potatoes, peeled and diced (½-inch cubes)
-
1 small onion, chopped
-
2 cloves garlic, minced
-
1 tbsp olive oil
-
1 tsp chili powder
-
½ tsp cumin
-
½ tsp smoked paprika
-
Salt & pepper, to taste
-
½ cup black beans, drained and rinsed
-
½ cup corn (fresh, canned, or frozen)
Optional Toppings: shredded cheese, avocado, cilantro, lime wedges, tortilla chips, or warm tortillas
Optional Twists:
-
Kick up the heat: diced jalapeño or chipotle in adobo
-
Add greens: spinach or kale at the end of cooking
-
Breakfast style: top with a fried egg
-
Extra veggies: bell peppers, zucchini
-
Low-carb/Keto: swap sweet potatoes for cauliflower florets
Instructions
1. Prep & Cook Sweet Potatoes
-
Heat olive oil in a large skillet over medium heat.
-
Add diced sweet potatoes in an even layer. Cook 8–10 min, stirring occasionally, until lightly browned and caramelized.
2. Add Onion & Garlic
-
Push sweet potatoes to the side and add onion and garlic. Sauté 2 min until fragrant and translucent.
3. Cook the Ground Beef
-
Push veggie mixture aside, add ground beef, and crumble as it cooks 5–7 min until browned. Drain excess grease if desired.
4. Spice Things Up
-
Stir in chili powder, cumin, smoked paprika, salt, and pepper. Combine everything so the spices coat the beef, potatoes, and onions evenly.
5. Add Beans & Corn
-
Stir in black beans and corn. Cook another 5 min, until heated through and sweet potatoes are tender.
6. Serve & Top
-
Serve directly from the skillet or in bowls. Top with cheese, avocado, cilantro, and a squeeze of lime. Pair with tortilla chips, tortillas, or rice for a complete meal.
Notes
-
Tender Sweet Potatoes: Cut into ½-inch cubes. If still firm, add 2–3 tbsp water or broth and cover for 3–5 min.
-
Meal Prep Friendly: Store in airtight containers for up to 4 days. Reheat gently, adding a splash of water if needed.
-
Freezing: Freeze for up to 3 months; thaw overnight in the fridge before reheating.
-
Instant Pot / Slow Cooker:
-
Instant Pot: Sauté beef & onions, add other ingredients except corn & beans, pressure cook 4 min, then stir in corn & beans.
-
Slow Cooker: Brown beef first, then cook all ingredients on low 6–7 hrs or high 3–4 hrs.
-
Nutrition
- Calories: 430–460Cal estimate per serving
- Fat: 18–20g
- Carbohydrates: 38–40g
- Protein: 28–30g
Nourishing Your Body & Soul
While I’m all about flavor first, it’s a wonderful bonus when something this tasty is also packed with good-for-you ingredients. This skillet is a well-rounded meal all on its own! The lean ground beef provides a great source of protein and iron. Sweet potatoes are a nutritional powerhouse, loaded with Vitamin A, fiber, and antioxidants. Black beans add even more fiber and plant-based protein, helping to keep you full and satisfied. Using olive oil, a heart-healthy fat, and loading up on veggies makes this a meal you can feel really good about serving to your family. Remember, the provided nutritional info is an estimate and can vary based on your specific ingredients and toppings.
One Pan, Endless Possibilities
And there you have it! A simple, soul-satisfying meal that proves you don’t need a ton of time or ingredients to get a seriously delicious dinner on the table. This Southwest Ground Beef and Sweet Potato Skillet is more than just a recipe; it’s a reminder that the best moments often happen around the table, sharing food made with love (and just one pan to wash!).
I really hope this recipe becomes a trusted favorite in your home, just like it is in mine. If you make it (and I really hope you do!), tag me on social @feastical so I can see your beautiful creations. Now go forth, get that skillet sizzling, and dig in!
With love and a full plate,
Chicken and Sweet Potato Rice Bowl
Your New Favorite Bowl Awaits
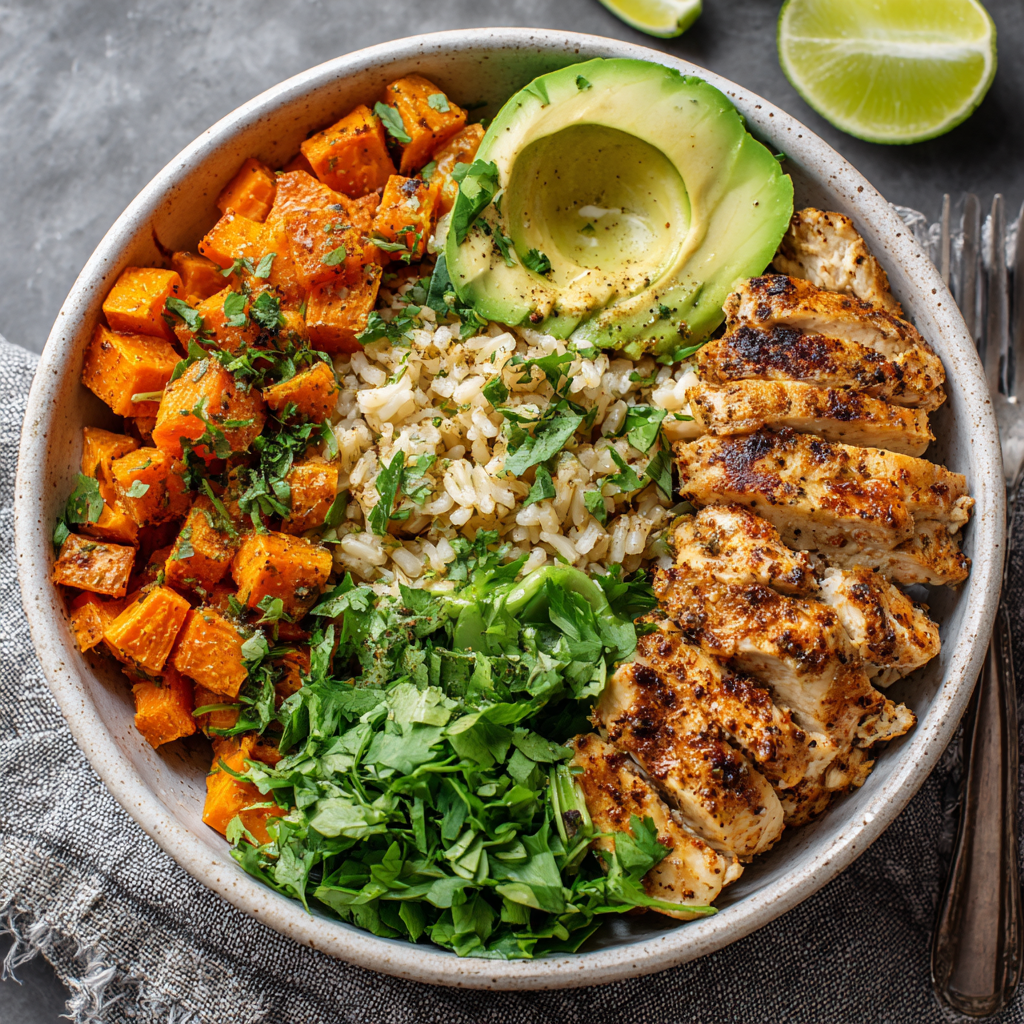
Hey friends, Beau here! Let’s talk about the magic of a really, really good bowl. You know the kind I mean. The one that feels like a warm, delicious hug at the end of a long day. The one that’s packed with so much flavor and texture that you find yourself scraping the bottom, wishing there was just one more bite. That’s exactly the kind of everyday magic we’re creating today with this incredibly satisfying Chicken and Sweet Potato Rice Bowl.
This isn’t just another recipe; it’s your new weeknight hero, your meal prep bestie, and your answer to the eternal question, “What’s for dinner?” We’re talking juicy, perfectly seasoned chicken, sweet potatoes roasted until they’re caramelized and crispy on the edges, and fluffy rice to bring it all together. It’s a symphony of savory, sweet, and fresh that comes together in about 35 minutes flat. I’ve built this recipe to be simple enough for a hectic Tuesday but special enough to scratch that comfort food itch. So, tie on your favorite apron, and let’s make a bowl that’s anything but boring!
The Bowl That Started It All
This recipe takes me right back to my first tiny apartment kitchen. It was about the size of a postage stamp, with one wonky burner that only had two settings: ‘off’ and ‘inferno.’ My budget was tight, but my craving for good, real food was huge. I started throwing whatever I had—a lone sweet potato, a single chicken breast, some leftover rice—onto a sheet pan and into a skillet. The goal was simple: survive.
But what happened was magic. The smells that filled that little kitchen were incredible. The sweet potato caramelized into candy, the chicken got a beautiful golden sear, and when I piled it all into a bowl with a squeeze of lime? It was a revelation. It was more than the sum of its parts. It was the moment I realized that cooking isn’t about fancy ingredients; it’s about heart. This bowl was my first real “a-ha!” moment in the kitchen, and it’s a feeling I’ve been chasing—and sharing—ever since.
Gathering Your Flavor Team
Here’s the beautiful part: this dish is built on simple, wholesome ingredients. Let’s break them down. This isn’t just a list; it’s your flavor roadmap!
- 2 medium sweet potatoes, peeled and cubed: Don’t you love that vibrant orange color? That’s beta-carotene, nature’s sunshine! Try to cut them into even ½-inch cubes so they all roast at the same rate. No one likes a half-burnt, half-raw potato situation.
- 2 tbsp olive oil (divided): We’re dividing this for a reason! One tablespoon for coating our sweet potatoes to help them crisp up, and another for cooking our chicken to golden perfection. Avocado oil works great here too if you have it.
- 1 tsp paprika: This is our secret weapon for the sweet potatoes. It adds a subtle smokiness and deep color that plays so nicely with the natural sweetness. Smoked paprika is an epic upgrade if you have it!
- Salt & pepper to taste: The dynamic duo! Season as you go, friends. Season the potatoes. Season the chicken. Taste at the end. This is the number one way to make your food taste like it came from a restaurant.
- 2 boneless, skinless chicken breasts: The blank canvas. You can absolutely use chicken thighs here for even more juicy, flavorful goodness. Just adjust the cooking time by a few minutes.
- 1 tsp garlic powder: We’re using powder here for its even distribution and quick caramelization on the chicken. It gives you that consistent, savory garlic flavor in every bite.
- 1 cup cooked rice: I’m a sucker for jasmine rice for its floral scent, but brown rice adds a wonderful nutty chew and extra fiber. Use what you love! This is also a fantastic place to use up leftover rice.
- ½ avocado, sliced (optional): I say “optional,” but really, it’s mandatory for me. That cool, creamy fat is the perfect contrast to the warm, spiced components. No avocado? A dollop of Greek yogurt works wonders.
- Fresh cilantro or parsley, chopped: This is your fresh pop at the end! It brightens the whole dish. If you’re one of those folks who thinks cilantro tastes like soap (I feel for you!), flat-leaf parsley is your best friend.
- Lime wedges (for serving): Do not, I repeat, DO NOT skip the lime wedge. That quick squeeze of bright, acidic juice right before eating wakes up every single flavor in the bowl. It’s the magic trick.
Let’s Build Some Flavor, Step-by-Step
Ready to rock? This comes together so quickly. The key is multitasking like a pro. Let’s get that oven going and our ingredients prepped. Mise en place, chefs! (That’s just a fancy way of saying “get everything in its place” before you start cooking. It makes everything smoother.)
- Preheat and Prep: Crank that oven to 425°F (220°C). This high heat is what gives us those beautifully caramelized edges on the sweet potatoes. While it’s heating, peel and cube those sweet potatoes. Toss them in a bowl with 1 tbsp of olive oil, the paprika, and a good pinch of salt and pepper. Get your hands in there and massage it all together—you want every single cube coated in that flavorful oil. Spread them out in a single layer on a baking sheet. This is crucial for roasting, not steaming! Pop them in the oven and set your timer for 25 minutes.
- Chicken Time: While the potatoes are getting their roast on, let’s focus on the chicken. Pat the chicken breasts completely dry with a paper towel. This is my number one hack for getting a gorgeous golden sear instead of a pale steam. Season both sides generously with garlic powder, salt, and pepper.
- Sear and Cook: Heat the remaining 1 tbsp of olive oil in a skillet over medium heat. Once the oil is shimmering (test it by flicking a tiny drop of water in—if it sizzles, you’re good!), carefully add the chicken. Let it cook, undisturbed, for about 6-7 minutes. You’re waiting for that perfect golden-brown crust to form. Flip and cook for another 6-7 minutes on the other side, or until the internal temperature reaches 165°F. Remove the chicken from the skillet and let it rest on a cutting board for at least 5 minutes. Don’t skip the rest! It lets the juices redistribute throughout the meat, ensuring every slice is succulent.
- Slice and Assemble: By now, your sweet potatoes should be tender and lightly charred, and your kitchen should smell amazing. Slice your rested chicken against the grain into thin strips. This makes it so much easier to eat and keeps it tender. Now, the fun part: building your bowls! Start with a fluffy base of rice. Top with a generous scoop of those gorgeous roasted sweet potatoes. Artfully arrange your sliced chicken over the top.
- The Grand Finale: Now, accessorize! Top with creamy avocado slices, a shower of fresh chopped herbs, and don’t forget those lime wedges on the side for that essential squeeze right before you dig in.
How to Serve This Beauty
This bowl is a complete meal all on its own, but let’s talk about making it an experience. I love serving this family-style. Pile the rice, sweet potatoes, and sliced chicken into separate bowls and let everyone build their own masterpiece at the table. It’s interactive, fun, and guarantees everyone gets exactly what they want.
If you really want to take it over the top, set out a few extra topping options. Think sliced radishes for crunch, a drizzle of sriracha or hot honey for heat, a sprinkle of toasted pepitas or sesame seeds, or even a quick creamy cilantro lime dressing. The bowl is your canvas—paint it with your favorite flavors!
Make It Your Own: Delicious Variations
The best recipes are like a great playlist—sometimes you wanna hear the original, and sometimes you need a remix. Here are a few of my favorite ways to switch up this bowl:
- Southwest Fiesta: Swap the paprika for chili powder and cumin on the sweet potatoes. Use black beans instead of (or in addition to!) the chicken, and top with corn salsa, a dollop of sour cream, and a handful of tortilla strips.
- Mediterranean Twist: Season the chicken with oregano and lemon zest. Replace the sweet potatoes with roasted cauliflower. Top with a handful of kalamata olives, crumbled feta cheese, a spoonful of tzatziki, and fresh dill.
- Curry In A Hurry: Toss the sweet potatoes and chicken with 2 tablespoons of yellow curry powder mixed with the olive oil before roasting. Serve the bowl with a side of warm naan bread for dipping.
- Greens Lover’s Delight: Add a bed of fresh baby spinach or massaged kale underneath the warm rice. The heat from the components will gently wilt the greens, making them part of the dish.
- Whole30/Paleo Friendly: This is an easy one! Simply replace the rice with cauliflower rice. Sauté it quickly in the skillet after the chicken is done to soak up any delicious leftover bits. Ensure your seasonings are compliant, and you’re good to go!
Beau’s Chef Notes
This recipe has been with me for years, and it’s evolved in so many fun ways. I remember one time I was filming a video for the site and I was so busy chatting away that I completely forgot to set the timer for the sweet potatoes. Let’s just say we had “extra caramelized” potatoes that day! The funny thing is, they were almost better—a little blackened and extra sweet. A happy little accident, as Bob Ross would say.
Over time, I’ve learned that the real key is the resting time for the chicken. I used to slice it right away and watch all those precious juices run onto the cutting board. Now, I use that resting time to finish prepping my toppings. It’s a small change that makes a world of difference. This bowl is a testament to the fact that the best food doesn’t have to be complicated—it just has to be made with a little bit of love and attention.
FAQs & Troubleshooting
Q: My sweet potatoes are mushy instead of crispy. What did I do wrong?
A: The most common culprit is overcrowding the pan! If the cubes are too close together, they’ll steam instead of roast. Make sure they’re in a single layer with a little space between them. Also, ensure your oven is fully preheated before they go in.
Q: Can I make this ahead for meal prep?
A: Absolutely! This is a meal prep superstar. Let all the components cool completely before storing them in separate airtight containers in the fridge for up to 4 days. I recommend waiting to slice the avocado until you’re ready to eat. Reheat the chicken, potatoes, and rice gently in the microwave.
Q: My chicken always turns out dry. Help!
A: Two things: First, make sure you’re not overcooking it. A digital meat thermometer is your best friend—pull the chicken at 165°F. Second, and just as important, let it rest for a full 5 minutes before slicing. This is non-negotiable for juicy chicken!
Q: Is brown rice a good substitute?
A: 100%! Brown rice adds a wonderful nutty flavor and chewy texture. Just note that it typically takes longer to cook than white rice, so plan accordingly. Using leftover rice from last night’s takeout is also a fantastic and quick option.

Chicken and Sweet Potato Rice Bowl
Description
Hey friends! This Chicken and Sweet Potato Rice Bowl is the ultimate weeknight hero. Juicy, perfectly seasoned chicken, caramelized sweet potatoes, and fluffy rice come together in about 35 minutes to create a bowl that’s comforting, satisfying, and anything but boring. Add a few fresh toppings, a squeeze of lime, and you’ve got a meal that’s meal-prep friendly, dinner-party ready, and pure happiness in a bowl.
Ingredients
Serves 2–3
-
2 medium sweet potatoes, peeled and cubed (½-inch cubes)
-
2 tbsp olive oil, divided (1 tbsp for sweet potatoes, 1 tbsp for chicken)
-
1 tsp paprika (smoked paprika optional)
-
Salt & pepper, to taste
-
2 boneless, skinless chicken breasts (thighs optional)
-
1 tsp garlic powder
-
1 cup cooked rice (white, jasmine, or brown rice)
-
½ avocado, sliced (optional, but highly recommended)
-
Fresh cilantro or parsley, chopped
-
Lime wedges, for serving
Optional Toppings & Variations:
-
Southwest Fiesta: Chili powder & cumin on potatoes, black beans, corn salsa, sour cream, tortilla strips.
-
Mediterranean Twist: Oregano & lemon zest on chicken, roasted cauliflower, feta, kalamata olives, tzatziki.
-
Curry Bowl: Yellow curry powder on chicken & potatoes, served with naan.
-
Greens Lover’s Delight: Bed of fresh spinach or kale under warm rice.
-
Whole30/Paleo: Replace rice with cauliflower rice.
Instructions
1. Preheat & Prep Sweet Potatoes
-
Preheat oven to 425°F (220°C).
-
Toss cubed sweet potatoes with 1 tbsp olive oil, paprika, salt, and pepper.
-
Spread in a single layer on a baking sheet (no crowding!).
-
Roast for 25 minutes, flipping halfway through, until tender and caramelized.
2. Cook Chicken
-
Pat chicken dry and season both sides with garlic powder, salt, and pepper.
-
Heat remaining 1 tbsp olive oil in a skillet over medium heat.
-
Cook chicken 6–7 min per side until golden brown and internal temp reaches 165°F.
-
Remove and let rest for 5 minutes before slicing against the grain.
3. Assemble Bowls
-
Place a scoop of rice at the base of each bowl.
-
Top with roasted sweet potatoes and sliced chicken.
-
Add avocado slices and fresh herbs.
-
Serve with lime wedges for a bright, finishing touch.
Notes
-
Crispy Sweet Potatoes: Don’t overcrowd the pan, and make sure your oven is fully preheated.
-
Juicy Chicken: Use a thermometer and let it rest 5 minutes before slicing.
-
Meal Prep Friendly: Store components separately in airtight containers for up to 4 days. Slice avocado just before serving.
-
Leftover Rice: Perfect for quick prep; reheats beautifully.
Nutrition
- Calories: 480 Cal per serving
- Fat: 17g
- Carbohydrates: 40g
- Protein: 38g
Nutritional Info (A Quick Note!)
While I’m all about flavor first, I know many of you are curious about what’s fueling your body. This bowl is a fantastic balance of macronutrients! The chicken provides a lean, high-quality protein source to keep you full and support muscle repair. The sweet potatoes are a complex carbohydrate, packed with fiber, Vitamin A, and antioxidants. The healthy fats from the avocado and olive oil help absorb all those fat-soluble vitamins and keep you satisfied.
Please remember that nutritional information is an estimate based on the specific ingredients I used and can vary greatly based on product brands, exact measurements, and any substitutions you make. Use it as a friendly guideline! The estimated values per serving are roughly: Calories: 480 | Fat: 17g | Carbs: 40g | Sugar: 6g | Protein: 38g
Final Thoughts
And there you have it, friends! Your guide to a bowl that’s guaranteed to become a regular in your rotation. It’s proof that a handful of simple ingredients, treated with a little care, can create something truly special and deeply satisfying.
I hope this recipe brings as much joy to your kitchen as it has to mine. The real secret ingredient is always you—your energy, your love, and your willingness to give it a try. Now, I’d love to hear from you! Did you add a crazy topping? Try a wild variation? Tag me on social @feastical with your creations. Nothing makes me happier than seeing you guys enjoy these recipes. Until next time, keep your spatula close and your appetite closer!

Garlic Parmesan Sweet Potato Wedges
Garlic Parmesan Sweet Potato Wedges: Your New Favorite Comfort Food
Hey there, friends! Beau from Feastical here. Let’s talk about something serious for a second: the side dish. Now, don’t get me wrong, I love a good main course, but a truly show-stopping side? That’s where the magic happens. It’s the supporting actor that steals the show, the unexpected guest who becomes the life of the party. And if there’s one side dish that consistently gets more applause than the main act at my dinner table, it’s these unbelievably delicious Garlic Parmesan Sweet Potato Wedges.
Imagine this: sweet potatoes, cut into perfect, rustic wedges, roasted until the edges are caramelized and irresistibly crispy. Their insides? Pure, cloud-like tenderness. Now, while they’re still piping hot from the oven, we shower them with a snowfall of nutty Parmesan cheese and a generous dose of fragrant, minced garlic. The heat from the potatoes slightly melts the cheese and mellows the garlic, creating a flavor bomb that is nothing short of legendary. This isn’t just a recipe; it’s a warm, crunchy, cheesy hug on a baking sheet. They’re perfect for a cozy weeknight dinner, an impressive side for guests, or honestly, just eaten straight off the pan while standing over the stove—no judgment here. So, grab your favorite knife and let’s turn some humble sweet potatoes into pure, unadulterated gold.
A Wedge of Wisdom: My First Kitchen Triumph
This recipe takes me right back to my first real “aha!” moment in the kitchen. I was maybe 19, living in my first apartment with a kitchen the size of a postage stamp. I had ambitiously invited a bunch of friends over for a “gourmet” dinner, which, in reality, was a slightly-burnt piece of chicken and a bag of salad. I needed a side dish, and fast. All I had were two lonely sweet potatoes staring back at me from the counter and the dregs of a Parmesan cheese wedge in the fridge.
In a moment of pure panic-induced inspiration, I chopped those spuds into wedges, tossed them with what little oil I had, and threw them in the oven. When they came out, I grated that last bit of cheese over them and added a crushed clove of garlic from a jar (hey, we all start somewhere!). I served them with a nervous smile. You guys, the room went silent. Then, it was just the sound of crunching and a chorus of “What IS this?!” and “Beau, this is incredible!” That was the moment I realized that the best food isn’t about fancy techniques or expensive ingredients. It’s about heart, a little creativity, and the power of garlic and cheese to save the day. These wedges have been my culinary security blanket ever since.
Gathering Your Flavor Arsenal: The Ingredients
One of the best things about this recipe is its beautiful simplicity. You probably have most of this in your pantry right now! Here’s what you’ll need to create this masterpiece:
- 2 large sweet potatoes: Look for firm potatoes with smooth, taut skin. The size is key here—larger potatoes give you longer, more substantial wedges that are perfect for holding all our yummy toppings. Don’t peel them! The skin gets deliciously crispy and adds great texture and nutrients.
- 2 tbsp olive oil: This is our crisp-maker! A good extra virgin olive oil adds a lovely fruitiness, but any neutral oil like avocado or grapeseed will work perfectly. The oil helps the spices stick and conducts the heat for that perfect golden-brown roast.
- 3 garlic cloves, minced: Fresh is best here, friends! The sharp, pungent flavor of fresh garlic mellows and sweetens beautifully in the oven. In a true pinch, ¾ teaspoon of garlic powder can work, but you’ll lose that incredible aromatic punch.
- ½ tsp salt: Crucial for enhancing all the other flavors. I use fine sea salt. If you’re using kosher salt, you might want to use a tiny bit more.
- ½ tsp black pepper: Freshly cracked is my go-to for the brightest flavor. It adds a little warm, subtle heat that complements the sweetness of the potato.
- 1 tsp Italian seasoning: This convenient little blend is a powerhouse of herbs like oregano, basil, thyme, and rosemary. It adds a wonderful savory, earthy depth that makes these wedges taste incredibly complex.
- ⅓ cup grated Parmesan cheese: Please, for me, grab a wedge of real Parmigiano-Reggiano and grate it yourself. The pre-shredded stuff in bags contains anti-caking agents that prevent it from melting as beautifully. The real deal gives you those delicious, crispy, cheesy bits.
- Fresh parsley, chopped (for garnish): This isn’t just for looks! The fresh, bright pop of parsley cuts through the richness of the cheese and oil, balancing every bite beautifully. Cilantro or chives would also be fantastic.
Let’s Get Cooking: Building the Perfect Wedge, Step-by-Step
Ready to make some magic? Follow these steps, and I’ll throw in my best chef hacks to ensure your wedges are absolutely flawless.
- Preheat and Prep: Fire up your oven to 425°F (220°C). This high heat is non-negotiable—it’s the secret to getting that crispy exterior without steaming the potatoes. While it heats, line a large baking sheet with parchment paper. This isn’t just for easy cleanup (though that’s a huge bonus); it also prevents the wedges from sticking and helps them crisp up evenly. Chef Hack: If you want EXTRA crispiness, place a metal baking rack on top of the lined sheet. This allows hot air to circulate all around the wedges, making them crispy on all sides without needing to flip them!
- The Wedge Work: Scrub those sweet potatoes clean under cold water—we’re keeping the skins on! Slice them in half lengthwise, then cut each half into 3-4 even wedges, depending on the size of your potato. You’re aiming for steak fry-sized wedges. The key here is consistency! If the wedges are all different sizes, some will burn while others are still undercooked. Chef Hack: Soak the cut wedges in cold water for 20-30 minutes before drying and seasoning. This pulls out excess starch, which is the ultimate trick for achieving a super crispy exterior.
- The Flavor Toss: In a large bowl, combine the sweet potato wedges, olive oil, minced garlic, salt, pepper, and Italian seasoning. Now, get in there with your hands! Toss everything together until every single wedge is glistening and evenly coated. Using your hands is the best way to ensure no spot is left unseasoned. Chef Hack: For an extra flavor boost, add a teaspoon of lemon zest to the mix. The citrus notes will brighten everything up beautifully.
- Single Layer is Key: Arrange the wedges on your prepared baking sheet in a single layer, making sure they aren’t touching each other. This is critical! If you crowd the pan, the wedges will steam instead of roast, and we’ll end up with soft, sad potatoes instead of crispy, glorious ones. Place them skin-side down—this creates a stable base for the cut sides to caramelize. Chef Hack: Give each wedge a little space—think of them needing personal space in the oven, just like we do sometimes.
- Roast to Perfection: Slide that sheet into your preheated oven and roast for 25-30 minutes. We’re going for a beautiful golden brown color and crispy edges. About halfway through the cooking time, take the pan out and carefully flip each wedge. This ensures even browning on both sides. Don’t skip the flip!
- The Cheesy Finale: Once the wedges are crispy and tender (you can test one with a fork!), pull the pan from the oven. Immediately sprinkle the grated Parmesan cheese evenly over the top. Be generous! Return the pan to the oven for just 3-5 more minutes. You’ll know it’s ready when the cheese is melted, bubbly, and starting to form those irresistible golden-brown spots.
- Garnish and Serve: Carefully remove the wedges from the oven. Let them rest for just a minute on the pan—this helps the cheese set a little. Then, transfer them to a serving platter and shower them with the freshly chopped parsley. Serve immediately while they’re hot and fabulous!
How to Serve These glorious Wedges
Honestly, these wedges are so good they can stand alone, eaten directly from the baking sheet with your fingers. But if you want to make them the star of a bigger show, here are a few of my favorite ways to serve them:
The Classic Sidekick: They are the perfect partner for a juicy grilled burger, a perfectly seared steak, or some simple baked chicken breasts. They add a sweet and savory element that balances any protein beautifully.
The Dip Party: Turn them into the ultimate appetizer or snack by serving them with a trio of dips. My go-to is a cool, creamy garlic aioli, a spicy sriracha mayo, and a tangy ranch. Let everyone dip and decide their favorite!
The “Fork and Knife” Salad Topper: Crumble these wedges over a big bed of fresh greens like arugula or spinach. The warmth from the potatoes will slightly wilt the greens, and the crispy bits act like the world’s best crouton. Drizzle with a balsamic glaze for a restaurant-worthy salad.
The Brunch of Champions: Serve them alongside some sunny-side-up eggs with runny yolks. Using a wedge to scoop up that golden yolk is a life-changing experience, trust me.
Mix It Up! Delicious Recipe Variations
Once you’ve mastered the classic, the world is your sweet potato! Here are a few fun twists to keep things exciting:
- Smoky Paprika & Lime: Swap the Italian seasoning for 1 tsp smoked paprika and ½ tsp cumin. After baking, squeeze fresh lime juice over the wedges and garnish with cilantro instead of parsley. It’s a fiesta in every bite!
- Everything Bagel Seasoning: Before baking, toss the oiled wedges with 2 tablespoons of everything bagel seasoning instead of the salt and Italian blend. The garlic, onion, sesame, and poppy seeds create an incredible texture and flavor. Finish with the Parmesan as usual.
- Maple Cinnamon (Sweet Version): For a dessert-like treat, skip the garlic, salt, and Italian seasoning. Toss the wedges with olive oil, 2 tablespoons of pure maple syrup, 1 tsp cinnamon, and a pinch of nutmeg. Roast as directed. They’re like healthy-ish donut fries!
- Vegan-Friendly: Easily make these dairy-free by omitting the Parmesan or using your favorite plant-based Parmesan alternative. Nutritional yeast is also a great option—a tablespoon or two will give you that savory, cheesy flavor.
- Spicy Buffalo: Toss the hot, cooked wedges (without the Parmesan) in a bowl with 3-4 tablespoons of your favorite Buffalo sauce. Then spread them back on the pan, sprinkle with blue cheese or vegan cheese crumbles, and pop back in the oven for 2-3 minutes to warm the sauce. Serve with ranch or blue cheese dressing.
Beau’s Chef Notes: A Few Parting Wisdom Nuggets
This recipe has evolved so much since that first panicked apartment attempt. I’ve learned that the soak-and-dry method is a total game-changer for crispiness. I’ve also learned that investing in a good microplane for both the garlic and the Parmesan makes a world of difference—you get a finer, more even distribution of flavor that clings to every nook and cranny.
One funny story: I once was talking to a friend while mincing garlic and completely lost count of how many cloves I’d added. Let’s just say those were the most… *assertive* garlic Parmesan wedges ever created. We called them “Vampire Repellent Wedges” and ate them anyway because, well, garlic. The moral of the story? Even when you “mess up,” you usually end up with something delicious. Cooking is an adventure, not a test!
FAQs & Troubleshooting: Your Questions, Answered
Q: My wedges are soggy instead of crispy. What did I do wrong?
A: The most common culprits are overcrowding the pan and not using a hot enough oven. Ensure your wedges have plenty of space and that your oven is fully preheated. Also, make sure you’re patting the wedges completely dry after soaking (if you do soak them) and before adding oil. Excess water is the enemy of crispiness!
Q: Can I make these ahead of time?
A: You can prep the wedges ahead by cutting and soaking them in water for up to 24 hours in the fridge. Keep them submerged to prevent browning. Drain and pat them VERY dry before seasoning and roasting. I don’t recommend roasting them fully ahead of time as they will lose their crispness. However, you can re-crisp leftovers in the air fryer or a 400°F oven for a few minutes.
Q: Is an air fryer a good option for this recipe?
A: Absolutely! Air fryers are fantastic for these wedges. Cook them at 380°F for 15-20 minutes, shaking the basket halfway through. Add the Parmesan in the last 2-3 minutes of cooking. They get incredibly crispy!
Q: My cheese isn’t sticking to the wedges. How can I fix that?
A: The cheese needs a slightly “sticky” surface to adhere to. Make sure you’re adding the cheese immediately after the initial bake, while the wedges and the oil on their surface are still very hot. The residual heat will melt the cheese and help it stick. Pressing it down gently can also help.

Garlic Parmesan Sweet Potato Wedges
Description
Hey friends! These Garlic Parmesan Sweet Potato Wedges are crispy, golden on the outside, tender on the inside, and loaded with cheesy, garlicky goodness. They’re the perfect side dish for weeknight dinners, special occasions, or just eating straight off the pan. Baking instead of frying makes them healthier, and the Parmesan adds a nutty, melty touch that turns simple wedges into something extraordinary.
Ingredients
Serves 4
-
2 large sweet potatoes, scrubbed and cut into wedges
-
2 tbsp olive oil
-
3 garlic cloves, minced (or ¾ tsp garlic powder)
-
½ tsp salt
-
½ tsp black pepper
-
1 tsp Italian seasoning
-
⅓ cup grated Parmesan cheese
-
Fresh parsley, chopped (for garnish)
Optional Variations:
-
Smoky Paprika & Lime: Replace Italian seasoning with 1 tsp smoked paprika + ½ tsp cumin, squeeze lime over wedges, garnish with cilantro.
-
Everything Bagel Seasoning: Toss wedges with 2 tbsp everything bagel seasoning before baking.
-
Maple Cinnamon: Omit garlic and Italian seasoning; toss with 2 tbsp maple syrup, 1 tsp cinnamon, pinch of nutmeg.
-
Vegan: Use nutritional yeast or plant-based Parmesan instead of cheese.
-
Buffalo: Toss baked wedges in 3–4 tbsp Buffalo sauce, top with blue cheese or vegan cheese, warm 2–3 min in oven.
Instructions
-
Preheat Oven & Prep Pan
Preheat oven to 425°F (220°C). Line a baking sheet with parchment paper. For extra crispiness, place a metal rack on top of the sheet. -
Soak & Dry (Optional but Recommended)
Soak cut wedges in cold water for 20–30 min, then pat completely dry to remove excess starch for a crispier exterior. -
Season Wedges
In a large bowl, toss sweet potato wedges with olive oil, garlic, salt, pepper, and Italian seasoning until evenly coated. -
Arrange for Roasting
Place wedges in a single layer on the prepared sheet, skin-side down. Make sure they aren’t touching to prevent steaming. -
Roast
Bake 25–30 min, flipping halfway through, until golden and crispy. -
Add Cheese & Finish
Sprinkle grated Parmesan over wedges immediately after baking. Return to oven for 3–5 min until cheese melts and browns slightly. -
Garnish & Serve
Sprinkle with chopped parsley and serve hot.
Notes
-
Don’t overcrowd the pan—space is key for crispiness.
-
Keep wedges dry before roasting; moisture = soggy wedges.
-
Air fryer option: 380°F for 15–20 min, shake halfway; add cheese in last 2–3 min.
-
Cheese sticks best when added immediately after baking while wedges are hot.
Nutrition
- Calories: 220 Cal per serving
- Fat: 9g
- Saturated Fat: 2g
- Carbohydrates: 30g
- Fiber: 5g
Nutritional Info (Because We’re Curious!)
While we’re all about the flavor first, it’s always nice to know what’s going into our bodies! Sweet potatoes are a nutritional powerhouse. They’re loaded with Beta-Carotene (which our bodies convert to Vitamin A), which is fantastic for eye health and our immune systems. They’re also a great source of fiber, Vitamin C, and potassium.
This recipe, as written, is a healthier alternative to deep-fried fries. Baking them uses significantly less oil. The olive oil provides healthy monounsaturated fats, and the Parmesan adds a dose of calcium and protein. Remember, these values are estimates and can vary based on the exact size of your potatoes and specific brands of ingredients used.
Per Serving (approx.): Calories: 220 | Fat: 9g | Saturated Fat: 2g | Carbohydrates: 30g | Fiber: 5g | Sugar: 7g | Protein: 4g
Final Thoughts: More Than Just a Side Dish
So there you have it, friends. What started as a kitchen Hail Mary in my tiny first apartment has become a recipe I hold near and dear to my heart. These Garlic Parmesan Sweet Potato Wedges are more than just a side; they’re a reminder that the most memorable meals aren’t about perfection. They’re about the joy of creating something delicious, the confidence that comes from a few simple ingredients singing in harmony, and the sheer, unadulterated comfort of a warm, crispy, cheesy bite

Turkey, Cranberry & Brie Egg Rolls
Turn Your Thanksgiving Leftovers Into Party Gold!
Hey friends, Beau here from Feastical! Let’s be real for a second. The day after Thanksgiving is a beautiful, chaotic mess, right? You’re floating in a tryptophan-induced haze, the fridge is bursting at the seams with containers of deliciousness, and you’re faced with the age-old question: “Do we just eat turkey sandwiches for the next five days?” Don’t get me wrong, I love a good leftover sandwich, but my culinary soul craves a little more creativity.
That’s where these life-changing Turkey, Cranberry & Brie Egg Rolls come in. Imagine this: a crispy, golden-brown wrapper giving way to a warm, savory-sweet explosion of tender turkey, melty, creamy brie, and that iconic tart cranberry sauce. It’s like all the best parts of your holiday plate got together, decided to put on their fancy clothes, and threw a party in your mouth. I’m not kidding, these are a total game-changer.
The best part? We’re baking them, not frying. That means less mess, less guilt, and more time to actually enjoy your guests (or your couch, no judgment here). This recipe is designed to be a crowd-pleaser—it’s doubled to make a big batch perfect for game day, a holiday gathering, or just because you deserve something amazing. So, let’s raid that fridge, roll up our sleeves, and transform those beloved leftovers into something truly spectacular. Get ready for your new favorite post-Thanksgiving tradition!
The Thanksgiving That Started It All
This recipe was born out of pure, beautiful necessity a few years back. My cousin hosted a massive “Friendsgiving,” and like any good food-obsessed relative, I volunteered to handle the turkey. Well, I got a little over-excited and roasted a bird that could have fed a small army. We had leftovers for days. On the third day of turkey sandwiches, my best friend looked at me, held up a sad-looking slice of white bread, and said, “There has to be a better way, Chef Beau.”
Challenge accepted. We started riffing. We had a block of brie from the cheese board, a half-eaten jar of cranberry sauce, and a packet of egg roll wrappers I’d bought for a failed attempt at homemade Chinese takeout. What started as a silly kitchen experiment quickly turned into magic. The moment that first batch came out of the oven, golden and smelling incredible, we knew we’d stumbled onto something special. They were gone in minutes, and the recipe has been a Feastical family staple ever since. It’s a reminder that some of the best dishes aren’t meticulously planned—they’re created with a little ingenuity and a lot of love for not letting good food go to waste.
Gathering Your Feast Roll-Up Crew
Here’s everything you’ll need to create these crispy pockets of joy. Don’t stress about being exact—cooking is about feeling, not just following!
For the Egg Rolls (Makes 20)
- 20 egg roll wrappers: Look for these in the refrigerated produce section of your grocery store. They dry out fast, so keep them under a damp paper towel while you work. Chef’s Tip: If you can only find wonton wrappers (which are smaller), just use less filling and adjust your rolling technique!
- 2 cups cooked turkey, shredded: The star of the show! White meat, dark meat—use whatever you love most. This is a fantastic way to use up drier pieces, as the cranberry and brie will add moisture back in.
- 1/4 teaspoon poultry seasoning (optional): A little flavor boost never hurt anybody. If you don’t have any, a pinch of sage and thyme works beautifully.
- Salt and black pepper to taste: Season as you go! Taste your turkey mixture before assembling.
- 1 cup cranberry sauce: Jellied or whole-berry? Your call! I’m a whole-berry guy for the added texture, but jellied spreads easier. Homemade is heaven, but store-bought is absolutely perfect here.
- 20 slices brie cheese: Aim for slices about 1/4–1/2 inch thick and 1 1/2 inches long. Pro Hack: Pop the brie in the freezer for 15 minutes before slicing—it makes it so much easier to handle! You can leave the rind on; it’s totally edible and adds a lovely earthy flavor.
Flavor Boosters (Optional but Highly Recommended)
- 1/2 cup caramelized onions or thinly sliced green apple: The sweet, deep flavor of caramelized onions is INSANE in these. For a faster, fresh crunch, a few thin slices of tart green apple are phenomenal.
- Fresh thyme or rosemary, finely chopped: A little sprinkle of these fresh herbs cuts through the richness and makes everything taste brighter.
- Crushed pecans or walnuts: For that unforgettable Thanksgiving crunch. Toast them first for maximum flavor!
For the Cranberry Mustard Dipping Sauce
- 1 cup cranberry sauce: The base of our tangy, sweet, and spicy dip.
- 2 tablespoons Dijon mustard: Adds a sharp, sophisticated tang. Yellow mustard can work in a pinch, but the flavor will be different.
- 2 tablespoons honey: Balances the tartness. Maple syrup is a great substitute.
- Salt and pepper to taste: Always season your sauces!
- A splash of apple cider vinegar or a pinch of cayenne: This is your secret weapon. The vinegar adds brightness, and the cayenne gives a sneaky, welcome kick.
Let’s Get Rolling! Your Step-by-Step Guide
Follow these steps, and you’ll be an egg roll master in no time. I’ve packed this section with all my best hacks to ensure your success.
- Preheat and Prep: Fire up your oven to 400°F (200°C). Line a large baking sheet with parchment paper—this is non-negotiable for easy cleanup and preventing sticking. Lightly grease the parchment if you’re extra cautious. Chef’s Note: Giving your oven a full preheat is key for that initial blast of heat that makes them crisp up perfectly.
- Season the Turkey: In a medium bowl, toss your shredded turkey with the poultry seasoning (if using), and a good pinch of salt and pepper. Give it a taste! Does it need more pepper? Go for it. This is your creation.
- The Assembly Line: Set up your workstation: a bowl of turkey, your cranberry sauce, sliced brie, any extras (like apples or herbs), a small bowl of water for sealing, and your egg roll wrappers under that damp towel. This “mise en place” (everything in its place) makes the process smooth and fun.
- Fill and Fold: Place one wrapper on a clean surface like a diamond. Spoon about a tablespoon of the seasoned turkey just below the center. Top with a teaspoon of cranberry sauce, a slice of brie, and any extras. Pro Hack: Don’t overfill! This is the number one mistake. Too much filling and they’ll burst open in the oven. Now, fold the bottom corner up over the filling. Fold the left and right corners inward toward the center. Brush the top corner with a little water, then roll it up tightly, sealing the edge. Place it seam-side down on your prepared baking sheet. Repeat with love!
- Bake to Perfection: Lightly spray or brush the tops of all the egg rolls with a neutral oil (avocado, canola, or olive oil spray). This is what gives them that gorgeous, golden, fried-looking color without the fryer. Bake for 10-12 minutes, then carefully flip them over. Bake for another 8-10 minutes, until they are deeply golden brown and incredibly crispy.
- Whip Up the Sauce: While the egg rolls are baking, make your dipping sauce. Simply whisk together the cranberry sauce, Dijon mustard, honey, and a pinch of salt and pepper in a small bowl. Taste it! Want more kick? Add a pinch of cayenne. Want it tangier? A splash of apple cider vinegar will do the trick. Set it aside or pop it in the fridge to let the flavors meld.
How to Serve These Golden Gems
Presentation is part of the fun! You’ve created something incredible—let’s show it off.
Pull that baking sheet out of the oven and let the egg rolls rest for just a minute or two. They are molten lava on the inside right out of the oven! I love serving them on a large wooden board or a beautiful platter, maybe scattered with a few fresh cranberries and rosemary sprigs for a festive touch. Pour that gorgeous crimson dipping sauce into a small bowl and place it right in the center.
What to serve with them? They are the ultimate appetizer, so they shine all on their own. But if you’re making a meal of it, a simple, crisp arugula salad with a lemon vinaigrette is the perfect light, peppery contrast to the rich, savory egg rolls. For a drink pairing, a crisp hard cider, a dry Riesling, or even a light-bodied red like a Pinot Noir are all fantastic matches for the sweet and savory flavors.
Mix It Up! Delicious Variations
This recipe is a fantastic blueprint. Make it your own with these fun twists!
- The “Thanksgiving Dinner”: Add a spoonful of leftover stuffing and a drizzle of gravy into the mix. Seriously, go for it.
- Southwest Twist: Swap the turkey for shredded chicken, use pepper jack cheese instead of brie, and replace the cranberry sauce with a chipotle-lime cranberry sauce or even a mango salsa for the dip.
- Vegetarian Delight: No turkey? No problem! Use a combination of mashed sweet potatoes and sautéed mushrooms for a deeply savory and satisfying vegetarian version.
- Breakfast Roll: Use scrambled eggs, breakfast sausage, and cheddar cheese with a little apple butter for dipping. You’re welcome.
- Air Fryer Method: Want them even crispier? These are a dream in the air fryer! Spray the basket, arrange egg rolls in a single layer (work in batches), spray the tops with oil, and air fry at 370°F for 8-10 minutes, flipping halfway through.
Beau’s Chef Notes & Kitchen Stories
This recipe has seen a few… interesting iterations over the years. There was the time I tried to use phyllo dough instead of egg roll wrappers (flaky disaster). There was also the “more is more” incident where I overstuffed them so badly they erupted like little cheesy volcanoes in my oven. My kitchen smelled amazing, but they looked like abstract art. We’ve landed on this perfect, foolproof method after all that tasty trial and error.
The biggest evolution was moving from frying to baking. I found that with a good spray of oil and a hot oven, you get 95% of the crunch without any of the greasy mess. It makes me feel better about eating three… or four. Remember, cooking is an adventure. Embrace the little mishaps—they often make for the best stories later!
Your Questions, Answered
Q: Can I make these ahead of time?
A: Absolutely! You can assemble the egg rolls completely, place them on a baking sheet, and freeze them solid. Once frozen, transfer them to a zip-top bag. When you’re ready, bake them straight from frozen, adding 5-7 extra minutes to the cooking time. No need to thaw!
Q: My egg rolls are bursting open in the oven! What did I do wrong?
A: This almost always means they were overfilled. It’s tempting to pack in all that goodness, but show a little restraint! Also, make sure you’re sealing the final edge well with water—that’s your edible glue.
Q: Can I use a different cheese?
A: Of course! Brie is melty and creamy, but other great options are camembert, havarti, mozzarella, or even a sharp white cheddar for a more pronounced cheesy flavor.
Q: My oven runs hot/cold. How do I know when they’re done?
A: Ovens can be tricky. Go by color, not just time. You’re looking for a deep, golden brown. If they’re lightly blonde, they won’t be as crisp. If your oven has hot spots, rotating the pan halfway through is a great idea.

Turkey, Cranberry & Brie Egg Rolls
Description
Hey friends! If your fridge is overflowing with Thanksgiving leftovers, it’s time to level up. These Turkey, Cranberry & Brie Egg Rolls turn cold turkey and cranberry sauce into a crispy, golden, melty, savory-sweet delight. The best part? We’re baking them, not frying, so you get all the crunch with less mess and guilt. Perfect for game day, a holiday gathering, or just because you deserve something amazing.
Ingredients
Makes 20 egg rolls
For the Egg Rolls:
-
20 egg roll wrappers (keep under a damp towel)
-
2 cups cooked turkey, shredded
-
1/4 tsp poultry seasoning (optional)
-
Salt and black pepper, to taste
-
1 cup cranberry sauce (jellied or whole-berry)
-
20 slices brie cheese (1/4–1/2 inch thick, 1 1/2 inches long)
Optional Flavor Boosters:
-
1/2 cup caramelized onions or thinly sliced green apple
-
Fresh thyme or rosemary, finely chopped
-
Crushed pecans or walnuts (toasted)
Cranberry Mustard Dipping Sauce:
-
1 cup cranberry sauce
-
2 tbsp Dijon mustard
-
2 tbsp honey (or maple syrup)
-
Salt and pepper, to taste
-
Optional: splash of apple cider vinegar or pinch of cayenne
Instructions
-
Preheat Oven & Prep Pan
Preheat oven to 400°F (200°C). Line a large baking sheet with parchment paper and lightly grease. -
Season the Turkey
In a medium bowl, mix shredded turkey with poultry seasoning (if using), salt, and pepper. Taste and adjust seasoning. -
Set Up Assembly Line
Arrange your turkey, cranberry sauce, brie slices, optional add-ins, water for sealing, and wrappers for easy access. -
Fill & Roll
-
Lay wrapper in a diamond shape.
-
Spoon ~1 tbsp turkey near the bottom center.
-
Top with ~1 tsp cranberry sauce, a slice of brie, and optional add-ins.
-
Fold bottom corner over filling, then fold sides inward.
-
Brush top corner with water, roll tightly, and place seam-side down on baking sheet.
-
-
Bake Egg Rolls
Lightly spray or brush tops with neutral oil. Bake 10–12 min, flip, then bake another 8–10 min until golden brown and crispy. -
Make Dipping Sauce
Whisk cranberry sauce, Dijon, honey, salt, and pepper. Add apple cider vinegar or cayenne if desired. Serve chilled or room temperature.
Notes
-
Make Ahead: Assemble and freeze; bake from frozen with 5–7 extra minutes.
-
Cheese Swap: Try camembert, havarti, mozzarella, or sharp cheddar.
-
Filling Ideas: Add leftover stuffing, gravy, or switch to mashed sweet potatoes & mushrooms for a vegetarian version.
-
Air Fryer Option: 370°F for 8–10 min, flipping halfway.
Nutrition
- Calories: 180 Cal per egg
- Fat: 8g
- Saturated Fat: 4g
- Cholesterol: 35mg
Nutritional Information*
*Please note: This is an estimated nutritional breakdown based on the ingredients used and standard calculations. Values can vary significantly based on specific brands, portion sizes, and optional ingredients.
Per Egg Roll (approx.):
Calories: ~180 | Total Fat: 8g | Saturated Fat: 4g | Cholesterol: 35mg | Sodium: 220mg | Total Carbohydrates: 18g | Dietary Fiber: 1g | Sugars: 8g | Protein: 9g
While these are a treat, baking instead of frying saves a significant amount of fat and calories. Turkey is a fantastic lean protein source, and cranberries are packed with antioxidants. Enjoy them as part of a balanced diet!
Your New Leftover Legacy
And there you have it, friends! Your guide to turning the humble Thanksgiving leftover into the undisputed star of the show. These Turkey, Cranberry & Brie Egg Rolls are more than just a recipe; they’re a conversation starter, a crowd-pleaser, and a deliciously creative way to reduce food waste.
I hope this recipe brings as much joy and flavor to your kitchen as it has to mine. I’d love to hear how yours turn out! Did you add apples? Try the air fryer? Snap a picture and tag me @feastical on Instagram so I can see your culinary masterpiece.
Now, go forth and conquer that fridge. Happy cooking!
With love and a full plate,
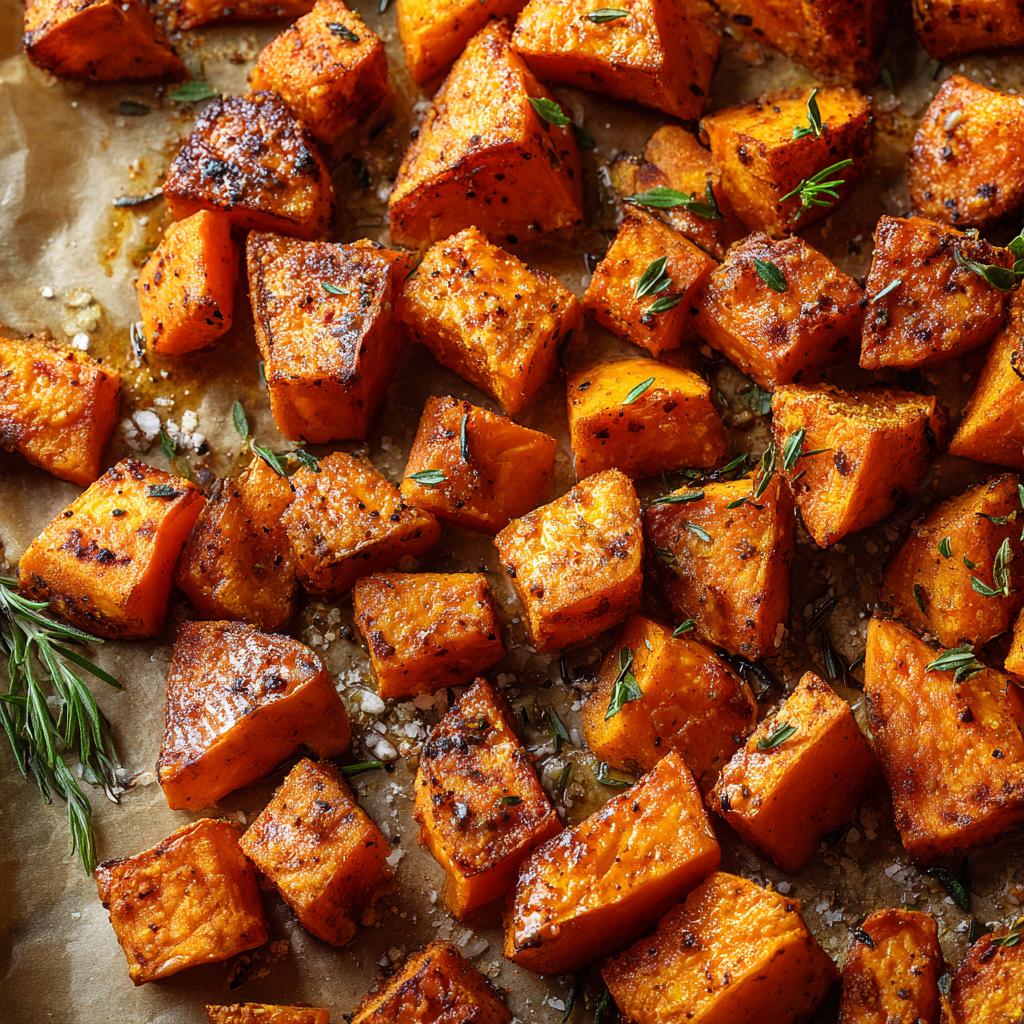
Savory Roasted Sweet Potatoes
Your New Favorite Side Dish: Savory Roasted Sweet Potatoes
Hey friends, Beau here from Feastical! Let’s talk about a kitchen superstar that’s about to become your go-to for, well, just about every meal. I’m talking about savory roasted sweet potatoes. Now, I know what you might be thinking—sweet potatoes are for Thanksgiving, smothered in marshmallows, right? Well, my friend, we’re about to break that mold wide open. We’re taking these gorgeous, earthy tubers on a savory adventure that will have you reaching for seconds and thirds.
Imagine this: golden-brown cubes, crispy on the outside with those irresistible caramelized edges, yet impossibly fluffy and tender on the inside. They’re seasoned with a smoky, garlicky, herby blend that makes them the perfect partner for your weeknight chicken, your weekend steak, or even just a pile of greens. The best part? This isn’t some fussy, complicated recipe. It’s the kind of simple, soulful cooking I built Feastical on. We’re talking ten minutes of prep, one baking sheet, and a whole lot of flavor. So, preheat that oven, grab your favorite mixing bowl, and let’s turn something simple into something spectacular together.
The Campfire & The Culinary “Aha!” Moment
This recipe always takes me back to my first big camping trip with friends. I was put in charge of the fire and the food—no pressure, right? We had a bag of sweet potatoes, some basic spices, and a whole lot of hope. Wrapped in foil and tossed into the embers, they came out blackened and, honestly, a little scary. But when we cracked them open? Pure magic. The smoke from the fire had infused the flesh, and the natural sweetness was the perfect contrast to the savory spices we’d rubbed on the skin.
That smoky, savory-sweet combo was a revelation. I spent the next week in my home kitchen trying to recreate that campfire flavor without the, you know, actual forest fire. After a few (dozen) tries, I landed on this exact blend of smoked paprika and thyme. It captures that essence of an outdoor adventure but makes it achievable on a busy Tuesday night. It’s a reminder that the best recipes aren’t always born in fancy kitchens; sometimes, they come from a little smoke, a few good friends, and a happy accident.
Gathering Your Flavor Arsenal
Here’s the beautiful lineup of ingredients you’ll need. This is where the flavor foundation is built!
- 2 lbs sweet potatoes, peeled and cubed: Look for firm potatoes with smooth, taut skin. I like to use a mix of orange-fleshed Garnets and white-fleshed Hannahs for a cool color contrast! Pro Chef Insight: Try leaving the skin on for extra fiber and a delightful rustic texture—just give them a really good scrub first.
- 2 tbsp olive oil: This is our cooking medium. It helps the spices stick and promotes that gorgeous, crispy caramelization. Substitution Tip: Avocado oil is a fantastic high-heat alternative with a neutral flavor.
- 1 tsp garlic powder: Yes, powder! While I love fresh garlic, powder distributes evenly and won’t burn in the hot oven, giving you a consistent, mellow garlicky flavor in every bite.
- 1 tsp smoked paprika: This is the secret weapon, folks. It delivers that deep, smoky, campfire-like flavor without any actual fire. Substitution Tip: If you only have regular paprika, use it! The flavor will be less smoky but still delicious. For a kick, use ½ tsp of hot smoked paprika.
- ½ tsp dried thyme: Her earthy, slightly floral notes are a classic pairing with root vegetables and smoke. Substitution Tip: Fresh thyme is even better! Use 1 tsp of fresh leaves, stripped from the stems.
- ½ tsp salt: Crucial for enhancing all the other flavors. Don’t skip it!
- ¼ tsp black pepper: Freshly cracked is always best for the brightest flavor.
Let’s Get Roasting: Your Foolproof Guide
Follow these steps, and I promise you’ll achieve sweet potato perfection. I’ve sprinkled in all my favorite chef hacks to make it even easier.
- Preheat & Prep: Crank that oven to 425°F (220°C). This high heat is non-negotiable—it’s the key to getting crispy edges instead of steamed potatoes. While it heats, line a large baking sheet with parchment paper. This isn’t just for easy cleanup; it also prevents sticking and promotes even browning. Chef Hack: If you want EXTRA crispiness, preheat the baking sheet in the oven for 5-10 minutes before adding the potatoes. Just be careful when you take it out!
- The Big Toss: In a large bowl, combine your cubed sweet potatoes and olive oil. Toss them until every single cube is glistening. This oil coating is what allows the spices to cling on for dear life. Now, sprinkle in all your gorgeous spices: garlic powder, smoked paprika, dried thyme, salt, and pepper. Toss, toss, toss again! I like to use my hands for this to really ensure every nook and cranny is seasoned. Chef Hack: For maximum flavor penetration, you can let the seasoned potatoes sit for 10-15 minutes before roasting.
- Spread for Success: Dump those beautifully coated potatoes onto your prepared baking sheet and spread them out into a single, even layer. This is critical, people! If the potatoes are crowded or piled on top of each other, they’ll steam instead of roast. We want crispy, not soggy! Give them a little room to breathe. Chef Hack: If you’re doubling the recipe, use two baking sheets. It’s worth it.
- Roast to Perfection: Slide that sheet into your hot oven and let the magic happen. Set your timer for 15 minutes. When it goes off, pull the sheet out and flip the potatoes. I use a thin metal spatula to get under them and flip them in sections. This ensures every side gets its moment of direct heat for an all-over golden-brown crisp. Pop them back in for another 10-15 minutes. They’re done when you can easily pierce a cube with a fork and the edges are beautifully browned and slightly crisp.
- The Final Touch: Pull the baking sheet out of the oven. Let the potatoes rest for just a minute or two on the sheet. This allows them to firm up slightly. Then, transfer them to a serving bowl, taste, and add another tiny pinch of salt if needed. This “seasoning at the end” trick always makes flavors pop!
How to Serve These Golden Gems
Okay, they’re out of the oven and smell incredible. Now what? The possibilities are endless!
For a simple, stunning side, just pile them high in a rustic ceramic bowl and sprinkle with a little fresh parsley or thyme. They are the ultimate partner for weeknight dinners—seriously, they go with everything. Serve them alongside roasted chicken, seared pork chops, or a perfectly grilled steak.
Want to make them the star? Turn them into a hearty bowl meal. Start with a base of quinoa or greens, add these warm roasted sweet potatoes, a dollop of hummus or tzatziki, some creamy avocado, and a sprinkle of feta cheese. Drizzle with a little tahini dressing, and you have a restaurant-quality lunch right at home.
And hey, let’s not forget breakfast! These are amazing reheated in a skillet with a little oil, topped with a fried egg and a dash of hot sauce. Trust me on this one.
Mix It Up! 5 Flavorful Twists
Once you’ve mastered the base recipe, the world is your sweet potato! Here are a few of my favorite ways to switch things up.
- Maple Sriracha Glaze: For a sweet-heat situation, whisk together 2 tbsp maple syrup and 1 tbsp sriracha. Toss the roasted potatoes in this glaze as soon as they come out of the oven.
- “Everything Bagel” Style: Swap the spice blend for 2 tablespoons of Everything Bagel Seasoning. It’s salty, seedy, and utterly addictive.
- Herb & Parmesan: After roasting, toss the hot potatoes with a handful of freshly grated Parmesan cheese and a tablespoon of chopped fresh rosemary. The cheese will melt into a salty, delicious crust.
- Curry Coconut: Replace the olive oil with melted coconut oil and swap the paprika and thyme for 2 tsp of your favorite curry powder. The tropical, aromatic flavor is incredible.
- Loaded Potato Style: Turn them into a meal! Serve a big portion and top with black beans, corn, diced avocado, a dollop of Greek yogurt (or sour cream), and a sprinkle of green onions. It’s a fiesta!
Beau’s Kitchen Notes
This recipe is a living, breathing thing in my kitchen. It’s evolved from those foil-wrapped campfire spuds to this reliable weeknight hero. One time, I was filming a video for Feastical and was so busy chatting to the camera that I completely forgot to set a timer. Let’s just say we got *extra* crispy potatoes that day! They were borderline burnt, but you know what? We tossed them with a quick lime juice drizzle and they were still pretty darn good. It was a great reminder that cooking is resilient and rarely a total loss. Don’t stress about perfection. The goal is deliciousness, and these potatoes are very, very forgiving.
Your Questions, Answered
Q: My potatoes are always mushy, not crispy. What am I doing wrong?
A: The most common culprit is overcrowding the pan! If the potatoes are too close together, they steam each other. Spread them out in a single layer with some space between them. Also, make sure your oven is fully preheated to that nice hot 425°F.
Q: Can I make these ahead of time?
A: You can prep them ahead! Peel and cube the potatoes up to a day in advance. Keep them submerged in a bowl of cold water in the fridge to prevent browning. Just drain and pat them VERY dry before tossing with oil and spices. You can also roast them fully and reheat them in a 375°F oven for 10-15 minutes to bring back the crispiness.
Q: Are sweet potatoes and yams the same thing?
A> Great question! In most American supermarkets, the labels are used interchangeably, but they are actually different root vegetables. The orange-fleshed “yams” you see are almost always a variety of sweet potato. True yams have rough, bark-like skin and starchy, white flesh. For this recipe, any orange, garnet, or even white sweet potato will work beautifully.
Q: My spices are burning before the potatoes are cooked!
A> This can happen if your oven runs hot or the rack is too high. Try lowering your oven temperature to 400°F and roasting for a slightly longer time. Ensuring your potatoes are in similarly sized cubes (about ¾-inch) also helps them cook evenly.
Savory Roasted Sweet Potatoes
Description
Savory Roasted Sweet Potatoes
Crispy edges, tender centers, and loaded with smoky, garlicky flavor.
Ingredients
-
2 lbs sweet potatoes, peeled and cubed (¾-inch pieces)
-
2 tbsp olive oil (or avocado oil)
-
1 tsp garlic powder
-
1 tsp smoked paprika
-
½ tsp dried thyme (or 1 tsp fresh)
-
½ tsp salt
-
¼ tsp black pepper
Optional Toppings & Twists:
-
Maple syrup + sriracha glaze
-
Everything Bagel seasoning
-
Grated Parmesan + fresh rosemary
-
Curry powder + coconut oil
-
Toppings: black beans, corn, avocado, Greek yogurt, green onions
Instructions
1. Preheat & Prep
-
Preheat oven to 425°F (220°C).
-
Line a large baking sheet with parchment paper. For extra crispiness, preheat the sheet in the oven 5–10 minutes.
2. Toss the Potatoes
-
In a large bowl, combine sweet potato cubes and olive oil.
-
Add garlic powder, smoked paprika, thyme, salt, and pepper. Toss until evenly coated.
-
Optional: Let sit 10–15 minutes to enhance flavor.
3. Spread & Roast
-
Arrange potatoes in a single layer on the baking sheet. Give them space!
-
Roast 15 minutes, then flip with a spatula.
-
Roast another 10–15 minutes, until edges are golden and slightly crisp.
4. Serve
-
Let cool 1–2 minutes on the sheet.
-
Transfer to a serving bowl and taste; add a pinch more salt if needed.
Notes
-
Avoid mushy potatoes: Don’t overcrowd the pan.
-
Make ahead: Cube potatoes a day in advance, store in cold water. Dry thoroughly before roasting.
-
Reheating: 375°F oven, 10–15 minutes to restore crispiness.
-
Even cooking: Cubes ~¾-inch.
A Note on Nutrition
Let’s be clear: I’m a chef, not a dietitian. But I love knowing that what I’m eating is also doing good things for my body! Sweet potatoes are a nutritional powerhouse. They’re loaded with beta-carotene (which gives them that vibrant color and is great for your eyes), and they’re an excellent source of fiber, which helps keep you full and satisfied. They also provide a healthy dose of Vitamin C and potassium. Using olive oil, a heart-healthy fat, helps your body absorb all those fat-soluble vitamins. So while these taste like an indulgent treat, they’re actually packed with goodness. It’s a win-win on a baking sheet!
Dig In!
And there you have it, friends—everything you need to know to make the most incredible savory roasted sweet potatoes of your life. This is more than just a recipe; it’s a template for countless delicious meals. It’s about taking a humble ingredient and treating it with a little love and spice to create something truly memorable.
I hope this recipe finds its way onto your table again and again. When you make it, I’d love to see your creation! Tag me @Feastical on social media so I can share in your kitchen victory. Now, go preheat that oven. Your fork is waiting.

Gingerbread Truffles
Welcome to My Favorite Holiday Bite!
Hey friends, Beau here from Feastical! Is there anything that captures the cozy, spiced-up magic of the holiday season quite like the smell of gingerbread? That warm, molasses-rich, spicy aroma that seems to hug the entire house? I’ve always believed that the best holiday memories are made not just around the dinner table, but also in the moments of creating something special with your own two hands. That’s why I’m so incredibly excited to share one of my all-time favorite no-bake treats with you today: Gingerbread Truffles.
Imagine the soul of your favorite gingerbread cookie, transformed into a creamy, decadent, bite-sized truffle. We’re talking a rich, spiced center made from crushed gingersnaps and cream cheese, all enrobed in a sleek coat of sweet white chocolate. They’re the perfect little package of festive joy. Whether you’re whipping them up for a cookie swap, leaving a plate out for Santa (he’ll be thrilled, trust me), or simply treating yourself after a long day of holiday chaos, these truffles are a guaranteed mood-lifter. They’re incredibly simple to make, require zero oven time, and are an absolute blast to decorate. So, tie on your favorite apron, put on some classic holiday tunes, and let’s make some magic together. This is one recipe that’s about to become a non-negotiable part of your holiday tradition!
The Christmas Eve Kitchen Rescue
I have to tell you about the first time these truffles truly saved the day. It was Christmas Eve, and I’d ambitiously planned an elaborate seven-course dinner for my family. Everything was on schedule until I opened the oven to check on the main course… only to be greeted by the smoky remnants of what was supposed to be a glorious gingerbread Yule log. I’d completely forgotten about it! The kitchen was a disaster, my masterpiece was a charcoal briquette, and I had about two hours until guests arrived with zero dessert.
Panic mode: activated. But then, I remembered a half-eaten bag of gingersnaps in the pantry and a block of cream cheese in the fridge. In a whirlwind of inspiration (and slight desperation), I threw them together with some spices and molasses. I rolled the mixture into balls, dunked them in the only chocolate I had left—white chocolate—and frantically shoved the tray into the freezer. Twenty minutes later, I presented these hastily assembled truffles on a platter, fully expecting a polite but disappointed reception. Instead, they were the undisputed star of the night. My grandma even said, “Beau, you’ve outdone yourself this time!” I never told her they were a happy accident born from a kitchen fail. Sometimes, the best recipes come from a little chaos and a whole lot of heart.
Gathering Your Truffle Toolkit
One of the best things about this recipe is its beautiful simplicity. You likely have most of these ingredients already hanging out in your pantry, just waiting to become something spectacular. Here’s what you’ll need:
- 1½ cups crushed gingersnap cookies: This is the flavor foundation! I like to use a sturdy food processor to get fine crumbs, but a zip-top bag and a rolling pin work just as well (and can be a great stress-reliever!). Chef’s Insight: The brand of cookie matters. Nabisco’s Famous Gingersnaps have a robust spice level that I love, but feel free to use your favorite store brand or even homemade cookie crumbs!
- 4 oz cream cheese, softened: This is our binding agent, and it provides that luscious, creamy texture. Pro Tip: FULL FAT is the way to go here for the best consistency and flavor. Make sure it’s softened to room temperature to avoid a lumpy mixture.
- 2 tbsp molasses: This is the deep, rich, soulful sweetness that defines gingerbread. Substitution Tip: If you’re in a pinch, dark corn syrup or maple syrup can work, but the flavor profile will be lighter and less complex.
- ½ tsp ground cinnamon, ¼ tsp ground ginger, ¼ tsp ground nutmeg, Pinch of cloves: Our spice quartet! This is where you can really make these truffles your own. Love a spicy kick? Add an extra pinch of ginger or even a tiny dash of black pepper. Chef’s Hack: For an incredible depth of flavor, try using freshly grated nutmeg. It makes a world of difference!
- 8 oz white chocolate (for coating): I recommend using high-quality baking bars or melting wafers, as they melt more smoothly than chocolate chips, which contain stabilizers. Substitution Tip: Dark or milk chocolate would also be delicious for a different flavor twist!
- Optional garnishes: Crushed cookies, festive sprinkles, holiday-themed nonpareils, or a light dusting of cinnamon. This is your chance to get creative and have fun!
Let’s Make Some Truffle Magic: Step-by-Step
Okay, team! Let’s get our hands dirty (figuratively, and maybe a little literally). This process is simple, fun, and honestly, a little therapeutic. Follow these steps, and you’ll be a truffle-making pro in no time.
- Create the Truffle Base: In a medium-sized mixing bowl, combine your finely crushed gingersnap cookies, softened cream cheese, molasses, and all those wonderful spices (cinnamon, ginger, nutmeg, and cloves). Now, roll up your sleeves and get in there with your hands! Mix everything together until it’s completely uniform and smooth. You shouldn’t see any streaks of cream cheese or dry patches of cookie crumbs. Chef’s Hack: If the mixture feels a tad too soft to roll, pop it in the fridge for 15 minutes. This will make it much easier to handle.
- Roll and Chill: Using a small cookie scoop or a tablespoon, portion out the mixture. Then, with clean, dry hands, roll each portion into a smooth, tight 1-inch ball. Place each little ball of goodness onto a parchment paper-lined baking sheet. Once they’re all rolled, it’s crucial to let them firm up. Slide the tray into the refrigerator for at least 30 minutes, or into the freezer for 15. Pro Tip: This chilling step is non-negotiable! A cold truffle center is what will allow you to dip it into the warm chocolate without it turning into a puddle.
- Melt the Chocolate: While the truffle centers are chilling, melt your white chocolate. You can do this gently in a double boiler (a heatproof bowl set over a pot of simmering water, making sure the bottom of the bowl doesn’t touch the water) or in short bursts in the microwave. If using the microwave, heat in 20-second intervals, stirring vigorously between each burst, until it’s completely smooth and fluid. Chef’s Warning: White chocolate is notoriously finicky and can “seize” (become clumpy) if it gets too hot or if even a drop of water gets in the bowl. Keep everything completely dry!
- The Big Dip: Remove your truffle centers from the fridge. Using a fork or a specialty dipping tool, submerge one truffle ball completely into the melted chocolate. Gently lift it out, tap the fork against the side of the bowl to allow the excess chocolate to drip off, and then carefully slide it back onto the parchment-lined tray. Chef’s Hack: If the chocolate starts to thicken up too much as you work, you can gently reheat it for a few seconds.
- Garnish Immediately: This is the fun part! If you’re adding any sprinkles, cookie crumbs, or a dusting of cinnamon, you have to do it RIGHT NOW, before the chocolate shell sets. They’ll only stick to wet chocolate.
- The Final Chill: Once all your truffles are beautifully coated and decorated, return the entire tray to the refrigerator for a final 20-minute chill. This allows the chocolate coating to set completely, giving you that perfect, satisfying snap when you bite into one.
How to Serve These Little Gems
Presentation is part of the fun! These truffles are gorgeous all on their own, but a little styling goes a long way in making them feel extra special.
I love serving them piled high on a beautiful rustic wooden board or a vintage cake stand. For a truly festive touch, place them in mini paper candy cups – you can find these in holiday colors or patterns at any craft store. It makes them look professional and makes them easy for guests to grab. They are the perfect addition to a holiday dessert charcuterie board, paired with other cookies, fresh berries, and maybe even a sharp cheese. For a cozy night in, simply stack a few on a small plate next to a steaming mug of hot cocoa, coffee, or a chai tea latte. They’re also fantastic packaged in a cute box or cellophane bag tied with a ribbon as a heartfelt, homemade gift for neighbors, teachers, or friends. However you choose to serve them, just be prepared for recipe requests!
Mix It Up! Creative Variations
The classic recipe is a winner, but don’t be afraid to play with your food! Here are a few of my favorite ways to mix things up:
- The Chocolate Lover: Swap the white chocolate coating for rich, dark chocolate. The bitterness of the dark chocolate creates an incredible contrast with the sweet, spicy gingerbread center.
- Nutty Professor: Add some crunch! Mix 2-3 tablespoons of very finely chopped toasted pecans or walnuts right into the truffle base before rolling.
- Orange Zest Twist: Brighten up the deep spices by adding the zest of one small orange to the truffle mixture. The citrus aroma is a game-changer.
- Dairy-Free Delight: You can easily make this vegan! Use your favorite vegan gingersnaps (check the label), a plant-based cream cheese alternative, and vegan white chocolate bars for melting.
- Bourbon-Spiked: For an adults-only version, add 1-2 teaspoons of bourbon or dark rum to the truffle mixture. It amplifies all those warm, cozy flavors perfectly.
Beau’s Chef Notes & Kitchen Stories
Over the years, this recipe has become a living thing in my kitchen. I’ve made it with my nieces and nephews, their little hands covered in chocolate and sprinkles, and I’ve made elegant versions for fancy dinner parties. The biggest lesson? Embrace the imperfection. Not every truffle will be a perfect sphere, and that’s okay! Sometimes the ones with a little extra drizzle or a rogue sprinkle have the most character. I once accidentally used salted caramel chips instead of white chocolate for the coating—it was a happy accident that everyone loved. The point is to have fun and enjoy the process. The messier the kitchen, the better the memories. These truffles are forgiving, so don’t stress. Just pour some love into the bowl, and it’ll shine through in every single bite.
Your Questions, Answered!
Q: My truffle mixture is too sticky to roll. What did I do wrong?
A: This usually means your cream cheese was a bit too warm, or your cookies weren’t crushed finely enough. No worries! Just pop the mixture into the fridge for 15-20 minutes to firm up. You can also lightly dampen your hands with water while rolling to prevent sticking.
Q: Why did my white chocolate get thick and clumpy when I melted it?
A: Ah, the dreaded “seized” chocolate! This happens if the chocolate gets too hot or if even a tiny bit of steam or water gets into the bowl. Unfortunately, you can’t really fix it for dipping. Your best bet is to start over slowly. For seized chocolate, you can sometimes save it by stirring in a teaspoon of neutral oil (like vegetable or coconut) and using it as a drizzle instead.
Q: How far in advance can I make these?
A: They are fantastic for making ahead! Store them in an airtight container in the refrigerator for up to a week. You can also freeze them for up to 2 months. Just thaw in the fridge overnight before serving.
Q: Can I use something other than cream cheese?
A: The cream cheese is key for the texture and tang. However, for a different approach, you could use a thick, canned coconut cream (just the solid part) for a dairy-free version, though the texture will be slightly less firm.

Gingerbread Truffles
Description
Gingerbread Truffles (No-Bake Holiday Treats)
Creamy, spiced, and coated in white chocolate—perfect for the holidays!
Ingredients
Truffle Base:
-
1½ cups crushed gingersnap cookies
-
4 oz cream cheese, softened (full-fat recommended)
-
2 tbsp molasses
-
½ tsp ground cinnamon
-
¼ tsp ground ginger
-
¼ tsp ground nutmeg
-
Pinch of cloves
Coating:
-
8 oz white chocolate, melted
-
Optional garnishes: crushed cookies, festive sprinkles, nonpareils, cinnamon
Tools: Parchment paper, baking sheet, small cookie scoop or tablespoon
Instructions
1. Make the Truffle Base
-
In a medium bowl, combine crushed cookies, softened cream cheese, molasses, and spices.
-
Mix until smooth and uniform. If too soft to roll, refrigerate 15 minutes.
2. Roll & Chill
-
Scoop out 1-inch portions and roll into balls.
-
Place on parchment-lined baking sheet.
-
Chill in the fridge for 30 minutes (or freezer for 15) until firm.
3. Melt Chocolate
-
Melt white chocolate in a double boiler or microwave in 20-second intervals, stirring between bursts.
-
Keep completely dry to prevent seizing.
4. Coat Truffles
-
Dip chilled truffles into melted chocolate.
-
Let excess drip off and place back on parchment-lined tray.
-
Add garnishes immediately before chocolate sets.
5. Final Chill & Serve
-
Refrigerate for 20 minutes to set chocolate.
-
Serve on a festive board, in paper candy cups, or package as gifts.
Notes
-
Sticky mixture? Chill before rolling.
-
Seized chocolate? Stir in a tsp neutral oil and use as drizzle.
-
Cream cheese is key for texture—substitutions may alter firmness.
Nutrition
- Calories: 120 Cal
- Fat: 7g
- Carbohydrates: 13g
- Protein: 1G
Nutritional Information*
*Please note: This is an estimated nutritional breakdown based on the specific ingredients listed. Values can vary based on specific brands and measurements used.
Per Truffle (approx. 1 truffle):
Calories: 120 | Total Fat: 7g | Saturated Fat: 4g | Cholesterol: 10mg | Sodium: 60mg | Total Carbohydrates: 13g | Dietary Fiber: 0.3g | Sugars: 10g | Protein: 1g
While these are certainly a treat, it’s all about balance and joy during the holiday season! Enjoy them mindfully as part of your celebrations.
Final Thoughts from My Kitchen to Yours
Well, there you have it, my friends—my secret weapon for holiday happiness, all wrapped up in a spiced, creamy, chocolatey bite. These Gingerbread Truffles are more than just a recipe; they’re an experience. They’re about the joy of creating, the fun of getting a little messy, and the pure pleasure of sharing something delicious with the people you love.
I hope this recipe brings as much light and laughter to your kitchen as it has to mine. Remember, the best dishes are the ones made with a pinch of love and a dash of adventure. So from my Feastical family to yours, happy holidays and happy cooking! Don’t forget to tag me @feastical in your photos—I absolutely love seeing your creations.
Until next time, keep spreading joy, one bite at a time.

Classic Hard Candy
Let’s Make Some Magic: The Ultimate Guide to Classic Hard Candy
Hey friends, Beau here from Feastical! Pull up a stool and get ready for a sweet adventure. Today, we’re diving headfirst into one of the most magical, satisfying, and downright fun recipes you can make in your kitchen: Classic Homemade Hard Candy. Now, I know what you might be thinking—”Beau, that sounds… intimidating. Isn’t that for professional candy makers with fancy copper pots?”
I’m here to tell you, with a big, reassuring smile, absolutely not. This is for us. This is for anyone who has ever unwrapped a piece of colorful, glassy candy and wondered at the sheer delight of it. It’s for the gift-givers, the holiday enthusiasts, the curious cooks, and anyone who believes food should be a little bit of fun. We’re talking about creating stunning, flavor-packed gems that are completely customizable. Want a batch of fiery cinnamon red hots? You got it. A rainbow of fruity treats for a birthday party? Consider it done. A soothing, homemade peppermint candy for the holidays? Let’s make it happen.
The process is a beautiful dance of sugar, heat, and timing. It’s alchemy in a saucepan, and I’ll be your guide every step of the way. We’ll keep it simple, soulful, and—most importantly—successful. So, grab your favorite heavy-bottomed pot and that candy thermometer you’ve been meaning to use. We’re about to create something truly spectacular that’s as joyful to make as it is to eat. Let’s dig in!
A Sweet Slice of Nostalgia: My Grandma’s Candy Kitchen
For me, the smell of melting sugar will forever be tied to my Grandma Eleanor’s kitchen around Christmastime. The air would be thick with the scent of pine, gingerbread, and the distinct, dangerous, and delicious aroma of sugar syrup hitting the hard crack stage. To my young eyes, she was a wizard. She’d wield her saucepan like a wand, and with a flick of her wrist and a drop of peppermint oil, she’d conjure up these glistening, blood-red shards of candy that would put any store-bought candy cane to shame.
I was her official “Taste Tester” and “Powdered Sugar Dust-er,” jobs I took very seriously. She’d pour the molten candy onto her greased baking sheet, and we’d watch it spread into a shimmering, hot lake. The rule was absolute: “Don’t you dare touch it, Beau Michael!” The waiting was agony. But the reward… oh, the reward. That first *crack* with the blunt end of a butter knife, the sound of sugar snapping into perfect, irregular pieces, and the explosive flavor of that first piece—it was pure magic. It wasn’t just candy; it was a tradition. It was patience, science, and love, all crystallized into something you could hold in your hand. That’s the spirit I want to bring to your kitchen today.
Gathering Your Candy-Making Crew: The Ingredients
One of the best things about this recipe is its beautiful simplicity. You only need a handful of core ingredients to create an infinite world of flavors. Here’s your shopping list, with a little chef-ly insight for each one.
- 3¾ cups Granulated Sugar: This is the foundation of our candy. Sugar crystals are what will give our treat its structure and that satisfying, solid snap. Make sure your sugar is fresh and free of any lumps for the smoothest results.
- 1½ cups Light Corn Syrup: “But Beau, can I skip this?” I get asked this a lot. The answer is, I don’t recommend it for your first time. The corn syrup is the guardian angel of your candy. It prevents the sucrose (the granulated sugar) from recrystallizing back into a grainy, messy texture. It ensures our final product is gloriously clear and glass-like. You can experiment with alternatives like golden syrup later, but for now, let’s stick with the classic.
- 1 cup Water: Good ol’ H2O. This is the vehicle that dissolves our sugar and corn syrup evenly so everything can cook together harmoniously. Just use regular tap water!
- 1 tsp Flavor Extract (per batch): This is where your personality shines! Use high-quality extracts for the best, most potent flavor. Think peppermint, lemon, cherry, orange, cinnamon, even butter rum! Pro Chef Tip: Have this measured and ready to go before your sugar hits 300°F. Speed is key here.
- Food Coloring (to match flavor): Go for gel or paste food coloring rather than the liquid kind. The liquid can add too much moisture and affect the candy’s texture, while gels and pastes provide vibrant, bold color without watering things down.
- Powdered Sugar (optional, for dusting): This isn’t for the candy itself, but for after it’s broken. A light dusting prevents the pieces from sticking together in your candy jar, like a little edible insurance policy.
The Main Event: Cooking Your Candy to Perfection
Alright, team. This is where the fun begins. Read through all the steps once before you start. Mise en place—that’s just a fancy way of saying “get everything in its place”—is your absolute best friend here. You can’t walk away once this process starts.
- Prep Your Station: First things first, line a large, rimmed baking sheet with aluminum foil or a silicone baking mat. Grease it lightly with a neutral oil (like canola or vegetable oil) or a non-stick spray. If you’re using fun silicone candy molds, have those ready on the counter. Now, measure out your flavor extract and have your food coloring uncapped and waiting. Last thing: make sure your candy thermometer is attached to the side of your heavy-bottomed saucepan. Trust me, you do not want to be searching for this with a pot of 300°F sugar on the stove.
- Combine and Dissolve: In your heavy saucepan, combine the granulated sugar, light corn syrup, and water. Turn your burner to medium heat. Using a wooden spoon or heatproof spatula, stir constantly until the sugar has completely dissolved. This is crucial. You should see no granules swirling at the bottom of the pot. Once it’s clear, stop stirring. I mean it! Chef Hack: To check if the sugar is dissolved, dip a spoon in and feel the back of it. It should feel smooth, not gritty.
- Cook Without Disturbance: This is the test of patience. Once the sugar is dissolved, stop stirring entirely. Attach your candy thermometer and let the mixture come to a boil. Do not stir it during this phase. Stirring can cause the syrup to splatter onto the sides of the pan where it can crystallize and potentially cause a chain reaction, making your candy grainy. Just let it do its thing. It will bubble away, going from clear to a rolling, furious boil. Watch the thermometer, not the clock.
- Hit the Magic Number: Watch that thermometer closely. We are waiting for it to hit exactly 300°F (150°C), also known as the Hard Crack Stage. You can test this without a thermometer by dropping a small bit of the syrup into a glass of cold water. If it forms hard, brittle threads that snap when bent, you’re there! But a good candy thermometer is your most reliable partner.
- The Flavor Flash: The second that thermometer hits 300°F, immediately remove the pan from the heat. Working quickly but carefully (the steam is hot!), stir in your 1 teaspoon of flavor extract and several drops of your chosen food coloring. The mixture will bubble and steam aggressively—that’s normal. Stir just until everything is incorporated evenly. Don’t over-mix!
- Pour With Purpose: Immediately pour the hot candy syrup onto your prepared baking sheet. Tilt the pan to spread it into a relatively even layer, or carefully pour it into individual candy molds. Safety First: This stuff is like edible lava. Be super careful and keep kids and pets away during this step.
- The Cool Down: Now, the hardest part: walk away. Let the candy cool completely at room temperature. Do not try to speed this up in the fridge, as the sudden temperature change can cause it to become sticky or attract moisture. It should take about 30 minutes. You’ll know it’s ready when it’s completely firm to the touch.
- Break It Up: Once cool, lift the giant candy disc from the foil. Grab a kitchen mallet, the back of a heavy knife, or even your hands (protected, maybe with clean gloves) and break it into beautiful, irregular shards. For a cleaner break, you can score the candy lightly with a knife while it’s still slightly warm. If you used molds, just pop them out!
- The Final Touch (Optional): If your candy is at all sticky, or if you plan to store it in layers, give the pieces a light toss in a bowl with a bit of powdered sugar. This will keep them separated and looking gorgeous.
Sharing the Sweetness: How to Serve Your Masterpiece
You’ve just created edible art! Now, how do you show it off? The possibilities are endless.
For gifting, this homemade candy is a showstopper. Fill clear cellophane bags tied with a rustic ribbon for a charming, old-fashioned treat. Layer different colors and flavors in a glass mason jar for a truly personal and stunning gift that says, “I made this just for you.” It’s perfect for holiday teacher gifts, party favors, or a just-because surprise for a neighbor.
For serving at home, presentation is key. Pile the colorful shards high in a beautiful ceramic bowl or a vintage candy dish as the centerpiece of your dessert table. During the holidays, crush up some peppermint candy and use it as a dazzling garnish on top of cupcakes, brownies, or even your morning oatmeal for a festive twist.
And let’s not forget the ultimate serving suggestion: sneaking a piece directly from the baking sheet the moment it’s cool enough, standing over the kitchen counter and savoring the fruits of your labor. I won’t tell anyone.
Get Creative: Flavor Twists and Dietary Swaps
The basic formula is your playground. Once you’ve mastered the classic, try these fun variations!
- The Rainbow Array: Instead of making one big batch of one color, divide the cooked syrup among several heatproof bowls right after you take it off the heat. Quickly stir a different flavor and color into each one, then pour them onto the sheet side-by-side or swirl them gently for a gorgeous marbled effect.
- The Spicy Kick: Add ¼ to ½ teaspoon of cayenne pepper to a batch of cinnamon candy for a “Fiery Cinnamon” treat that has a real kick. It’s an amazing grown-up flavor combination.
- The Creamsicle Dream: Combine orange extract and a touch of vanilla extract (about ¾ tsp orange + ¼ tsp vanilla) with orange coloring for a candy that tastes just like a dreamsicle.
- Vegan & Gluten-Free Friendly: Good news! This recipe is naturally gluten-free and vegan as written. Just double-check that your sugar is certified vegan (some refined white sugars use bone char in processing, but most organic sugars do not) and that your extracts don’t contain any sneaky animal products.
- Sour Power: For a sour version, toss the cooled, broken candy pieces in a zip-top bag with a mixture of citric acid (find it in the canning aisle or online) and a little extra sugar. Give it a good shake to coat. The sour coating paired with the sweet interior is irresistible.
Beau’s Kitchen Chronicles: A Few Parting Thoughts
This recipe has evolved in my kitchen from a once-a-year holiday spectacle to an anytime creative outlet. I’ve learned a few things along the way. I once tried to “multitask” and answer an email while the syrup was boiling. I learned that sugar goes from 290°F to 320°F (burnt and bitter!) in what feels like ten seconds. I also learned that adding the flavoring oil too early (before taking it off the heat) can cause the volatile oils to evaporate, leaving you with bland candy. The biggest lesson? The mess is always worth it. There’s something incredibly grounding and satisfying about making something from scratch that most people only ever buy in a store. You’re not just making candy; you’re making memories.
Your Questions, Answered: Candy Troubleshooting
Q: My candy turned out sticky and doesn’t snap. What happened?
A: This usually means the sugar syrup didn’t quite make it to the hard crack stage (300°F). The most common culprit is an inaccurate candy thermometer. Test your thermometer in boiling water; it should read 212°F (100°C). If it’s off, you’ll know to adjust. Humidity on a rainy day can also make candy sticky after it’s broken.
Q: Why is my candy cloudy or grainy?
A: Graininess is caused by sugar crystals forming. This can happen if sugar granules splashed onto the side of the pan and crystallized, or if you stirred the mixture after it started boiling. Always wash down the sides of the pan with a wet pastry brush in the initial dissolving stage to prevent crystals from forming. And remember, no stirring once it boils!
Q: Can I double this recipe?
A: I don’t recommend it for beginners. A larger volume of sugar syrup will take much longer to reach the desired temperature, which can throw off your timing and increase the risk of burning or recrystallization. It’s best to make multiple separate batches for different flavors.
Q: How do I store homemade hard candy?
A: Store it in an airtight container at room temperature, away from light and moisture. If you’ve dusted it with powdered sugar, place parchment paper between layers. Properly stored, it should last for several weeks… if it doesn’t get eaten first!

Classic Hard Candy
Description
Classic Homemade Hard Candy
Glassy, colorful, and infinitely customizable.
Ingredients
-
3¾ cups granulated sugar
-
1½ cups light corn syrup
-
1 cup water
-
1 tsp flavor extract (peppermint, lemon, cherry, orange, cinnamon, etc.)
-
Food coloring (gel or paste recommended)
-
Powdered sugar (optional, for dusting)
Equipment
-
Heavy-bottomed saucepan
-
Candy thermometer
-
Rimmed baking sheet lined with foil or silicone mat
-
Heatproof spatula or wooden spoon
Instructions
1. Prep Your Station
-
Line a baking sheet with foil or a silicone mat. Grease lightly.
-
Have your flavor extract measured and food coloring ready.
-
Attach your candy thermometer to the saucepan.
2. Combine & Dissolve
-
In the saucepan, combine sugar, corn syrup, and water.
-
Stir constantly over medium heat until sugar dissolves completely.
-
Once dissolved, stop stirring.
3. Boil to Hard Crack Stage
-
Bring syrup to a boil without stirring.
-
Watch candy thermometer until it reaches 300°F (150°C).
-
Optional cold water test: drop a bit of syrup into cold water; it should snap.
-
4. Add Flavor & Color
-
Remove pan from heat. Quickly stir in flavor extract and food coloring.
-
Be careful: syrup will bubble and steam aggressively.
5. Pour & Cool
-
Pour syrup onto prepared baking sheet or molds. Spread evenly.
-
Let cool completely at room temperature (about 30 minutes).
6. Break & Store
-
Once firm, break candy into shards using a mallet or knife.
-
Optional: toss lightly with powdered sugar to prevent sticking.
-
Store in an airtight container at room temperature, layered with parchment if needed.
Notes
-
Sticky candy: Likely didn’t reach 300°F. Check thermometer accuracy.
-
Cloudy/grainy candy: Avoid stirring after syrup starts boiling; wash down sides early.
-
Doubling recipe: Not recommended for beginners; make multiple smaller batches.
-
Storage: Airtight container, away from moisture and light.
Nutritional Information (For Your Info!)
Alright, let’s be real: we’re not making health food here. We’re making joy food. But it’s always good to know what you’re enjoying. This nutritional info is an estimate per piece (assuming the batch yields about 65 pieces).
Estimated per piece: ~50 kcal | 0g fat | 13g carbs | 0g protein
Since this candy is primarily sugar, it’s a source of quick energy. It’s a treat, perfect for savoring one or two pieces to satisfy a sweet tooth. Because it’s made with simple ingredients, it’s free of the preservatives and artificial flavors you might find in some store-bought versions, which is a win in my book!
The Last Bite
Well, my friends, we’ve done it. We’ve taken sugar, water, and a little bit of science and turned it into something magical. I hope this recipe empowers you to get into the kitchen and play. Don’t be afraid of the thermometer. Embrace the steam and the snap. Make a mess. Make a memory.
This classic hard candy is more than just a sweet snack; it’s a testament to the fact that the most delightful things often come from the simplest ingredients and a little bit of courage. I’d love to see your creations! Tag me @Feastical on social media and show me your colorful candy masterpieces.
Until next time, keep your spoons scraping and your ovens warm!

Turkish Delight
A Sweet Slice of Magic: Let’s Make Homemade Turkish Delight!
Hey friends, Beau here from Feastical! Pull up a stool and get comfy. Today, we’re embarking on a slightly magical, totally delicious kitchen adventure. We’re making something that feels like it’s straight out of a storybook, a confection that’s as fun to say as it is to eat: Homemade Turkish Delight.
I know what you might be thinking. “Beau, that sounds… intricate. Like, ‘specialty-store-ingredients-and-years-of-experience’ kind of intricate.” But trust me on this one. If you can stir a pot, you can absolutely create this delicate, chewy, and exotically fragrant sweet right in your own kitchen. It’s a project, for sure, but it’s the kind of project that fills your home with the most incredible aroma and ends with you feeling like a certified pastry wizard.
Forget the dusty, overly sweet versions you might have tried from a box. The real deal is a revelation. It’s soft, subtly floral or citrusy, and has a uniquely satisfying chew that’s unlike any other candy. It’s perfect for dressing up a dessert platter, gifting in a beautiful box (seriously, major brownie points), or just treating yourself with a cup of strong coffee. So, are you ready to unlock a new level of your kitchen prowess? Let’s gather our ingredients and whip up a batch of this timeless Middle Eastern treat together. I promise to guide you through every step with all my best chef hacks to ensure your success.
The Bite That Started It All
My love affair with Turkish Delight began not in a fancy bakery, but in the most unlikely of places: my grandmother’s cluttered, wonderful attic. I was about ten, “helping” her sort through old boxes, which mostly meant I was getting distracted by every shiny object I found. In a worn wooden chest, next to a stack of faded letters tied with ribbon, was a small, intricately patterned tin. Inside, nestled on a piece of wax paper, were a few strange, sugar-dusted pink and white cubes.
Nana saw my curious look and her face lit up. “Ah, *Lokum*!” she said. A friend had brought it back from her travels years before. She let me try a piece. That first bite was a sensory explosion I’ll never forget—the powdery sugar giving way to an impossibly soft, yielding chew, followed by the most beautiful and unexpected floral flavor of rose. It felt sophisticated, ancient, and magical. In my young mind, I wasn’t in an attic anymore; I was in a bustling Istanbul market, surrounded by spices and stories. That single bite taught me that food is more than sustenance; it’s a passport to other cultures, a trigger for memory, and a pure, simple joy. Making it myself always brings me right back to that moment.
Gathering Your Magical Ingredients
Don’t let the short list fool you—each ingredient here plays a crucial role in creating that signature texture. Here’s exactly what you’ll need and why:
- 4 cups granulated sugar: This is the sweet heart of our delight. It creates the syrup that forms the candy’s base. I don’t recommend subbing this with honey or maple syrup, as the chemistry and moisture content are vital for setting correctly.
- 1½ cups water (for the syrup) + 2¾ cups water (for the starch mixture): Seems like a lot of water, right? It all cooks off during the long simmering process, leaving behind the perfect gel-like consistency. Just make sure to keep them separate!
- 1 cup cornstarch: This is the MVP, the star of the show! It’s what gives Turkish Delight its iconic soft, gelatinous, and chewy texture without using any gelatin. It acts as a gelling agent. There’s no real substitute here—it has to be cornstarch.
- 1 tsp cream of tartar: This little powerhouse is our insurance policy. It prevents the sugar from crystallizing and helps stabilize the mixture, ensuring our final product is gloriously smooth and not grainy. If you’re in a pinch, a teaspoon of lemon juice can work, but cream of tartar is preferred.
- 1–2 tsp rosewater, lemon extract, or fruit flavoring: This is where you make it your own! Rosewater is the classic, authentic flavor. A little goes a long way, so start with 1 tsp and add more after tasting. For a citrus kick, lemon or orange extract is fantastic. For a fruity twist, try a high-quality pomegranate or cherry flavoring. Use extracts, not emulsions, for the best, purest taste.
- Gel food coloring (optional): This is purely for fun! A drop of pink or red for rose, yellow for lemon, a deep red for pomegranate. Gel coloring is best because it won’t thin out your mixture. Feel free to leave it natural for a beautiful, creamy-white treat.
- Powdered sugar + cornstarch (for coating): This dynamic duo is essential for preventing our sticky sweets from gluing themselves together into one big block. A 50/ mix is perfect.
Crafting Your Delight: A Step-by-Step Journey
Alright, team. Put on some good music, clear your stovetop, and let’s get cooking. This process is a labor of love, but I’ll be with you for every stir.
Step 1: Prep Your Pan
Lightly grease an 8×8-inch baking pan with a neutral oil (like vegetable or canola). Then, line it with parchment paper, leaving some overhang on two sides—this will be your “lifeline” for removing the set block later. Now, give the bottom and sides a generous dusting with your powdered sugar and cornstarch mix. This creates a non-stick barrier. Chef’s Hack: Do this first! It’s the one thing you don’t want to be scrambling to do once your candy is hot and ready to pour.
Step 2: Make the Sugar Syrup
In a medium-sized, heavy-bottomed saucepan, combine your 4 cups of granulated sugar and 1½ cups of water. Place it over medium heat and stir just until the sugar is completely dissolved. Once it starts to simmer, stop stirring entirely. This is key! Stirring can cause sugar crystals to form. Instead, just swirl the pan gently if needed. Attach a candy thermometer to the side of the pot and let it boil until it reaches the soft-ball stage, 240°F (115°C). This usually takes about 10-15 minutes. While it’s working, move on to the next step.
Step 3: Create the Starch Base
In a separate, larger pot (trust me, you need the room), whisk together the 1 cup of cornstarch and 1 tsp of cream of tartar. Slowly whisk in the 2¾ cups of water until you have a completely smooth, milky liquid with no lumps. Now, place this pot over medium heat. You must stir this constantly with a whisk or a flat-bottomed wooden spoon. It will start to thicken surprisingly quickly, transforming from liquid to a thick, paste-like consistency in just a few minutes. Once it’s thick and bubbling, reduce the heat to low.
Step 4: The Grand Combination & The Long Cook
Here’s where the magic happens. Your sugar syrup should be at 240°F by now. Slowly and carefully, pour the hot sugar syrup into the starch paste in a thin stream, WHISKING CONSTANTLY and vigorously. The mixture will sizzle and bubble up—this is normal! Once all the syrup is incorporated, keep the heat on low and switch to a wooden spoon. You now need to simmer this mixture for 45 to 60 minutes, stirring every few minutes to prevent it from sticking and scorching on the bottom. Yes, it’s a arm workout! You’ll know it’s done when the mixture has turned from white to a very pale golden or buttery yellow color and has become a very thick, jelly-like mass that pulls away from the sides of the pot as you stir.
Step 5: Flavor & Set
Remove the pot from the heat. Now, stir in your chosen flavoring (start with 1 tsp, taste, and add more if you want) and food coloring if using. Work quickly but carefully—it’s hot! Pour the incredibly thick mixture into your prepared pan. Do your best to smooth the top with your spoon (it doesn’t have to be perfect). Now, the hardest part: walk away. Let it sit uncovered at room temperature for at least 6 hours, but preferably overnight. Do not refrigerate it, as this can cause condensation and make it sticky.
Step 6: The Big Reveal: Cut & Coat
The next day, use the parchment paper overhang to lift the entire slab of Turkish delight out of the pan. It should be firm and jiggly, like a giant gummy bear. Dust a large cutting board with your sugar/cornstarch mix. Place the slab on it. Take a sharp knife (a chef’s knife or pizza wheel works great) and dust the blade with the coating mix to prevent sticking. Cut the slab into long strips, about 1-inch wide, then cut across them to create perfect little cubes. Now, toss each cube gently in a bowl of the coating mixture until it’s fully covered on all sides. Shake off the excess.
How to Serve Your Masterpiece
You’ve created something beautiful—now show it off! Presentation is part of the fun. For a classic approach, pile the pastel cubes high on a small, elegant plate or in a shallow bowl for everyone to share. They look stunning on a dessert board alongside dark chocolate truffles, nuts, and fresh berries.
For gift-giving, which I highly recommend, find some small cardboard gift boxes or clear cellophane bags. Layer the cubes between sheets of wax paper to keep them pretty. It’s a heartfelt, handmade gift that people will truly remember.
And how to eat it? Well, alongside a small cup of strong Turkish coffee or a pot of mint tea is the traditional and perfect pairing. The bitter, robust coffee contrasts beautifully with the sweet, floral candy. It’s also a wonderful little treat after a big family meal or as a unique addition to your holiday cookie spread.
Make It Your Own: Delicious Variations
The basic recipe is your canvas. Here are a few of my favorite ways to paint outside the lines:
- The Classic Rose & Pistachio: Add 1-2 tsp of rosewater and a few drops of pink or red food coloring. Just before pouring the mixture into the pan, fold in ½ cup of finely chopped, unsalted pistachios. The nutty crunch against the floral chew is absolute perfection.
- Sunshine Citrus: Use 1-2 tsp of lemon or orange extract (or a combination!). For an extra zing, add the finely grated zest of one lemon or orange to the mixture at the same time as the extract. A drop of yellow or orange food coloring completes the sunny look.
- Berry Bliss: Substitute the 1½ cups of water in the sugar syrup with 1½ cups of strained raspberry or pomegranate juice. Use a corresponding fruit flavoring extract. The result is a beautiful, fruity, and vibrant delight.
- Chocolate-Dipped Dream: Once your cubes are set and coated, melt some high-quality dark chocolate. Dip half of each cube into the chocolate, let the excess drip off, and place them on a parchment-lined tray to set. It’s next-level.
- Minty Fresh: Use 1-2 tsp of pure peppermint extract (not mint extract, which can taste like toothpaste) and a tiny drop of green food coloring for a cool, refreshing treat.
Beau’s Chef Notes & Kitchen Stories
This recipe has evolved in my kitchen over many, many batches. My first attempt was… a learning experience. I didn’t stir the starch base enough and ended up with lumps I couldn’t whisk out. I also learned the hard way that “soft-ball stage” is not a suggestion—it’s a requirement! I pulled my syrup off too early one time and ended up with a batch that never fully set. We ended up calling it “Turkish Delight Sauce” and serving it over ice cream, which was a delicious save, but not the goal.
The long cooking time is your friend. It’s what develops that perfect translucent jelly texture and cooked sugar flavor. Don’t rush it by turning up the heat, or you’ll risk scorching. Put on a podcast, enjoy the process, and savor the incredible smell that will fill your kitchen. It’s a recipe that teaches patience, and the reward is so, so worth it.
Your Questions, Answered
Q: My mixture is still white after an hour of cooking. What’s wrong?
A: Don’t worry! The color change can be subtle. As long as it’s very thick and pulling away from the sides of the pot, it’s likely done. The pale color is fine and will just result in a whiter final product, especially if you don’t add food coloring.
Q: Why is my Turkish Delight so sticky and wet even after coating?
A: This usually means it needed to cook a bit longer to evaporate more moisture. It can also happen if the humidity is high in your kitchen. All is not lost! Just give the sticky pieces a fresh, heavy roll in the powdered sugar/cornstath mix and store them in a container with an extra tablespoon of the mix tossed in. They’ll absorb the excess powder.
Q: Can I make this without a candy thermometer?
A: I really don’t recommend it for your first time. The soft-ball stage (240°F) is crucial for texture. You can test by dropping a small amount of syrup into a cup of cold water—if it forms a soft, pliable ball that flattens when removed, it’s ready. But a thermometer takes the guesswork out and is a great investment for candy-making.
Q: How long does homemade Turkish Delight last, and how should I store it?
A: Stored in an airtight container at cool room temperature with layers separated by wax paper, it will keep beautifully for about 2-3 weeks. If it starts to get sticky, just give the pieces another toss in the coating mixture.

Turkish Delight
Description
Soft, chewy, floral or citrusy, and absolutely magical—this classic Middle Eastern treat is easier to make at home than you might think!
Ingredients
-
4 cups granulated sugar
-
1½ cups water (for sugar syrup)
-
2¾ cups water (for starch mixture)
-
1 cup cornstarch
-
1 tsp cream of tartar
-
1–2 tsp rosewater, lemon extract, or fruit flavoring
-
Gel food coloring (optional)
-
Powdered sugar + cornstarch (50/50 mix, for coating)
-
Neutral oil (for greasing pan)
Optional mix-ins & variations:
-
Pistachios: ½ cup finely chopped
-
Citrus zest: from 1 lemon or orange
-
Fruit juice: replace sugar syrup water with raspberry/pomegranate juice
-
Chocolate: melt dark chocolate to dip finished cubes
-
Peppermint: 1–2 tsp extract + green coloring
Instructions
1. Prep Your Pan
-
Lightly grease an 8×8-inch pan.
-
Line with parchment paper, leaving overhang for easy removal.
-
Dust generously with powdered sugar/cornstarch mix.
2. Make Sugar Syrup
-
Combine 4 cups sugar + 1½ cups water in a medium saucepan.
-
Stir to dissolve, then simmer without stirring.
-
Attach a candy thermometer; cook to soft-ball stage (240°F / 115°C) (~10–15 min).
3. Make Starch Base
-
Whisk 1 cup cornstarch + 1 tsp cream of tartar.
-
Slowly add 2¾ cups water until smooth.
-
Heat over medium, stirring constantly until thick and paste-like. Reduce heat to low.
4. Combine & Cook
-
Slowly pour hot sugar syrup into starch base while whisking constantly.
-
Reduce heat to low; cook 45–60 min, stirring occasionally.
-
Mixture should become thick, jelly-like, and pull away from pot sides.
5. Flavor & Set
-
Stir in flavoring and food coloring.
-
Pour into prepared pan, smooth top, and let sit uncovered at room temp 6+ hours (preferably overnight).
6. Cut & Coat
-
Lift slab from pan using parchment overhang.
-
Dust cutting board with powdered sugar/cornstarch mix.
-
Cut into 1-inch cubes, dust each piece thoroughly.
-
Store in airtight container with layers separated by wax paper.
Notes
-
Sticky pieces? Toss again in powdered sugar/cornstarch mix.
-
No thermometer? Use the soft-ball test: drop syrup in cold water, should form a soft, pliable ball.
-
Cooking color: Pale golden is normal; thicker texture matters more than color.
Nutrition
- Calories: 50 kcalper 1-inch cubE
- Carbohydrates: 13 g
A Quick Note on Nutrition
Let’s be real, friends—this is a candy, a treat to be enjoyed in moderation. But it’s a wonderfully pure one, made with simple ingredients and without any preservatives or weird additives. A single 1-inch cube, based on this recipe, contains roughly an estimated 50 calories, 0g fat, 13g carbohydrates (from the sugar), and 0g protein. It’s naturally fat-free and gluten-free. The joy and cultural experience it brings? That’s calorie-free
Final Thoughts: Your Kitchen, Your Magic
And there you have it! What began as a memory in a dusty attic has transformed, through sugar, starch, and a little bit of patience, into a box of beautiful, homemade sweets that you created with your own hands.
Making Turkish Delight is more than just following a recipe; it’s an experience. It’s about embracing the process, trusting the slow simmer, and filling your home with an aroma that feels both exotic and wonderfully comforting. This isn’t about achieving impossible perfection—it’s about the joy of creating something magical from a handful of simple ingredients.
Whether you stayed classic with rose and pistachio or ventured into citrusy sunshine, you’ve now got a skill that’s sure to impress. You’ve crafted more than just candy; you’ve made edible memories, the perfect conversation-starting gift, and a delicious testament to your own kitchen prowess.
So, dust off that last piece of lokum, pour yourself a cup of strong coffee, and take a proud bite. You didn’t just make a treat; you bottled a little bit of storybook magic right in your own kitchen. Until our next culinary adventure, friends—keep finding the magic, one bite at a time.