Festive Holiday Monkey Bread
Festive Holiday Monkey Bread: The Ultimate Crowd-Pleasing Breakfast
Hey friends, Beau here! Is there anything better than the smell of something warm, sweet, and cinnamony baking in the oven on a crisp holiday morning? It’s the scent of pure, unadulterated joy. It’s the signal that it’s time to slow down, put on your comfiest pajamas, and gather around the table with the people you love most.
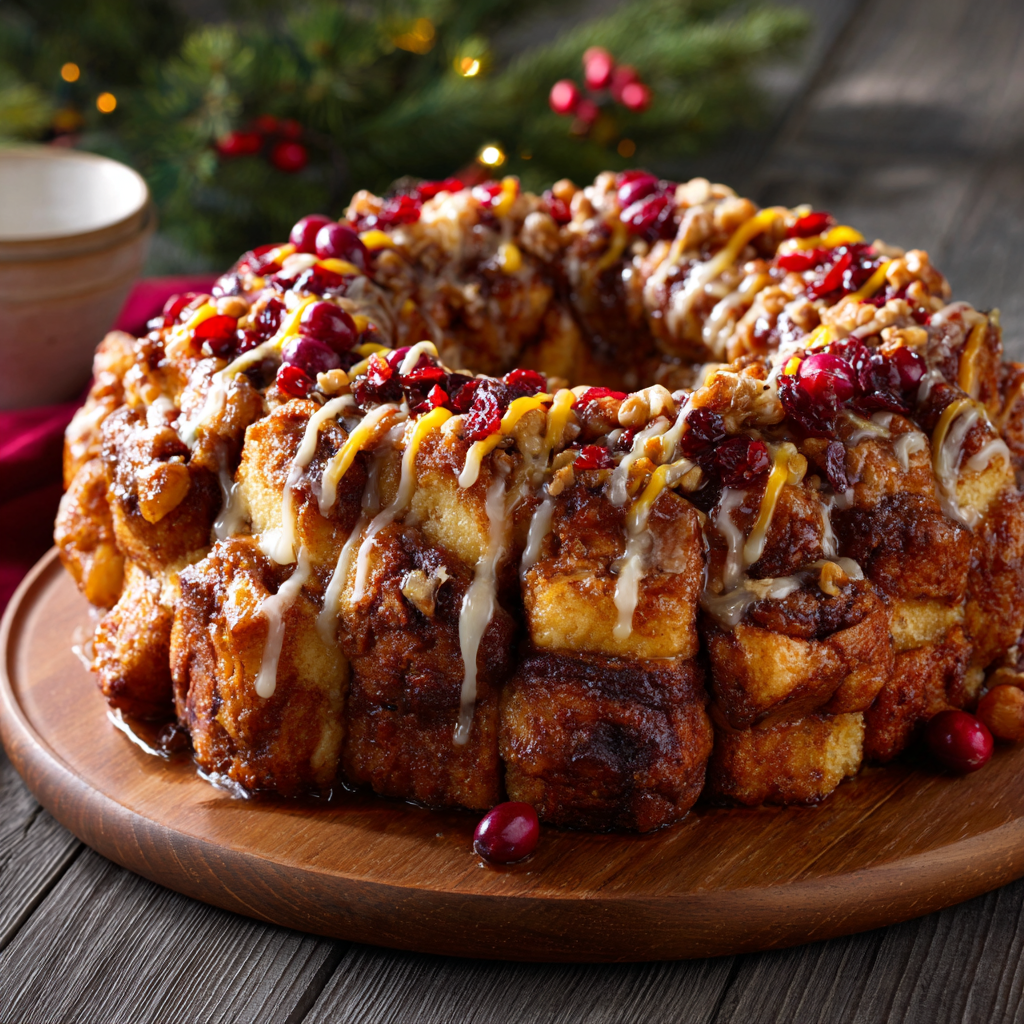
And if there’s one dish that absolutely embodies that feeling for me, it’s this Festive Holiday Monkey Bread. We’re talking about sticky, pull-apart goodness loaded with cinnamon, nuts, and a whole lot of holiday cheer. This isn’t just a recipe; it’s an event. It’s interactive, it’s deliciously messy, and it’s guaranteed to bring a smile to everyone’s face, from your littlest nephew to your most serious uncle.
I’ve taken the classic monkey bread we all know and love and given it a full holiday makeover. We’re doubling the batch to feed a full house (because leftovers are a beautiful thing), and we’re weaving in some festive twists that’ll make it the star of your breakfast spread. Think tart dried cranberries for a pop of color, bright orange zest to cut through the sweetness, and a fun, colorful icing drizzle that screams celebration. It’s warm, it’s gooey, and I promise you, it will bring people back for seconds and thirds. So, let’s preheat that oven and create some magic together!
A Sticky-Fingered Christmas Memory
This recipe always takes me right back to my grandma’s kitchen. She was the queen of Christmas morning, and her table was a glorious, chaotic spread of every breakfast food you could imagine. But nestled right in the center, still steaming from the oven, was always her famous monkey bread.
We weren’t allowed to touch it until my grandpa had taken his annual, overly-dramatic photo. My cousins and I would sit there, practically vibrating with anticipation, staring at that towering, glistening masterpiece. The second we got the green light, it was a free-for-all. No plates, no forks—just a bunch of kids with buttery, sugar-coated fingers, pulling apart warm, soft pieces of dough and laughing as the sticky sauce dripped down our chins. It was more than just eating; it was a shared experience, a moment of pure, uncomplicated happiness. That’s the feeling I want to bottle up and share with you in this recipe. It’s not about perfection; it’s about togetherness.
Gathering Your Festive Ingredients
Here’s the beautiful part: this show-stopping breakfast is deceptively simple to make. We’re using a brilliant shortcut that lets us focus on the fun, flavorful additions. Here’s what you’ll need to feed a crowd:
- 4 cans Pillsbury Cinnamon Rolls (13 oz each): This is our superstar base. It already has the cinnamon flavor and the sweet icing built right in! Chef’s Insight: Keep these refrigerated until the very last second. Cold dough is much easier to cut and handle.
- 1 cup granulated sugar + 2 tsp ground cinnamon: This dynamic duo creates that classic, sparkly coating on each piece of dough. Substitution Tip: You can swap the granulated sugar for turbinado sugar for a deeper, molasses-like flavor and a delightful crunch.
- 1 cup raisins or dried cranberries (Twist #1!): I’m team cranberry all the way for the holidays! They add a beautiful ruby red color and a lovely tartness that balances the sweetness perfectly.
- 1 cup chopped walnuts or pecans: For that essential crunch and nutty flavor. Toasting them beforehand in a dry skillet for a few minutes will take their flavor to a whole new level!
- 2 cups brown sugar, packed: This is the heart of the sticky, gooey sauce. The molasses in the brown sugar gives monkey bread its signature depth and richness.
- 1 cup unsalted butter, melted: Combined with the brown sugar, it creates that irresistible caramel-like sauce that seeps into every nook and cranny.
- Zest of 1 orange (Twist #2!): Don’t skip this! The bright, citrusy aroma cuts through the richness and adds a surprisingly festive, sophisticated note. It makes the whole house smell incredible.
- Red and green icing drizzle (Twist #3!): We’ll use the icing that comes with the cinnamon rolls, divide it, and tint it with food coloring for a fun, festive finish.
Let’s Build This Masterpiece: Step-by-Step
Okay, team! Let’s get our hands dirty (figuratively, for now). Follow these steps, and you’ll have a golden, bubbling work of art in no time.
Step 1: Prep the Pan & Preheat
First things first, grab your largest Bundt pan. If you don’t have a giant one, two standard 10-cup Bundt pans or even a 9×13-inch baking dish will work perfectly. Give it a really good coating of non-stick spray or butter. I mean, get in all those grooves! This is our insurance policy for a flawless flip later. Now, preheat your oven to 350°F (175°C). A properly heated oven is key for that perfect rise and golden bake.
Step 2: Coat the Dough Pieces
Open those cans of cinnamon rolls (that satisfying *pop* never gets old!) and cut each roll into quarters. Chef’s Hack: Use kitchen shears for this—it’s way faster and less messy than a knife. In a large bowl (or a sturdy gallon-sized ziplock bag), toss the granulated sugar and cinnamon together. Now, add your dough pieces and toss, toss, toss until every single piece is coated in that sugary, cinnamony goodness. This coating creates a delicious crust and helps prevent the pieces from sticking together into one big blob.
Step 3: Layer It Up with Love
This is where we build the flavor layers. Start by scattering a handful of your cranberries and nuts in the bottom of the greased pan. Then, add a layer of the sugar-coated dough pieces. Sprinkle on more cranberries, nuts, and a good pinch of that vibrant orange zest. Repeat this process until all your ingredients are used up, ending with a final sprinkling of the good stuff on top. This ensures every single bite is packed with festive flavor.
Step 4: Create the Magical Sauce
In a medium saucepan or a microwave-safe bowl, melt your butter. Stir in the packed brown sugar until it’s completely smooth and looks like a thick, luxurious caramel. Pro Tip: Let this mixture cool for just a minute before pouring it over the dough. This prevents it from melting the sugar coating too much. Now, slowly and evenly pour this liquid gold over the entire layered structure in your pan. Don’t be shy—get it in every corner!
Step 5: The Big Bake
Carefully place your pan in the preheated oven. Bake for 30-35 minutes. You’re looking for a deep golden brown top and bubbles actively simmering around the edges. The smell in your kitchen will be absolutely intoxicating! Watchful Eye: If the top is browning too quickly, you can tent it loosely with a piece of aluminum foil for the last 10 minutes of baking.
Step 6: The Most Important Step: The Rest
I know, I know. The temptation to flip it immediately is REAL. But fight it! This is the hardest part of the whole recipe. Let the monkey bread cool in the pan on a wire rack for exactly 10 minutes. This allows the molten sugar sauce to thicken up just enough so that when you invert it, it holds its beautiful shape instead of becoming a lava flow. After 10 minutes, place a large plate or serving platter over the pan, and with confidence (and oven mitts!), flip it over. Give the pan a few gentle taps, and lift it off to reveal your masterpiece.
Step 7: Decorate & Serve with Flair
While the bread is resting, divide the icing that came with the rolls into two small bowls. Tint one with red food coloring and the other with green. Once your monkey bread is gloriously displayed on the platter, take turns drizzling the red and green icing over the top. This is the final, festive touch that makes it truly holiday-ready. Serve it warm and watch it disappear!
How to Serve Your Holiday Monkey Bread
Presentation is part of the fun! I love placing the whole Bundt cake right in the middle of the table on a beautiful cake stand or rustic wooden board. It becomes the centerpiece of your breakfast spread. Pile a stack of small plates and napkins nearby (trust me, you’ll need the napkins!), and let everyone dig in with their hands. That’s the whole point of monkey bread—it’s interactive and communal.
What to serve alongside? A hot cup of strong coffee or a pot of tea is non-negotiable for cutting through the sweetness. If you want to make a full brunch out of it, pair it with something savory like a simple scrambled egg casserole or a platter of crispy bacon. The sweet and salty combination is a match made in heaven!
Get Creative: Recipe Variations
This recipe is a fantastic canvas for your own creativity! Here are a few of my favorite twists:
- Chocolate Lover’s Dream: Swap the cranberries for a cup of semi-sweet chocolate chips. The chocolate will melt into gooey pockets of bliss.
- Apple Pie Twist: Add a cup of finely chopped, peeled apples (like Granny Smith) along with the cranberries, and add a teaspoon of apple pie spice to the cinnamon sugar.
- Boozy & Brilliant: For a grown-up version, add a tablespoon of bourbon or rum to the butter and brown sugar sauce. It adds a wonderful warmth.
- Nut-Free & Fruity: Simply omit the nuts and add extra dried fruit. Dried cherries or chopped apricots would be delicious!
- From-Scratch Glory: If you have the time, use your favorite homemade yeast dough instead of the canned rolls. It’s a labor of love, but oh-so-worth it.
Chef’s Notes: A Few Kitchen Confessions
This recipe has been a part of my holiday tradition for years, and it’s evolved quite a bit. The first time I made it, I was so impatient that I flipped it after only two minutes of resting. Let’s just say I served “Monkey Bread Soup” that year—delicious, but not exactly photogenic! I’ve learned that patience is the secret ingredient.
Another funny story: one year, my dog, Biscuit, managed to snag an entire un-baked cluster of dough off the counter. He looked so guilty, but also so pleased with himself. So, my pro tip? Keep your furry kitchen helpers at a safe distance when this beauty is resting on the counter!
FAQs & Troubleshooting
Q: My monkey bread stuck to the pan! What did I do wrong?
A: Oh, we’ve all been there! The most likely culprits are not greasing the pan thoroughly enough or not letting it rest before inverting. Next time, be really generous with the non-stick spray, making sure to hit every crevice. And remember, that 10-minute rest is non-negotiable for the sauce to set.
Q: Can I make this the night before?
A: Absolutely! You can assemble the entire thing the night before—layer the coated dough, cranberries, nuts, and zest in the pan, and pour the butter-brown sugar sauce over it. Cover it tightly with plastic wrap and refrigerate. In the morning, let it sit on the counter while the oven preheats, then bake as directed. You may need to add 5-10 minutes to the baking time since it’s starting from cold.
Q: My sauce pooled at the bottom. How can I prevent this?
A: A little pooling is normal, but if it’s excessive, it might be because the sauce was too hot when poured over the dough, melting the outer sugar coating. Let your butter-sugar mixture cool for a few minutes before using it. Also, ensure you’re layering the ingredients evenly, not just dumping them all in at once.
Q: Can I freeze monkey bread?
A> You can! Bake it completely, let it cool fully, and wrap it tightly in plastic wrap and then aluminum foil. Freeze for up to 2 months. Thaw overnight in the refrigerator and reheat, covered, in a 300°F oven until warm throughout.

Festive Holiday Monkey Bread
Description
This Holiday Monkey Bread is gooey, cinnamony, and perfect for festive breakfasts. With cranberries, orange zest, and a colorful icing drizzle, it’s guaranteed to wow your family or brunch guests.
Ingredients
-
4 cans Pillsbury Cinnamon Rolls (13 oz each)
-
1 cup granulated sugar
-
2 tsp ground cinnamon
-
1 cup dried cranberries or raisins
-
1 cup chopped walnuts or pecans (toasted optional)
-
2 cups packed brown sugar
-
1 cup unsalted butter, melted
-
Zest of 1 orange
-
Red and green icing (from cinnamon roll tubes), for drizzle
Instructions
1. Preheat & Prep
-
Preheat oven to 350°F (175°C).
-
Grease a large Bundt pan (or two 10-cup Bundt pans / 9×13-inch pan) thoroughly.
2. Prepare Dough
-
Cut each cinnamon roll into quarters (kitchen shears = fastest).
-
Toss dough pieces with sugar and cinnamon until fully coated.
3. Layer Ingredients
-
Scatter a layer of cranberries, nuts, and orange zest in the pan.
-
Add a layer of sugar-coated dough pieces.
-
Repeat layers until all ingredients are used, finishing with cranberries, nuts, and zest on top.
4. Make the Sauce
-
Melt butter and stir in brown sugar until smooth.
-
Let cool slightly, then pour evenly over the layered dough.
5. Bake
-
Bake for 30–35 minutes until golden brown and bubbling.
-
Tent loosely with foil if the top browns too quickly.
6. Rest & Invert
-
Cool for 10 minutes in the pan.
-
Place a serving plate over the pan and invert.
-
Tap gently to release the bread.
7. Decorate
-
Divide cinnamon roll icing into two bowls. Tint one red and one green.
-
Drizzle over monkey bread for a festive finish.
Notes
-
Rest Before Flipping: 10 minutes is key to prevent “Monkey Bread Soup.”
-
Prevent Sticking: Grease pan thoroughly and rest before inverting.
-
Make-Ahead: Assemble the night before, refrigerate, then bake in the morning (add 5–10 mins if baking from cold).
-
Freeze: Bake, cool, wrap tightly, freeze up to 2 months. Reheat in 300°F oven until warm.
Nutritional Information (Approximate)
Let’s be real—this is a celebratory treat! It’s all about indulgence and joy. But for those who like to keep track, here’s a rough estimate per serving (based on 24 servings). Remember, these values can vary based on specific ingredients used.
Per Serving: Calories: 320 | Carbohydrates: 44g | Fat: 14g | Sugar: 26g | Protein: 4g
This is a rich, energy-dense food perfect for a special occasion. The key, as with all good things, is to enjoy it mindfully and savor every delicious, sticky bite!
Final Thoughts from My Kitchen to Yours
Well, there you have it, my friends—my ultimate recipe for Festive Holiday Monkey Bread. It’s more than just a list of ingredients and steps; it’s an invitation to create a moment. A moment of laughter, of sticky fingers, of gathering around the table and simply enjoying each other’s company.
Don’t stress about making it perfect. Embrace the mess, have fun with the decorations, and most importantly, share it with people who make your heart full. That’s what Feastical is all about—food that feels like a warm hug. I hope this recipe becomes a cherished part of your holiday traditions, just like it is for me.
If you make it, I’d love to see your creation! Tag me @Feastical on social media so I can share in the joy. Now, go preheat that oven and get ready to make some memories. Happy holidays, and happy eating!
– Beau
***
Blueberry Croissant Bread Pudding
Blueberry Croissant Bread Pudding: Your New Favorite Comfort Food
Hey there, friend! Beau here, welcoming you back to my kitchen at Feastical. Today, we’re tackling a recipe that feels less like cooking and more like a warm, buttery hug. We’re making a Blueberry Croissant Bread Pudding that is so incredibly good, it might just become your go-to dish for lazy weekend brunches, potlucks, or those nights when you just need a little something sweet to cap things off.
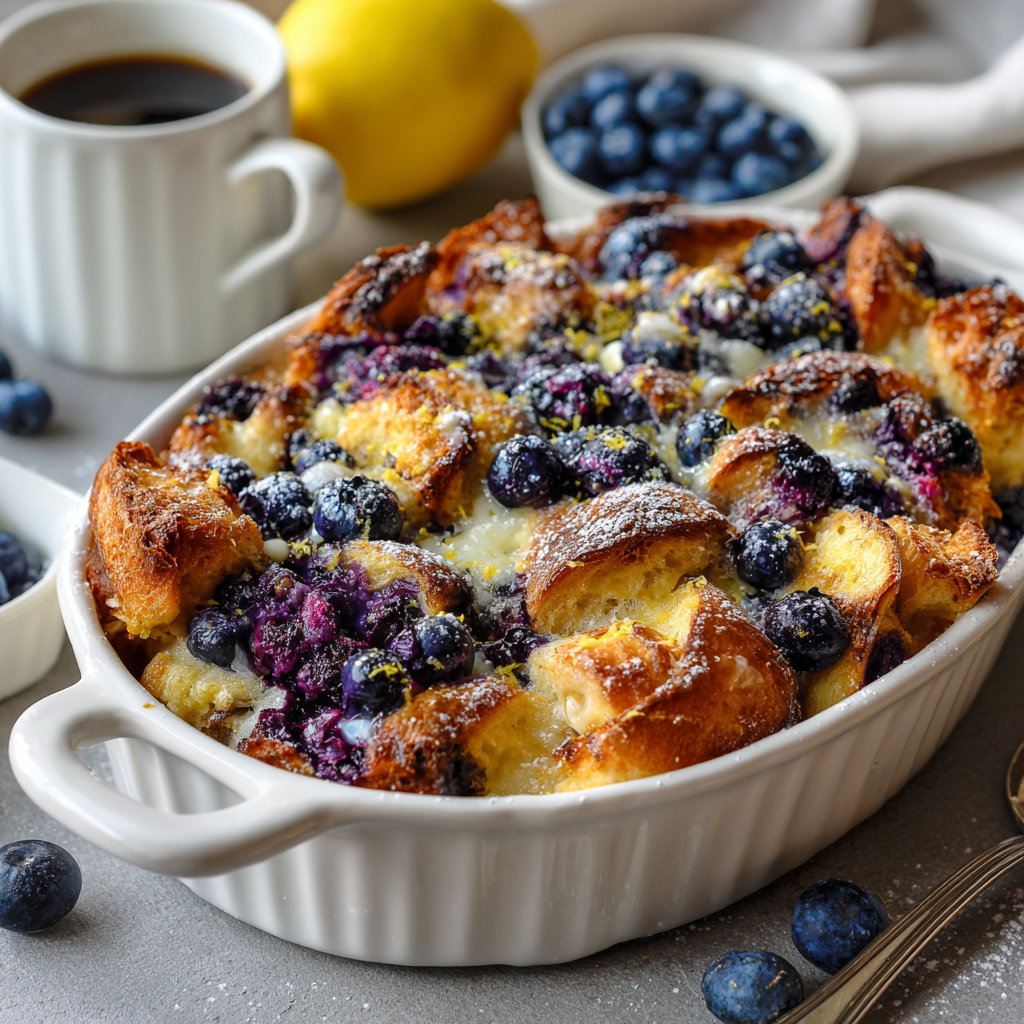
Now, I know what you might be thinking: “Bread pudding? Isn’t that a bit… old-fashioned?” And to that, I say, some of the best things in life are gloriously old-fashioned! But here’s the secret – we’re not using just any bread. We’re starting with croissants. Those flaky, golden, beautifully laminated pastries that already feel like a treat. When you soak them in a rich, creamy custard and stud them with bursts of juicy blueberries, something magical happens in the oven. The top gets crisp and golden, while the inside stays impossibly soft, creamy, and decadent.
This recipe is the ultimate in feel-good food. It’s forgiving (no need to be a pastry chef!), it’s crowd-pleasing (doubling the batch is highly encouraged), and it’s the perfect way to give day-old croissants a spectacular second life. So, grab your favorite mixing bowl, preheat that oven, and let’s create a little bit of magic together. I promise, the aroma alone will make your entire home smell like a cozy bakery.
A Sweet Slice of Nostalgia
This recipe always takes me back to my Grandma Rose’s sun-drenched kitchen. She was a wizard with what she called “kitchen sink” baking – turning whatever was about to go stale into something unforgettable. Her classic bread pudding was a staple, made with simple white bread and raisins. It was humble, hearty, and I loved it.
But the first time I made it for myself as a young, broke line cook, I looked at a bag of day-old croissants from the restaurant and had a “what if?” moment. What if we swapped the humble bread for something luxurious? What if we traded the raisins for plump, tart blueberries? That first experimental batch was a revelation. It felt like I had taken my grandma’s comforting hug and dressed it up in its Sunday best. It’s a recipe that honors tradition while confidently adding its own delicious twist – and that’s what Feastical is all about.
Gathering Your Blueberry Croissant Dream Team
Here’s everything you’ll need to bring this cozy masterpiece to life. Don’t stress about having the exact brands – cooking is about flexibility and using what you have!
- 6 large croissants (or 8 cups cubed brioche or French bread): This is the star! Stale, day-old croissants are actually perfect here because they soak up the custard like a dream without turning to mush. No croissants? Brioche will give you a similar rich, buttery vibe, or a sturdy French bread will work beautifully for a more traditional base.
- 2 cups blueberries (fresh or frozen): No need to thaw frozen berries! They’ll release their juices as they bake, creating little pockets of blueberry bliss. Fresh are fantastic when in season.
- 16 oz cream cheese, softened: This is our secret weapon for an ultra-creamy, rich custard. Pro tip: leave it on the counter for at least 30 minutes before you start. Soft cream cheese blends smoothly, leaving no lumps.
- 1⅓ cups granulated sugar: This sweetens the deal. You can adjust this slightly based on your sweet tooth and the sweetness of your croissants.
- 4 large eggs: The backbone of our custard, providing structure and richness.
- 2 tsp vanilla extract or almond extract (Twist #1): Vanilla is a classic, but almond extract? It adds a wonderful, fragrant depth that pairs incredibly well with the blueberries. It’s a game-changer!
- 2 cups milk (whole or half-and-half for creaminess): Whole milk is great, but if you’re feeling indulgent, half-and-half or even a combination of milk and heavy cream will make it extra luxurious.
- Zest of 1 lemon (Twist #2): Don’t skip this! The bright, sunny zest cuts through the richness and makes the blueberry flavor pop. It’s the difference between “good” and “wow.”
- ½ cup white chocolate chips (Twist #3, optional but dreamy): Because why not? They add little melty, sweet surprises. A truly decadent touch.
- Powdered sugar, for serving: For that beautiful, snowy finish that makes everything look professionally baked.
Let’s Get Baking: Your Step-by-Step Guide
Ready? Let’s do this. I’ll walk you through each step with a few chef hacks I’ve picked up over the years.
Step 1: Preheat and Prep. First things first, get that oven preheating to a nice 350°F (175°C). This is your first secret to even baking. While it’s warming up, grab a 9×13-inch baking dish and give it a good coating of butter, cooking spray, or a light brush of oil. We want nothing sticking to that beautiful golden crust!
Step 2: Prep the Croissants. Now for the fun part – tearing up the croissants! I like to tear them into rustic, uneven chunks with my hands. You can certainly cube them neatly with a knife, but tearing creates more nooks and crannies for the custard to cling to. Spread the croissant pieces evenly in your prepared baking dish. Now, scatter the blueberries and those optional (but highly recommended) white chocolate chips over the top. Toss them gently with your hands so everything is mingling happily.
Step 3: Create the Dreamy Custard. In a large mixing bowl, beat the softened cream cheese and granulated sugar together until it’s completely smooth and creamy. No lumps allowed! This is where an electric hand mixer or a stand mixer makes life easy, but a sturdy whisk and some elbow grease will work too. Once smooth, add the eggs one at a time, beating well after each addition. Now, pour in the milk, your chosen extract (vanilla or almond!), and that glorious lemon zest. Mix it all until you have a silky, homogeneous custard.
Step 4: Assemble with Love. Slowly and evenly, pour the custard mixture over the croissants and berries. Now, here’s a crucial little hack: take a spatula or clean hands and gently press down on the croissant pieces. You want to help them soak up all that liquid goodness. Don’t smash them, just a gentle press to ensure every piece gets a nice bath. Let it sit for about 10-15 minutes if you have time – this allows the bread to fully absorb the custard for a more uniform texture.
Step 5: Bake to Golden Perfection. Slide that beautiful dish into your preheated oven and bake it uncovered for 40-45 minutes. You’re looking for a deeply golden brown top and a center that is set but might still have a slight jiggle. A knife inserted near the center should come out relatively clean (a little blueberry juice is fine!). If the top is browning too quickly, you can tent it loosely with a piece of foil for the last 10-15 minutes of baking.
Step 6: The Hardest Part – Wait! Once it’s out of the oven, resist the urge to dive in immediately! Let it cool on a wire rack for at least 15-20 minutes. This allows the custard to set up perfectly, making it easier to slice and serve. It also gives the flavors a chance to meld together beautifully.
How to Serve This Slice of Heaven
Now for the best part – eating! A final dusting of powdered sugar right before serving makes it look absolutely gorgeous. You can serve it straight from the dish, spooning out generous portions.
While it’s sublime all on its own, here are a few of my favorite ways to gild the lily:
- À La Mode Style: A scoop of high-quality vanilla ice cream melting over a warm serving is pure bliss.
- Breakfast Vibes: A dollop of thick Greek yogurt or a drizzle of cold heavy cream adds a lovely tang and creaminess that’s perfect for a brunch table.
- Fruit Forward: Serve it with a side of fresh, macerated berries or a quick blueberry compote for an extra burst of fruit flavor.
It’s fantastic warm, at room temperature, or even cold straight from the fridge the next day (trust me on this!).
Make It Your Own: Delicious Twists & Swaps
The beauty of this recipe is its versatility. Feel free to get creative and make it your own!
- Lemon Blueberry Bliss: Amplify the citrus! Add the juice of half that zested lemon to the custard mixture for an extra zing.
- Nutty Crunch: Sprinkle a half-cup of chopped pecans or sliced almonds over the top before baking for a wonderful textural contrast.
- Mixed Berry Medley: Don’t limit yourself to just blueberries! A mix of raspberries, blackberries, and blueberries is a summer sensation. If using frozen mixed berries, no need to thaw.
- Dairy-Free Delight: You can easily make this dairy-free. Use your favorite plant-based milk (oat or almond work well), dairy-free cream cheese, and vegan croissants. The result will still be delicious!
- Chocolate Lover’s Dream: Swap the white chocolate chips for semi-sweet or dark chocolate chips. The combination of dark chocolate and blueberry is sophisticated and deeply satisfying.
Chef’s Notes: From My Kitchen to Yours
This recipe has evolved so much since that first batch in my tiny apartment kitchen. I’ve learned that the “stale bread” rule is golden, but in a pinch, you can cube fresh croissants and toast them in a 300°F oven for 10 minutes to dry them out. It works like a charm!
One of my favorite kitchen memories involves this very pudding. I once brought it to a friend’s potluck and set it down next to a truly impressive, multi-layer cake. By the end of the night, the cake was mostly untouched, and my humble bread pudding was completely devoured. It just goes to show that sometimes, the simplest, most comforting dishes are the ones that truly win people over. It’s not about being fancy; it’s about being full of flavor and love.
FAQs & Troubleshooting: Your Questions, Answered!
Q: Can I make this bread pudding ahead of time?
A: Absolutely! You can assemble the entire dish the night before, cover it tightly with plastic wrap, and refrigerate it. In the morning, just take it out while the oven preheats (let it sit on the counter for about 20-30 minutes to take the chill off) and then bake as directed. You might need to add a few extra minutes to the baking time since it’s starting from cold.
Q: My custard seems a bit watery before baking. Is that okay?
A: Yes, that’s perfectly normal! The croissants will continue to absorb the liquid as it sits and during the baking process. The magic of bread pudding is how the starches in the bread thicken the custard as it bakes. As long as you’ve pressed the bread down to help it soak, you’re on the right track.
Q: The top is browning too fast, but the center is still liquid. What do I do?
A: This is a common oven issue! Simply tent the dish loosely with a sheet of aluminum foil. This will shield the top from direct heat, allowing the center to cook through without burning the top. Just remove the foil for the last 5 minutes if you want the top to crisp up a bit more.
Q: Can I freeze the leftovers?
A: You can! Let it cool completely, then cut it into individual portions. Wrap each portion tightly in plastic wrap and then in foil, or place them in a freezer-safe container. It will keep for up to 2 months. To reheat, thaw overnight in the fridge and then warm in a 350°F oven until heated through, or microwave a single portion.
Blueberry Croissant Bread Pudding
Description
This Blueberry Croissant Bread Pudding is a warm, comforting dessert (or brunch treat!) that’s rich, creamy, and studded with juicy blueberries. The flaky croissants soak up a luscious custard, creating a golden, decadent top and a soft, melt-in-your-mouth interior.
Ingredients
-
6 large croissants (or 8 cups cubed brioche/French bread)
-
2 cups blueberries (fresh or frozen)
-
16 oz cream cheese, softened
-
1⅓ cups granulated sugar
-
4 large eggs
-
2 tsp vanilla or almond extract
-
2 cups milk (whole or half-and-half)
-
Zest of 1 lemon
-
½ cup white chocolate chips (optional)
-
Powdered sugar, for serving
Instructions
1. Preheat & Prep
-
Preheat oven to 350°F (175°C).
-
Grease a 9×13-inch baking dish with butter or cooking spray.
2. Prep Croissants & Blueberries
-
Tear croissants into rustic pieces and place in the dish.
-
Scatter blueberries and optional white chocolate chips over the top.
3. Make Custard
-
Beat softened cream cheese and sugar until smooth.
-
Add eggs one at a time, then milk, extract, and lemon zest. Mix until silky.
4. Assemble
-
Pour custard evenly over croissants and berries.
-
Gently press croissant pieces into the custard. Let sit 10–15 minutes to absorb.
5. Bake
-
Bake uncovered for 40–45 minutes until top is golden and center is set (slight jiggle is okay).
-
Tent with foil if top browns too quickly.
6. Cool & Serve
-
Cool 15–20 minutes before serving.
-
Dust with powdered sugar. Optional: serve with vanilla ice cream, Greek yogurt, or a berry compote.
Notes
-
Stale Croissants Are Perfect – they soak up custard without becoming mushy.
-
Custard Absorption – let the croissants sit in custard for 10–15 minutes before baking.
-
Make-Ahead – assemble overnight, refrigerate, then bake; add a few extra minutes to cooking time.
-
Freezing – bake, cool, portion, and freeze up to 2 months. Reheat in the oven.
Nutrition
- Calories: 370 Cal per Serving
- Sugar: 24g
- Fat: 22g
- Carbohydrates: 34g
- Protein: 7g
Nutritional Information (Approximate)
Please remember, this is a rough estimate and can vary based on the specific ingredients and brands you use. This information is provided as a courtesy.
Per Serving (1 of 12):
Calories: 370 | Protein: 7g | Carbohydrates: 34g | Fat: 22g | Sugar: 24g | Fiber: 2g
This is a treat, through and through! It’s perfect for sharing on special occasions or for making a regular weekend feel a little more celebratory. Enjoy it mindfully and savor every single bite.
Final Thoughts: Share the Comfort
Well, there you have it – my all-time favorite Blueberry Croissant Bread Pudding. It’s a recipe that embodies everything I love about cooking: it’s resourceful, deeply comforting, and absolutely bursting with flavor. It proves that with a few simple, quality ingredients and a little bit of time, you can create something that feels truly special.
I hope this recipe finds its way into your kitchen and becomes a new tradition for you and your loved ones. If you make it (and I really hope you do!), I’d love to hear about it. Tag me on social @Feastical or leave a comment on the blog with your thoughts and any creative twists you tried.
Now, go preheat that oven and get ready for your home to smell incredible. Happy baking, friends!
Bacon-Wrapped Brussels Sprouts
Bacon-Wrapped Brussels Sprouts: Your New Go-To Party Hero
Hey friends, Beau here from Feastical! Let’s talk about a little magic trick I like to pull out when I need a guaranteed crowd-pleaser. We’re taking two of the most beloved (and sometimes debated) ingredients and combining them into one unforgettable bite. That’s right, we’re diving headfirst into the glorious world of Bacon-Wrapped Brussels Sprouts.
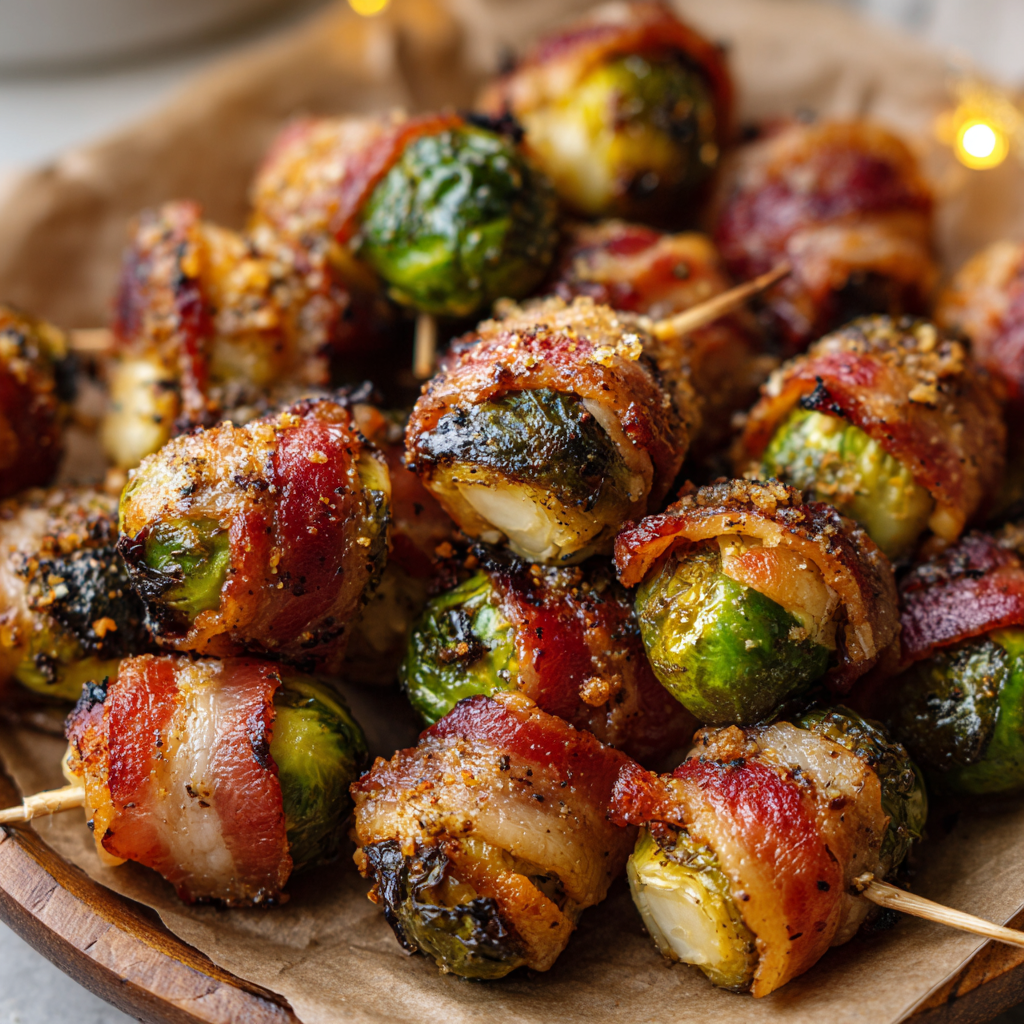
Now, I know what some of you might be thinking. Brussels sprouts? Weren’t those the mushy, bitter little cabbages we dreaded as kids? I’m here to tell you that those days are long gone. When you roast them at a high heat, something incredible happens. Their edges get caramelized and crispy, their insides turn tender and sweet, and they shed any trace of their former, less-glamorous reputation. And when you swaddle each one in a cozy blanket of smoky, crispy bacon? You’re not just making a side dish; you’re creating a full-blown experience.
These little guys are the ultimate party food. They’re naturally bite-sized, easy to handle (just pop a toothpick in ‘em), and they look absolutely stunning on a platter. They’re the perfect blend of fancy and approachable. Whether you’re hosting a holiday feast, a game-day gathering, or just a casual Friday night with friends, this recipe will have people hovering around the oven, asking, “Are they ready yet?” I promise you, they disappear faster than a cold drink on a hot day. So, let’s grab our aprons and transform these humble sprouts into the star of the show.
The Thanksgiving That Almost Wasn’t
This recipe always takes me back to a particularly chaotic Thanksgiving a few years ago. I was in charge of the sides, and I’ll admit, I got a little ambitious. There was a complicated gratin, a from-scratch stuffing with about twenty ingredients, and a cranberry sauce that required constant attention. Everything was vying for oven space at different temperatures, and let’s just say… the kitchen was a war zone. The gratin was threatening to boil over, the stuffing was drying out, and I was one dropped spoon away from a full-blown meltdown.
Then I remembered my secret weapon: a big bag of Brussels sprouts and a pack of bacon I had stashed in the fridge as a backup plan. With minutes to go before guests arrived, I frantically wrapped those little sprouts, tossed them on a sheet pan, and shoved them in the one free corner of the oven. I didn’t have time for fancy seasonings—just some black pepper and a prayer. Twenty-five minutes later, as I was frantically plating the other dishes, I pulled them out. They were perfect. Golden, crispy, and smelling like heaven. You know which dish got the most compliments that year? Not the complicated gratin. It was those last-minute, thrown-together bacon-wrapped sprouts. They saved the day and taught me a valuable lesson: the best recipes are often the simplest ones, made with a whole lot of heart.
Gathering Your Flavor Arsenal
One of the best things about this recipe is its simplicity. You only need a few key players, but each one brings its A-game. Here’s what you’ll need to get started.
- 4 lbs Brussels Sprouts (about 48-56): Look for firm, bright green sprouts that are similar in size. This helps them cook evenly. If some are huge, go ahead and halve them so every bite is consistent. Chef’s Insight: Don’t be shy about peeling off any loose or yellowed outer leaves—it makes for a prettier final product!
- 24 strips of Bacon, halved: This is your flavor powerhouse! I recommend using a standard-cut bacon, not thick-cut. Thick-cut can take longer to crisp up and might not wrap as easily. Substitution Tip: For a leaner option, you can use turkey bacon, but spritz it with a little oil to help it crisp.
- Fresh Black Pepper, to taste: Freshly cracked pepper is a must here. It adds a little sharpness that cuts through the richness of the bacon beautifully.
Flavor Twists (Because Why Not?):
- Twist #1: Garlic Powder + Smoked Paprika: A light sprinkle of these two before baking adds a deep, smoky warmth that complements the bacon incredibly well.
- Twist #2: The Cheesy Surprise: For the larger sprouts, use a paring knife to cut a small slit and insert a cube of mozzarella or sharp cheddar before wrapping. You’ll be rewarded with a delicious, melty center.
- Twist #3: Honey-Sriracha Glaze: Mix ¼ cup honey with 2 tsp sriracha. Brush this on during the last 5 minutes of baking for a sweet, spicy, and sticky finish that’s absolutely addictive.
Let’s Get Wrapping: Your Step-by-Step Guide
Ready to make some magic? Follow these steps, and you’ll be a bacon-wrapping pro in no time. I’ve sprinkled in a few of my favorite kitchen hacks to make the process even smoother.
- Preheat and Prep: First things first, get that oven roaring hot to 400°F (200°C). A hot oven is the secret to crispy bacon and caramelized sprouts, not steamed ones. While it heats up, line a large baking sheet with parchment paper or foil. Chef’s Hack: Lining the pan isn’t just for easy cleanup; it also prevents the bacon sugar from sticking and burning, giving you a perfect release every time.
- The Great Wrap: Take each Brussels sprout and snugly wrap it with one of your half-slices of bacon. The key is to wrap it so the bacon ends meet on the bottom of the sprout. This way, the weight of the sprout itself helps seal the bacon as it cooks. If a piece feels particularly unruly, you can secure it with a toothpick. Pro Tip: Place each little bundle seam-side down on your prepared baking sheet. Make sure they aren’t touching each other—we want hot air to circulate around them for maximum crispiness!
- Season with Love: Now, give your army of sprouts a generous grind of fresh black pepper. If you’re using the garlic powder and smoked paprika from our flavor twists, now’s the time to dust them lightly. Chef’s Note: I usually don’t add salt at this stage because the bacon brings plenty of its own salty goodness. You can always add a sprinkle of flaky sea salt at the end if needed.
- Bake to Perfection: Slide that sheet pan into your preheated oven and roast for 25-30 minutes. Here’s the crucial part: about halfway through, take a minute to flip each one over. This ensures even cooking and crispiness on all sides. You’ll know they’re done when the bacon is crispy and the sprouts are tender when pierced with a knife. Want that final, irresistible crunch? Switch your oven to broil for the last 2-3 minutes, but watch them like a hawk—they can go from golden to burnt in seconds! If you’re using the honey-sriracha glaze, brush it on right before this broiling step.
- Serve Immediately: Transfer your beautiful, glistening bacon-wrapped sprouts to a serving platter. They are best served hot and crispy, straight from the oven!
How to Serve These Little Gems
Presentation is part of the fun! I love using a rustic wooden board or a simple white platter to really let the golden-brown color of these bites pop. Stick a toothpick in each one—it makes them easy to grab and keeps fingers clean.
And let’s talk about dips! While these sprouts are fantastic on their own, a little dipping sauce on the side takes them to the next level. Here are a few of my favorites:
- Warm Maple Syrup: The classic sweet and salty combo is a winner every time. Just warm up some pure maple syrup for a cozy, comforting dip.
- Balsamic Reduction: This adds a tangy, slightly sweet complexity that cuts through the fat beautifully. You can find it pre-made at most stores, or reduce balsamic vinegar in a saucepan until it’s syrupy.
- Garlic Aioli: Creamy, garlicky, and rich—this is my personal go-to. A good store-bought aioli works great, or you can whip up your own quickly with mayo, minced garlic, lemon juice, and a pinch of salt.
Mix It Up! Creative Twists on the Classic
Once you’ve mastered the basic recipe, the world is your oyster… or, well, your Brussels sprout! Don’t be afraid to get creative. Here are a few of my favorite variations to keep things exciting.
- Brown Sugar & Chili Glaze: Swap the honey-sriracha for a mix of brown sugar and a pinch of chili powder. The molasses notes in the brown sugar pair amazingly with the smoky bacon.
- The “Everything Bagel” Sprout: Before baking, give your wrapped sprouts a light roll in Everything Bagel seasoning. It adds onion, garlic, sesame, and poppy seed flavors that are insanely good.
- Parmesan-Herb Finish: As soon as the sprouts come out of the oven, while they’re still hot, toss them in a bowl with a handful of grated Parmesan cheese and some chopped fresh parsley. The cheese will stick to the bacon creating a savory crust.
- Vegetarian/Vegan Version: Yes, it’s possible! Use large, whole mushrooms (like cremini) or even thick slices of plant-based sausage instead of the sprouts. For the “bacon,” there are some great coconut or rice-paper vegan bacon options available now.
- Air Fryer Method: Want them even crispier, faster? Arrange the wrapped sprouts in a single layer in your air fryer basket (you’ll need to work in batches). Cook at 375°F for 12-15 minutes, shaking the basket halfway through.
Beau’s Chef’s Notes
This recipe has been a staple in my kitchen for years, and it’s evolved in the best way. I used to be so precise, carefully trimming every single leaf and measuring every sprinkle of seasoning. Now? I embrace the rustic charm. A few charred leaves around the edges? That’s flavor! A slightly lopsided bacon wrap? That’s character! The beauty of this dish is in its imperfection. It’s meant to be shared and enjoyed, not stressed over.
One of my favorite kitchen memories is teaching my niece how to make these. She was about seven, and her little hands were so determined to get the bacon just right. We had flour everywhere, and more than a few sprouts ended up on the floor, but the look of pride on her face when she pulled the pan out of the oven was worth every second. That’s what Feastical is all about—creating those warm, delicious memories together.
FAQs & Troubleshooting: Your Questions, Answered!
Q: My bacon isn’t getting crispy. What did I do wrong?
A: This is the most common issue! The culprit is usually overcrowding the pan. If the sprouts are too close together, they steam instead of roast. Make sure there’s a little space between each one. Also, ensure your oven is fully preheated. If you’re still having trouble, the broiler trick at the end is your best friend.
Q: Can I make these ahead of time?
A: You can definitely get a head start! Assemble the sprouts and wrap them in bacon up to a day in advance. Keep them covered on the baking sheet in the fridge until you’re ready to bake. You may need to add a couple of extra minutes to the cooking time since they’ll be going into the oven cold.
Q: The toothpicks keep burning. Any tips?
A: Great question! If you’re worried about toothpicks burning, you can soak them in water for 20-30 minutes before using them. This helps them withstand the heat of the oven. Alternatively, if you wrap the bacon snugly and place the seam side down, you might find you don’t need toothpicks at all!
Q: My sprouts are a bit bitter. How can I prevent that?
A> Bitterness in Brussels sprouts is often tamed by the Maillard reaction (that beautiful browning we love). Make sure you’re roasting them at a high enough temperature. The caramelization process naturally sweetens them. Also, smaller sprouts tend to be sweeter than larger, older ones.

Bacon-Wrapped Brussels Sprouts
Description
These Bacon-Wrapped Brussels Sprouts are crispy, savory, and irresistibly addictive. Roasting the sprouts caramelizes their edges and brings out a natural sweetness, while the bacon adds smoky, crispy perfection. Perfect as a holiday appetizer, game-day snack, or any time you want a bite-sized crowd-pleaser.
Ingredients
-
4 lbs Brussels sprouts (about 48–56), trimmed and halved if large
-
24 strips of bacon, halved
-
Freshly cracked black pepper, to taste
Optional Flavor Twists:
-
Garlic & Smoked Paprika: Sprinkle lightly before baking for a smoky warmth.
-
Cheesy Surprise: Insert a small cube of mozzarella or cheddar into larger sprouts before wrapping.
-
Honey-Sriracha Glaze: Mix ¼ cup honey with 2 tsp sriracha and brush on in the last 5 minutes of baking.
Instructions
1. Preheat and Prep
-
Preheat oven to 400°F (200°C).
-
Line a large baking sheet with parchment paper or foil for easy cleanup and to prevent sticking.
2. Wrap the Sprouts
-
Wrap each Brussels sprout with a half-strip of bacon, seam-side down.
-
Secure with a toothpick if needed.
-
Place sprouts on the baking sheet, leaving space between each for even roasting.
3. Season
-
Grind fresh black pepper over the wrapped sprouts.
-
Add optional spices or glaze if desired.
4. Roast
-
Bake for 25–30 minutes, flipping halfway through.
-
Check for crispy bacon and tender sprouts.
-
Optional: Broil for 2–3 minutes at the end for extra crispiness. Brush honey-sriracha glaze before broiling if using.
5. Serve
-
Arrange on a platter and serve hot.
-
Optional dips: warm maple syrup, balsamic reduction, or garlic aioli.
Notes
-
Even Cooking: Choose sprouts of similar size or halve large ones.
-
Crispy Bacon: Don’t overcrowd the pan; space allows air to circulate.
-
Make Ahead: Wrap sprouts up to a day in advance; bake when ready.
-
Toothpick Safety: Soak toothpicks in water for 20–30 minutes to prevent burning.
Nutrition
- Calories: 120 Cal (Approximate per 2 pieces
- Carbohydrates: 4g
- Protein: 6g
Nutritional Information (Because We’re Curious!)
Okay, let’s be real—we’re not eating bacon-wrapped anything because it’s a diet food. But it’s always good to know what’s going into our bodies! This info is approximate and based on a serving of two pieces.
Per Serving (2 pieces): Calories: 120 | Protein: 6g | Carbohydrates: 4g | Fat: 9g | Fiber: 2g
Now, here’s the cool part: Brussels sprouts are nutritional powerhouses all on their own. They’re packed with fiber, which is great for digestion, and they’re loaded with vitamins C and K. So, while the bacon adds some fat and sodium, you’re also getting a solid dose of goodness from the green hero of the dish. It’s all about balance, friends!
Final Thoughts: Your New Secret Weapon
And there you have it! My complete guide to creating the most irresistible, conversation-starting, party-perfect Bacon-Wrapped Brussels Sprouts. This recipe is more than just a list of ingredients and steps; it’s a blueprint for creating a little bit of kitchen magic that brings people together.
I hope you feel inspired to try this recipe, make it your own, and share it with the people you love. Don’t forget to play with the flavor twists—that’s where the real fun begins. If you do make them, I’d be absolutely thrilled if you tagged me @Feastical on social media or left a comment on the blog. I love seeing your creations!
Remember, good food doesn’t have to be complicated. It just has to be made with a dash of joy and a whole lot of flavor. Now, go preheat that oven and get wrapping. Happy cooking!
– Beau
Ornament Oreo Truffles
Ornament Oreo Truffles: Your New Favorite Holiday Party Trick!
Hey friends, Beau here! Can you smell it? That’s the scent of sugar cookies, pine trees, and pure, unadulterated holiday magic starting to swirl in the air. And you know what that means—it’s time to roll up our sleeves, put on our favorite festive apron, and create some edible joy that’ll have everyone talking.
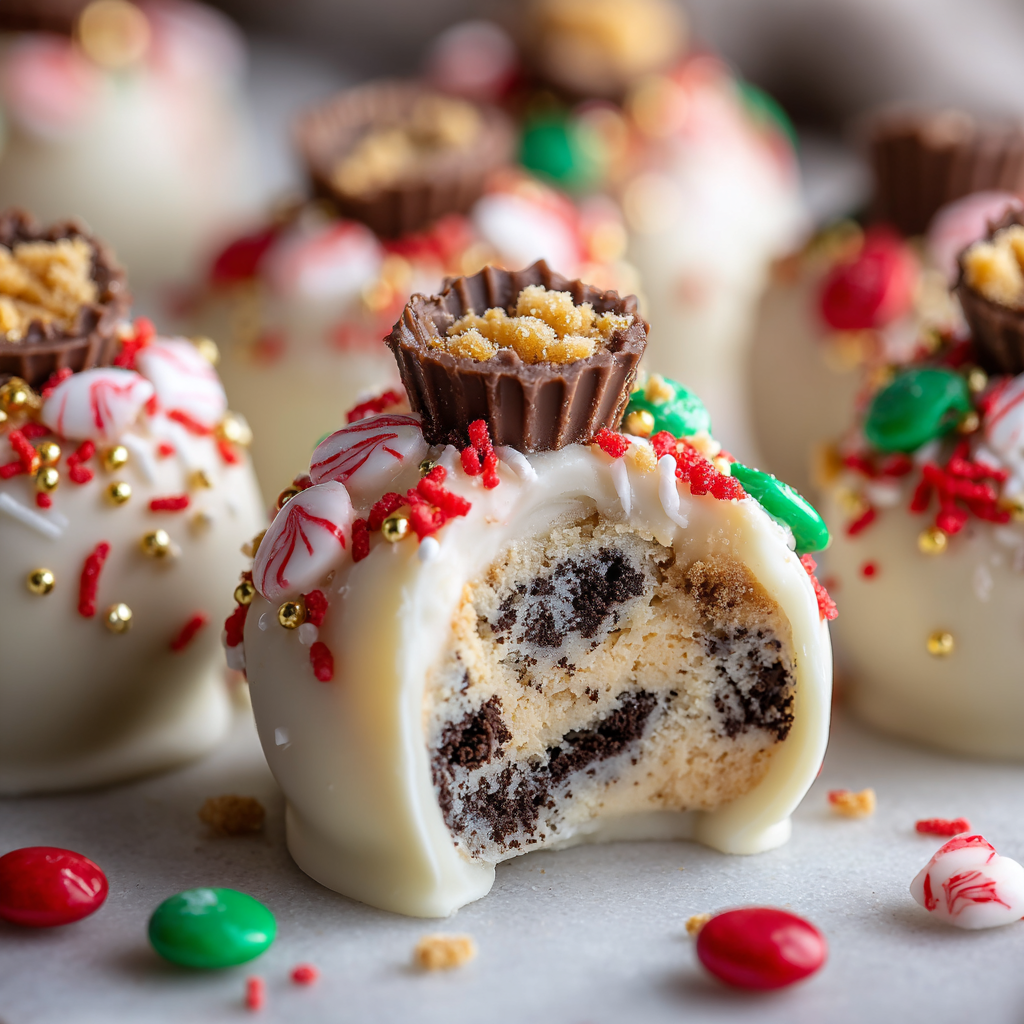
Today, we’re diving headfirst into one of my all-time favorite, foolproof, crowd-pleasing recipes: Ornament Oreo Truffles. Imagine this: a rich, creamy, no-bake Oreo cheesecake center, hugged by a sleek shell of smooth white chocolate, and dressed up like the most adorable mini-ornaments you’ve ever seen. They’re creamy, they’re crunchy, and they are absolutely dressed to impress.
I’m talking Christmas cheer in every single bite. The best part? You don’t need to be a pastry chef to pull these off. Whether you’re the designated dessert-bringer for the family potluck or you just want to whip up something special that makes your kitchen smell like happiness, these truffles are your secret weapon. They’re simple, soulful, and so satisfying to make. So, grab your food processor (or a trusty zip-top bag and a rolling pin!), and let’s make some magic together.
The Christmas Eve Kitchen Catastrophe (That Started a Tradition)
I have to share a little story with you. A few years back, I volunteered to bring dessert to my family’s massive Christmas Eve bash. I had this grand plan for a complicated, four-layer yule log cake. Spoiler alert: it was a disaster of epic proportions. The cake cracked, the frosting split, and I was left staring at a culinary crime scene at 10 PM on December 24th with a kitchen covered in chocolate splatters.
In a mild panic, I scanned my pantry. Oreos. Cream cheese. Some leftover candy from a baking project. A lightbulb went off. I threw everything together, rolled them into balls, and gave them a quick dip in some melting wafers. To make them look festive, I raided my kids’ candy stash and stuck a little hook on top. They were a little rustic, I’ll admit, but when I brought them to the party? They were the first platter to be wiped clean. My aunt still asks me every year, “Are you bringing your famous ornament balls?”
That kitchen fail taught me a beautiful lesson: the best holiday treats aren’t about perfection; they’re about the love and fun you stir into them. These truffles are proof that a little creativity (and a lot of Oreos) can save the day and start a delicious new tradition.
Gathering Your Truffle-Making Squad: The Ingredients
Here’s the beautiful part: you only need a handful of simple ingredients to create something truly spectacular. I’ve doubled the classic recipe here to make a party-sized batch of 80 truffles because, trust me, you’ll want plenty to share (and a few to hide for yourself!).
- 80 Oreo Cookies, finely crushed: This is the heart and soul of our truffle. I don’t scrape out the filling—we use the whole cookie! That creamy center is part of the magic. Chef’s Insight: For a deeper chocolate flavor, you can use Double Stuf Oreos, but your mixture will be a bit softer.
- 16 oz (2 blocks) Cream Cheese, softened: This is what transforms crushed cookies into that luscious, creamy, cheesecake-like filling. Pro Tip: Make sure your cream cheese is at room temperature. This is non-negotiable for a smooth, lump-free mixture! If you forget to take it out, you can microwave it for 10-15 seconds on low power.
- 48 oz White Chocolate or Vanilla Candy Melts: This is our ornament’s shiny coat. Substitution Tip: High-quality white chocolate chips will taste amazing but can be trickier to melt smoothly. Candy melts (like Wilton or Merckens) are designed for coating and will give you a perfect, snap-able shell every time. I’m using them here for foolproof success!
- 80 mini Reese’s Peanut Butter Cups: These are the adorable “ornament tops” that also add a fantastic peanut butter surprise. Unwrap them all before you start dipping—it’s a great job for a helper!
- 2 cups Red Licorice Lace (like Twizzlers Pull ‘n’ Peel): Cut into 2-inch strips. This creates the cute little hook for our ornament. If you can’t find red, any color will work!
- 2 tbsp Holiday Nonpareils or Sprinkles: For that festive sparkle. This is where you can really let your personality shine—use your favorite holiday sprinkles!
Let’s Get Rolling: Your Step-by-Step Guide to Truffle Perfection
Okay, team. This is where the fun begins. I’ll walk you through each step with all my favorite little hacks to make this process smooth, fun, and totally stress-free.
Step 1: Create the Truffle Mixture
First, we need to turn those Oreos into a fine, dark sand. You have two great options here. The Food Processor Method is my go-to for speed and consistency. Just toss in the Oreos (in batches if needed) and pulse until you have fine, even crumbs. The Low-Tech Method is just as effective! Place the Oreos in a large, sturdy zip-top bag, press out the air, and seal it. Then, grab a rolling pin and channel any holiday stress into crushing those cookies into a uniform crumb. No big pieces left!
Now, in a large mixing bowl, combine the Oreo crumbs with your softened cream cheese. If you’re adding the peppermint twist, now’s the time for that 1 tsp of peppermint extract. Use a hand mixer or just a sturdy spatula to blend it all together. You’ll know it’s ready when the mixture is completely uniform, dark, and holds together when you pinch it. It should look like a thick, fudgy dough. Chef’s Hack: Scrape down the sides of the bowl a few times to make sure everything is fully incorporated.
Step 2: Shape and Chill
Line a large baking sheet with parchment paper. This is crucial for easy cleanup and preventing sticking. Now, using a small cookie scoop (about 1 teaspoon in size) or a measuring spoon, portion out the mixture. Roll each portion between your palms to form a smooth, round ball. Place each ball on the prepared tray.
Once all the truffles are rolled, pop the entire baking sheet into the freezer for 20-30 minutes. Don’t skip this step! This firming-up stage is what makes dipping them in chocolate so much easier. A firm, cold truffle won’t fall apart in the warm chocolate.
Step 3: Melt the Chocolate Like a Pro
While the truffles are chilling, it’s time to melt your coating. Place your candy melts or white chocolate chips in a microwave-safe bowl. The key to smooth, perfect melting is low and slow. Microwave on high power for 30 seconds, then stop and stir. Even if it doesn’t look melted, stir! Then, microwave for another 30 seconds and stir again. Continue this process in 15-20 second bursts, stirring vigorously each time, until the chocolate is completely smooth and fluid.
Chef’s Hack: If your chocolate seems too thick, you can add a tiny, tiny amount of coconut oil or vegetable shortening (about 1/2 teaspoon at a time) to thin it out to a perfect dipping consistency.
Step 4: The Grand Dip & Decorate
This is the most fun part! Take your truffles out of the freezer. Working with a few at a time (so they stay cold), drop one truffle into the melted chocolate. Use a fork or a dipping tool to gently roll it around until it’s completely coated. Lift it out with the fork, and gently tap the fork on the edge of the bowl to shake off any excess chocolate. This is the secret to a thin, professional-looking shell.
Carefully place the dipped truffle back onto the parchment-lined tray. Now, for the magic—act quickly before the shell sets! Gently press a mini peanut butter cup onto the top to form the ornament cap. Then, take a 2-inch piece of your red licorice lace, fold it into a “J” or hook shape, and tuck it under the front of the peanut butter cup. Finally, while the chocolate is still wet, add a pinch of your festive sprinkles or nonpareils. Repeat with all the truffles!
Step 5: Set, Store, and Celebrate!
Let the truffles sit at room temperature until the chocolate shell is completely firm and hard. This usually takes about 30-60 minutes. If you’re in a hurry, you can pop them in the refrigerator for 15-20 minutes to speed things up. Once set, transfer them to an airtight container. They store beautifully in the refrigerator for up to a week… if they last that long!
How to Serve These Edible Ornaments
Presentation is half the fun! I love arranging these truffles on a large platter or a tiered dessert stand to really show off their adorable ornament shape. For an extra festive touch, line the platter with a piece of burlap or a holiday-themed tea towel to look like tree skirts.
These are the perfect make-ahead dessert for any holiday gathering. They’re a superstar on cookie swap platters, the perfect sweet ending to a Christmas dinner, or a wonderful homemade gift. Package a few in a cute cellophane bag tied with a ribbon, and you’ve got a present that’s straight from the heart (and the kitchen!).
Get Creative! Fun Flavor Twists & Swaps
Once you’ve mastered the classic, the world is your oyster… or should I say, your truffle! Here are a few of my favorite ways to mix things up:
- Peppermint Sparkle: Add 1 tsp of peppermint extract to the Oreo mixture for a refreshing, minty center. For the coating, use crushed candy canes instead of sprinkles for a classic holiday combo.
- Colorful Ornament Ball: Instead of all white chocolate, divide your coating and melt some red and green candy melts too. Dip a third of your truffles in each color for a vibrant, multicolored platter that looks like a box of classic Christmas ornaments.
- Glitter & Gold: For a truly elegant look, skip the sprinkles. After dipping, while the chocolate is still wet, dust the truffles with edible gold or silver dust for a sophisticated shimmer.
- Nut-Free Variation: If you have nut allergies, simply swap the mini Reese’s for another topping. A yellow peanut-shaped candy (like a Mike and Ike) can work, or just use a larger, festive sprinkle or a solid milk chocolate disk.
- Golden Oreo Joy: For a different flavor profile, try using Golden Oreos instead of the classic chocolate ones. You’ll get a blondie-like truffle that’s just as delicious!
Beau’s Chef’s Notes: A Few Parting Thoughts
This recipe has evolved so much since that frantic Christmas Eve. I’ve learned that using a cookie scoop is the real key to uniform truffles—no more lopsided ornaments! I also used to be intimidated by dipping, but the fork-tapping method truly changed the game for me. The biggest evolution, though, has been in the decorations. My kids love helping with this part now, and every year they come up with a new “design.” Some years the ornaments have faces, other years they’re covered in so many sprinkles you can barely see the chocolate. And you know what? Those are always my favorites.
Your Ornament Truffle Questions, Answered!
Let’s tackle a few common questions to ensure your truffle-making is a breeze.
Q: My truffle mixture is too soft/sticky to roll. What did I do wrong?
A: This usually happens if the cream cheese was too warm or if you used Double Stuf Oreos. No worries! Just pop the whole bowl of mixture into the refrigerator for 20-30 minutes to firm up before rolling. You can also lightly dampen your hands with water while rolling to prevent sticking.
Q: Why is my melted chocolate seizing up or getting clumpy?
A> The enemy of melted chocolate is water! Even a single drop can cause it to seize. Make sure your bowl, utensils, and truffles are completely dry. If it does seize, try stirring in a small amount of vegetable oil (a teaspoon at a time) to bring it back. If it’s beyond saving, it’s best to start with a new batch of melts.
Q: Can I make these truffles ahead of time?
A: Absolutely! They are the perfect make-ahead dessert. You can store them in an airtight container in the refrigerator for up to a week, or even freeze them for up to 3 months. Just thaw in the fridge before serving.
Q: My chocolate coating is too thick. How can I thin it out?
A: This is a common issue. Simply add a very small amount of paramount crystals, coconut oil, or vegetable shortening (start with 1/2 teaspoon) to the melted chocolate and stir until smooth. This will thin it to a perfect dipping consistency.
Ornament Oreo Truffles
Description
There’s nothing quite like the smell of chocolate, cookies, and holiday cheer swirling in the kitchen. These Ornament Oreo Truffles are creamy, chocolatey, and perfectly festive—like mini edible ornaments for your holiday spread. The best part? No baking required! With just a few simple ingredients, you can create a treat that will wow your friends, family, and coworkers.
Ingredients
-
80 Oreo cookies, finely crushed (whole cookies, filling included)
-
16 oz (2 blocks) cream cheese, softened
-
48 oz white chocolate or vanilla candy melts
-
80 mini Reese’s Peanut Butter Cups, unwrapped
-
2 cups red licorice lace (like Twizzlers Pull ‘n’ Peel), cut into 2-inch strips
-
2 tbsp holiday nonpareils or sprinkles
-
Optional: 1 tsp peppermint extract for a minty twist
Tips:
-
Room-temperature cream cheese ensures a smooth, lump-free truffle mixture.
-
Candy melts give a perfect, glossy coating that sets nicely.
-
A cookie scoop helps create uniform truffles.
Instructions
1. Make the Truffle Base
-
Crush Oreos into fine crumbs using a food processor or place in a zip-top bag and crush with a rolling pin.
-
In a large bowl, mix Oreo crumbs with cream cheese (and peppermint extract if using) until fully combined. The mixture should hold together when pinched.
2. Shape and Chill
-
Line a baking sheet with parchment paper.
-
Using a small cookie scoop or teaspoon, form balls from the mixture and place them on the sheet.
-
Freeze for 20–30 minutes to firm up.
3. Melt the Chocolate
-
Melt candy melts in a microwave-safe bowl in 30-second intervals, stirring after each interval until smooth.
-
If the chocolate is too thick, add a tiny amount of coconut oil or vegetable shortening (½ tsp at a time) to thin.
4. Dip and Decorate
-
Dip chilled truffles in melted chocolate using a fork or dipping tool. Tap off excess chocolate.
-
Place back on parchment. Press a mini peanut butter cup on top to form the ornament cap.
-
Insert a 2-inch licorice strip under the cup to create a hook.
-
Sprinkle nonpareils on top while chocolate is still wet.
5. Set and Store
-
Let truffles sit until chocolate is firm (30–60 minutes at room temperature).
-
Store in an airtight container in the fridge for up to 1 week or freeze for up to 3 months.
Notes
-
Peppermint Sparkle: Add peppermint extract to the filling; top with crushed candy canes.
-
Colorful Ornaments: Use red and green candy melts for variety.
-
Elegant Touch: Dust truffles with edible gold or silver for a sophisticated look.
-
Nut-Free Option: Replace peanut butter cups with chocolate disks or decorative candies.
Nutrition
- Calories: 120 Cal per truffle
- Sugar: 9g
- Fat: 7g
- Carbohydrates: 12g
Nutritional Information (For Your Info!)
Alright, let’s be real—these are a treat, through and through! But I believe in transparency, so here’s a general breakdown per truffle (approximate, as ingredients can vary). Remember, this is for one truffle from a batch of 80.
Per Truffle: Calories: 120 | Carbohydrates: 12g | Fat: 7g | Sugar: 9g | Protein: 1g
The main thing to know is that these are a rich, indulgent dessert perfect for sharing and savoring. The joy they bring is worth every bite! Enjoy them mindfully as part of your holiday celebrations.
Final Thoughts from My Kitchen to Yours
Well, there you have it, my friends. My ultimate guide to creating these unforgettable Ornament Oreo Truffles. More than just a recipe, this is an invitation to create a little bit of edible magic this holiday season. It’s about the laughter that happens while you’re rolling the balls, the pride you feel when you see that perfect, shiny shell, and the joy of sharing something you made with love.
So don’t stress about perfection. Embrace the fun, maybe get a little messy, and create a treat that’s as full of personality as you are. I can’t wait for you to try them. From my Feastical family to yours, have the happiest, most delicious holiday season!
Let me know in the comments how your truffles turn out! And if you snap a pic, tag me on social @feastical—I love seeing your creations.
Happy Cooking,
Beau
<!– End Final
Christmas Ornament Oreos
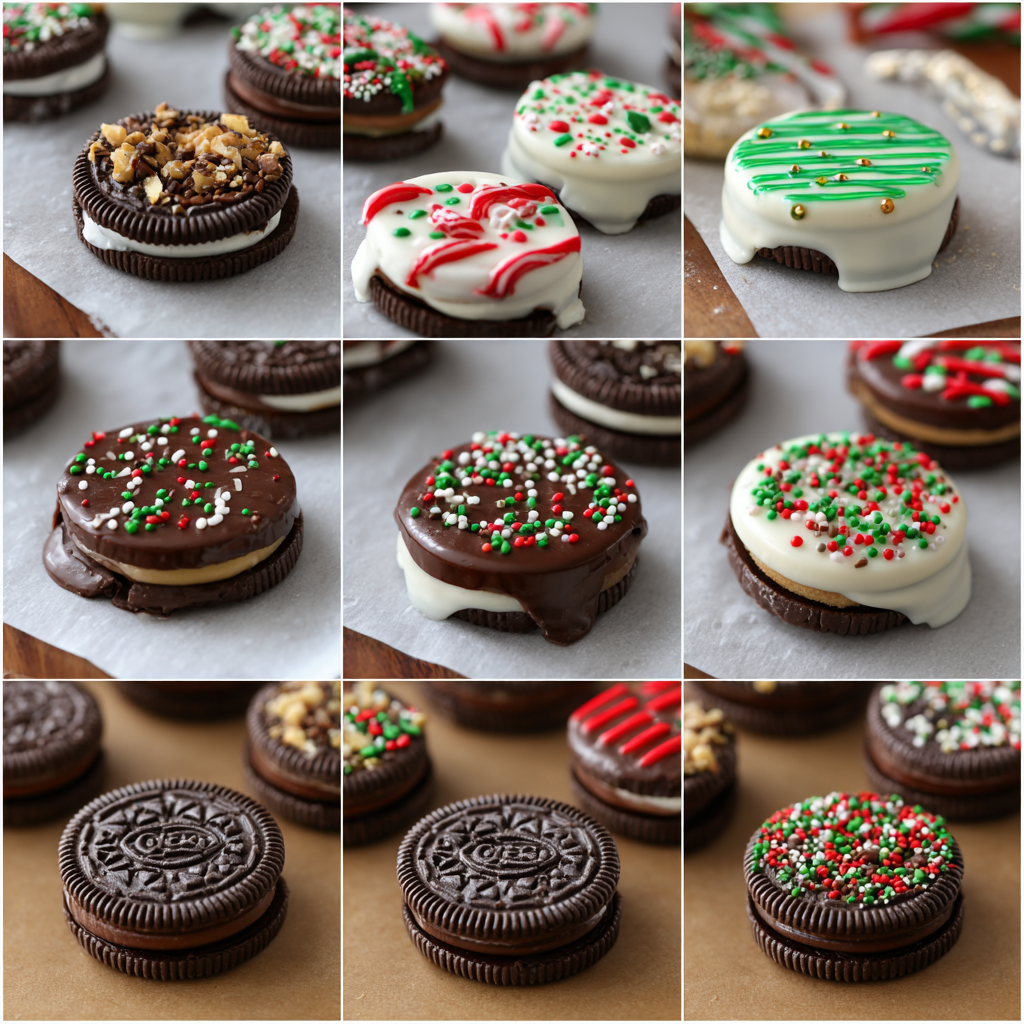
Christmas Ornament Oreos: Your New Favorite No-Bake Holiday Treat!
Hey friends, Beau here! Can you feel it? That crispness in the air, the twinkle of lights starting to appear on houses, the undeniable urge to wear your coziest sweater? That’s right, the holiday season is upon us, and my kitchen is officially buzzing with all the festive, feel-good energy. I live for this time of year—the smells, the sounds, and most importantly, the food that brings everyone together.
But let’s be real for a second. As much as I love spending a whole day crafting intricate, from-scratch cookies, sometimes life has other plans. Between shopping for gifts, hosting family, and trying to actually enjoy the magic of the season, we all need a kitchen shortcut that doesn’t feel like a shortcut. A recipe that delivers maximum wow-factor with minimal fuss. That’s where these unbelievably cute Christmas Ornament Oreos come in.
Imagine this: classic Oreo cookies, dipped in smooth, creamy chocolate and dressed up like little holiday ornaments. They’re fun, festive, and require absolutely zero baking. I’m talking about a project that’s perfect for a solo kitchen session with your favorite holiday playlist or an incredibly fun activity to do with kids. In just about 30 minutes, you can have a platter of edible decorations that look almost too good to eat… almost! So, grab your favorite apron, and let’s turn these simple ingredients into a holiday showstopper that’s sure to become a new tradition.
A Messy Kitchen and a Sweet Memory
This recipe always takes me back to one particularly chaotic, yet wonderful, Christmas Eve at my grandma’s house. I was probably eight years old, and my main job was to stay out of the way of the serious cooks orchestrating the big dinner. But my grandma, being the brilliant woman she was, knew a busy kid is a happy kid. She sat me down at the kitchen table with a box of cookies, some melted chocolate she had leftover from her famous fudge, and every sprinkle and candy decoration she owned.
There was no plan, just pure, unadulterated creativity. I made a glorious mess, creating what I thought were masterpieces. My “ornaments” were lopsided, covered in a thick layer of chocolate, and probably had more sprinkles on the table than on the cookies. But the joy in that process, the feeling of being included in the kitchen magic, has stuck with me forever. These Oreo ornaments are my grown-up, slightly more polished version of that memory. They capture that same spirit of simple, hands-on fun. It’s proof that the best holiday treats aren’t always the most complicated ones—they’re the ones made with a little bit of love and a whole lot of sprinkles.
Gathering Your Ornament-Making Kit
One of the best things about this recipe is how simple the ingredient list is. It’s all about assembly and decoration! Here’s what you’ll need to make about two dozen of these edible ornaments.
- 24 Oreo Cookies: The classic choice! The sturdy construction of an Oreo is perfect for dipping. Feel free to experiment with other flavors—Peppermint Oreos during the holidays are a game-changer!
- 12 oz White Chocolate or Candy Melts: This is your “paint.” I often use candy melts because they’re formulated to melt smoothly and set firmly. White chocolate is delicious, but make sure it’s high-quality to avoid seizing. Chef’s Insight: You can dye white chocolate or light-colored candy melts with gel food coloring to create red, green, or even blue ornaments!
- Holiday Sprinkles and Edible Decorations: This is where your personality shines! Use jimmies, nonpareils, sugar pearls, or even crushed candy canes. Go wild!
- 24 Mini Peanut Butter Cups or Rolos (unwrapped): This is our secret weapon for creating the little “cap” on top of the ornament. Peanut butter cups give a great color contrast, while Rolos offer a caramel-y surprise.
- 1 tbsp Coconut Oil (optional): A little secret for achieving a super-smooth, dippable chocolate. It thins the melted chocolate just enough for a perfect coating. You can use vegetable oil if that’s what you have on hand.
- Optional: Lollipop Sticks or String Licorice: If you want to hang these on your tree (for a very short time, I might add!) or present them as pops, these are essential.
Let’s Build Some Edible Ornaments: A Step-by-Step Guide
Okay, team, it’s go time! This process is so much fun. Clear a little space on your counter, line your baking sheets, and let’s get decorating. I’ll walk you through each step with a few of my favorite kitchen hacks to ensure your ornaments are absolutely flawless.
Step 1: The Melt-Down (The Most Important Step!)
Place your chocolate or candy melts in a microwave-safe bowl. I like to use a deep, narrow bowl—it makes dipping the entire Oreo much easier. Microwave on high for 30 seconds, then stop and stir. Repeat this process, stirring well each time, until the chocolate is completely smooth and liquid. Chef’s Hack: Do NOT be tempted to microwave for a full minute or two straight. This is the #1 way to burn your chocolate and turn it into a grainy, clumpy mess. Patience is key! If you’re using the coconut oil, stir it in now. It will make the chocolate glossier and easier to work with.
Step 2: The Big Dip
Line a baking sheet with parchment paper. This is non-negotiable—it prevents sticking and makes cleanup a breeze. Now, take your first Oreo. If you’re using lollipop sticks, gently twist the cookie apart and press the stick into the filling, then sandwich it back together. For the classic ornament, just hold the cookie by its edges. Submerge it completely into the melted chocolate. Use a fork or a dipping tool to lift it out, gently tapping off any excess chocolate. Chef’s Hack: That tapping motion is crucial for a smooth, even coat without big drips down the side. Place the dipped cookie carefully onto your parchment-lined tray.
Step 3: The Bling Station
This is the fun part, and you have to work relatively quickly before the chocolate sets. Immediately after placing the cookie on the tray, shower it with your chosen sprinkles and decorations. Don’t be shy! This is your chance to make each ornament unique. Want a classic look? A simple line of red sugar pearls does the trick. Feeling festive? Go for a mix of green and red jimmies. Chef’s Hack: If you’re adding larger decorations, like a sugar pearl “bow,” press it on gently with your finger to make sure it adheres.
Step 4: The Finishing Touch (The Ornament Cap)
Before the chocolate fully sets, take one of your mini peanut butter cups or Rolos and press it firmly onto the top center of the Oreo. This creates the iconic metal cap that holds the hook of a real ornament. Press down just enough so it sticks, but not so hard that you crack the cookie underneath. This small detail is what truly sells the “ornament” illusion!
Step 5: The Patience Game
Now, we wait. You can let the ornaments set at room temperature, which might take 20-30 minutes, or you can pop the entire tray into the refrigerator for about 10-15 minutes to speed up the process. The chocolate will become firm to the touch. And just like that, you’re done!
How to Serve Up These Holiday Jewels
Presentation is part of the fun with these treats! You’ve put in the creative work, now let’s show them off.
The most classic way is to arrange them on a festive platter as part of your holiday cookie spread. They add incredible visual interest and are always a conversation starter. For a really stunning effect, stack them in a pyramid or circle on a cake stand.
If you added lollipop sticks, you can stand them up in a mug filled with sugar or candy canes to create an edible centerpiece. For a truly magical touch, tie a short piece of ribbon or string licorice through the “cap” and gently hang a few on your Christmas tree—just make sure you take them down before your guests arrive, or you might find a curious nibbler has taken a bite out of your decoration!
They also make fantastic food gifts. Package a few in a clear cellophane bag tied with a ribbon for a homemade, heartfelt present for teachers, neighbors, or friends.
Mix It Up! 5 Fun Variations to Try
The basic recipe is a blank canvas for your holiday creativity. Once you’ve mastered the classic, try one of these delicious twists!
- The Peppermint Swirl: Use dark chocolate or chocolate candy melts for dipping. Once decorated, drizzle with melted white chocolate and immediately sprinkle with crushed candy canes for a cool, minty flavor.
- Snowy Forest: Dip the Oreos in white chocolate. Before adding the cap, cover the entire top with white sanding sugar or shredded coconut to look like snow. Use a tiny piece of a green fruit roll-up to make a little ribbon loop on the cap.
- Nut-Free Fun: Instead of a peanut butter cup for the cap, use a Rolo, a Hershey’s Kiss, or even a small dollop of hardened chocolate to ensure the treat is safe for everyone.
- Golden Glam: For an elegant, sophisticated look, use golden Oreos and dip them in white or dark chocolate. Decorate with gold sanding sugar and edible gold leaf flakes for a truly luxurious ornament.
- The Grinch: Use green candy melts. After dipping, add a small red heart sprinkle near the bottom. It’s an adorable nod to everyone’s favorite holiday grouch!
Beau’s Chef Notes: Lessons from My Kitchen
This recipe has evolved so much since that first messy Christmas Eve. I’ve learned that the type of chocolate really matters—a good quality melting wafer will save you a lot of headache. I also used to try and decorate with tweezers for “perfection,” but I’ve since learned that the charm of these ornaments is in their slight imperfections. They’re handmade with love, and that’s what makes them special.
One of my favorite kitchen fails was the year I tried to use cheap chocolate chips. Let’s just say I ended up with a bowl of thick, un-dippable cement and a lesson learned! Now, I always keep a bag of good candy melts in the pantry during December, just in case a last-minute baking urge (or a surprise visit from friends) strikes.
FAQs & Troubleshooting: Your Questions, Answered!
Q: My chocolate is thick and clumpy! What did I do wrong?
A: Ah, the dreaded seized chocolate! This usually happens if a tiny drop of water or steam gets into the melting chocolate, or if it’s overheated. To fix it, try stirring in a teaspoon of coconut oil or vegetable shortening. If it’s really bad, it’s often easier to start over. Remember: low and slow when melting!
Q: My decorations are falling off. How can I make them stick?
A: The key is timing! You have to add the sprinkles while the chocolate is still wet and tacky. If you wait too long, they won’t adhere. If you’re finding the chocolate sets too quickly, try working in smaller batches, dipping and decorating 4-5 cookies at a time.
Q: Can I make these ahead of time?
A: Absolutely! These are a great make-ahead treat. Once set, store them in a single layer in an airtight container at room temperature for up to 5 days. You can also separate layers with parchment paper. I don’t recommend freezing them, as the condensation when they thaw can make the decorations soggy.
Q: Are there any other cookies I can use besides Oreos?
A> For sure! Any similarly sturdy sandwich cookie will work. I’ve had great success with Nutter Butters (they look like little gifts!) and even some store-brand chocolate sandwich cookies. Just make sure they’re firm enough to handle the dipping process without breaking.

Christmas Ornament Oreos
Description
Christmas Ornament Oreos
Ingredients
-
24 Oreo cookies (any flavor)
-
12 oz white chocolate or candy melts (red, green, or dyed with gel food coloring)
-
1 tbsp coconut oil (optional, for smoother coating)
-
Holiday sprinkles & edible decorations
-
24 mini peanut butter cups or Rolos (for ornament “caps”)
-
Optional: lollipop sticks or string licorice (for pops or hanging)
Instructions
-
Melt Chocolate
-
Place chocolate/candy melts in a microwave-safe bowl. Heat in 30-second bursts, stirring until smooth. Stir in coconut oil if using.
-
-
Dip Cookies
-
Line a baking sheet with parchment.
-
Dip each Oreo fully into melted chocolate, using a fork to lift and tap off excess. Place on tray.
-
-
Decorate
-
While chocolate is still wet, add sprinkles, sugar pearls, or crushed candy canes. Press larger decorations gently so they stick.
-
-
Add Ornament Cap
-
Immediately press a mini peanut butter cup or Rolo onto the top center of each Oreo to create the ornament “cap.”
-
-
Set
-
Let sit at room temp 20–30 minutes or refrigerate 10–15 minutes until firm.
-
Notes
-
Snowy Forest: White chocolate + shredded coconut or sanding sugar.
-
Nut-Free: Use Rolos, Kisses, or a dollop of chocolate instead of peanut butter cups.
-
Golden Glam: Golden Oreos + white/dark chocolate + gold sanding sugar.
-
Grinch: Green candy melts + red heart sprinkle.
Nutrition
- Calories: 170 calories per cookie
- Sugar: 15g
- Fat: 9g
- Carbohydrates: 20g
Nutritional Info (Approximate)
Let’s be real—these are a holiday treat, a celebration in cookie form! But it’s always good to know what you’re enjoying. The nutritional information below is per cookie ornament, assuming you get 24 from the recipe. Remember, these are estimates and can vary based on the specific brands of ingredients you use.
Per Cookie: Calories: 170 | Carbohydrates: 20g | Fat: 9g | Sugar: 15g | Protein: 2g
These are a fun, indulgent dessert perfect for sharing. The joy they bring is worth every delicious bite!
Final Thoughts: The Joy of Simple Traditions
Well, friends, there you have it. A recipe that’s less about precision and more about joy. These Christmas Ornament Oreos are proof that you don’t need to be a professional pastry chef to create something truly special and memorable for the holidays. They’re about the experience—the laughter, the sprinkles on the floor, the pride of creating something beautiful with your own two hands.
I hope this recipe brings as much light and happiness to your kitchen as it has to mine. So from my Feastical family to yours, I wish you the happiest of holidays filled with good food, great company, and maybe a few edible ornaments. Now, go forth and create!
Don’t forget to tag me @Feastical on social media if you make them—I love seeing your creations!
Happy cooking,
Homemade Pistachio Cream
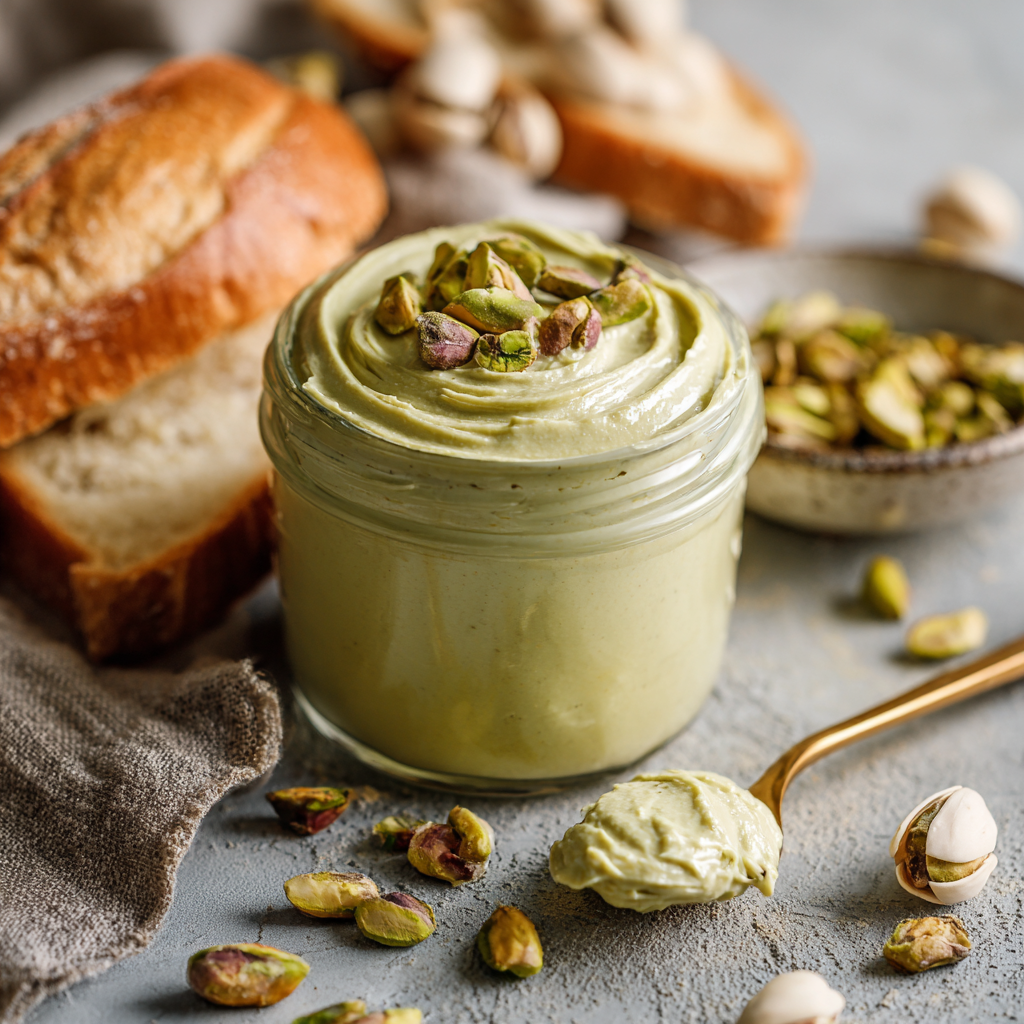
Forget the Jar: This Homemade Pistachio Cream is Your New Kitchen Obsession
Hey friends, Beau here! Let’s talk about one of life’s simple, soul-soothing pleasures: finding that perfect something in your pantry that can turn a boring Tuesday into a tiny celebration. For me, that magic potion is a jar of homemade pistachio cream. Imagine the richest, smoothest, most nutty and indulgent spread you can think of, but made by you, with love, in your own kitchen. That’s what we’re diving into today.
If you’ve ever swooned over a pistachio croissant from a fancy bakery or wondered how to get that vibrant green goodness into your morning routine, you’ve come to the right place. This isn’t just a recipe; it’s a game-changer. We’re taking beautiful, whole pistachios and transforming them into a velvety, lightly sweet cream that’s perfect on toast, swirled into yogurt, dolloped on pancakes, or, let’s be real, eaten straight from the spoon with zero shame.
The best part? It’s deceptively easy. You don’t need any fancy equipment—just a good food processor and a little patience for blending. We’re using real ingredients you can feel good about, with no mysterious additives. So, if you’re ready to impress yourself and absolutely everyone you decide to share it with (which, trust me, will be a tough decision), grab your favorite apron. We’re about to make your kitchen smell like a dream.
A Spoonful of Sicily: The Moment I Fell in Love
I’ll never forget the first time I truly *met* pistachio cream. I was wandering through a sun-drenched market in a tiny Sicilian town, the air thick with the smell of fresh bread and salty sea air. A baker with a kind smile and flour-dusted hands handed me a warm, flaky cornetto. I took a bite, and time just stopped. It wasn’t just a pastry; it was an experience. The filling was this impossibly smooth, intensely nutty, and not-too-sweet cream that tasted purely of pistachios. It was a world away from anything I’d ever had from a store.
I must have looked utterly blissful because the baker laughed and simply said, “Pistacchio di Bronte,” with a knowing nod. That moment cemented it for me: real food, made with passion and incredible ingredients, has the power to create core memories. This recipe is my attempt to bottle a little bit of that Sicilian sunshine and bring it to your kitchen. Every time I make a batch, I’m transported right back to that market stall, and I hope it brings a little bit of that joy to your table, too.
Gathering Your Green Gold: The Ingredients
This recipe is all about simplicity and quality. Here’s what you’ll need to create your own jar of liquid gold. Don’t just think of this as a shopping list—think of it as your flavor blueprint!
- 16 oz (450g) Shelled Pistachios: This is the star of the show! I recommend using raw, unsalted pistachios. You’ll be boiling them, which softens them and makes peeling easier. Using already-roasted and salted nuts can throw off the final flavor and make it too salty. Chef’s Insight: If you can find them, pistachios from Bronte, Sicily are the absolute gold standard, but any good-quality raw pistachio will work beautifully.
- ¾ Cup Milk (Divided): We’ll use this in two parts. The first bit helps the pistachios break down into a paste, and the rest gets melted with the chocolate for a creamy base. Whole milk will give you the richest result, but 2% works just fine. For a dairy-free version, oat milk or almond milk are fantastic substitutes.
- 4 oz White Chocolate, Chopped: This is our secret weapon for sweetness and an unbelievably smooth texture. The cocoa butter in the chocolate helps emulsify the cream, making it luxuriously spreadable. Substitution Tip: Look for a good-quality baking bar instead of chips, which often have stabilizers that can hinder melting. If you’re not a white chocolate fan, you can use the same amount of high-quality milk chocolate.
- ¾ Cup Powdered Sugar: Also called confectioner’s sugar. Its fine texture dissolves instantly into our cream, preventing any graininess. It also gives us that perfect level of sweetness without being overpowering. You can adjust this amount up or down by a quarter cup based on your preference.
- 2 Tbsp Unsalted Butter: A little bit of fat goes a long way in enriching the flavor and adding a lovely sheen. Using unsalted butter lets us control the salt level perfectly. For a dairy-free cream, you can substitute with coconut oil.
The Fun Part: Let’s Make Some Magic!
Okay, team, let’s fire up the food processor! This process is simple, but a few pro-tips along the way will ensure you get that restaurant-quality smoothness. Read through the steps once before you begin—it’s a smooth ride to pistachio paradise.
- Boil & Peel the Pistachios: Bring a medium pot of water to a rolling boil. Add your shelled pistachios and let them boil for exactly 5 minutes. This step is crucial—it softens the nuts and, more importantly, loosens those thin, bitter skins. Drain them immediately and spread them out on a clean kitchen towel. Chef’s Hack: Once they’re cool enough to handle, gather the corners of the towel and rub the pistachios vigorously inside the towel. You’ll be amazed at how most of the skins just slip right off! Don’t worry about getting every single one; 90% peeled is perfect.
- Blend the Pistachio Paste: Toss your peeled pistachios into the bowl of a food processor. Add that first ¼ cup of milk. Now, here’s where patience is your best friend. Pulse a few times to break up the nuts, then let the processor run for a good 3-5 minutes. It will go from crumbly, to a thick ball, and finally, to a smooth, thick paste. Stop and scrape down the sides a few times to ensure everything gets evenly blended. Little Kitchen Story: The first time I did this, I almost gave up during the “thick ball” phase—it looks like it’s not working! But trust the process. Keep blending until it becomes noticeably smoother and oilier.
- Make the Creamy Base: While your food processor is doing its thing (or right after), grab a small saucepan. Melt the butter over low heat. Once melted, add the remaining ½ cup of milk and your chopped white chocolate. Keep the heat low and stir continuously with a whisk or spatula until the chocolate is completely melted and the mixture is smooth and uniform. Take it off the heat the second it’s smooth—we don’t want to scorch the chocolate!
- The Grand Finale: Combine & Final Blend: With the food processor running, carefully pour the warm chocolate and milk mixture through the feed tube into the pistachio paste. Let it blend for a minute to incorporate. Then, add the powdered sugar. Now, let it rip for another 2-3 minutes. You’re watching the magic happen as it transforms into a beautifully smooth, pale green cream. Pro-Tip: If you want an ultra-silky texture, you can strain the cream through a fine-mesh sieve at this point to catch any stubborn nut bits, but I usually love the tiny bit of texture.
- Chill & Store: Scoop your glorious homemade pistachio cream into a clean jar or airtight container. It will be somewhat liquid now but will thicken up beautifully as it chills in the refrigerator. Let it set for at least 2 hours, preferably overnight, before diving in.
How to Serve Your Masterpiece
Okay, the hard part is over (wait, was any of it really hard?). Now for the best part: eating it! This cream is incredibly versatile. Here are a few of my favorite ways to enjoy it:
- The Classic: Slather it generously on warm, crusty toast or a flaky croissant. This is breakfast heaven.
- The Dessert Dream: Use it as a filling for macarons, thumbprint cookies, or layer it in a parfait with berries and whipped cream.
- The Sweet Dip: Serve it in a small bowl alongside a platter of fresh fruit like apple slices, strawberries, and bananas for an easy, elegant dessert.
- The Secret Weapon: Swirl a big spoonful into your morning oatmeal or Greek yogurt. It instantly elevates your bowl from basic to brilliant.
- The Honest Approach: Grab a spoon. Stand in front of the fridge. Enjoy. No judgment here.
Make It Your Own: Delicious Recipe Variations
Once you’ve mastered the base recipe, the world is your pistachio-filled oyster! Get creative and try one of these fun twists:
- Citrus Zest Boost: Add the finely grated zest of one orange or a small lemon to the food processor during the final blend. The bright citrus cuts through the richness beautifully.
- Boozy Adult Version: For a sophisticated twist, add a tablespoon of amaretto, Frangelico, or even a dark rum along with the powdered sugar. It adds a wonderful depth of flavor.
- Dairy-Free/Vegan Delight: It’s easy! Use oat milk or almond milk, dairy-free white chocolate, and substitute the butter with coconut oil. You’ve got an incredible plant-based spread.
- Spiced Pistachio Cream: Warm spices are a match made in heaven for nuts. Add a half teaspoon of cardamom or a pinch of cinnamon along with the powdered sugar.
- Extra Nutty Crunch: Fold in ¼ cup of finely chopped pistachios after blending for a cream with a delightful texture.
Beau’s Chef Notes: A Few Parting Thoughts
This recipe has evolved in my kitchen over the years. The first time I tried to make it, I mistakenly used salted pistachios and it was… an experience. A very, very salty experience! That’s how I learned the importance of starting with a blank canvas (aka raw, unsalted nuts). I’ve also found that the quality of your food processor makes a difference. If you have a high-powered one, you’ll get a smoother cream faster. If you have a standard model, just be patient and give it those extra few minutes—it will get there!
This cream also makes for the most thoughtful homemade gift. Pour it into a cute little jar, tie a ribbon around it, and you’ve got a present that says, “I think you’re awesome” in the most delicious way possible. I love hearing how you guys make it your own, so be sure to tag @Feastical when you post your creations!
Your Questions, Answered: FAQs & Troubleshooting
Q: My cream is a bit gritty, not super smooth. What did I do wrong?
A: This is usually one of two things. First, you might not have blended it long enough. Pistachios need time to release their oils and become paste-like. Second, it could be your food processor. If it’s not super high-powered, don’t worry! Just blend for a few minutes longer, stopping to scrape down the sides. You can also try straining it through a sieve for absolute silkiness.
Q: How long does this pistachio cream last in the fridge?
A: Stored in an airtight container, it will keep beautifully for up to 2 weeks. The fat content helps preserve it. Always use a clean spoon when dipping in to prevent contamination.
Q: Can I freeze it?
A: Absolutely! It freezes wonderfully for up to 3 months. Thaw it overnight in the refrigerator before using. This is a great trick for making a big batch to have on hand for unexpected guests (or unexpected cravings).
Q: The color isn’t as vibrant green as I expected. Why?
A> The vibrant green you see in some commercial products often comes from added colorings. Our homemade version gets its color purely from the pistachios themselves, which can vary in hue. It will be a lovely, natural pale green. If you want to boost the color naturally, a tiny, tiny pinch of matcha powder blended in can do the trick without affecting flavor.

Homemade Pistachio Cream
Description
Homemade Pistachio Cream
Ingredients
-
16 oz (450 g) raw, unsalted shelled pistachios
-
¾ cup milk, divided (whole or 2%; oat/almond milk for dairy-free)
-
4 oz white chocolate, chopped (good-quality baking bar)
-
¾ cup powdered sugar
-
2 tbsp unsalted butter (or coconut oil for dairy-free)
Instructions
-
Boil & Peel Pistachios
-
Boil pistachios in water for 5 minutes. Drain.
-
Rub in a kitchen towel to remove most skins (90% peeled is fine).
-
-
Blend Pistachio Paste
-
In a food processor, add peeled pistachios + ¼ cup milk.
-
Blend 3–5 minutes, scraping sides, until smooth paste forms.
-
-
Make Creamy Base
-
In a saucepan, melt butter over low heat.
-
Stir in remaining ½ cup milk + chopped white chocolate until smooth. Remove from heat.
-
-
Combine
-
With processor running, pour in the warm chocolate-milk mixture.
-
Add powdered sugar. Blend 2–3 minutes until creamy and pale green.
-
(Optional: Strain through fine sieve for ultra-smooth texture.)
-
-
Chill & Store
-
Transfer to a jar. Chill at least 2 hours to thicken.
-
Keeps in fridge up to 2 weeks. Freeze up to 3 months.
-
Notes
-
Citrus Zest: Add zest of 1 orange or lemon
-
Boozy Twist: Stir in 1 tbsp amaretto, Frangelico, or dark rum
-
Dairy-Free: Use plant-based milk, dairy-free chocolate, and coconut oil
-
Spiced: Add ½ tsp cardamom or pinch of cinnamon
-
Nutty Crunch: Fold in ¼ cup finely chopped pistachios after blending
Nutrition
- Calories: 180 calories per 2 tbsp,
- Sugar: 10g
- Fat: 12g
- Carbohydrates: 14g
- Protein: 4g
A Quick Note on Nutrition
While this is certainly a treat, it’s made with real, whole ingredients, which is something to feel good about! Pistachios are a nutritional powerhouse, packed with protein, healthy fats, fiber, and antioxidants. They’re great for heart health. Because we’re controlling the sugar, this version is likely less sweet than anything you’d buy at the store. A little goes a long way in adding flavor and satisfaction to your meals. As with all good things, enjoy it mindfully as part of a balanced diet!
Per Serving (approximately 2 tbsp): Calories: 180, Protein: 4g, Carbohydrates: 14g, Sugars: 10g, Fat: 12g, Fiber: 2g
Final Thoughts from My Kitchen to Yours
Well, there you have it, my friends—your ticket to pistachio cream bliss. This recipe is a perfect example of what Feastical is all about: taking something that seems fancy or store-bought and showing you just how simple and satisfying it can be to create it yourself. The process is fun, the result is incredibly impressive, and the taste… well, the taste is pure joy.
I hope this recipe brings a little bit of that Sicilian sunshine into your home and gives you the confidence to keep playing in the kitchen. Remember, the best meals and the best memories are often made with a dash of curiosity and a whole lot of heart. Now, go forth and spread the pistachio love! And as always, happy cooking!
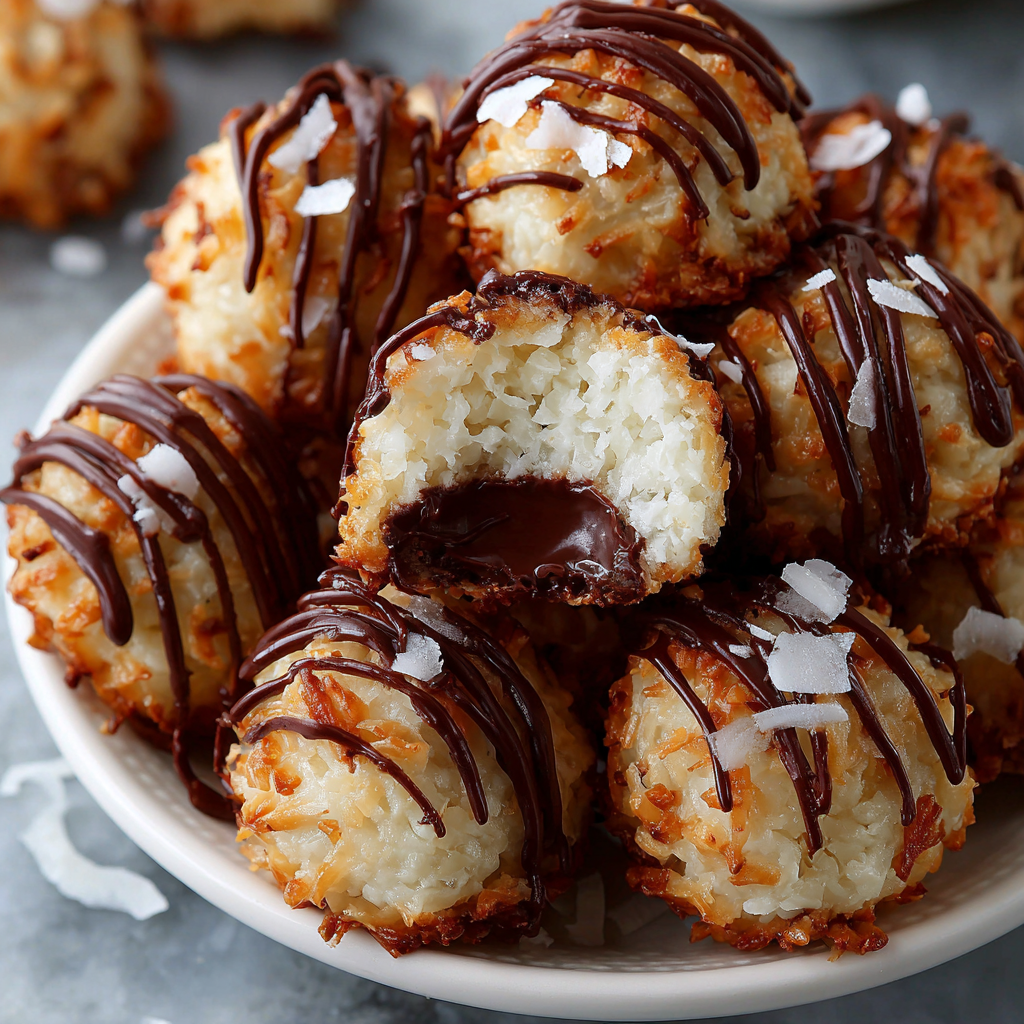
Coconut Cookie Balls with Chocolate Centers
Your New Favorite No-Bake Bite: Coconut Cookie Balls with a Chocolatey Secret
Hey friends, Beau here! Tell me if this sounds familiar: you’re craving something sweet, something that feels a little fancy, but the thought of preheating the oven, sifting flour, and cleaning a mountain of bowls just feels… exhausting. I get it. Some of the best moments in life happen when you’re not sweating over a hot stove, but simply mixing, rolling, and laughing in the kitchen.
That’s exactly why I’m so excited to share this recipe with you today. These Coconut Cookie Balls with Chocolate Centers are my go-to when I need a dose of pure, uncomplicated joy. We’re talking chewy, sweet coconut hugging a core of smooth, melted dark chocolate. They’re like a sophisticated snowball with a delicious secret at its heart. The best part? They’re no-bake, which means they come together in under an hour with minimal fuss.
Whether you’re prepping for a holiday cookie swap, need a stunning dessert for a potluck, or just want to treat yourself after a long day, these little bites deliver big on flavor without demanding a lot of your time or energy. They’re proof that the most magical recipes are often the simplest. So, let’s ditch the complicated techniques and dive into creating something truly special. Get ready to fall in love with your new favorite treat!
A Sweet Memory: Where It All Began
This recipe takes me right back to my grandma’s kitchen, a place that always smelled like vanilla and warm sugar. She wasn’t a fancy pastry chef, but she was a wizard with a can of sweetened condensed milk and a bag of coconut. Her version of these was simpler—just the coconut mixture rolled into mounds—but they were legendary in our family.
One rainy afternoon, I was helping her make a batch when I decided to get “creative.” I sneakily tucked a few chocolate chips into the center of my coconut balls before she could notice. When we taste-tested them, her eyes lit up. “Beau Collier,” she said, wiping a smudge of chocolate from my cheek, “you’ve just invented something spectacular.” That tiny act of kitchen rebellion became our signature twist, a little secret we shared every time we baked together. Now, whenever I make these, I’m not just making cookies; I’m sharing a piece of that warm, happy memory with all of you.
Gathering Your Ingredients: A Chef’s Walk-Through
Part of what makes this recipe so wonderful is its simplicity. You only need a handful of pantry staples to create pure magic. Let’s talk about each one and why it’s important.
For the Coconut Mixture:
- 3 cups sweetened shredded coconut: This is the star of the show! It gives our balls that iconic chewy texture and sweet, tropical flavor. Chef’s Insight: I prefer shredded over desiccated coconut here because it has more moisture and creates a better chew. If you only have unsweetened, you may want to add an extra tablespoon or two of condensed milk to balance the sweetness.
- 1 cup sweetened condensed milk: This is the glue that holds everything together and adds that irreplaceable creamy sweetness. Substitution Tip: For a dairy-free version, coconut cream (the thick part from a can of full-fat coconut milk) can work, but the texture will be less firm. You might need to add a bit more coconut to compensate.
- 1 tsp pure vanilla extract: A splash of vanilla enhances all the other flavors and adds a warm, aromatic depth. Always go for pure vanilla if you can—it makes a world of difference!
- ¼ tsp salt: Don’t skip this! Salt is the secret weapon that cuts the sweetness and makes the coconut and chocolate flavors pop. It’s the difference between “sweet” and “complex and delicious.”
For the Chocolate Filling & Drizzle:
- 1 ½ cups dark chocolate chips (divided): We use dark chocolate for its rich, slightly bitter flavor that perfectly balances the sweet coconut. Chef’s Insight: The quality of your chocolate matters! I like using chips with around 60% cacao. Feel free to use semi-sweet or milk chocolate if that’s more your style.
- 2 tbsp heavy cream: When melted with the chocolate, this creates a smooth, ganache-like center that stays soft and fudgy when chilled. Substitution Tip: Whole milk or even a plant-based creamer can work in a pinch.
- 1 tbsp coconut oil: This is just for the drizzle. It thins the melted chocolate, making it easy to drizzle and giving it a beautiful, glossy finish as it sets.
Let’s Get Rolling: Your Step-by-Step Guide
Alright, team, it’s action time! This process is more fun than fiddly. Put on some music, and let’s create some deliciousness.
- Make the Chocolate Filling: In a microwave-safe bowl, combine 1 cup of the dark chocolate chips and the 2 tablespoons of heavy cream. Microwave in 20-second bursts, stirring well after each burst, until the chocolate is completely melted and smooth. Chef’s Hack: Resist the urge to microwave it all at once! Slow and steady prevents the chocolate from seizing and becoming grainy. Once smooth, pop the bowl into the refrigerator for about 15 minutes. This firms it up just enough so we can roll it.
- Form the Chocolate Centers: After chilling, the chocolate mixture should be like a soft, pliable fudge. Use a small spoon or a melon baller to scoop out tiny amounts and roll them between your palms to form 24 small balls, about the size of a large pea. Place them on a parchment-lined plate or baking sheet and stick them in the freezer for a solid 10 minutes. Chef’s Tip: This quick freeze is crucial! It prevents the chocolate from melting into the coconut when we assemble the balls.
- Create the Coconut Mixture: While the chocolate chills, grab a large mixing bowl. Add the shredded coconut, sweetened condensed milk, vanilla extract, and salt. Mix it all together with a spatula or your hands until it’s fully combined. You’ll have a sticky, cohesive, and wonderfully fragrant mixture.
- The Grand Assembly: This is the fun part! Take about one tablespoon of the coconut mixture and flatten it in the palm of your hand. Place one of your firm, frozen chocolate balls right in the center. Now, gently wrap the coconut mixture around the chocolate, sealing it completely. Roll it between your palms to form a perfect, smooth sphere. If the mixture is sticking to your hands, a quick tip: lightly dampen your palms with water. It works like a charm! Repeat until all the coconut and chocolate centers are used up.
- The Final Chill: Place all your beautifully formed coconut balls on a parchment-lined tray and refrigerate them for at least 20-30 minutes. This step allows them to firm up and hold their shape perfectly.
- The Glamorous Drizzle: For the finishing touch, melt the remaining ½ cup of chocolate chips with the tablespoon of coconut oil using the same gentle microwave method. Once smooth, transfer it to a small zip-top bag, snip off a tiny corner, and drizzle artistically over your chilled coconut balls. Or, just use a spoon for a more rustic look! Let the drizzle set in the fridge for another 5-10 minutes.
How to Serve These Little Beauties
Presentation is part of the fun! These cookie balls look like they came from a fancy bakery with almost zero effort. I love arranging them on a simple white platter or a rustic wooden board. For a party, place them in pretty paper liners to make them easy to grab. They’re fantastic with a cup of strong coffee, a glass of cold milk, or even a dessert wine. They also make incredible homemade gifts. Tuck a dozen into a cute cellophane bag tied with a ribbon, and you’ve got a present that’s guaranteed to make someone’s day.
Get Creative: Fun Flavor Twists
Once you’ve mastered the classic, the kitchen playground opens up! Here are a few of my favorite ways to mix things up:
- Almond Joy Vibe: Add ½ teaspoon of almond extract to the coconut mixture and replace the dark chocolate center with a whole, roasted almond. Instant candy bar upgrade!
- Tropical Escape: Mix 2-3 tablespoons of finely chopped dried pineapple or mango into the coconut mixture. It adds a lovely chewy texture and a burst of tropical sunshine.
- Mint Chocolate Delight: Add a drop or two of peppermint extract (be careful, it’s potent!) to the chocolate filling. It’s like a refreshing, no-bake Thin Mint.
- Cookie Dough Dream: For the ultimate treat, replace the chocolate ganache center with a small ball of edible chocolate chip cookie dough. Just ensure you’re using a recipe meant to be eaten raw!
- Rolled in Style: After forming the balls, instead of just the chocolate drizzle, try rolling them in a light coating of crushed pistachios, toasted coconut, or even a dusting of cocoa powder for extra flair.
Beau’s Kitchen Notes & Stories
This recipe has been a work in progress for years. My grandma’s original was a bit crumbly, so I found that the specific ratio of coconut to condensed milk is key—too much milk and they’re sticky; too little and they won’t hold together. The chocolate center was my “aha!” moment, but the drizzle was a happy accident one day when I had leftover melted chocolate. I love how recipes evolve like that!
A funny story: I once brought these to a party and a friend, trying to be polite, asked if they were “arancini” (those fancy Italian rice balls). I just smiled and said, “Sort of, but sweeter.” He took one bite and his eyes went wide. “These are the best arancini I’ve ever had!” he declared. We still laugh about it. So, feel free to call them Sweet Coconut Arancini if you’re feeling fancy!
Your Questions, Answered!
Q: My coconut mixture is too sticky to handle. What did I do wrong?
A: Don’t worry! This usually means your condensed milk was a bit generous or your coconut was extra fine. The fix is easy: just add a little more shredded coconut, a tablespoon at a time, until the mixture is less sticky. And remember, damp hands are your best friend for rolling!
Q: Can I make these ahead of time?
A: Absolutely! These are perfect for making ahead. They keep beautifully in an airtight container in the refrigerator for up to a week. You can also freeze them (without the drizzle) for up to 3 months. Just thaw in the fridge and add the drizzle before serving.
Q: Why did my melted chocolate for the filling become thick and grainy?
A: That means it “seized,” which usually happens if a tiny bit of steam or water gets into the chocolate. To avoid this, ensure your bowl and utensils are completely dry. If it happens, you can sometimes save it by vigorously stirring in a teaspoon of warm coconut oil or vegetable oil until it smooths out again.
Q: Are there any nut-free options for rolling?
A> For sure! Instead of rolling in crushed nuts, try toasted shredded coconut, crushed freeze-dried raspberries for a tangy punch, or even a light roll in colorful sprinkles for a festive look.

Coconut Cookie Balls with Chocolate Centers
Description
Coconut Cookie Balls with a Chocolatey Secret
Ingredients
For the Coconut Mixture
-
3 cups sweetened shredded coconut
-
1 cup sweetened condensed milk
-
1 tsp pure vanilla extract
-
¼ tsp salt
For the Chocolate Filling & Drizzle
-
1 ½ cups dark chocolate chips, divided
-
2 tbsp heavy cream
-
1 tbsp coconut oil
Instructions
-
Make Chocolate Filling: Melt 1 cup chocolate chips with heavy cream in 20-second microwave bursts, stirring until smooth. Chill 15 minutes until fudge-like.
-
Form Centers: Scoop into ~24 small balls (pea-sized). Freeze 10 minutes.
-
Mix Coconut Base: In a bowl, combine coconut, condensed milk, vanilla, and salt until sticky and cohesive.
-
Assemble: Flatten 1 tbsp coconut mixture in your palm, place a frozen chocolate ball in the center, and wrap coconut around it. Roll into smooth balls. Repeat.
-
Chill: Place on a parchment-lined tray and refrigerate 20–30 minutes.
-
Drizzle: Melt remaining ½ cup chocolate chips with coconut oil. Drizzle over chilled balls. Chill another 5–10 minutes to set.
Notes
-
Serve on a platter, in paper liners, or pack into gift bags/tins.
-
Store in the fridge up to 1 week, or freeze (without drizzle) up to 3 months.
Nutrition
- Calories: 90 calories (per ball
- Sugar: 7g
- Fat: 6g
- Carbohydrates: 9g
A Quick Note on Nutrition
While these are definitely a treat, it’s good to know what you’re enjoying! The nutritional info is per ball (based on 24 balls). They’re energy-dense thanks to the healthy fats in the coconut and the carbohydrates from the sugar. The dark chocolate adds a touch of antioxidants. As with all good things, enjoying them in moderation is the key to a happy balance. If you have specific dietary needs, remember the substitution tips above—like using dairy-free chocolate and coconut cream to make them vegan-friendly!
Approximate Nutrition Per Ball: Calories: 90 | Carbohydrates: 9g | Fat: 6g | Sugar: 7g | Protein: 1g
Final Thoughts from My Kitchen to Yours
Well, there you have it! My beloved Coconut Cookie Balls with Chocolate Centers. I hope this recipe brings as much happiness to your kitchen as it has to mine. It’s more than just a list of ingredients and steps; it’s an invitation to slow down, get your hands a little messy, and create something beautiful and delicious from the heart.
Remember, cooking is an adventure. Don’t be afraid to put your own spin on it. Maybe you’ll discover a new favorite variation that becomes your signature. I’d love to hear how it goes! Tag me on social @Feastical or leave a comment on the blog with your creations and stories.
Now, go grab that can of condensed milk and get rolling! Happy cooking, friends.
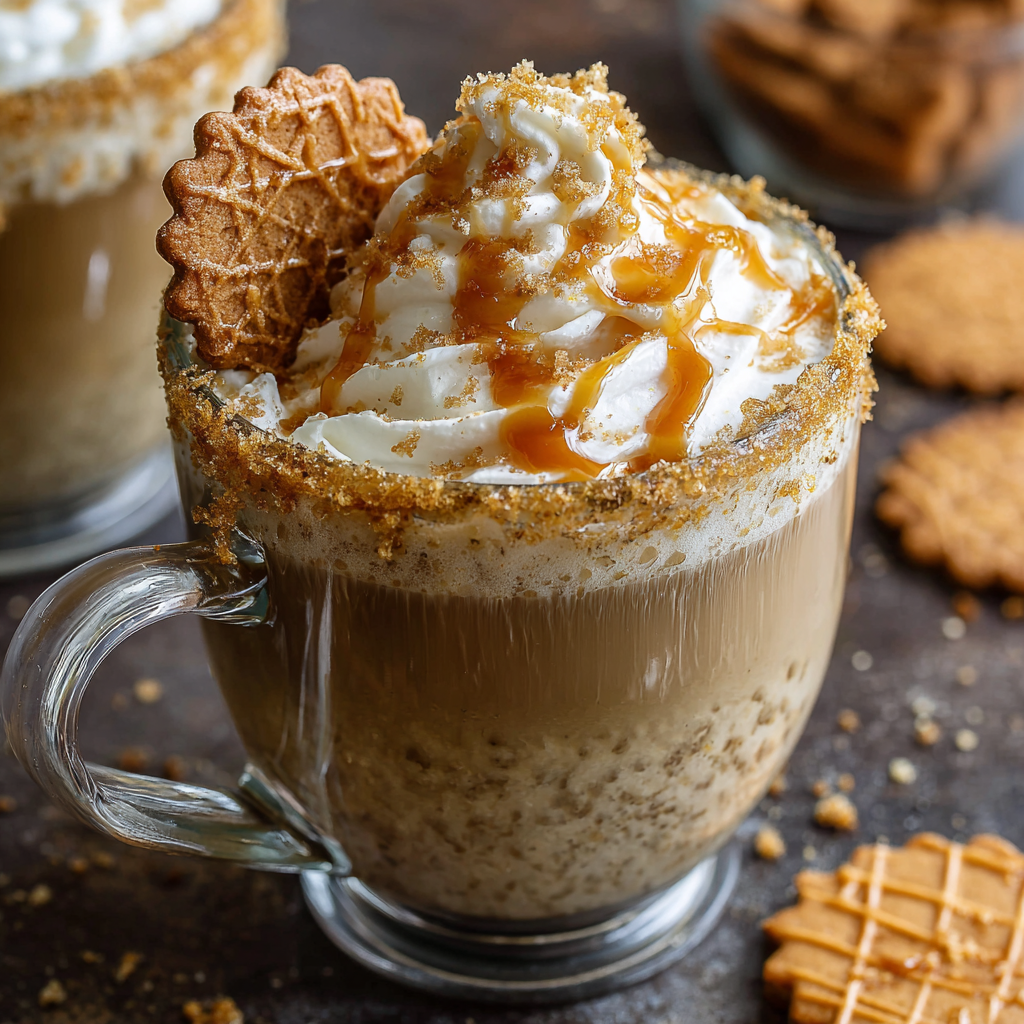
Slow Cooker Gingerbread Lattes
Your New Favorite Holiday Tradition: Slow Cooker Gingerbread Lattes
Hey there, friend! Beau from Feastical here. Can you smell it? That magical moment when you step into a cozy coffee shop in December, and the air is thick with the scent of pine, cinnamon, and sweet, spiced gingerbread? It’s pure holiday magic in a cup. But what if I told you we could bottle up that exact feeling and have it simmering away in your own kitchen, filling your entire home with that warm, welcoming aroma, without you having to put on real pants or brave the holiday mall traffic?
That’s the beauty of this Slow Cooker Gingerbread Latte. This isn’t just a drink; it’s an experience. It’s your secret weapon for festive mornings, your go-to for effortless holiday entertaining, and the ultimate hug in a mug for a quiet evening by the tree. We’re taking all the classic, soul-warming flavors of gingerbread—the deep molasses, the rich brown sugar, the kick of ginger, and the warmth of cinnamon and cloves—and we’re letting our trusty slow cooker do all the work.
Imagine this: you have friends dropping by. Instead of scrambling to make individual coffees, you simply lift the lid of your slow cooker and ladle out mugs of creamy, perfectly spiced latte for everyone. Or picture a slow Saturday morning in December. You pad into the kitchen, pour yourself a cup of this liquid comfort, and let the festive spirit wash over you. It’s simple, soulful, and incredibly satisfying. So, let’s ditch the single-serve lines and create some real, shareable holiday cheer. Grab your favorite mug, and let’s make some magic together.
A Gingerbread Latte Memory: More Than Just a Drink
This recipe takes me right back to my first apartment after college. My kitchen was about the size of a postage stamp, and my culinary skills were, let’s say, a work in progress. But when the holidays rolled around, I wanted to host something, to create that feeling of home I missed. I decided on a casual open house, but I had a panic attack thinking about how I’d afford to make fancy drinks for everyone.
Then I remembered my mom’s slow cooker, a housewarming gift I’d barely used. I thought, “What if I just… dump everything in there?” I threw in coffee, milk, and every spice I had in the cupboard. It was a gamble. But when my friends started arriving, the entire apartment smelled like a gingerbread bakery. That big, clunky slow cooker became the heart of the party. We stood around it, ladling steaming mugs, laughing, and feeling genuinely connected. It wasn’t about the perfect foam or barista art; it was about the warmth, the shared experience, and the incredible aroma that made my tiny apartment feel like the coziest place on earth. That’s the spirit I’ve baked into this recipe—it’s about bringing people together.
Gathering Your Gingerbread Latte Ingredients
Here’s the lineup for our holiday superstar. The beauty of this is that you probably have most of this in your pantry right now! I’ve included some little chef insights and swaps to make this recipe truly yours.
- 6 cups Whole Milk: Whole milk gives us that rich, creamy base that makes a latte so luxurious. It holds up beautifully to the long, gentle heat. Chef’s Insight: For a lighter version, 2% milk works, but avoid skim milk as it can taste a bit thin. For a dairy-free twist, oat milk is my top choice—it’s wonderfully creamy and neutral.
- 1/2 cup Brown Sugar, packed: This isn’t just sweetness; it’s flavor. The molasses notes in brown sugar are the foundation of our gingerbread taste. Sub Tip: You can use dark brown sugar for an even deeper, more caramel-like flavor.
- 1/4 cup Molasses: This is the soul of the gingerbread flavor! Don’t skip it. It provides that deep, almost smoky sweetness. Chef’s Insight: I prefer mild or original molasses, not blackstrap, which can be too bitter for this drink.
- 3 cups Strong Brewed Coffee: Brew your coffee a little stronger than you normally would. Since we’re diluting it with milk, we need that robust coffee flavor to shine through. Pro Hack: Using leftover coffee from your morning pot is a fantastic way to reduce waste!
- 1 1/2 tsp Ground Ginger: The star of the spice show! Ginger gives that warm, slightly sharp kick that defines gingerbread.
- 1 1/2 tsp Ground Cinnamon: The warm, familiar hug of the spice world. It rounds out the ginger perfectly.
- 1/4 tsp Ground Nutmeg: A little nutmeg adds a wonderful, nutty warmth and complexity. Freshly grated is amazing if you have it!
- 1/4 tsp Ground Cloves: Use a light hand here—cloves are powerful! They add a intense, pungent warmth that makes the whole spice blend sing.
- 2 tsp Vanilla Extract: Always add the vanilla at the end, off the heat. This preserves its beautiful, fragrant aroma. It’s the finishing touch that ties everything together.
Brewing the Magic: Your Step-by-Step Guide
Ready to make your house smell like a holiday dream? Let’s get cooking! This process is wonderfully hands-off, but I’ll walk you through each step with some tips to ensure latte perfection.
- Brew and Prep. First things first, brew your strong coffee. While that’s going, grab your slow cooker. This is a great time to give it a quick spray with non-stick cooking spray. It’s not essential, but it makes cleanup from the sugary mixture a total breeze. Little Chef Hack: If you want an ultra-smooth latte, you can whisk your spices into the molasses and a tablespoon of the milk first to create a paste. This helps prevent any tiny spice clumps!
- Combine Everything (Except the Vanilla!). Now for the fun part—the dump! Pour the whole milk, brewed coffee, packed brown sugar, and molasses right into the slow cooker. Then, sprinkle in all your gorgeous spices: the ginger, cinnamon, nutmeg, and cloves. Pro Tip: When measuring molasses, give your measuring cup a quick spray with cooking spray first. The molasses will slide right out, leaving no sticky mess behind!
- Stir It Up! Grab a whisk or a large spoon and give everything a really good, vigorous stir. We want to make sure that brown sugar and molasses are fully dissolved into the liquid. Don’t be shy—get in there and mix until the liquid looks uniform in color.
- Slow Cook to Perfection. Pop the lid on your slow cooker and set it to LOW. We’re going to let it work its magic for 2-3 hours. This is crucial: resist the urge to set it on HIGH to speed things up. Low and slow is the key here. High heat can cause the milk to scalding or develop a weird film. We want gentle, even warming. Chef’s Note: Give it a gentle stir every hour or so if you’re around. This helps incorporate any spices that might have settled.
- The Final Touch: Vanilla. After 2-3 hours, your latte will be steaming and fragrant. Turn off the slow cooker. Now, stir in those 2 teaspoons of vanilla extract. Adding it at the end preserves its delicate flavor. Give it one final stir, and it’s ready to serve!
How to Serve Your Gingerbread Latte in Style
Ladling this beautiful brew into mugs is a joy in itself. But why not make it extra special? Here are a few of my favorite ways to dress up these gingerbread lattes.
First, grab your favorite holiday mugs—the chunky, oversized ones are perfect for this. A dollop of freshly whipped cream on top is non-negotiable for me. It melts slowly into the hot latte, creating a creamy, dreamy layer. For a final flourish, dust the top with a little extra cinnamon or nutmeg. If you’re feeling fancy, a caramel drizzle or a crumbled gingerbread cookie on top of the whipped cream takes it to a whole new level of decadence. For a fun twist, offer a small bowl of mini marshmallows for your guests to add themselves. It’s all about creating that cozy, festive experience!
Make It Your Own: Delicious Recipe Variations
This recipe is a fantastic canvas for your creativity! Here are a few twists to try depending on your mood or dietary needs.
- The Decadent Bourbon-Spiked Latte: For an adults-only version, add a shot (1.5 oz) of bourbon or spiced rum to your mug before ladling in the hot latte. The bourbon’s oakiness pairs incredibly well with the molasses and spices.
- Dairy-Free Delight: Easily make this vegan! Swap the whole milk for creamy oat milk or full-fat coconut milk. Use a plant-based whipped cream for topping. The coconut milk version is especially tropical and festive.
- White Chocolate Gingerbread Latte: Stir in 1/2 cup of white chocolate chips when you add all the other ingredients. They’ll melt into the latte, making it even richer and creamier.
- Sugar-Conscious Swap: You can reduce the brown sugar to 1/4 cup and use a sugar-free maple syrup alternative instead of molasses for a lower-sugar version. The spice will still be fantastic!
- Chai-Spiced Twist: Love chai? Add a couple of black tea bags to the slow cooker during the last 30 minutes of cooking for a gingerbread chai tea latte hybrid. Just remember to remove them before serving!
Beau’s Chef Notes & Kitchen Stories
This recipe has evolved so much since that first apartment experiment. I’ve learned that the type of coffee you use makes a big difference—a medium or dark roast with chocolatey notes works beautifully. I also used to add the vanilla at the beginning, but one time I forgot and added it at the end. The difference in aroma was astounding! It’s now a non-negotiable final step.
A funny story: I once decided to double the recipe for a huge party and filled my slow cooker to the absolute brim. Let’s just say when it started to simmer, it bubbled over like a volcano, creating a sticky, spiced river all over my counter. Lesson learned: never fill your slow cooker more than 3/4 of the way full! There’s always a little kitchen adventure, isn’t there? That’s what makes it fun.
Your Gingerbread Latte Questions, Answered!
Q: Can I make this ahead of time?
A: Absolutely! Let the latte cool completely after cooking, then store it in an airtight container in the refrigerator for up to 2 days. Reheat it gently on the stovetop or in the slow cooker on LOW, giving it a good stir. You may need to add a splash of fresh milk as it can thicken a bit when chilled.
Q: My latte seems a bit thin. How can I make it thicker?
A: For a thicker, creamier texture, you can add 1/2 cup of heavy cream or half-and-half when you add the milk. Another trick is to create a slurry with 1 tablespoon of cornstarch and 2 tablespoons of cold milk, then whisk it into the latte during the last 30 minutes of cooking.
Q: Can I use fresh ginger instead of ground?
A: You can! Grate about 1 tablespoon of fresh ginger root. I’d recommend tying it up in a little piece of cheesecloth to make it easy to remove before serving, so you don’t have little ginger bits in your drink.
Q: My slow cooker is large. Can I halve this recipe?
A: Yes, but keep an eye on the cooking time. A smaller volume will heat up faster, so it may only need 1.5 to 2 hours on LOW. The key is to heat it until it’s steaming hot but not boiling.
Slow Cooker Gingerbread Lattes
Description
Slow Cooker Gingerbread Lattes
Ingredients
-
6 cups whole milk (or oat milk for dairy-free)
-
1/2 cup packed brown sugar (light or dark)
-
1/4 cup molasses (not blackstrap)
-
3 cups strong brewed coffee
-
1 1/2 tsp ground ginger
-
1 1/2 tsp ground cinnamon
-
1/4 tsp ground nutmeg
-
1/4 tsp ground cloves
-
2 tsp vanilla extract (add at the end)
Optional for serving: whipped cream, caramel drizzle, crushed gingerbread cookies, cinnamon or nutmeg dusting.
Instructions
-
Brew coffee. Make 3 cups of strong coffee.
-
Combine. In slow cooker, add milk, coffee, brown sugar, molasses, ginger, cinnamon, nutmeg, and cloves. Stir well.
-
Cook. Cover and cook on LOW for 2–3 hours, stirring occasionally. Do not use HIGH.
-
Finish. Stir in vanilla extract just before serving.
-
Serve. Ladle into mugs, top with whipped cream and festive garnishes.
Notes
-
Bourbon-Spiked: Add 1.5 oz bourbon or spiced rum to each mug.
-
White Chocolate: Stir in 1/2 cup white chocolate chips while cooking.
-
Chai Twist: Add 2 black tea bags for last 30 minutes; remove before serving.
-
Dairy-Free: Use oat milk or coconut milk + dairy-free whipped cream.
Nutrition
- Calories: 180 calories per serving
- Sugar: 24g
- Fat: 6g
- Carbohydrates: 28g
Nutritional Information (Approximate)
Here’s a rough nutritional breakdown per serving (based on 8 servings without whipped cream). Remember, these are estimates and can vary based on your specific ingredients.
Calories: 180 | Fat: 6g | Carbohydrates: 28g | Sugar: 24g | Protein: 5g
This is definitely a treat-worthy beverage! To lighten it up, you can use the sugar-conscious swaps mentioned in the variations section or simply use less whipped cream on top. It’s all about balance—enjoying the festive flavors that make the season special.
Final Thoughts from My Kitchen to Yours
Well, friend, there you have it—your ticket to the coziest holiday season yet. This Slow Cooker Gingerbread Latte is more than a recipe; it’s a tool for connection, a source of comfort, and a way to make your home feel instantly more festive. It proves that the best holiday moments don’t have to be complicated. Sometimes, the most magical things happen when you simply gather a few good ingredients, let them mingle in a pot, and share the results with people you love.
I hope this recipe becomes a cherished part of your holiday traditions, just like it has for me. If you make it, I’d love to hear about it! Tag me on social @Feastical or leave a comment on the blog. Now, go forth, brew some joy, and enjoy every delicious sip. Happy holidays, and happy cooking!
Cheers,
Beau
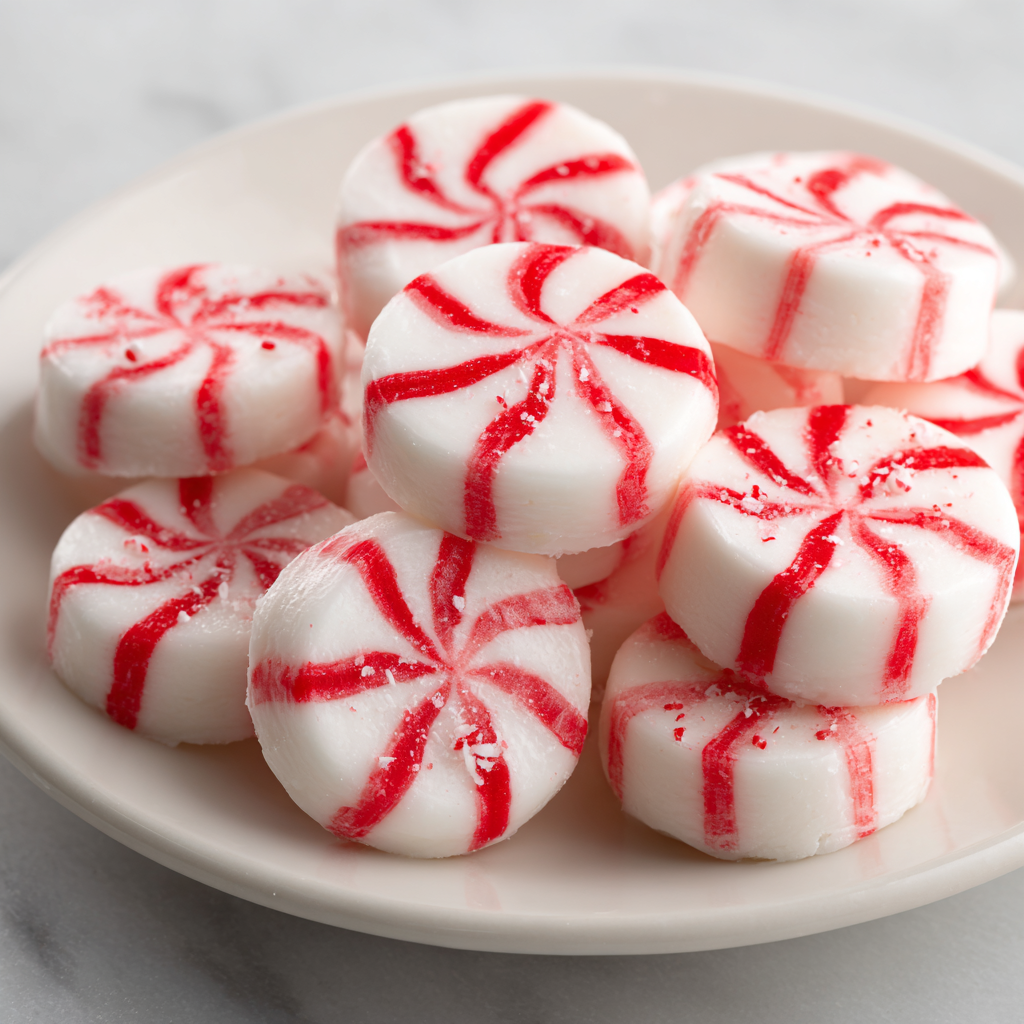
Soft Christmas Peppermints
Let’s Make Some Holiday Magic: Homemade Soft Christmas Peppermints
Hey friends, Beau here from Feastical! Can you smell it? That crisp, chilly air is starting to carry whispers of pine, cinnamon, and… peppermint. There’s just something about that cool, sweet flavor that screams holidays, isn’t there? It’s the taste of candy canes on the tree, of a warm mug of cocoa after building a snowman, of pure, unadulterated joy.
But today, we’re not just talking about any old peppermint. We’re ditching the store-bought stuff and creating something truly special: Homemade Soft Christmas Peppermints. These aren’t the rock-hard candies that threaten a dental emergency. Oh no. These are creamy, melt-in-your-mouth, little pillows of peppermint bliss. They’re sweet, they’re smooth, they have the most delightful airy texture, and they pack just the right amount of gentle peppermint kick.
I know what you might be thinking: “Beau, making candy? That sounds complicated!” Trust me on this one, friend. If you can cream butter and sugar, you can absolutely make these. This recipe is my go-to for a reason—it’s incredibly simple, deeply satisfying, and the results are downright gorgeous. They’re perfect for filling a candy dish at your holiday party, for packaging up in cute little bags as heartfelt homemade gifts, or for, ahem, “quality control” snacking while you wrap presents.
So, grab your favorite mixing bowl, put on some classic holiday tunes, and let’s roll up our sleeves. We’re about to create a treat that’s not just delicious, but one that’s woven with the cozy, comforting spirit of the season. Let’s dig in!
The Sweet Scent of Memories
This recipe always takes me right back to my Grandma Eleanor’s kitchen. Her house during the holidays was a wonderland of sights, sounds, and smells. But the best smell, the one that signaled the real start of Christmas for me, was the sharp, clean scent of peppermint wafting from her kitchen.
She’d have her big, old, yellow mixing bowl out, dusted with a fine layer of powdered sugar that looked like fresh snow. I’d pull up a chair, my legs swinging, and watch her magically transform simple ingredients into these beautiful, swirled red-and-white candies. She’d always let me have the first taste—a slightly misshapen one that didn’t make the “gift-worthy” cut. That first bite, soft and cool and sweet, is a core memory for me. It tasted like love and anticipation.
Making these peppermints now, in my own kitchen, is my way of keeping that tradition alive. It’s my little culinary hug from the past. And I love the thought of you creating your own memories with this recipe. Maybe it’ll become a new tradition for your family, too.
Gathering Your Peppermint Dream Team
One of the best things about this recipe is the short and sweet ingredient list. You probably have most of this in your pantry right now! Here’s what you’ll need and a little “chef’s insight” on each one.
- 4 cups powdered sugar, sifted: This is the base of our candy, giving it that classic smooth, melt-in-your-mouth texture. Pro-Tip: Sifting is non-negotiable here! It prevents lumps and makes for a silky-smooth dough. If you skip this, you’ll be fighting pesky sugar lumps later.
- 1/4 cup unsalted butter, softened: This is the secret weapon! The butter adds a rich creaminess that sets these apart from other hard candies. Using unsalted lets you control the flavor perfectly. Make sure it’s truly softened at room temperature for easy mixing.
- 1/4 cup heavy cream: This adds moisture and fat, creating that soft, tender texture. For a dairy-free version, full-fat coconut cream can work in a pinch, though the flavor will be slightly different.
- 1/2 tsp peppermint extract: The star of the show! I prefer pure peppermint extract over imitation for the cleanest, brightest flavor. You can adjust this up or down by 1/8 tsp based on how strong you like it.
- Optional: 1/2 tsp vanilla extract: This is my little “chef’s kiss.” The vanilla doesn’t scream “I’m here!” but it rounds out the peppermint flavor beautifully, adding a subtle warmth and depth that makes the candy taste more complex.
- Red food coloring: For that classic Christmas look! I like using gel food coloring because it’s highly concentrated and won’t water down your dough. A little goes a long way!
Crafting Your Candy: A Step-by-Step Guide
Ready to make some magic? Let’s walk through this together. It’s a simple process, but I’ve got some key tips for each step to ensure your peppermints are absolutely perfect.
Step 1: The Creamy Foundation
In a large mixing bowl, beat the softened butter, heavy cream, peppermint extract, and vanilla extract (if using) together until the mixture is completely smooth and well-combined. I like to use a hand mixer or a stand mixer with the paddle attachment for this. You want everything to be homogenous—no little bits of butter floating around! Chef’s Hack: If your butter is still a bit cold, zap it in the microwave for 5-second bursts, but be careful! You want it soft, not melted.
Step 2: The Sweet Incorporation
Now, here’s where patience pays off. With your mixer on a low speed, gradually add the sifted powdered sugar, about a cup at a time. Why slowly? If you dump it all in at once, you’ll create a powdered sugar mushroom cloud that will cover you and your entire kitchen! After each addition, let the sugar incorporate fully before adding the next. The dough will start out looking like a thick frosting and will gradually become a soft, moldable dough. It should hold together when you pinch it and not feel overly sticky. If it’s a bit too sticky, you can add another tablespoon or two of powdered sugar.
Step 3: The Colorful Divide
Turn the dough out onto a clean surface lightly dusted with powdered sugar. Divide it into two equal halves. Leave one half plain and white. Now, for the fun part! Add a few drops of red gel food coloring to the other half. Knead it in with your hands until the color is uniform. Don’t be shy here—a vibrant red makes for a stunning final product! Pro-Tip: Wearing food-safe gloves will save your hands from turning into Santa’s for a few hours.
Step 4: The Twist & Shape
This is where the signature swirl comes to life. Take each portion of dough and roll them into long, thin ropes of equal length, about 1/2 to 3/4-inch in diameter. Don’t worry if they aren’t perfect! Now, place the red and white ropes side-by-side and gently press them together at one end. Then, carefully twist them together, like a candy cane stripe. Once twisted, gently roll the entire length back and forth on the counter to smooth it out and fuse the two ropes into one beautiful, swirled log.
Step 5: The Slice & Dry
Using a sharp knife, slice the log into 1/4-inch to 1/2-inch thick discs. You’ll see the lovely swirl pattern on each piece! Place the peppermint discs on a baking sheet or tray lined with parchment or wax paper. Now, the hardest part: the wait. Let them sit uncovered at room temperature for a full 24 hours. This allows the outside to dry just enough to form a slight crust while the inside stays beautifully soft and creamy. Resist the urge to speed this up—it’s crucial for the perfect texture!
How to Serve These Peppermint Gems
Once your patience is rewarded and the mints are set, it’s time for the fun part—serving them! I love putting these out in a beautiful ceramic bowl or a vintage candy dish as the centerpiece of my holiday coffee table. They look so festive and inviting.
They also make the most thoughtful homemade gifts. Layer them in a clear cellophane bag tied with a rustic ribbon, or pack them into a small, decorative tin. Add a handwritten tag that says “Homemade with Love,” and you’ve got a present that truly comes from the heart. They’re also a wonderful addition to a holiday cookie plate, adding a different texture and flavor among all the chocolate and spice.
Get Creative! Fun Flavor Twists
Once you’ve mastered the classic, feel free to get creative! This dough is a wonderful canvas for all sorts of holiday flavors.
- Chocolate Swirl: Replace the red food coloring with 2 tablespoons of sifted unsweetened cocoa powder when you mix the second half of the dough. A chocolate-peppermint combo is a classic for a reason!
- Wintergreen Wonderland: Swap the peppermint extract for wintergreen extract for a different, slightly sweeter minty flavor that will remind you of those classic pink wintergreen lozenges.
- Sparkling Sugared Mints: Before the mints dry, you can roll the edges in or sprinkle the tops with coarse sparkling sugar for a beautiful, frosty effect.
- Peppermint Pattie Style: For a fun shape, instead of twisting, roll each color into a sheet, layer them, and use a small round cookie cutter to create perfect red-and-white circles.
- Fruity Fun: For a non-holiday version, try using different extracts like lemon or orange and matching food colorings. They’re delightful any time of year!
Beau’s Chef’s Notes
This recipe has been a living thing in my kitchen. The first time I made it, I was so impatient that I tried to speed up the drying process by putting the tray near a warm oven. Big mistake! The butter melted, and I ended up with peppermint puddles. A delicious, but very messy, lesson learned. The 24-hour wait is your friend, I promise.
I’ve also found that the texture can change slightly with the weather. On a very humid day, they might need an extra few hours to set up properly. And don’t stress if your first rope-twisting attempt isn’t magazine-perfect. The charm of homemade is in its slight imperfections! Every batch I make is a little different, and that’s part of the fun.
Your Peppermint Questions, Answered!
Q: My dough is too dry and crumbly. What happened?
A: This usually means you added a bit too much powdered sugar or the butter wasn’t soft enough. Don’t worry! Just add a teaspoon of heavy cream at a time and knead it in until the dough comes together smoothly.
Q: Can I use milk instead of heavy cream?
A: I don’t recommend it. The high fat content in heavy cream is essential for the rich, soft texture. Using milk will result in a much harder, less creamy candy.
Q: How should I store these, and how long do they last?
A: Once fully dried, store them in an airtight container at room temperature. Layering them with parchment paper is a good idea to prevent sticking. They will keep beautifully for up to 2 weeks… if they last that long!
Q: Why are my mints still sticky after 24 hours?
A: This is likely due to high humidity. Just give them a bit more time to dry. You can also very lightly dust them with a bit of powdered sugar before storing to combat stickiness.

Soft Christmas Peppermints
Description
Homemade Soft Christmas Peppermints
Ingredients
-
4 cups powdered sugar, sifted
-
1/4 cup unsalted butter, softened
-
1/4 cup heavy cream
-
1/2 tsp peppermint extract
-
1/2 tsp vanilla extract (optional)
-
Red gel food coloring
Instructions
-
Cream Base – In a large bowl, beat butter, heavy cream, peppermint extract, and vanilla until smooth.
-
Add Sugar – Gradually mix in powdered sugar, 1 cup at a time, until a soft, moldable dough forms.
-
Divide & Color – Split dough in half. Leave one half white, and knead red food coloring into the other until uniform.
-
Shape – Roll each half into ropes, twist together, and gently roll into a log. Slice into 1/4–1/2 inch discs.
-
Dry – Place on parchment-lined tray. Let sit uncovered at room temperature for 24 hours to set.
Notes
-
Store in an airtight container at room temperature for up to 2 weeks.
-
Layer with parchment to prevent sticking.
Nutrition
- Calories: 45 cal per mint, approx.
- Sugar: 0g
- Fat: • 1.3g
- Carbohydrates: 9g
- Protein: 8.5g
A Quick Nutritional Note
Let’s be real, friends—these are a treat, through and through! They’re pure holiday indulgence. Here’s a rough estimate per mint (based on a yield of 60 pieces). Remember, this is an approximation, and exact values can vary based on the specific ingredients you use.
Per Piece (approx.): Calories: 45, Fat: 1.3g, Carbohydrates: 9g, Sugars: 8.5g, Protein: 0g.
The beauty of making them yourself is that you control the size. If you want to make them smaller, you can easily get 80-90 smaller mints, which adjusts the numbers accordingly. The key, as with all good things, is to enjoy them mindfully and share them generously!
Final Thoughts from My Kitchen to Yours
Well, there you have it! My recipe for Soft Christmas Peppermints, straight from the heart. This isn’t just about making candy; it’s about creating an experience. It’s about the joy of getting your hands a little dusty with powdered sugar, the satisfaction of seeing those beautiful red and white swirls, and the warmth of sharing something you made with love.
I hope this recipe brings as much happiness to your kitchen as it has to mine. It’s a simple pleasure, a little bite of holiday magic that reminds us what the season is all about: connection, tradition, and a whole lot of sweetness.

Irresistibly Chewy Pistachio Cream Cookies
Irresistibly Chewy Pistachio Cream Cookies: Your New Favorite Comfort Food
Hey there, friend! Beau here, welcoming you back to my kitchen. You know that feeling when you open the oven and a wave of warmth and the most incredible smell just washes over you? That’s the magic we’re cooking up today. We’re taking everything you love about a classic, chewy chocolate chip cookie and giving it a glorious, nutty, sophisticated twist that will absolutely blow your mind.
I’m talking about my Irresistibly Chewy Pistachio Cream Cookies. Imagine a cookie that’s soft in the center, slightly crisp at the edges, and packed with pockets of melted chocolate and crunchy, salty roasted pistachios. But the real secret weapon? We’re creaming a whole cup of luxurious pistachio cream right into the butter and sugar. This isn’t just a cookie with pistachios in it; this is a cookie that breathes pistachio in every single, chewy bite.
Whether you’re a seasoned baker who can cream butter and sugar in your sleep or you’re just figuring out that the little hook on your mixer is called a paddle attachment (no judgment, we all start somewhere!), this recipe is for you. It’s simple, soulful, and so, so satisfying. So, tie on your favorite apron, preheat that oven, and let’s create some kitchen magic together. This is one of those recipes that’s about to become a staple in your recipe box, I promise.
The Story Behind the Cookie: A Happy Accident
I have to be honest with you; this cookie was born from a beautiful kitchen mishap. A few years back, I was hosting a big, chaotic Friendsgiving at my place. The plan was to make my famous double-chocolate espresso cookies, but in the frenzy of also trying to brine a turkey that was far too big for my fridge, I accidentally grabbed a jar of pistachio cream I’d bought for a baklava project instead of the jar of chocolate hazelnut spread.
I didn’t realize my mistake until the first batch was in the oven, and this incredible, nutty, almost floral aroma started wafting through the house. It was nothing like the deep, rich chocolate smell I was expecting. My heart sank for a second, but then I pulled the tray out. They were a beautiful pale green-gold, dotted with dark chocolate and pistachios. I took a bite while they were still dangerously warm, and my eyes just went wide. They were a revelation! My friends devoured them in minutes, and the chocolate espresso cookies were completely forgotten. It was a happy accident that taught me a fantastic lesson: sometimes the best recipes come from a little bit of chaos and a whole lot of curiosity.
Gathering Your Ingredients: A Chef’s Guide
Okay, let’s get our mise en place ready—that’s just a fancy way of saying “get everything in its place.” It makes the baking process so much smoother. Here’s what you’ll need to make about two dozen of these glorious cookies. I’ve included some of my favorite tips and swaps for each ingredient.
- 1 cup pistachio cream: This is the star of the show! You can often find it in specialty grocery stores, online, or in Middle Eastern markets. It has a smoother, less oily texture than nut butters and a wonderfully intense flavor. Chef’s Insight: If you can’t find pistachio cream, almond butter or hazelnut spread (like Nutella) will work beautifully, though they’ll, of course, change the final flavor profile.
- 1 cup (2 sticks) unsalted butter, softened: Using unsalted butter lets you control the salt level. Pro Tip: “Softened” means your finger should leave a slight indent when you press it. Don’t melt it! This is key for achieving the perfect chewy texture.
- 1 cup packed brown sugar: The molasses in brown sugar is what gives these cookies their signature chew and moistness. Pack it firmly into your measuring cup.
- 2 large eggs, at room temperature: Room-temperature eggs incorporate much more easily into the creamed butter and sugar, creating a smoother, more emulsified dough. Quick Hack: To quickly bring eggs to room temp, place them in a bowl of warm water for 5-10 minutes.
- 2 cups all-purpose flour: The foundation of our cookie. For a slightly more tender cookie, you can swap in 1/2 cup of cake flour, but all-purpose works perfectly.
- 1 teaspoon baking soda: Our leavening agent! This is what gives the cookies a little lift and spread. Make sure it’s fresh for the best results.
- 1 cup roasted, salted pistachios, roughly chopped: The salty crunch against the sweet, chewy dough is everything. Using pre-salted ones adds a fantastic flavor contrast. If you use unsalted, just add an extra 1/4 teaspoon of salt to the dry ingredients.
- 1 cup chocolate chunks (white or dark): I’m a chunks-over-chips guy because you get those beautiful, melty pools of chocolate. Dark chocolate balances the sweetness perfectly, but white chocolate offers a lovely creaminess. Use what you love!
- Optional: 1 teaspoon cardamom or cinnamon: A pinch of warm spice takes these cookies to a whole new level, especially in the fall and winter. Cardamom is a particularly magical pairing with pistachio.
- Optional: 1 cup dried cherries or cranberries: If you love a bit of tartness to cut through the richness, dried fruit is a fantastic add-in.
Baking Your Masterpiece: Step-by-Step
Ready to make some magic? Follow these steps, and you’ll be a pistachio cookie pro in no time. I’ve sprinkled in my best chef hacks to ensure your success.
Step 1: Preheat and Prep. First things first, preheat your oven to 350°F (175°C). This is non-negotiable for even baking. Line your baking sheets with parchment paper or silicone baking mats. Trust me, this prevents sticking and makes cleanup an absolute breeze. Little Chef Hack: If you only have two baking sheets but multiple batches to bake, make sure you let the hot baking sheet cool down before placing the next batch of dough on it. A hot pan will make the cookies spread too fast!
Step 2: The Creaming Method. In the bowl of a stand mixer fitted with the paddle attachment (or in a large bowl using a hand mixer), cream together the softened butter, pistachio cream, and brown sugar on medium speed for about 2-3 minutes. You want the mixture to become light, fluffy, and pale. This step is crucial because it incorporates air into the dough, which helps with the texture. Don’t rush it!
Step 3: Incorporate the Eggs. Add the room-temperature eggs, one at a time, beating well after each addition until they are fully combined. Scrape down the sides of the bowl with a spatula to make sure everything is homogenous. It might look a little curdled at this point if your eggs were cold—don’t panic, it will come together when you add the flour.
Step 4: Combine the Dry Ingredients. In a separate, medium-sized bowl, whisk together the all-purpose flour and baking soda. This ensures the baking soda is evenly distributed throughout the flour, so you don’t get any bitter pockets in your cookies. If you’re using the optional spices or salt (if your pistachios were unsalted), add them now.
Step 5: Bring It All Together. With the mixer on low speed, gradually add the dry ingredients to the wet ingredients. Mix just until the flour disappears. Pro Tip: Overmixing at this stage can develop the gluten in the flour and lead to tough cookies. A few streaks of flour are okay—they’ll get incorporated in the next step.
Step 6: The Fun Part – Fold-Ins! Switch to a sturdy spatula or wooden spoon. Gently fold in the chopped roasted pistachios, chocolate chunks, and any other optional add-ins (like dried fruit) until they are evenly distributed throughout the dough.
Step 7: Scoop and Space. Using a cookie scoop or a tablespoon, portion the dough into balls roughly 1.5 inches in diameter. Place them about 2 inches apart on your prepared baking sheets. They need room to spread! For an extra-thick, bakery-style cookie, you can chill the scooped dough balls for 30 minutes before baking.
Step 8: Bake to Perfection. Bake for 10-12 minutes. You’re looking for golden-brown edges while the centers still look slightly soft and underdone. Chef’s Secret: They will continue to cook on the hot baking sheet after you take them out. This is the secret to a perfectly chewy center! Don’t wait for the centers to look fully set, or you’ll end up with a crispier cookie.
Step 9: The All-Important Cool Down. Let the cookies cool on the baking sheet for at least 5 minutes. This allows them to set up enough so you can move them without them falling apart. Then, transfer them to a wire rack to cool completely. Or, you know, grab a glass of milk and enjoy a few warm, gooey ones right away. I won’t tell.
How to Serve These Beauties
These cookies are pretty much perfect all on their own, still warm from the oven with a cold glass of milk. But let’s get creative! For a simple, elegant dessert, crumble one over a bowl of vanilla bean ice cream and drizzle with a little extra pistachio cream. The combination of warm cookie, cold ice cream, and nutty sauce is next-level.
Hosting a party? Create a cookie platter! Pair these pistachio cream cookies with a plate of lemon shortbread bars and some dark chocolate truffles for a beautiful, varied dessert spread. They also make incredible gifts. Tuck a stack into a cellophane bag, tie it with a ribbon, and you’ve got a homemade present that’s straight from the heart (and the kitchen).
Make It Your Own: Recipe Variations
The beauty of this recipe is its versatility. Feel free to play around and create your own signature version!
- The Citrus Zing: Add the zest of one orange or lemon to the dough when you cream the butter and sugar. The bright citrus notes cut through the richness and pair wonderfully with the pistachio.
- Double Chocolate Pistachio: Replace 1/4 cup of the all-purpose flour with 1/4 cup of unsweetened cocoa powder for a decadent double-chocolate experience.
- Gluten-Free & Vegan Friendly: Easy swaps! Use a 1:1 gluten-free flour blend and ensure your baking soda is GF. For vegan cookies, use a vegan butter alternative and flax eggs (1 tbsp ground flaxseed mixed with 3 tbsp water per egg, let sit for 5 minutes to gel).
- Baklava-Inspired: Channel those flavors! Add a 1/2 teaspoon of cinnamon and a 1/4 teaspoon of ground cloves to the dry ingredients, and use white chocolate chunks instead of dark. After baking, while still warm, drizzle with a simple honey glaze.
- The “Kitchen Sink”: Go for it! Add a 1/2 cup of toasted coconut flakes or a 1/2 cup of chopped pretzels for a sweet-and-salty crunch explosion.
Beau’s Chef Notes
This recipe has evolved so much since that fateful Friendsgiving. I’ve played with chilling the dough (which makes a thicker, denser cookie) and even tried browning the butter once, which added a lovely nutty depth. My biggest lesson? Don’t be afraid to make it your own. Baking is part science, part art, and a whole lot of heart. The first time I made these correctly, I felt like a kitchen wizard. Now, I always keep a jar of pistachio cream in the pantry, just in case a cookie emergency strikes. And trust me, they do.
Your Questions, Answered: FAQs & Troubleshooting
Q: My cookies spread too much and turned out flat. What happened?
A: This is usually due to butter that was too warm or melted. Make sure your butter is just softened, not greasy. Also, check that your baking soda is fresh and that you measured your flour correctly (spoon it into the measuring cup and level it off; don’t scoop directly from the bag). Chilling the dough for 30 minutes can also help prevent excess spread.
Q: Can I make the dough ahead of time and bake it later?
A: Absolutely! You can scoop the dough balls, freeze them on a baking sheet, and then transfer them to a freezer bag. When a cookie craving hits, just bake them straight from the freezer, adding 1-2 minutes to the baking time. You’ll have fresh, warm cookies in minutes!
Q: My cookies are cakey, not chewy. How can I fix that?
A: A cakey texture often comes from too much flour or overmixing. Be gentle when combining the wet and dry ingredients, and mix only until the flour disappears. Also, make sure you’re not overbaking them. Taking them out when the centers look soft is key for chewiness.
Q: Is pistachio cream the same as pistachio butter?
A> They are similar, but pistachio cream is often smoother, sweeter, and sometimes has a more vibrant color. Pistachio butter can be used, but it might be oilier and have a more intense, less sweet flavor. You may want to adjust the sugar slightly if using a pure, unsweetened pistachio butter.

Irresistibly Chewy Pistachio Cream Cookies
Description
Hey there, friend! Beau here, welcoming you back to my kitchen. You know that cozy moment when the oven door opens and a wave of buttery, nutty sweetness fills the air? That’s the magic of these Irresistibly Chewy Pistachio Cream Cookies.
We’re talking soft centers, lightly crisp edges, melty chocolate pools, and the salty crunch of roasted pistachios—all held together with the rich, nutty base of creamy pistachio spread. It’s like a hug in cookie form, perfect for sharing or sneaking straight from the cooling rack.
Ingredients
-
1 cup pistachio cream (or substitute almond butter/hazelnut spread if needed)
-
1 cup (2 sticks) unsalted butter, softened
-
1 cup packed brown sugar
-
2 large eggs, at room temperature
-
2 cups all-purpose flour
-
1 teaspoon baking soda
-
1 cup roasted salted pistachios, chopped
-
1 cup chocolate chunks (dark or white)
-
Optional: 1 teaspoon cardamom or cinnamon
-
Optional: 1 cup dried cherries or cranberries
Instructions
-
Preheat & Prep – Heat oven to 350°F (175°C). Line baking sheets with parchment paper.
-
Cream the Base – Beat together softened butter, pistachio cream, and brown sugar until light and fluffy (about 2–3 minutes).
-
Add the Eggs – Mix in eggs one at a time, scraping down the bowl as needed.
-
Dry Mix – In another bowl, whisk together flour and baking soda (plus optional spices).
-
Combine – Slowly add dry ingredients to wet mixture. Mix only until combined—don’t overwork it.
-
Fold-ins – Stir in pistachios, chocolate chunks, and dried fruit (if using).
-
Shape – Scoop 1½-inch dough balls and space 2 inches apart on trays. For thicker cookies, chill dough balls for 30 minutes.
-
Bake – Bake 10–12 minutes until edges are golden but centers still look soft.
-
Cool – Let cookies rest 5 minutes on the tray before moving to a wire rack.
Notes
-
Chewy texture hack: Don’t overbake! Pull them when centers look slightly underdone.
-
Spread control: Chill dough before baking if your kitchen is warm.
-
Chocolate upgrade: Use chopped bars instead of chips for gooey pools of chocolate.
Nutrition
- Calories: ~250 Cal per cookie,
- Sugar: 16g
- Fat: 15g
- Carbohydrates: 26
A Quick Note on Nutrition
While I’m all about indulgence and joy in food, I know some folks like to have a general idea of what they’re enjoying. Here’s a basic breakdown per cookie (assuming 24 cookies per batch). Remember, these are estimates and can vary based on your specific ingredients and portion sizes.
Nutrition (per cookie):
Calories: ~250 | Fat: 15g | Saturated Fat: 7g | Carbohydrates: 26g | Sugar: 16g | Protein: 4g
These cookies are a treat, and that’s exactly what they’re meant to be! They provide a little energy boost from the carbs and fats, and the pistachios add a touch of protein and fiber. Enjoy them mindfully as part of a balanced diet, and savor every single bite.
Final Thoughts from My Kitchen to Yours
Well, friend, we’ve done it. We’ve taken a simple concept and turned it into something truly special. These Irresistibly Chewy Pistachio Cream Cookies are more than just a dessert; they’re a conversation starter, a memory maker, and a warm, nutty hug in cookie form.
I hope you feel empowered to bake up a batch and maybe even create your own happy accident in the kitchen. The best recipes are the ones you make with a little bit of love and a whole lot of curiosity. If you do make them, I’d be absolutely thrilled to hear how they turned out! Tag me on social @Feastical or drop a comment on the blog. Happy baking!
With love and a full cookie jar,
Beau