
Cinnamon Roll Pumpkin Pie Cups
Your New Favorite Fall Treat is Here!
Hey friends, Beau here! Can we talk about that magical moment when you can’t decide if you want brunch or dessert? You’re standing there, spatula in hand, torn between the cozy, spiced warmth of a pumpkin pie and the sweet, swirly comfort of a fresh-baked cinnamon roll. Well, what if I told you that you don’t have to choose? What if I told you we could smash these two icons together into one incredible, bite-sized masterpiece?
Welcome to the world of Cinnamon Roll Pumpkin Pie Cups. These little guys are the definition of a happy accident waiting to happen in your kitchen. Imagine this: a soft, buttery cinnamon roll pressed into a mini pie crust, filled to the brim with a velvety, spiced pumpkin custard, and topped with a luxurious swirl of cream cheese frosting. They’re individual servings of pure joy, perfect for a festive breakfast spread, a holiday potluck showstopper, or just a Tuesday night when you deserve something special.
The best part? They are unbelievably simple. We’re using a brilliant shortcut—refrigerated cinnamon rolls—to create a crust that’s already packed with flavor. No fussing with pie dough, no worrying about a soggy bottom. Just straightforward, feel-good baking that delivers maximum flavor with minimal stress. So, preheat that oven, grab your favorite mug of coffee, and let’s create some kitchen magic that’s about to make your entire house smell like a fall paradise.
A Match Made in Brunch Heaven
This recipe takes me right back to my first Thanksgiving hosting gig. I was determined to impress, but my grand plans for a from-scratch, lattice-topped pumpkin pie were… well, let’s just say the lattice looked more like abstract art. In a panic, I glanced at the cinnamon rolls I’d bought for the next morning’s breakfast. A crazy idea sparked.
I pressed those cinnamon rolls into a muffin tin, whipped up my pumpkin pie filling, and crossed my fingers. Twenty minutes later, I pulled out these puffy, golden, fragrant little cups. They were a total hit! My aunt, who usually just nibbles at dessert, ate two. That’s when I knew I was onto something. It was a reminder that the best recipes aren’t always the most complicated ones; they’re the ones that bring a smile to people’s faces and solve a little problem with a lot of creativity. These pie cups are my go-to for that exact reason—they’re fun, forgiving, and forever linked to a happy, slightly chaotic kitchen memory.
Gathering Your Kitchen Crew: The Ingredients
Here’s the dream team! The beauty of this list is its simplicity. Let’s break it down so you know exactly why each ingredient is a star player.
- 1 can refrigerated cinnamon rolls (8-count): This is our secret weapon! I usually grab the classic brand, but any will work. Chef’s Insight: Don’t unroll them yet! We’re using the whole roll as our dough. The cinnamon swirl already baked in gives our “crust” an incredible flavor head start.
- 1 cup pumpkin purée: Make sure you’re grabbing 100% pure pumpkin purée, not pumpkin pie filling, which has sugar and spices already added. We want to control those flavors ourselves! Substitution Tip: If you’re feeling adventurous, homemade roasted pumpkin purée adds a deep, caramelized flavor.
- ¼ cup brown sugar: Brown sugar is my go-to here for its rich molasses notes that pair perfectly with pumpkin and cinnamon. Substitution Tip: You can use dark brown sugar for an even deeper flavor, or coconut sugar for a less refined option.
- 1 large egg: This is the binding agent that sets our pumpkin filling into a custardy, pie-like texture. Make sure it’s at room temperature for smoother mixing.
- ½ tsp cinnamon + ¼ tsp nutmeg: The dynamic duo of fall spices! Chef’s Insight: For a next-level spice blend, try adding a pinch of ginger, cloves, or even a dash of cardamom. Freshly grated nutmeg makes a world of difference if you have it!
- ¼ tsp vanilla extract: A splash of vanilla enhances all the other sweet and spicy flavors. Use the real stuff—it matters!
- Pinch of salt: Never skip the salt! It balances the sweetness and makes every other ingredient pop.
- ½ cup cream cheese frosting: The icing that comes with the cinnamon rolls is perfect. Chef’s Insight: If you’re feeling fancy, whip up a quick homemade version with 4 oz softened cream cheese, 2 tbsp softened butter, ½ cup powdered sugar, and a splash of vanilla. It’s unbeatable!
Let’s Get Baking: The Step-by-Step Fun
Ready to see this magic happen? Follow these steps, and you’ll be a pie cup pro in no time. I’ve packed in my favorite chef hacks to make sure your results are perfect.
- Preheat and Prep: Fire up your oven to 350°F (175°C). Now, grab a standard 12-cup muffin tin and give it a good spray with non-stick cooking spray. Chef’s Hack: Even if your tin is non-stick, a quick spray ensures those golden cups pop out effortlessly after baking. Trust me on this one!
- Create the Crust: Open that can of cinnamon rolls (the best sound in the world, right?). You’ll have 8 rolls. Place one roll into each of the 8 greased muffin cups. Now, using your fingers or the back of a small spoon, press the dough down into the bottom and up the sides of each cup to form a little bowl. Chef’s Hack: If the dough is sticky, lightly wet your fingertips—it’ll prevent sticking and make shaping a breeze. Don’t worry about it being perfect; rustic is charming!
- Whisk the Filling: In a medium bowl, combine the pumpkin purée, brown sugar, egg, cinnamon, nutmeg, vanilla, and that all-important pinch of salt. Whisk it all together until it’s completely smooth and beautifully homogenous. Chef’s Tip: No need for a mixer here! A good old-fashioned whisk and a little elbow grease will do the trick perfectly. You’re looking for a silky, lump-free mixture.
- Fill ‘Em Up: Now, carefully spoon the pumpkin filling into each cinnamon roll crust. I like to use a tablespoon cookie scoop for less mess, but a regular spoon works great. Fill them almost to the top, leaving just a tiny lip so the filling doesn’t overflow. You should use about 2 tablespoons of filling per cup.
- Bake to Perfection: Slide the muffin tin into your preheated oven and bake for 15-18 minutes. You’ll know they’re done when the cinnamon roll edges are a deep golden brown and the pumpkin filling is set. It might puff up a little, and that’s a good sign! Chef’s Hack: To test for doneness, give the tin a gentle jiggle. The center of the filling should have just the slightest wobble—it will continue to set as it cools.
- The All-Important Cool Down: This is the hardest part: patience! Remove the tin from the oven and let the pie cups cool in the pan for at least 5 minutes. Then, gently run a butter knife around the edges of each cup to loosen them and carefully transfer them to a wire rack to cool completely. Why? If you frost them while they’re hot, the frosting will melt into a puddle (which is still tasty, but not as pretty!).
- The Grand Finale: Frosting! Once the cups are completely cool, it’s time for the frosting. You can spoon it on, drizzle it from a fork, or for a real pro look, pop the frosting into a small zip-top bag, snip off a corner, and pipe a beautiful swirl on top. Divine!
How to Serve These Little Beauties
Presentation is part of the fun! These pie cups are incredibly versatile. For a casual brunch, I love stacking them on a rustic wooden board or a simple platter. They’re self-contained, so no plates or forks are strictly necessary—perfect for grabbing and going.
If you’re serving them as a dessert, place each one on a small dessert plate alongside a cup of strong coffee or a glass of cold milk. For a truly decadent touch, add a tiny dollop of whipped cream and a light dusting of cinnamon right on top of the frosting. The contrast of temperatures and textures is just wonderful.
Mix It Up! Creative Twists on the Classic
Once you’ve mastered the basic recipe, the sky’s the limit! Here are a few of my favorite ways to play with this concept:
- The Pecan Pie Upgrade: Before adding the pumpkin filling, sprinkle a few pecan halves into the bottom of each cinnamon roll crust. After baking, top with a drizzle of caramel sauce along with the frosting.
- Chocolate Swirl Delight: Are you a chocolate and pumpkin fan? Me too! Fold ¼ cup of mini chocolate chips into the pumpkin filling before spooning it into the cups. The melted chocolate pockets are a dream.
- Gluten-Free & Dairy-Swap Friendly: Many brands now offer gluten-free refrigerated cinnamon rolls. Use those, and ensure your frosting is GF. For a dairy-free version, use a vegan cream cheese frosting.
- Gingerbread Spice: Swap the cinnamon and nutmeg in the filling for a gingerbread spice blend (think ginger, allspice, cloves). It gives the cups a warm, festive kick that’s perfect for the holidays.
- Maple Brown Butter Bliss: Brown your butter and let it cool slightly before mixing it into the pumpkin filling instead of the egg (this makes it richer, but not custardy). Use a maple-infused cream cheese frosting for the ultimate fall flavor.
Beau’s Chef Notes
This recipe has evolved in my kitchen over the years. I used to try and press the cinnamon rolls super thin, but I’ve learned that a slightly thicker base gives you this amazing, soft, almost bread-pudding-like texture that soaks up the filling. It’s better! I also used to bake them until the filling was completely firm, but letting them have that slight jiggle results in a much creamier center. The funniest kitchen fail? I once forgot the sugar in the filling. Let’s just say they were… very spiced. My friends were good sports, but it was a great lesson in double-checking your mise en place!
Your Questions, Answered!
Q: Can I make these ahead of time?
A: Absolutely! You can assemble the cups (unbaked) cover the tin with plastic wrap, and refrigerate overnight. Bake them straight from the fridge, adding a minute or two to the baking time. You can also bake and cool them completely, then store in an airtight container for up to 2 days. Frost just before serving for the best texture.
Q: My filling overflowed! What happened?
A: This usually means the cups were filled a bit too high. Remember to leave a small lip of the cinnamon roll crust visible. Also, ensure your oven is fully preheated so the crust can start cooking and setting immediately.
Q: The center of my filling is still liquidy.
A: No worries! Just pop them back in the oven for another 2-3 minutes. Oven temperatures can vary. The jiggle test is your best friend here—a set edge with a slightly wobbly center is the goal.
Q: Can I freeze these?
A: You can, but I recommend freezing them without the frosting. Bake and cool the cups completely, then freeze them in a single layer on a baking sheet before transferring to a freezer bag. Thaw at room temperature and frost when ready to eat.

Cinnamon Roll Pumpkin Pie Cups
Description
Soft, buttery cinnamon roll “crusts” filled with creamy, spiced pumpkin custard and topped with luscious cream cheese frosting. Perfect for brunch, dessert, or anytime you need a cozy, fall-inspired treat!
Ingredients
Crust:
-
1 can (8-count) refrigerated cinnamon rolls
Pumpkin Filling:
-
1 cup pumpkin purée (100% pumpkin, not pie filling)
-
¼ cup brown sugar
-
1 large egg, room temperature
-
½ tsp cinnamon
-
¼ tsp nutmeg
-
¼ tsp vanilla extract
-
Pinch of salt
Topping:
-
½ cup cream cheese frosting (from cinnamon rolls or homemade)
Optional Add-Ins / Variations:
-
Pecan halves, mini chocolate chips, gingerbread spices, or maple brown butter for a twist
Instructions
1. Preheat & Prep:
-
Preheat oven to 350°F (175°C).
-
Grease a standard 12-cup muffin tin with non-stick spray.
2. Form the Crusts:
-
Place one cinnamon roll in each of 8 muffin cups.
-
Press gently into the bottom and up the sides to form a bowl. Wet fingers slightly if dough sticks.
3. Make the Filling:
-
In a medium bowl, whisk pumpkin purée, brown sugar, egg, cinnamon, nutmeg, vanilla, and salt until smooth.
4. Fill the Cups:
-
Spoon about 2 tablespoons of filling into each cinnamon roll cup, leaving a small lip at the top.
5. Bake:
-
Bake 15–18 minutes, until cinnamon roll edges are golden and pumpkin filling is mostly set with a slight jiggle in the center.
6. Cool & Frost:
-
Cool in the pan 5 minutes, then transfer to a wire rack.
-
Once completely cool, frost with cream cheese frosting. Pipe, drizzle, or spoon on top.
Notes
-
Slightly thicker cinnamon roll crust = soft, bread-pudding-like texture.
-
Slight jiggle in the center = creamy, custardy filling.
-
Run a butter knife around the edges before removing from the tin for perfect cups.
Nutrition
- Calories: 210 Cal
- Sugar: 17g
- Fat: 9g
- Carbohydrates: 29g
Nutritional Information*
Okay, let’s be real—these are a treat! But here’s a rough breakdown per pie cup (based on using standard brand ingredients) so you can enjoy them mindfully.
- Calories: ~210
- Fat: 9g
- Carbohydrates: 29g
- Sugar: 17g
- Protein: 3g
*Please note that this is an estimate and can vary significantly based on the specific brands of ingredients you use. For precise nutritional information, I recommend using a calculator with your exact products.
Final Thoughts from My Kitchen to Yours
Friends, these Cinnamon Roll Pumpkin Pie Cups are more than just a recipe; they’re a reminder that cooking should be fun, accessible, and full of flavor. They prove that a few simple ingredients and a little creativity can create something truly special that brings people together. Whether you’re making them for a quiet morning, a holiday feast, or just because, I hope they fill your kitchen with the same warmth and happiness they’ve brought to mine.
So, did you give them a try? I’d love to hear about your baking adventure! Tag me @Feastical on social media with your creations. Until next time, happy baking!
– Beau
Prep: 15 min | Bake: 18 min | Cool: 20 min | Total: ~50 min
Yields: 8 Pie Cups

Caramel Corn Pecan Pie Bars
Caramel Corn Pecan Pie Bars: Your New Favorite Dessert Mashup
Hey there, friend! Beau here, welcoming you back to my kitchen at Feastical. Today, we’re throwing the dessert rulebook out the window and creating something truly magical. I’m talking about my Caramel Corn Pecan Pie Bars. Just let that name roll around in your mind for a second. We’re taking everything you love about classic, gooey pecan pie—the buttery crust, the rich, nutty filling—and giving it a fun, modern twist with a crunchy, sweet caramel corn topping.
If you’ve ever been intimidated by making a whole pecan pie (will the center set? will the crust shrink? the questions are endless!), these bars are your new best friend. They’re simpler, they’re shareable, and they pack an unbelievable textural punch in every single bite. Imagine this: a melt-in-your-mouth shortbread base, a layer of sticky-sweet pecan filling that’s just firm enough to hold its shape, and a glorious crown of crispy, salty-sweet caramel corn. It’s soft, it’s chewy, it’s crunchy—all at once.
These bars are the ultimate crowd-pleaser. They’re perfect for potlucks, holiday cookie trays, or just treating yourself after a long day. They slice up beautifully, travel like a dream, and have this incredible way of making people’s eyes light up. So, are you ready to bake something that’s equal parts nostalgic comfort and exciting new flavor? Grab your favorite mixing bowl and let’s get started. This is one recipe you’ll want to make again and again.
The Day I Dropped the Popcorn (And Found Inspiration)
This recipe was born from a happy little accident, as the best kitchen creations often are. It was a few years back, right around the holidays. I was in full-on baking mode, determined to make the “perfect” traditional pecan pie for a big family gathering. At the same time, my nephew was begging me to make a big batch of my sticky caramel popcorn. You can probably see where this is going.
In the beautiful chaos of a flour-dusted kitchen, I reached for a sheet pan and accidentally bumped a huge bowl of freshly made caramel corn. A cascade of crunchy, buttery popcorn tumbled right across the cooling rack where my beautiful, still-warm pecan pie sat. I was about to have a mini meltdown, but my nephew, with the wisdom of a six-year-old, just looked at the mess and said, “Uncle Beau, now it’s a crunchy pie!”
Instead of scraping it all off, I gently pressed the popcorn into the top of the warm, sticky filling. We let it cool, sliced it into bars, and… it was a revelation. The combination was insane! The classic pie suddenly had this playful, modern edge. That “mistake” became the star of the party, and I’ve been refining this recipe ever since. It just goes to show that sometimes, the best recipes find you when you least expect it.
Gathering Your Ingredients
Part of keeping things simple is understanding your ingredients. Here’s what you’ll need to create this masterpiece. I’ve included some of my favorite tips and swaps to make it your own.
For the Shortbread Crust:
- 1 cup unsalted butter, softened: This is the soul of our crust. Using unsalted butter lets us control the salt level. Pro tip: True softness is at room temperature—it should yield gently to a finger press, not be melty. If you only have salted butter, just reduce the added salt in the crust by half.
- ½ cup powdered sugar: Powdered sugar gives the crust a finer, more delicate, melt-in-your-mouth texture compared to granulated sugar. It’s our secret weapon for that perfect sandy shortbread.
- 2 cups all-purpose flour: The trusty foundation. I always give my flour a quick fluff with a spoon before measuring to avoid packing it down.
- ½ tsp salt: Don’t skip this! Salt is the flavor enhancer that makes the butter and sugar sing. It balances the sweetness perfectly.
For the Pecan Filling:
- ¾ cup corn syrup: This is key for that classic, gooey pecan pie texture. I use light corn syrup for its neutral sweetness. For a deeper flavor, you can use golden syrup or even a blend of maple syrup and honey, but note the texture and baking time might change slightly.
- ½ cup brown sugar, packed: Pack that brown sugar firmly into your measuring cup! Its molasses notes add a warm, caramel-like depth that white sugar just can’t match.
- 2 large eggs: These are the binding agents that set the filling. Make sure they’re at room temperature for a smoother, more even mixture.
- 1 tsp pure vanilla extract: A splash of vanilla adds a beautiful aroma and rounds out all the sweet flavors. It’s the invisible ingredient that makes everything taste more “finished.”
- 2 tbsp melted butter: A little extra butter enriches the filling and gives it a gorgeous sheen.
- 1½ cups chopped pecans: I like to toast my pecans for 5-7 minutes in a 350°F oven before chopping. It wakes up their oils and gives them an incredible, nutty flavor that shines through the sweet filling.
For the Topping:
- 2 cups caramel popcorn: You can use a good-quality store-bought brand to save time, or go the extra mile with my easy homemade caramel corn recipe. Either way, you’re in for a treat.
- Flaky sea salt (optional but highly recommended): A light sprinkle of Maldon salt or another flaky sea salt right at the end creates that irresistible sweet-and-salty dynamic. It’s the chef’s kiss!
Let’s Make Some Magic: Step-by-Step
Okay, team! Preheat that oven to 350°F (175°C) and let’s get our hands dirty. This is where the fun begins. I’ll walk you through each step with all my favorite kitchen hacks.
- Prep Your Pan: Line a 9×13-inch baking pan with parchment paper, leaving a little overhang on the two long sides. This is my number one tip for easy cleanup and even easier removal! You’ll be able to lift the entire slab of bars out in one piece, making slicing an absolute breeze. Give the parchment a light spray with cooking spray for extra non-stick insurance.
- Create the Shortbread Base: In a medium bowl, combine the softened butter, powdered sugar, flour, and salt. You can use a hand mixer, a stand mixer with the paddle attachment, or even just your fingertips. Mix until it comes together in a crumbly, sandy texture. It might not look like it will hold together, but trust the process. Now, dump those crumbs into your prepared pan and press them down firmly and evenly into one solid layer. I like to use the flat bottom of a measuring cup to really compact it—this prevents a crumbly crust later. Pop it in the preheated oven and bake for 15-18 minutes, or until the edges are just starting to turn a beautiful golden brown.
- Whisk the Gooey Filling: While the crust is baking, let’s make the filling. In that same bowl (fewer dishes is always a win!), whisk together the corn syrup, packed brown sugar, room-temperature eggs, vanilla, and melted butter. Whisk it until it’s completely smooth and homogenous. No need to overdo it, just make sure there are no streaks of egg white. Now, stir in those glorious chopped pecans. If your crust is ready, pull it out of the oven—it should be hot!—and immediately pour the pecan filling over the top, spreading it evenly right to the edges.
- Bake to Perfection: Carefully return the pan to the oven and bake for another 20-25 minutes. You’re looking for the filling to be set. It should look puffed up and will jiggle just slightly in the very center when you gently shake the pan. Don’t overbake it, or you’ll lose that wonderful gooey texture. It will continue to set as it cools.
- The Grand Finale – The Caramel Corn Topping: This is the star of the show! As soon as you pull the pan from the oven, while the pecan layer is still warm and sticky, gently press the caramel popcorn evenly across the entire surface. The warmth from the bars will help the popcorn adhere. Now, for the pro move: give it a light, artistic sprinkle of flaky sea salt. This not only looks gorgeous but cuts through the sweetness perfectly.
- The Hardest Part – Waiting: I know, the aroma is incredible and you want to dive right in. But patience is key here. You must let the bars cool completely in the pan on a wire rack. This usually takes a good hour or so. This waiting period is non-negotiable for clean slices. Once cool, use the parchment paper overhang to lift the whole block out onto a cutting board. Use a sharp knife to slice into squares or bars. Wiping the knife clean between cuts helps get those picture-perfect edges.
How to Serve These Show-Stopping Bars
Presentation is part of the joy! These bars are stunning all on their own, but here are a few ways to make them even more special.
For a simple, elegant look, arrange them on a rustic wooden board or a beautiful ceramic platter. They’re rich, so I find that cutting them into smaller, bite-sized squares is perfect for parties—they disappear fast!
If you’re serving them as a decadent dessert, why not gild the lily? A small dollop of freshly whipped cream or a scoop of high-quality vanilla bean ice cream alongside a warm bar is pure heaven. The contrast of temperatures and textures is just sublime. For a cozy coffee break, these bars pair beautifully with a strong cup of black coffee or a tall glass of cold milk. However you choose to serve them, get ready for the compliments to roll in!
Make It Your Own: Delicious Recipe Variations
One of the best things about this recipe is how adaptable it is. Feel free to get creative and tweak it to your taste!
- Chocolate Drizzle: Drizzle melted dark or milk chocolate over the cooled bars for a turtle candy-inspired treat. It’s a game-changer.
- Spiced Up: Add a teaspoon of cinnamon or a pinch of cayenne pepper to the pecan filling for a warm, spicy kick that plays beautifully with the sweetness.
- Salty-Sweet Boost: Mix ½ cup of crushed pretzels in with the caramel corn topping for an extra hit of salty crunch.
- Nut Swap: Not a pecan person? Try using walnuts or a mix of your favorite nuts like almonds and hazelnuts.
- Bourbon Infusion: For a grown-up twist, add a tablespoon of good bourbon to the pecan filling along with the vanilla. It adds incredible depth of flavor.
Beau’s Chef Notes
This recipe has become a staple in my kitchen, and it’s evolved a bit since that first accidental creation. I’ve found that toasting the pecans is the single biggest flavor upgrade you can make—it’s a small step with a huge payoff. Over the years, I’ve also learned that the type of caramel popcorn matters. A sturdier, homemade-style popcorn holds up better than an airy, commercial kind, but honestly, it’s all delicious.
The biggest lesson, though, was learning to embrace kitchen mishaps. That day I spilled the popcorn taught me that some of the best flavors come from not being afraid to experiment. So, if you have an idea, try it! Cooking should be fun, not stressful. These bars are a testament to that.
Your Questions, Answered
Q: My filling is still really liquidy after the recommended bake time. What happened?
A: Oven temperatures can vary! If the center is still very jiggly, give it another 5-10 minutes. Also, make sure you’re using large eggs, not extra-large or jumbo, as too much liquid can prevent setting. The most important thing is that it should only have a slight jiggle in the very center, not a wave.
Q: Can I make these bars ahead of time?
A: Absolutely! They are actually even better the next day. Once completely cool, store them in an airtight container at room temperature for up to 3 days. The flavors meld and the texture becomes even more perfect.
Q: My crust is crumbling when I try to slice the bars. Help!
A: This usually means the crust wasn’t pressed firmly enough into the pan before baking. No worries, they’ll still taste amazing! For next time, really use some muscle and press that crust down compactly. Also, ensuring the bars are completely cool before slicing is crucial.
Q: Can I freeze these caramel corn pecan pie bars?
A> You can, but with a caveat. The bars themselves freeze beautifully for up to 2 months. Wrap them tightly. However, the caramel corn topping will lose its crispness upon thawing. It will still taste good, but the texture will be softer. For the best experience, I recommend freezing before adding the popcorn, then adding fresh caramel corn after thawing.

Caramel Corn Pecan Pie Bars
Description
A buttery shortbread base, gooey pecan filling, and a crunchy caramel corn topping. Perfect for holidays, parties, or anytime you want a crowd-pleasing treat!
Ingredients
Shortbread Crust:
-
1 cup unsalted butter, softened
-
½ cup powdered sugar
-
2 cups all-purpose flour
-
½ tsp salt
Pecan Filling:
-
¾ cup light corn syrup
-
½ cup packed brown sugar
-
2 large eggs, room temperature
-
1 tsp vanilla extract
-
2 tbsp melted butter
-
1½ cups chopped pecans (toasted if desired)
Topping:
-
2 cups caramel popcorn (homemade or store-bought)
-
Flaky sea salt, optional
Instructions
1. Prep Pan:
Line a 9×13-inch pan with parchment paper, leaving a 2-inch overhang for easy lifting. Lightly spray parchment with cooking spray.
2. Make Shortbread Crust:
-
Combine butter, powdered sugar, flour, and salt in a bowl until crumbly.
-
Press firmly and evenly into the prepared pan.
-
Bake at 350°F (175°C) for 15–18 minutes, until edges are golden.
3. Prepare Pecan Filling:
-
Whisk corn syrup, brown sugar, eggs, vanilla, and melted butter until smooth.
-
Stir in chopped pecans.
4. Bake with Filling:
-
Pour filling over hot crust and spread evenly.
-
Bake another 20–25 minutes until set (slight jiggle in center is okay).
5. Add Caramel Corn Topping:
-
While bars are still warm, gently press caramel corn over the surface.
-
Sprinkle with flaky sea salt if desired.
6. Cool & Slice:
-
Cool completely on a wire rack (~1 hour).
-
Lift out with parchment overhang and slice into bars. Wipe knife between cuts for clean edges.
Notes
-
Toast pecans for extra flavor.
-
Press crust firmly to prevent crumbling.
-
Add caramel corn only after baking; for freezer-friendly bars, add fresh popcorn after thawing.
-
Let bars cool completely before slicing.
A Quick Note on Nutrition
Let’s be real, friends—these are a decadent treat, meant to be savored and enjoyed in moderation. I’m a big believer in food being about joy and connection, not just numbers. This nutritional info is an estimate per bar (if you cut the 9×13 pan into 24 bars) to help you make informed choices.
Approximate Nutrition Per Bar: Calories: 260, Fat: 16g, Carbohydrates: 28g, Sugar: 18g, Protein: 3g.
Remember, these bars are energy-dense thanks to the nuts, butter, and sugars. They’re perfect for when you need a little pick-me-up or want to celebrate. Balance is key—enjoy one with a cup of tea, share them with loved ones, and savor every delicious bite without guilt!
Final Thoughts from My Kitchen to Yours
Well, there you have it! My beloved Caramel Corn Pecan Pie Bars. This recipe is more than just a list of ingredients; it’s a story of a happy accident that turned into a family favorite. I love how it takes a classic and makes it feel new, fun, and utterly shareable.
I hope you feel inspired to preheat your oven and give these a try. Don’t be afraid to put your own spin on them. That’s what cooking is all about. And when you do make them, I’d love to hear about it! Tag me on social @Feastical or leave a comment on the blog. There’s nothing I love more than seeing your creations.
Until next time, happy baking, and remember—the best meals are the ones made with a pinch of love and a dash of adventure.
Thanksgiving Pie Cannoli
Your New Favorite Thanksgiving Dessert is Here (And It Fits in Your Hand!)
Hey friends, Beau here! Let’s talk about the best part of Thanksgiving. No, I’m not talking about the tryptophan-induced nap on the couch (though that’s a close second). I’m talking about that glorious moment when the dessert tray makes its grand entrance. The pies. The whipped cream. The sheer, unadulterated joy.
But let’s be real for a second. As much as we love tradition, sometimes you want to shake things up. What if you could have a little bit of everything without committing to a giant slice? What if dessert was not just delicious, but also a total conversation starter? That, my friends, is where the magic of our Thanksgiving Pie Cannoli comes in.
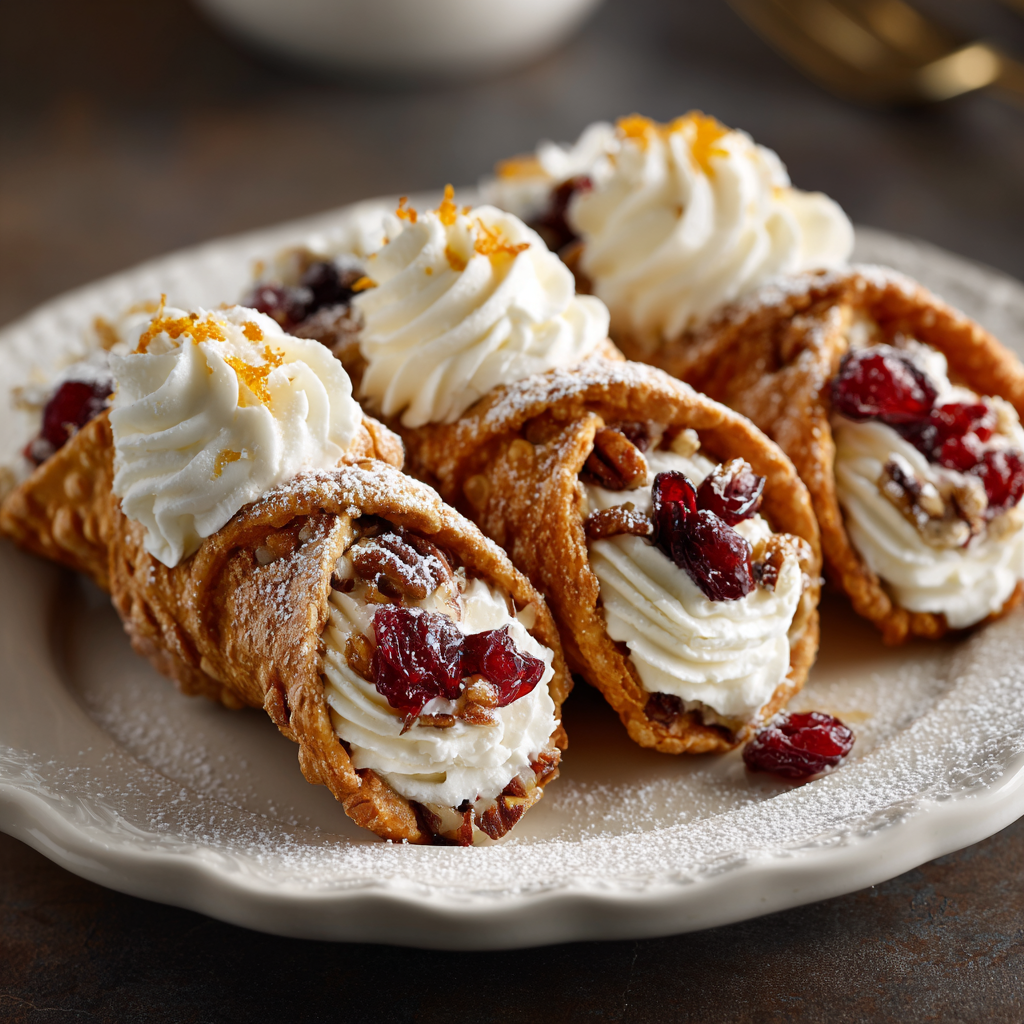
Imagine this: a crisp, golden cannoli shell, cradling not one, but three of your favorite pie fillings, whipped into fluffy, pipeable clouds. You get the warm spice of pumpkin, the rich, mapley goodness of pecan, and the bright, tart zing of cranberry, all in one perfect, handheld bite. It’s like a Thanksgiving dessert sampler platter that’s as fun to make as it is to eat. Whether you’re the designated dessert bringer or you just want to wow your family this year, this recipe is your secret weapon. So, tie on your favorite apron, and let’s turn pie night on its head!
The “Aha!” Moment: A Tale of Two Desserts
This recipe was born from a happy accident, as the best kitchen creations often are. A few years back, I hosted a “Friendsgiving” potluck in my first real apartment. The kitchen was tiny, the oven was… temperamental, and counter space was a myth. I volunteered for dessert duty, envisioning a beautiful trio of pies. Reality hit when I realized I only owned one pie dish.
Panic set in. But then, my eyes landed on a box of cannoli shells I’d picked up on a whim. Next to it sat a bowl of leftover pumpkin pie filling and some cranberry sauce from a test recipe. A lightbulb went off. What if I just… mixed them with some cream cheese and piped them in? The result was chaotic, messy, and an absolute smash hit. My friends couldn’t get enough. They loved the variety and the playful format. That messy experiment evolved into this refined, show-stopping recipe. It taught me that the best food isn’t about perfection; it’s about joy, creativity, and sharing something truly special with the people you love.
Gathering Your Pie Cannoli Toolkit
Here’s everything you’ll need to create these festive treats. Don’t stress about exact brands—this is all about feel-good cooking! I’ve included some insider tips and swaps to make it your own.
- 12 Cannoli Shells (store-bought or homemade): The edible vessel for our pie-filling masterpiece! Store-bought shells are a fantastic time-saver and work beautifully. If you’re feeling ambitious, homemade shells are a rewarding project, but for this recipe, we’re all about ease and fun.
- For the Pumpkin Filling:
- ½ cup Pumpkin Purée: Make sure you grab the plain, pure pumpkin purée, not pumpkin pie filling (which has sugar and spices already added). We want to control the flavor ourselves!
- ½ cup Whipped Cream Cheese: Using the whipped version makes blending a breeze. If you have a block of cream cheese, let it soften at room temperature for an hour before whipping it smooth.
- ¼ cup Powdered Sugar: Powdered sugar dissolves instantly and gives us a silky-smooth texture. Granulated sugar can leave a gritty feel.
- ½ tsp Pumpkin Pie Spice: The warm, cozy heart of the filling! No pumpkin pie spice? A mix of cinnamon, ginger, nutmeg, and a pinch of cloves will do the trick.
- For the Pecan Filling:
- ½ cup Pecan Pie Filling: This is a great use for store-bought filling or, even better, your Thanksgiving leftovers! If starting from scratch, simply simmer pecans with a little corn syrup, brown sugar, and a pat of butter until thickened.
- ¼ cup Mascarpone or Cream Cheese: Mascarpone adds a luxurious, rich creaminess, but standard cream cheese works perfectly too. It helps stabilize the sweet filling and adds a tangy balance.
- 1 tbsp Maple Syrup: A touch of real maple syrup enhances that classic pecan pie flavor. It’s our little chef’s secret for depth!
- For the Cranberry Filling:
- ½ cup Cranberry Sauce: Jellied or whole-berry both work! Jellied will give you a smoother, vibrant pink filling, while whole-berry offers lovely little bursts of tart fruit.
- ½ cup Whipped Cream: Whip your cream to stiff peaks before folding it in. This makes the cranberry filling light and airy.
- 2 tbsp Powdered Sugar: Cranberry sauce can be quite tart, so this sweetens it up just right.
Let’s Build These Beautiful Bites: A Step-by-Step Guide
Ready to play pastry chef? This process is simple, satisfying, and honestly, the most fun you’ll have in the kitchen all week. Follow these steps, and you’ll be a pie cannoli pro in no time.
- Chill Out First. Before you even start mixing, place your mixing bowls and beaters/whisk attachment in the freezer for 10-15 minutes. A cold bowl is the #1 secret to getting your whipped cream and fillings to fluff up perfectly. It’s a tiny step with a huge payoff.
- Whip It Good. We’ll make each filling one at a time. For the Pumpkin Filling, add the pumpkin purée, whipped cream cheese, powdered sugar, and pumpkin pie spice to a bowl. Beat them together with an electric mixer on medium speed until everything is smooth, creamy, and well-combined. Give it a taste—need more spice? Go for it! Scrape this into a separate bowl and set aside.
- Create the Pecan Dream. Now, for the Pecan Filling, combine the pecan pie filling, mascarpone (or cream cheese), and maple syrup. Beat until the mixture is uniform and fluffy. The mascarpone will cut the sweetness beautifully. Set this aside with the pumpkin filling.
- Get Berry Airy. For the Cranberry Filling, this one’s a two-parter. First, take your chilled bowl and beat the ½ cup of heavy cream with the 2 tbsp of powdered sugar until you have firm peaks. Then, gently fold in the cranberry sauce. “Folding” is key here—use a spatula and a light hand, cutting through the center and turning the bowl, to keep all that air in the whipped cream. We want it light, not dense!
- The Big Chill, Part Two. Cover all three bowls of filling and pop them in the refrigerator for at least 30 minutes. This is non-negotiable! Chilling firms up the fillings, making them much easier to pipe and preventing them from turning your cannoli shells soggy too quickly.
- Bag ‘Em Up. Once chilled, transfer each filling into its own piping bag. If you don’t have piping bags, no worries! You can use a sturdy plastic zip-top bag and snip a corner off. For a pro look, fit the bag with a large star tip—it creates those gorgeous, bakery-style swirls.
- The Grand Finale: Piping! Here’s where the magic happens. Gently pipe the fillings into each end of a cannoli shell. You can do one flavor per shell for a classic look, or go for the full “sampler” effect by piping two or even three different fillings into the same shell. Get creative! There’s no wrong way here. Just be gentle so you don’t crack the shell.
- Garnish and Glam. Right before serving, add your finishing touches. A sprinkle of crushed pecans on the pecan end, a tiny bit of candied orange zest on the cranberry, or a light dusting of powdered sugar over them all. This not only looks stunning but adds little bursts of texture and flavor.
How to Serve Your Thanksgiving Pie Cannoli
Presentation is part of the fun! These cannoli are naturally eye-catching, but a little staging goes a long way. I love arranging them on a long wooden cutting board or a elegant slate platter. Place them slightly overlapping in a row, with the colorful fillings facing up. It creates a stunning, abundant effect that will have everyone reaching for their phones to take a picture before they dig in.
For an extra touch, put small bowls of the garnishes—like extra crushed pecans or candied cranberries—on the side so guests can customize their own. These are the ultimate finger food dessert, perfect for a stand-up gathering or a more formal seated dinner. They pair wonderfully with a cup of strong coffee or a glass of dessert wine to balance the sweetness. Most importantly, serve them with a big smile—you just made something incredible!
Mix It Up! Your Pie Cannoli Playbook
The beauty of this recipe is its versatility. Once you master the base, the flavor combinations are endless. Here are a few of my favorite twists:
- Chocolate Sweet Potato: Swap the pumpkin filling for mashed sweet potato and add a tablespoon of cocoa powder to the mix. It’s like a sweet potato casserole and a brownie had a delicious baby.
- Apple Pie à la Mode: For the filling, fold a few tablespoons of thick, chunky apple butter into sweetened mascarpone. Pipe it in and immediately roll the ends in a mixture of graham cracker crumbs and cinnamon. It tastes just like apple pie with ice cream!
- Dairy-Free Delight: Easily make this vegan! Use dairy-free cream cheese and coconut whipped cream. Ensure your cannoli shells are made without butter or lard (many store-bought ones are vegan-friendly!).
- Boozy Bourbon Pecan: Add a teaspoon of good-quality bourbon to the pecan filling for a grown-up kick that screams holiday cheer.
- All-in-One Shell: Short on time? Make one batch of a single filling. A combination of cream cheese, whipped cream, and a half-cup of *both* pumpkin purée and cranberry sauce creates a swirled, festive flavor that’s easier but just as delicious.
Beau’s Kitchen Confidential
This recipe has come a long way since that first messy Friendsgiving! I’ve learned that the key is embracing the imperfections. Maybe a shell cracks a little—just fill it anyway and call it “rustic.” The first time I tried to pipe all three fillings at once, I created a colorful mess that looked more like abstract art than dessert. We laughed, we ate it, and it was still delicious.
My biggest tip? Don’t fill the cannoli shells more than an hour or two before serving. The shells will start to lose their signature crunch. It’s best to keep the fillings chilled in their bags and the shells separate, then do your piping right as guests arrive. That way, you get that satisfying, crisp snap with every single bite. It’s a little bit of planning for a perfect result.
Your Pie Cannoli Questions, Answered!
Q: Can I make the fillings a day ahead?
A: Absolutely! The fillings are actually better when they have time to chill and let the flavors meld. Prepare them up to 24 hours in advance, keep them covered tightly in the fridge, and give them a quick stir before piping.
Q: My cranberry filling is too runny. What happened?
A: This usually means the whipped cream was a bit soft or the cranberry sauce was very wet. Next time, make sure your cream is whipped to stiff peaks. For a quick fix, you can gently fold a tablespoon of instant pudding mix (vanilla or cheesecake flavor works well) into the runny filling to help thicken it up without altering the taste too much.
Q: Where can I find cannoli shells?
A: Most well-stocked grocery stores carry them in the bakery section or near the Italian foods. You can also check local Italian markets or order them online. They’re more common than you think!
Q: I can’t find piping bags. What’s the best hack?
A: A gallon-sized zip-top bag is your best friend here. Spoon the filling into one corner, press the air out, seal it, and then snip a half-inch off that corner. It works like a charm! For a star-shaped swirl, you can even tape a star piping tip to the outside of the bag before you snip the hole.

Thanksgiving Pie Cannoli
Description
Thanksgiving Pie Cannoli – Handheld Holiday Magic
Three classic Thanksgiving flavors—pumpkin, pecan, and cranberry—meet in one crisp cannoli shell. Fluffy, creamy, and perfectly portable, these bites are a dessert showstopper!
Ingredients
Cannoli Shells
-
12 store-bought or homemade cannoli shells
Pumpkin Filling:
-
½ cup pumpkin purée (plain)
-
½ cup whipped cream cheese
-
¼ cup powdered sugar
-
½ tsp pumpkin pie spice
Pecan Filling:
-
½ cup pecan pie filling (store-bought or leftover)
-
¼ cup mascarpone or cream cheese
-
1 tbsp maple syrup
Cranberry Filling:
-
½ cup cranberry sauce (jellied or whole-berry)
-
½ cup heavy cream, whipped to stiff peaks
-
2 tbsp powdered sugar
Optional Garnishes:
-
Crushed pecans, candied orange zest, powdered sugar
Instructions
1. Chill Bowls & Whisk:
Place mixing bowls and beaters in the freezer for 10–15 minutes for fluffier fillings.
2. Make Fillings:
-
Pumpkin: Beat pumpkin, cream cheese, powdered sugar, and pie spice until smooth.
-
Pecan: Beat pecan filling, mascarpone, and maple syrup until uniform.
-
Cranberry: Fold cranberry sauce into whipped cream gently to keep it airy.
3. Chill Fillings:
Cover bowls and refrigerate for at least 30 minutes to firm up.
4. Prepare Piping Bags:
Transfer each filling into a piping bag or zip-top bag with a corner snipped off. Optional: use a star tip for decorative swirls.
5. Pipe & Garnish:
-
Pipe fillings into cannoli shells.
-
One flavor per shell, or mix for a “sampler” effect.
-
Garnish with crushed pecans, candied zest, or powdered sugar just before serving.
Notes
-
Arrange on a long board or platter for visual appeal.
-
Keep shells separate until serving for a crisp texture.
-
Serve with coffee or dessert wine for a festive touch.
Nutrition
- Calories: 220 Cal per Cannoli
- Sugar: 14g
- Fat: 12g
- Carbohydrates: 24g
Nutritional Information (Per Cannoli, Approximate)
Let’s keep it real—this is a celebratory dessert! It’s all about enjoying special treats in moderation. This info is an estimate based on the specific ingredients used. Your exact numbers may vary.
- Calories: 220
- Fat: 12g
- Carbohydrates: 24g
- Sugar: 14g
- Protein: 3g
Remember, the joy and connection that come from sharing a homemade dessert are just as important as what’s on the plate. Savor every bite guilt-free!
Final Thoughts from My Kitchen to Yours
Well, there you have it! Your guide to creating the most talked-about dessert at your Thanksgiving table. These Thanksgiving Pie Cannoli are more than just a recipe; they’re a reminder that food is meant to be fun, creative, and shared.
I hope you feel inspired to give these a try. Don’t be afraid to put your own spin on them. Maybe you have a famous sweet potato recipe you want to turn into a filling, or perhaps you want to drizzle them with chocolate. Make it your own! That’s what cooking is all about.
If you do make them, I’d be absolutely thrilled to see your creation. Tag me @Feastical on social media so I can cheer you on! From my kitchen to yours, happy cooking, and have a wonderful, flavor-filled holiday.
– Beau
Prep Time: 25 min | Chill Time: 30 min | Total Time: ~55 min
Creamy Chicken & Wild Rice Soup
Your New Favorite Bowl of Comfort: Creamy Chicken & Wild Rice Soup
Hey there, friend! Beau here, welcoming you back to my kitchen. Is there anything quite like the feeling of a chilly day turning into a cozy night, especially when you have a pot of something incredible simmering on the stove? That’s the magic we’re cooking up today. I’m talking about my ultimate go-to, the soup that feels like a warm hug in a bowl: Creamy Chicken & Wild Rice Soup.
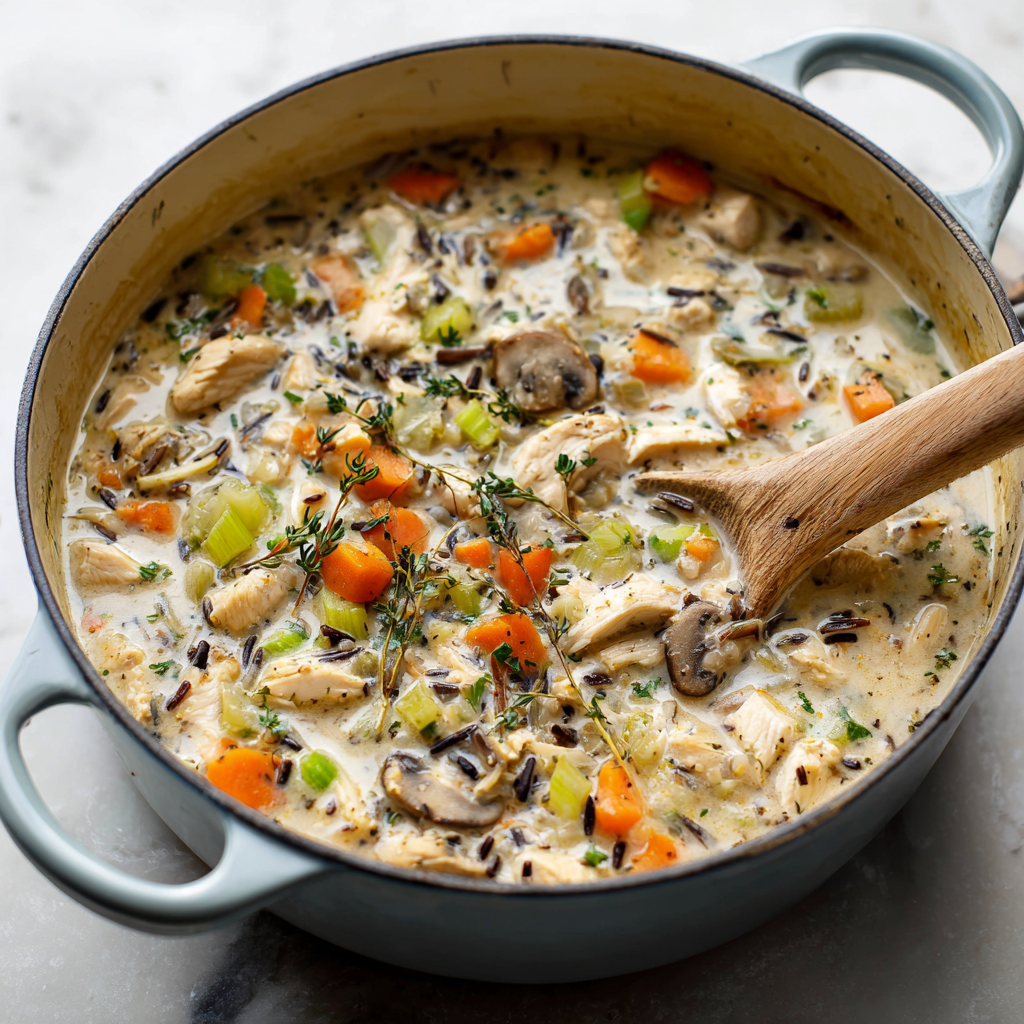
This isn’t just any soup. This is the one you make when you want a meal that’s both impressively delicious and incredibly forgiving. It’s the soup you proudly serve to guests but also happily eat curled up on the couch in your comfiest socks. We’re combining tender, juicy chicken with a nutty, hearty wild rice blend, all swimming in a creamy, savory broth that’s packed with classic veggies. It’s rich, it’s satisfying, and I promise you, it tastes even better the next day. The flavors have a chance to get to know each other in the fridge, resulting in a depth that’s just… *chef’s kiss*.
And because I’m all about making life easier and more delicious, I’ve got a fantastic little bonus for you: my favorite make-ahead Mason Jar Salad recipe. It’s the perfect, vibrant sidekick to this hearty soup, creating a balanced meal that’s ready when you are. So, tie on your apron, grab your favorite wooden spoon, and let’s create some kitchen magic together.
The Story Behind the Soup: A Potluck Savior
This recipe holds a special place in my heart because it truly saved the day once. A few years back, I was invited to a big, casual potluck with a bunch of friends. I’d had a crazy week and completely forgot about it until the morning of. Panic set in! I had no time for a fancy, complicated dish. I rummaged through my pantry and fridge, and there it was: a lone bag of wild rice blend, some chicken thighs, and the usual vegetable suspects.
I threw everything into my biggest Dutch oven, crossed my fingers, and let it simmer while I got ready. I remember the way the aroma filled my entire apartment—savory, herby, and deeply comforting. When I arrived at the party, my humble pot of soup was a little overshadowed by some fancier-looking dishes. But within an hour, that pot was scraped clean. People kept coming back for “just one more little ladleful.” It was the quiet superstar of the party, a reminder that the simplest, most heartfelt food often brings the most joy. That’s the spirit I want to bring to every recipe here at Feastical.
Gathering Your Ingredients: A Chef’s Guide
Great soup starts with great ingredients, but don’t stress about having everything exactly perfect. Cooking is an adventure, not a science experiment! Here’s what you’ll need, along with a few of my insider tips and swaps.
- 1 lb boneless, skinless chicken breasts or thighs: I’m a thigh guy through and through—they have more fat, which means more flavor and a juicier result, even after simmering. But breasts work beautifully if that’s what you have! They’ll stay super tender cooked gently in the broth.
- 1 tablespoon olive oil: Our cooking fat. Butter works here too for a richer flavor.
- 1 small onion, diced: The sweet, aromatic base of our soup. Yellow or white onions are perfect.
- 2 carrots, chopped: They add a subtle sweetness and a gorgeous pop of color. Don’t skip the chopping—uniform pieces mean even cooking.
- 2 celery stalks, chopped: The third member of the classic “holy trinity,” celery brings an essential earthy flavor that builds the foundation of the broth.
- 3 garlic cloves, minced: Because, well, garlic is life. Fresh is best here for that pungent kick that mellows into sweetness as it cooks.
- 6 cups chicken broth: This is the soul of your soup! Use a good-quality, low-sodium broth so you can control the salt level. Homemade stock is a game-changer if you have it.
- 1 cup wild rice blend, rinsed: I love a blend because you get different textures and colors. Pro-tip: Always rinse your rice! It removes excess starch and keeps your broth clear. True wild rice takes longer to cook, so a blend is more forgiving.
- 1 teaspoon dried thyme: This herb is a classic pairing with chicken and adds a lovely, subtle earthiness. If you have fresh thyme, use about 1 tablespoon.
- ½ teaspoon black pepper: Freshly cracked is always my preference for the brightest flavor.
- ¾ cup heavy cream or half-and-half: This is what gives the soup its luxurious, creamy texture. Heavy cream will be richer, half-and-half a bit lighter. For a dairy-free version, full-fat coconut milk is a fantastic substitute.
- 2 tablespoons flour (optional, for thicker texture): I like my soup brothy, but if you prefer a thicker, chowder-like consistency, this is your secret weapon.
- Salt, to taste: We add this at the end! Since broths vary in saltiness, we season after everything has come together.
Let’s Get Cooking: Building Your Masterpiece, Step-by-Step
Okay, now for the fun part! I’ll walk you through each step. It’s a simple process, but these little tips will make a big difference in your final bowl.
Step 1: The Aromatic Base (Sautéing the Veggies)
Grab your largest soup pot or Dutch oven and place it over medium heat. Add the olive oil. Once the oil shimmers (that’s your cue it’s hot!), toss in the diced onion, carrots, and celery. We call this “sweating” the vegetables. We’re not looking to brown them, just to soften them up and release their amazing flavors. Give them a good stir every minute or so and let them cook for about 5-7 minutes, until the onion becomes translucent. Now, add the minced garlic and stir for just 30 more seconds—until it’s fragrant. You don’t want to burn the garlic, or it’ll turn bitter. Ah, that smell? That’s the sound of success.
Step 2: The Simmering Heart (Bringing it All Together)
Now, add the whole chicken pieces, the rinsed wild rice blend, the dried thyme, the black pepper, and all 6 cups of chicken broth. Give everything a gentle stir to combine. Crank the heat up to high and bring the pot to a rolling boil. Once it’s bubbling away, immediately reduce the heat to low, cover the pot with a lid, and let it simmer gently. This is where the patience pays off. Set your timer for 40-45 minutes. The lid traps the steam and heat, cooking the rice and chicken perfectly. You’ll know it’s ready when the wild rice kernels have burst open and are tender.
Step 3: The Shred & Return (Prepping the Chicken)
Carefully remove the chicken breasts or thighs from the pot and place them on a cutting board. They’ll be piping hot, so I like to use two forks for this next part. Use one fork to steady the chicken and the other to pull and shred it into bite-sized pieces. It should fall apart easily if it’s cooked through. Once shredded, simply dump all that beautiful chicken back into the pot. See? Easy.
Step 4: The Creamy Finish (Adding Richness & Body)
Here’s where the magic happens! Turn the heat down to the lowest setting. Pour in the heavy cream or half-and-half and stir gently to incorporate. Chef’s Hack: If you want a thicker soup, now’s the time. Take the optional 2 tablespoons of flour and whisk it into a small bowl with a few tablespoons of the hot broth from the pot until it forms a smooth, lump-free paste (this is called a slurry). Slowly drizzle this slurry back into the soup while stirring constantly. Let it simmer for another 2-3 minutes, and you’ll feel the soup thicken up beautifully.
Step 5: The Final Taste (Seasoning is Key)
Finally, the most important step: tasting! Grab a clean spoon and taste your creation. Now, and only now, add salt as needed. Start with a ½ teaspoon, stir, taste again, and add more if you like. Remember, you can always add more salt, but you can’t take it out. Season until the flavors truly sing.
How to Serve It Up: The Perfect Bowl
Presentation is part of the fun! Ladle this gorgeous, steaming soup into deep, wide bowls. I love to garnish it with a little something extra for color and texture. A fresh sprinkle of chopped parsley or a few extra cracks of black pepper looks fantastic. For a touch of brightness, a small squeeze of lemon juice can really lift all the flavors.
And for the full Feastical experience, pair it with the Mason Jar Salad I mentioned. The crisp, tangy salad is the perfect contrast to the rich, creamy soup. It’s a meal that feels thoughtful and complete without any last-minute stress. Don’t forget a big slice of crusty, warm bread for dipping—it’s mandatory for getting every last drop of that creamy broth!
Make It Your Own: Delicious Recipe Variations
One of the best things about this soup is how adaptable it is. Feel free to get creative and make it suit your taste or what’s in your fridge!
-
- The Mushroom Lover’s Twist: Sauté 8 ounces of sliced cremini mushrooms with the onions and carrots for a deep, umami-rich flavor.
- Lighter Version: Swap the heavy cream for half-and-half or even whole milk. You can also use a leaner protein like turkey breast.
Dairy-Free Delight: Use full-fat coconut milk instead of cream. It adds a subtle sweetness that works surprisingly well with the savory flavors.
- “Everything but the Kitchen Sink” Soup: Toss in a handful of fresh spinach or kale during the last 5 minutes of cooking, just until wilted. A cup of frozen corn or peas works great too!
- Herbaceous Upgrade: Stir in 2 tablespoons of chopped fresh parsley and 1 tablespoon of fresh dill along with the cream for a bright, garden-fresh finish.
Beau’s Chef Notes: A Few Parting Thoughts
This recipe has evolved in my kitchen over the years. I used to be so precise, measuring every grain of rice. Now? I eyeball it. I add a little extra carrot because I love the color. Sometimes I throw in a parmesan rind while it simmers for an extra flavor boost (just fish it out before serving!). The point is, make it yours. This soup is forgiving. The first time I made it, I accidentally used a whole cup of cream instead of three-quarters. Guess what? It was still absolutely delicious. Don’t be afraid to play around. That’s where the real joy of cooking lives.
Your Soup Questions, Answered!
Q: My soup turned out too thin. How can I thicken it up?
A: No worries! The flour slurry mentioned in the instructions is your best bet. If you’ve already added the cream, you can still make a slurry with a tablespoon of cornstarch and two tablespoons of cold water or broth. Whisk it smooth, stir it in, and simmer for a few minutes until thickened.
Q: Can I make this in a slow cooker?
A: Absolutely! Sauté the veggies quickly on the stove first (this step adds a ton of flavor), then transfer everything except the cream and flour to your slow cooker. Cook on LOW for 6-7 hours or HIGH for 3-4 hours. Shred the chicken, then stir in the cream at the very end.
Q: Why is my wild rice still chewy?
A: Different wild rice blends can have different cooking times. If it’s still too firm after 45 minutes, just continue simmering, checking every 10 minutes, until it’s tender to your liking. You might need to add a splash more broth if it gets too thick.
Q: How long does this soup last in the fridge?
A: It keeps beautifully! Store it in an airtight container for up to 4 days. The rice will continue to absorb liquid, so you may need to add a little broth or water when you reheat it.

Creamy Chicken & Wild Rice Soup
Description
Creamy Chicken & Wild Rice Soup – A Hug in a Bowl
Tender chicken, nutty wild rice, and hearty veggies swim in a rich, creamy broth. This soup is comforting, forgiving, and tastes even better the next day.
Ingredients
-
1 lb boneless, skinless chicken breasts or thighs
-
1 tbsp olive oil (or butter)
-
1 small onion, diced
-
2 carrots, chopped
-
2 celery stalks, chopped
-
3 garlic cloves, minced
-
6 cups chicken broth (low-sodium recommended)
-
1 cup wild rice blend, rinsed
-
1 tsp dried thyme (or 1 tbsp fresh)
-
½ tsp black pepper
-
¾ cup heavy cream or half-and-half (or coconut milk for dairy-free)
-
2 tbsp flour (optional, for thicker soup)
-
Salt, to taste
-
Optional: chopped parsley or dill for garnish
Chef’s Tip: Rinse wild rice to remove excess starch and keep your broth clear.
Instructions
1. Sauté the Veggies:
In a large pot or Dutch oven over medium heat, heat olive oil. Add onion, carrots, and celery. Cook 5–7 minutes until softened. Add garlic and cook 30 seconds until fragrant.
2. Simmer Soup:
Add chicken, wild rice, thyme, pepper, and broth. Bring to a boil, then reduce heat to low, cover, and simmer 40–45 minutes, until rice is tender and chicken is cooked.
3. Shred Chicken:
Remove chicken, shred with two forks, and return to the pot.
4. Add Cream & Thicken (Optional):
Stir in cream or half-and-half. For thicker soup, make a slurry with flour and a little hot broth, then whisk it in. Simmer 2–3 minutes until thickened.
5. Season & Serve:
Taste and adjust salt. Serve with fresh parsley, dill, or a squeeze of lemon. Optional: pair with crusty bread or a crisp salad.
Notes
-
Mushroom Lover’s: Sauté 8 oz sliced mushrooms with the veggies.
-
Lighter Version: Use half-and-half or whole milk instead of cream.
-
Dairy-Free: Use coconut milk.
-
Extra Veggies: Add spinach, kale, corn, or peas near the end.
-
Herbaceous Upgrade: Stir in fresh parsley and dill for brightness.
-
Slow Cooker: Sauté veggies, transfer everything but cream and flour to slow cooker. Cook LOW 6–7 hrs or HIGH 3–4 hrs, then stir in cream at the end.
Nutrition
- Calories: 380 Cal
- Fat: 16g
- Carbohydrates: 30g
- Protein: 30g
Nutritional Information (Per Serving)
Prep Time: 15 minutes | Cook Time: 45 minutes | Total Time: 1 hour
Servings: 6
This nutritional info is an estimate and can vary based on specific ingredients used.
- Calories: ~380
- Protein: 30g
- Fat: 16g
- Carbohydrates: 30g
Diet Notes: This recipe is naturally gluten-free if you omit the flour or use a gluten-free alternative. It’s easily adaptable for dairy-free and lower-fat diets as outlined in the variations. It’s a fantastic make-ahead meal for easy weekly lunches or dinners.
The Perfect Partner: Make-Ahead Mason Jar Salads
Layer these ingredients in order in a quart-sized mason jar to keep your greens fresh and crisp. Makes 4 jars.
- Layer 1 (Bottom): 2 tbsp balsamic vinaigrette
- Layer 2: 2 tbsp dried cranberries
- Layer 3: 2 tbsp chopped pecans
- Layer 4: ¼ cup crumbled goat cheese
- Layer 5 (Top): 1 cup baby spinach, packed tightly
To Serve: Shake the jar vigorously to distribute the dressing, or pour the contents into a bowl for a perfectly dressed, flavorful salad!
Final Thoughts from My Kitchen to Yours
Well, there you have it, my friend. My heart-warming, soul-soothing recipe for Creamy Chicken & Wild Rice Soup. I hope this recipe becomes a trusted favorite in your home, just like it is in mine. It’s more than just a list of ingredients and steps; it’s an invitation to slow down, to create something nourishing, and to share it with the people you love.
If you make it (and I really hope you do!), I’d be thrilled to hear about it. Tag me on social @feastical or leave a comment on the blog. Tell me what variations you tried, or share your own favorite soup story. After all, food is the one language we all speak, and the kitchen is the best room in the house to connect. Until next time, happy cooking!

Buffalo Chicken Sweet Potato Casserole
Your New Favorite Dinner is Waiting in This One Pan
Hey friends, Beau here! Let’s be real for a second. Some nights, you want a meal that feels like a triumph. Something you can proudly post on your story. But most nights? Most nights, you just want something incredibly delicious, surprisingly wholesome, and ridiculously easy to clean up. You want flavor that punches you in the best way possible, and you want to know that tomorrow’s lunch is already handled. If you’re nodding your head, then my friend, you and this Buffalo Chicken Sweet Potato Casserole are about to become very close.
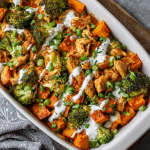
This isn’t just another casserole. This is the holy grail of weeknight wins. We’re talking tender, shredded chicken smothered in that iconic, tangy buffalo sauce, nestled alongside sweet, caramelized roasted potatoes and vibrant green broccoli. It all gets baked into a harmonious, feel-good feast that’s finished with a cool, creamy drizzle of ranch. It’s the perfect balance of spicy, sweet, and savory, all coming together in a single sheet pan. Whether you’re feeding a hungry family, prepping meals for a crazy week ahead, or just satisfying a serious comfort food craving, this recipe is your new go-to. It’s gluten-free, packed with protein, and so forgiving you can make it your own. So, preheat that oven, grab your favorite baking sheet, and let’s make a little magic happen.
The Game Day Miracle That Started It All
This recipe was born out of a beautiful, chaotic mess. Picture this: It’s a crisp autumn Sunday, my friends are piled into the living room for the big game, and I’m on snack duty. The usual suspects were there—wings, nachos, the works. But I had a few friends who were trying to eat a bit cleaner, and let’s be honest, wings, while glorious, can be a bit of a project. I looked at the spread and thought, “How can I give everyone that same game-day flavor punch but in a more wholesome, sit-down-and-enjoy-it kind of way?”
I raided the fridge. I had sweet potatoes, some leftover shredded chicken from the night before, and a head of broccoli looking lonely in the crisper. The buffalo sauce and ranch were already on the counter. In a moment of “what’s the worst that could happen?” inspiration, I tossed it all together on a sheet pan and threw it in the oven. The result? The wings were almost entirely ignored. This humble casserole was the surprise star of the day. It had all the crowd-pleasing flavor but felt nourishing and complete. It was a reminder that the best recipes aren’t always planned; sometimes, they’re discovered when you’re just trying to feed the people you love.
Gathering Your Flavor All-Stars
Here’s everything you’ll need to create this masterpiece. The beauty of this casserole is in its simplicity, so don’t stress about having every single thing exact. I’ve included some easy swaps and chef-y insights to help you along the way.
- 2 large sweet potatoes, peeled and cubed: These are our sweet, hearty base. Look for firm potatoes with smooth skin. Chef’s Insight: Cubing them into even, ½-inch pieces is key! This ensures they all cook at the same time, so you don’t end up with some mushy bits and some crunchy bits.
- 1½ lbs boneless, skinless chicken breasts, cooked and shredded: The protein powerhouse. Time-Saver Tip: Use a rotisserie chicken! It’s a total game-changer for speed. You can also poach or bake your own breasts ahead of time.
- 2 cups broccoli florets: For that pop of color, texture, and goodness. Substitution Idea: Not a broccoli fan? Cauliflower florets are a fantastic swap and soak up the buffalo sauce beautifully.
- 2 tablespoons olive oil: To get our potatoes perfectly roasted and crispy. Avocado oil works great here too for its high smoke point.
- ½ cup buffalo sauce (adjust to taste): The star of the show! Heat Level Tip: Start with ½ cup if you’re sensitive to spice, you can always add more later. I’m a Frank’s RedHot devotee, but use your favorite.
- ¼ cup ranch dressing (plus more for drizzling): The cool, creamy counterpart to the spice. Dietary Swap: For a lighter option, Greek yogurt mixed with ranch seasoning is a phenomenal, protein-packed alternative.
- Salt and pepper, to taste: The essential flavor builders. Don’t be shy with seasoning the potatoes!
- Optional: chopped green onion or parsley for garnish: A little fresh green at the end makes it look restaurant-worthy and adds a fresh flavor note.
Let’s Build Your Casserole, Step-by-Step
Ready to get your hands dirty? Follow these steps, and you’ll have a foolproof, delicious dinner in no time. I’ve sprinkled in my favorite kitchen hacks to make sure you get perfect results every single time.
- Preheat oven to 400°F (200°C). Getting your oven nice and hot before the potatoes go in is crucial for that caramelized, crispy exterior we’re after.
- Toss sweet potato cubes with olive oil, salt, and pepper. Spread on a baking sheet and roast for 20 minutes. Chef’s Hack: Use your hands to toss everything in a large bowl! This ensures every single cube gets a glossy coat of oil, which is the secret to even roasting. Spread them out in a single layer on the sheet pan—no overcrowding! This lets the hot air circulate and gives us those delicious browned edges.
- While the potatoes roast, mix shredded chicken with buffalo sauce and ranch dressing in a large bowl. This is where the magic starts. Let the chicken really soak up that saucy goodness. If you’re using pre-cooked chicken, this is also a great time to taste and adjust the spice level. Want more kick? Add more buffalo sauce!
- Remove sweet potatoes from the oven. Add broccoli florets directly to the hot pan and give everything a good toss. Why we do this: Adding the broccoli partway through prevents it from turning into a mushy, overcooked mess. The residual heat from the pan will start to cook it immediately, and it will roast to perfect tenderness in the final bake. This little trick saves you from washing another bowl, too!
- Spread the buffalo chicken mixture evenly over the veggies. Just dollop it right on top and use a spoon to create an even layer. Don’t mix it in! We want those potatoes and broccoli on the bottom to continue crisping up.
- Return the pan to the oven for 10–15 more minutes, until everything is heated through and the edges are slightly crisped. You’ll know it’s done when your kitchen smells incredible and you see the sauce bubbling around the edges.
- Drizzle with extra ranch before serving. Garnish with green onion or parsley if desired. This final flourish is non-negotiable! The cool ranch against the warm, spicy casserole is a flavor sensation you don’t want to miss.
How to Serve It Up Like a Pro
This casserole is a complete meal all on its own, but a few simple touches can take it from great to “can I get the recipe?!” territory. Here’s how I love to serve it:
Family-Style Feast: Bring the entire sheet pan right to the table (put a trivet down first!). Let everyone scoop their own portion. It’s casual, fun, and makes for a real communal eating experience.
The Perfect Plate: Use a large spoon to scoop down to the bottom, making sure you get a bit of sweet potato, broccoli, and chicken in every bite. Serve it alongside a simple, crisp green salad with a light vinaigrette to balance the richness. A few extra carrot and celery sticks on the side lean into the whole buffalo wing vibe and add a refreshing crunch.
For Meal Preppers: Divide the casserole evenly into four airtight containers. It reheats like a dream in the microwave, making your future self very, very happy.
Make It Your Own: 5 Flavorful Twists
One of the best things about this recipe is its versatility. Feel free to get creative and tailor it to your cravings or dietary needs!
- Cheesy Buffalo Bliss: Are you even a casserole without cheese? Right before the final bake, sprinkle a cup of shredded sharp cheddar or Monterey Jack cheese over the top. Broil for the last minute to get it golden and bubbly.
- BBQ Swap: Not in a buffalo mood? Swap the buffalo sauce for your favorite BBQ sauce. The sweet and smoky notes with the sweet potatoes are a match made in heaven.
- Go Fully Plant-Based: Use two cans of drained and rinsed chickpeas or a plant-based chicken alternative instead of the chicken. Just toss them with the sauce as directed. Use a vegan ranch to keep it dairy-free!
- “Loaded” Potato Style: After baking, top with all the loaded potato fixings: crispy bacon bits, extra sharp cheddar, and a big dollop of sour cream or Greek yogurt instead of ranch.
- Spice Explorer: Add a teaspoon of smoked paprika or cumin to the olive oil when tossing the sweet potatoes for an extra layer of warm, smoky flavor.
Beau’s Kitchen Notes & Stories
This recipe has become a staple in my home, and it’s evolved in the funniest ways. The first time I made it, I was so eager that I didn’t cube the sweet potatoes small enough. Let’s just say we had a mix of “fork-tender” and “still-crunchy-in-the-middle.” It was a good lesson in patience! Now, I always use a sharp knife and take my time. Another time, a friend who was over insisted on adding blue cheese crumbles instead of ranch. I was skeptical, but wow—it was incredible! It just goes to show that recipes are living things. Don’t be afraid to play with your food. The worst thing that can happen is you learn something for next time, and the best thing is you create a new family favorite.
Your Questions, Answered!
I’ve gotten a lot of questions about this casserole over the years. Here are the most common ones to help you avoid any kitchen hiccups.
Q: My sweet potatoes are still hard after 20 minutes. What gives?
A: This usually means your cubes were too large or your oven wasn’t fully preheated. All ovens vary a bit! Just pop them back in for another 5-10 minutes until they’re easily pierced with a fork. Smaller, uniform cubes are the key to success.
Q: Can I make this entire casserole ahead of time and just bake it later?
A: Absolutely! Assemble the entire casserole up to the point of the final bake. Cover the sheet pan tightly with plastic wrap or foil and refrigerate for up to 24 hours. When you’re ready, you may need to add a few extra minutes to the baking time since it will be going into the oven cold.
Q: My broccoli got mushy. How can I prevent that?
A: Mushy broccoli is almost always a sign of over-baking. The trick is adding it halfway through, just like the recipe states. If your broccoli florets are very large, you can even break them down into smaller pieces so they cook even quicker.
Q: Is there a way to make this less spicy for my kids?
A> For sure! You have a couple of options. You can use a mild buffalo sauce or even halve the amount of sauce you mix with the chicken. Another great idea is to set aside a portion of the un-sauced chicken and veggies for the kids before you mix in the buffalo sauce for the adults.
Buffalo Chicken Sweet Potato Casserole
Description
This sheet-pan casserole is the ultimate weeknight win: tender shredded chicken tossed in tangy buffalo sauce, caramelized sweet potatoes, and crisp-tender broccoli, finished with a creamy ranch drizzle. It’s gluten-free, high-protein, and meal-prep friendly.
Ingredients
-
2 large sweet potatoes, peeled and cubed (~½-inch)
-
1½ lbs cooked, shredded chicken (rotisserie or poached/baked)
-
2 cups broccoli florets (or cauliflower)
-
2 tbsp olive oil (or avocado oil)
-
½ cup buffalo sauce (adjust to taste)
-
¼ cup ranch dressing (plus extra for drizzling)
-
Salt and pepper, to taste
-
Optional: chopped green onion or parsley for garnish
Chef’s Tip: Evenly sized sweet potato cubes ensure consistent roasting; toss them in oil by hand for a glossy, crisp finish.
Instructions
-
Preheat Oven: 400°F (200°C).
-
Roast Sweet Potatoes: Toss cubes with olive oil, salt, and pepper. Spread on a sheet pan in a single layer and roast 20 minutes.
-
Prep Chicken: Mix shredded chicken with buffalo sauce and ranch in a large bowl. Adjust heat level as desired.
-
Add Broccoli: Remove sheet pan from oven, toss in broccoli florets, and return pan to oven for 5 minutes.
-
Assemble Casserole: Spread buffalo chicken over the sweet potatoes and broccoli. Return to oven 10–15 minutes until heated through and edges slightly crisp.
-
Finish & Serve: Drizzle with extra ranch and garnish with green onion or parsley. Serve family-style, on plates, or portion into meal prep containers.
Notes
-
Cube sweet potatoes uniformly for even roasting.
-
Add broccoli midway to prevent mushiness.
-
Adjust spice for kids by using mild buffalo sauce or setting aside unspiced portions.
Nutrition
- Calories: 420 Cal Per Serving
- Fat: 18g
- Carbohydrates: 28g
- Protein: 38g
A Quick Look at the Goodness Inside
Now, I’m not a nutritionist, but I am a chef who cares about fueling my body with delicious, real food. Here’s a general breakdown of what you’re getting in each hearty serving of this casserole. Remember, these are estimates and can vary based on your specific ingredients (like the brand of ranch or buffalo sauce you use).
Prep Time: 15 minutes | Cook Time: 35 minutes | Total Time: 50 minutes
Calories: ~420 | Protein: 38g | Fat: 18g | Carbs: 28g
This dish is naturally gluten-free (just double-check your buffalo and ranch labels to be sure) and is a fantastic high-protein meal. The sweet potatoes provide complex carbs and fiber for sustained energy, while the broccoli adds vitamins and minerals. It’s a balanced meal that satisfies your cravings without making you feel weighed down, which is exactly what we’re going for at Feastical.
Dig In & Enjoy!
Well, there you have it! My go-to recipe for when life gets busy but my taste buds demand something extraordinary. This Buffalo Chicken Sweet Potato Casserole is more than just a recipe; it’s a reminder that eating well doesn’t have to be complicated. It’s about throwing a few simple, good ingredients together and letting the oven do the work.
I truly hope this dish brings as much joy and ease to your kitchen as it has to mine. If you make it, I’d love to see your creation! Tag me @Feastical on social media or use the hashtag #FeasticalEats. Nothing makes me happier than seeing you guys bring these recipes to life. Now, go preheat that oven and treat yourself to something wonderful. You’ve earned it.
With love and a full plate,

Mini Meatloaf Muffins with Hidden Veggies
Mini Meatloaf Muffins: Your New Favorite Freezer-Friendly Feast
Hey friends, Beau here from Feastical! Let’s be real for a second. Some days, you want a meal that feels like a warm, comforting hug from the inside out. You’re dreaming of that classic, savory, home-cooked goodness that makes everyone gather around the table with zero complaints. But other days? Other days, you’re just trying to get a halfway-decent dinner on the table before your will to live evaporates into the steam rising from the sink full of pots and pans.
I see you. I’ve been you. And that, my friends, is precisely why I’m so utterly obsessed with these Mini Meatloaf Muffins. We’re taking the soul-soothing power of a classic meatloaf and giving it a genius, modern makeover. Imagine this: perfectly portioned, individual meatloaves, baked in a muffin tin until they’re tender and juicy with a slightly caramelized top. But here’s the secret weapon—they’re jam-packed with hidden veggies, making them a total win for the whole family (especially the little, veggie-skeptical ones).
And because I’m all about making life easier, we’re pairing these flavor-packed muffins with the creamy dreaminess of mashed sweet potatoes and some crisp, fresh green beans. It’s a balanced, beautiful plate of food that comes together in about 40 minutes. The best part? This recipe is a meal-prepping superstar. Whip up a batch on Sunday, and you’ve got lunches or dinners for the week that you’ll actually be excited to eat. No more sad desk salads! So, grab your favorite mixing bowl and let’s turn your kitchen into the heart of the home, one mini muffin at a time.
A Tale of Two Meatloaves: My Kitchen Epiphany
This recipe didn’t just appear out of thin air. It was born from a minor kitchen disaster that turned into a major “aha!” moment. Picture this: It’s a few years back, and I’m attempting to make my grandpa’s famous, massive, family-sized meatloaf for a casual weeknight dinner. I’m talking about a two-pound behemoth. I get it all shaped and in the pan, feeling pretty proud of myself, when I realize… I totally misjudged the time. That loaf needed a solid hour and a half in the oven. My stomach was growling at the 30-minute mark.
In a moment of hungry desperation, I scooped up a handful of the raw mixture, plopped it into a muffin tin I had out for morning pancakes, and thought, “Well, let’s see what happens.” Twenty minutes later, I pulled out these adorable, perfectly cooked mini meatloaves. They were faster, they had more of that delicious caramelized surface area, and they were just… fun! That happy accident changed my weeknight dinner game forever. It’s a reminder that sometimes the best recipes come from a little improvisation and a lot of hunger.
Gathering Your Flavor Arsenal: The Ingredients
Here’s everything you’ll need to create this feel-good feast. Don’t be shy about making swaps—cooking is all about making a recipe your own!
For the Meatloaf Muffins (Makes 12 Muffins)
- 1½ lbs lean ground beef or turkey: I often use 93/7 beef for a great balance of flavor and leanness, but ground turkey is a fantastic lighter option. The key is not to go too lean (like 99/1), or your muffins might be a tad dry.
- 1 cup finely grated carrots or zucchini (or a mix!): This is our secret veggie weapon! Grating them ensures they blend in seamlessly, adding moisture and nutrients. No one will ever know! If using zucchini, just squeeze out the excess water in a clean kitchen towel first.
- ½ cup finely diced onion: The aromatic base. Yellow onion is perfect here for its sweet, mellow flavor when cooked.
- 1 egg: Our trusty binder, holding all these beautiful ingredients together.
- ½ cup breadcrumbs: They help absorb the juices and keep the texture tender. Panko breadcrumbs will give you a slightly lighter texture, while traditional ones are great too. For a gluten-free option, almond flour or gluten-free oats pulsed in a food processor work wonders.
- 2 tablespoons ketchup (plus more for topping): A little bit mixed in adds a touch of sweetness and tang. We’ll also swipe a bit on top for that classic meatloaf glaze.
- 1 teaspoon garlic powder: For that essential, savory depth. You can use a fresh minced clove if you prefer!
- 1 teaspoon Italian seasoning: My favorite shortcut for a herbaceous punch. It’s a blend of oregano, basil, thyme, and rosemary all in one jar.
- Salt and pepper, to taste: The fundamentals! Don’t skip seasoning your mixture well.
For the Sides
- 4 cups mashed sweet potatoes: You can boil or roast your own, or for a serious time-saver, look for pre-peeled, pre-cubed sweet potatoes in the produce section. Their natural sweetness is a gorgeous contrast to the savory meatloaf.
- 2 cups steamed green beans: I love the fresh, crisp-tender snap they add to the plate. It’s the perfect textural contrast.
Let’s Get Cooking: Building Your Mini Masterpieces
Ready to see the magic happen? Follow these steps, and you’ll have a kitchen smelling like a dream in no time. I’ve sprinkled in my favorite chef hacks to make everything go smoothly.
- Preheat and Prep: Fire up your oven to 375°F (190°C). While it’s heating, grab your standard 12-cup muffin tin and give it a good coating of non-stick spray. This is non-negotiable for easy removal later! Chef’s Hack: If you really want to ensure no sticking, you can lightly brush the cups with a tiny bit of olive oil instead of spraying.
- The Veggie Prep: This is where the magic starts. Get your carrots and/or zucchini grated and your onion finely diced. The goal is tiny, uniform pieces that will practically disappear into the meat mixture. Chef’s Hack: Use the large holes on your box grater for the carrots/zucchini. It’s faster and gives you the perfect texture.
- The Big Mix: In a large bowl, add your ground meat, the grated veggies, diced onion, egg, breadcrumbs, 2 tablespoons of ketchup, and all the seasonings. Now, here’s the most important tip: use your hands! Yes, it’s a little messy, but it’s the only way to mix everything evenly without overworking the meat. Gently combine everything until it’s just uniform. Over-mixing will make your meatloaf muffins tough. Chef’s Hack: Wet your hands with a little cold water before mixing—the meat will stick to you much less!
- Portion and Top: Divide the mixture evenly among the 12 muffin cups. Don’t pack it down too hard; a gentle press is all you need. Then, take a little extra ketchup and add a small spoonful to the top of each muffin, spreading it gently with the back of the spoon. This creates that irresistible sweet and sticky glaze.
- Bake to Perfection: Slide the tin into your preheated oven and bake for 20-25 minutes. You’re looking for the tops to be nicely browned and for the internal temperature to reach 165°F when checked with a meat thermometer. Chef’s Hack: The thermometer is your best friend here! It takes the guesswork out and guarantees juicy, perfectly cooked meat every time.
- The Rest is Crucial: Once out of the oven, let the muffins rest in the tin for about 5 minutes. This allows the juices to redistribute, so they don’t all run out when you take them out. Then, use a small offset spatula or a butter knife to gently loosen the edges and pop them out.
- Sidekick Assembly: While the muffins are baking and resting, you’ve got the perfect window to whip up your sides. Get your sweet potatoes mashed (a splash of milk and a pat of butter never hurt anybody) and your green beans steamed to crisp-tender perfection.
Plating Up: How to Serve Your Feastical Feast
Now for the fun part—making it look as good as it tastes! For a family dinner, I love serving this family-style. Pile the mini meatloaf muffins high on a platter, spoon the creamy orange sweet potatoes into a beautiful bowl, and arrange the vibrant green beans alongside. Let everyone build their own plate. It feels interactive and celebratory.
For meal prep, it’s all about the containers! I use 4 glass meal-prep containers with compartments. In each one, place 3 meatloaf muffins, a generous scoop of mashed sweet potatoes, and a portion of green beans. It creates a visually appealing, restaurant-quality lunchbox that’s ready to grab and go. Pro-tip: Let everything cool completely to room temperature before putting the lids on and storing them in the fridge or freezer. This prevents condensation from making everything soggy.
Mix It Up! Creative Twists on the Classic
Once you’ve mastered the base recipe, the world is your oyster… or your meatloaf muffin! Here are a few of my favorite ways to switch things up:
- BBQ Bacon Twist: Swap the ketchup in the glaze for your favorite BBQ sauce. And for a real treat, mix ½ cup of cooked, crumbled bacon right into the meat mixture before baking. Smoky, sweet, and utterly irresistible.
- Greek-Inspired Muffins: Use ground lamb or beef, and mix in ½ cup of crumbled feta cheese, a tablespoon of chopped fresh oregano, and a teaspoon of dried mint. Top with a quick tzatziki sauce instead of ketchup after baking.
- Spicy Southwest Style: Add a kick with 1 teaspoon of chili powder and ½ teaspoon of cumin to the meat mixture. Stir in ⅓ cup of canned black beans (rinsed and drained) and a handful of frozen corn. A sprinkle of shredded cheddar cheese on top before baking is a must!
- Pork and Apple Delight: Use a mix of ground pork and beef. Replace the grated carrot with 1 cup of finely grated apple (like Granny Smith). The apple adds a subtle sweetness and incredible moisture.
- Low-Carb/Keto Version: Simply swap the breadcrumbs for ¼ cup of almond flour or crushed pork rinds. For the sides, serve with mashed cauliflower and roasted asparagus.
Beau’s Chef Notes: A Few Parting Thoughts
This recipe has become a true workhorse in my kitchen, and it’s evolved a bit over time. I used to be so precise with my veggie dicing, but I’ve found that the grating method is not only faster but actually works better for hiding them! I also started adding the zucchini after a friend gave me a giant one from her garden, and it was such a happy discovery for adding extra moisture.
The funniest thing? My nephew, who claims to “hate meatloaf,” will devour six of these “meat muffins” in one sitting. I’ll never tell him they’re basically the same thing! It just goes to show that a fun shape and a little presentation magic can make all the difference.
FAQs & Troubleshooting: Your Questions, Answered!
Q: My meatloaf muffins turned out a bit dry. What happened?
A: The most common culprits are overmixing the meat or using meat that is too lean. Remember, a little fat equals flavor and moisture. Also, be sure not to over-bake them—that meat thermometer is key! Finally, the hidden veggies are there to add moisture, so don’t skip them.
Q: Can I make these ahead of time and just bake them later?
A: Absolutely! You can assemble the raw meat mixture, portion it into the muffin tin, cover it tightly with plastic wrap, and refrigerate it for up to 24 hours. When you’re ready, just pop them in the oven. You might need to add 1-2 minutes to the baking time since they’re going in cold.
Q: How long do they last in the freezer, and what’s the best way to reheat?
A: They freeze beautifully for up to 3 months. For reheating, the microwave is your best bet for convenience. For a single meal prep container, I’ll microwave it (with the lid off) for 3-4 minutes from frozen, or until hot all the way through. If you have the time, reheating in a 350°F oven for 15-20 minutes will give you a crisper top.
Q: My muffins stuck to the pan! Any tips for next time?
A: It happens to the best of us! First, ensure you’re using a good non-stick spray. Letting them rest for 5 minutes after baking is also crucial, as it allows them to firm up slightly. Finally, run a small knife around the edges before attempting to remove them. Silicone muffin trays are also a fantastic, non-stick option.
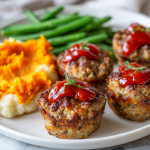
Mini Meatloaf Muffins with Hidden Veggies
Description
Hey friends! Some days you crave that warm, comforting hug of a classic meatloaf—but without the long wait or extra cleanup. These Mini Meatloaf Muffins are the perfect solution: individual, tender, juicy, and packed with hidden veggies. Pair them with creamy mashed sweet potatoes and crisp green beans, and you’ve got a balanced, freezer-friendly meal the whole family will love.
Ingredients
For the Meatloaf Muffins:
-
1½ lbs lean ground beef or turkey
-
1 cup finely grated carrots or zucchini (or a mix)
-
½ cup finely diced onion
-
1 egg
-
½ cup breadcrumbs (or almond flour for gluten-free)
-
2 tbsp ketchup (plus more for topping)
-
1 tsp garlic powder
-
1 tsp Italian seasoning
-
Salt and pepper, to taste
For the Sides:
-
4 cups mashed sweet potatoes
-
2 cups steamed green beans
Instructions
-
Preheat Oven & Prep Tin: Preheat to 375°F (190°C). Spray a 12-cup muffin tin with non-stick spray.
-
Prepare Veggies: Grate carrots/zucchini and finely dice onion.
-
Mix Ingredients: In a large bowl, combine meat, veggies, onion, egg, breadcrumbs, 2 tbsp ketchup, garlic powder, Italian seasoning, salt, and pepper. Mix gently with hands until just combined.
-
Portion & Glaze: Divide mixture evenly into muffin cups. Top each muffin with a small spoonful of ketchup.
-
Bake: Bake 20–25 minutes until tops are browned and internal temperature reaches 165°F (74°C).
-
Rest & Serve: Let muffins rest 5 minutes in the tin, then remove. Serve with mashed sweet potatoes and green beans.
Notes
-
Juicier Muffins: Don’t overmix meat; lean meat with a little fat works best.
-
Hidden Veggies: Grated carrots or zucchini add moisture and nutrients without altering taste.
-
Meal Prep Friendly: Cool completely before freezing in containers. Reheat in microwave (3–4 min from frozen) or oven (350°F / 15–20 min).
-
Creative Twists: Swap ketchup for BBQ sauce, mix in crumbled feta for Greek-inspired muffins, or add spices and beans for a Southwest version.
Nutrition
- Calories: 450 Cal Per Meal
- Fat: 18g
- Carbohydrates: 30g
- Protein: 34g
The Nutritional Lowdown (Per Meal: 3 Muffins + Sides)
This section is for those who like to know what’s fueling their body! This meal is designed to be satisfying and balanced. Please note, these are estimates and can vary based on your specific ingredients (like the leanness of your meat).
- Calories: ~450
- Protein: 34g (Excellent for muscle repair and keeping you full!)
- Fat: 18g (Provides energy and helps absorb vitamins.)
- Carbohydrates: 30g (Fuel for your brain and body, with a good mix of complex carbs from the sweet potatoes and fiber from the veggies.)
This meal is a great source of protein, Vitamin A (from the sweet potatoes and carrots), and iron. It’s a well-rounded plate that delivers comfort without the coma.
Final Thoughts: Comfort Made Easy
And there you have it! My go-to recipe for turning a classic comfort food into a quick, clever, and downright delicious meal that works for busy weeknights and savvy meal prep alike. These Mini Meatloaf Muffins are proof that you don’t have to choose between food that feels good and food that works for your life. You can have both.
I hope this recipe brings as much joy and ease to your kitchen as it has to mine. Give it a try, get creative with the variations, and most importantly, share it with someone you love. Food is always better together. Now, go forth and get Feastical!

Greek Chicken Power Bowls
Sunshine in a Bowl: Your New Favorite Greek Chicken Power Bowls
Hey friends, Beau here from Feastical! Let’s be real for a second. Some days, you want a meal that feels like a warm, cheesy hug (hello, my ultimate mac and cheese). But other days? You’re craving something fresh, something vibrant, something that makes you feel energized and ready to conquer the world. You want a meal that tastes as good as it makes you feel. If you’re nodding along, then you and I are on the exact same page, and my friend, you are in for a treat.
Today, we’re whipping up my absolutely legendary Greek Chicken Power Bowls. This isn’t just a salad; this is a full-on experience. Imagine this: perfectly grilled, herb-marinated chicken resting on a fluffy bed of quinoa, surrounded by a confetti of crisp cucumbers, juicy cherry tomatoes, and briny kalamata olives. A generous sprinkle of creamy feta cheese brings it all together, and a drizzle of cool tzatziki or a zesty lemon vinaigrette is the glorious finishing touch.
This bowl is the ultimate answer to the “what’s for lunch?” dilemma. It’s meal-prep magic, a crowd-pleasing dinner, and a guaranteed way to bring a little bit of Mediterranean sunshine to your table, no matter the weather outside. It’s clean eating that never feels like a compromise. So, grab your favorite knife and a big mixing bowl—we’re about to create something seriously delicious.
The Little Gyro Stand That Could: A Flavorful Memory
This recipe takes me right back to a sweltering summer afternoon years ago. I was wandering through a local street fair, lured by the sounds of music and the incredible smells wafting from every direction. But one aroma stopped me in my tracks: a magical blend of garlic, oregano, and sizzling meat. I followed my nose to a tiny, unassuming gyro stand with a line a mile long. That’s always a good sign, right?
I finally got my hands on a pita overflowing with grilled chicken, tomatoes, onions, and the most incredible tzatziki sauce I’d ever tasted. I found a spot on a curb, took one messy, perfect bite, and was instantly transported. It was so simple, yet every flavor was bold and distinct. It was a symphony in a pita! That experience cemented my love for Greek cuisine. This power bowl is my tribute to that little stand—all the bright, bold flavors I fell in love with, but deconstructed into a nourishing, feel-good bowl that fits perfectly into our busy lives. It’s that vacation feeling, served up in under 30 minutes.
Gathering Your Greek Bowl Superstars
One of the best things about this recipe is its flexibility. Think of this list as your blueprint for deliciousness. Here’s what you’ll need to feed four hungry people (or to set yourself up for a week of amazing lunches!).
For the Legendary Chicken Marinade:
- 1½ lbs boneless, skinless chicken breasts: The main event! I like to pound them to an even thickness so they cook perfectly without drying out. Chef’s Insight: You can easily swap this for chicken thighs for even more juicy, flavorful meat.
- 2 tablespoons olive oil: The base of our marinade. It helps carry all the flavors and keeps the chicken super moist.
- Juice of 1 lemon: Fresh is best here! The acid not only adds zing but also helps tenderize the chicken. Sub Tip: No fresh lemon? A tablespoon of red wine vinegar works in a pinch.
- 2 teaspoons dried oregano: The quintessential Greek herb. Rub it between your palms as you add it to wake up those earthy, aromatic oils.
- 2 garlic cloves, minced: Because what’s a marinade without garlic? For a milder flavor, you can use ½ teaspoon of garlic powder.
- Salt and pepper, to taste: Don’t be shy! Seasoning is key. I start with ¾ teaspoon of kosher salt and ½ teaspoon of black pepper.
For the Bowl Base & Toppings:
- 2 cups cooked quinoa: Our fluffy, protein-packed foundation. Chef’s Hack: Cook your quinoa in chicken broth instead of water for an extra layer of flavor.
- 1 cup cucumber, diced: For that essential cool, crisp crunch. I prefer English cucumbers for their thin skin and minimal seeds.
- 1 cup cherry tomatoes, halved: Little bursts of sweet acidity. Use heirloom tomatoes if you can find them for a gorgeous color mix!
- ½ cup kalamata olives, sliced: They bring a salty, briny depth that is absolutely irreplaceable. If you’re not an olive fan, you can leave them out, but they really make the dish.
- ½ cup crumbled feta cheese: The creamy, tangy crown jewel. Buy a block and crumble it yourself—it’s so much tastier than the pre-crumbled stuff!
- Optional extras: A handful of chopped red onion for bite, or some fresh parsley or dill for a herby freshness.
For the Dressing (Pick Your Potion!):
- Tzatziki sauce: My personal favorite! Its cool, creamy yogurt base is the perfect contrast to the savory chicken. Store-bought is fine, but my homemade version is ridiculously easy.
- Simple Lemon Vinaigrette: Whisk together 2 tbsp olive oil, 1 tbsp fresh lemon juice, a pinch of dried oregano, and salt and pepper. Light, zesty, and perfect.
Let’s Build Some Bowls: A Step-by-Step Journey
Okay, team! Let’s fire up the stove (or grill) and get assembling. I’ll walk you through each step with a few of my favorite kitchen hacks to ensure your bowls are absolutely perfect.
- Marinate the Chicken. In a medium bowl or a large zip-top bag, whisk together the olive oil, lemon juice, oregano, minced garlic, salt, and pepper. Add the chicken breasts, making sure they’re fully coated in the marinade. Let them hang out for at least 30 minutes at room temperature. If you have more time, marinating in the fridge for up to 4 hours is even better! The longer it marinates, the more flavorful it becomes. Chef’s Tip: If you’re short on time, just a 15-minute marinade will still impart great flavor. Every minute counts!
- Cook the Chicken to Perfection. Heat a grill pan, outdoor grill, or a regular skillet over medium-high heat. Add a tiny drizzle of oil to prevent sticking. Cook the chicken for 5-7 minutes per side, depending on thickness. You’re looking for beautiful grill marks and an internal temperature of 165°F. The most important step? Let the chicken rest for 5-10 minutes before slicing! This allows the juices to redistribute throughout the meat, ensuring every bite is succulent and not dry. Chef’s Hack: Use a meat thermometer! It’s the single best tool for guaranteeing perfectly cooked chicken every single time.
- Prep Your Veggies & Quinoa. While the chicken is cooking and resting, this is your moment to shine. Dice the cucumber, halve the tomatoes, slice the olives, and crumble the feta. Fluff your cooked quinoa with a fork. Chef’s Insight: I like to give my quinoa a quick fluff with a fork to separate the grains, making the base of our bowl light and airy instead of clumpy.
- The Grand Assembly. This is the fun part! Divide the fluffy quinoa evenly among four bowls. Now, artfully arrange your sliced chicken and all your prepped veggies over the top. I like to group the ingredients in little sections—it makes the bowl look like a work of art! Finally, crown your masterpiece with that glorious crumbled feta cheese.
- The Final Touch: Drizzle and Devour! Right before serving, drizzle your chosen dressing (tzatziki or lemon vinaigrette) over everything. I like to serve the dressing on the side if I’m meal-prepping, so the bowls don’t get soggy. And that’s it! You’ve just created a restaurant-quality meal right in your own kitchen.
How to Serve Your Greek Masterpiece
Presentation is part of the fun! I’m a firm believer that food tastes better when it looks beautiful. For these power bowls, I love using wide, shallow bowls so you can see all the colorful components. Arrange the ingredients in distinct sections around the bowl—it’s visually stunning and lets everyone customize each bite.
What to serve on the side? A warm, toasted pita wedge is classic and perfect for scooping up any last delicious bits. If you’re feeling fancy, a small side of lemon-herb hummus never hurt anybody. And for a drink pairing, a crisp glass of Assyrtiko wine or simply a glass of sparkling water with a squeeze of lemon complements these fresh flavors perfectly.
Make It Your Own: Delicious Twists & Swaps
The beauty of a power bowl is its versatility. Don’t be afraid to play around with these ideas!
- Go Grain-Free: Swap the quinoa for a bed of romaine lettuce, chopped kale, or even riced cauliflower for a low-carb option.
- Plant-Powered Perfection: Make it vegetarian by replacing the chicken with a can of drained and rinsed chickpeas. Toss them in the same marinade and roast at 400°F for 20 minutes for a crispy, flavorful protein.
- Mediterranean Meets Mexico: Give it a fun fusion twist! Use a cumin and chili powder rub on the chicken, swap the tzatziki for a cilantro-lime crema, and add a spoonful of corn and black beans.
- Add More Veggie Power: Feel free to add roasted red peppers, artichoke hearts, or thinly sliced radishes for extra color, texture, and nutrients.
- For a Creamier Dreamier Bowl: Add a big dollop of hummus right on top of the quinoa before adding the other ingredients. It creates an incredibly rich and creamy base.
Beau’s Kitchen Notes & Stories
This recipe has been a staple in my kitchen for years, and it’s evolved in the best ways. I remember one time I was making it for friends and realized I had completely run out of oregano. Panic set in for a second, but then I grabbed a makeshift blend of thyme and a little mint. Guess what? It was fantastic! It taught me that recipes are guides, not rules. The spirit of this bowl is fresh, flavorful, and flexible.
Another pro-tip: if you’re meal-prepping these for the week, keep the dressing separate and add it the day you eat it. It keeps the quinoa and veggies from getting soggy. Trust me, future-you will thank present-you for that little bit of extra effort.
Your Questions, Answered!
Q: Can I make this recipe ahead of time for meal prep?
A: Absolutely! This is a meal-prep superstar. Cook the chicken and quinoa, and chop the veggies (except the cucumber, which can get watery). Store everything in separate airtight containers in the fridge for up to 4 days. Assemble your bowl and add the dressing right before you eat.
Q: My chicken always turns out dry. What am I doing wrong?
A: The two biggest culprits are overcooking and not resting. First, use a meat thermometer to ensure you pull the chicken at 165°F—not a degree higher! Second, and this is non-negotiable, let it rest for at least 5 minutes after cooking. This allows the juices to settle back into the meat.
Q: I don’t have quinoa. What’s a good substitute?
A: No problem! Couscous, orzo, farro, or even brown rice make excellent bases. Just adjust the cooking time according to the package directions for your grain of choice.
Q: Is there a way to make this dairy-free?
A: For sure! Simply omit the feta cheese or use a dairy-free alternative. For the dressing, opt for the lemon vinaigrette instead of tzatziki, or try a dairy-free yogurt to make your own tzatziki.

Greek Chicken Power Bowls
Description
Hey friends! Some days, you crave something fresh, vibrant, and energizing—a meal that tastes as good as it makes you feel. Enter these Greek Chicken Power Bowls: tender, herb-marinated chicken on a fluffy bed of quinoa, surrounded by crisp cucumbers, juicy cherry tomatoes, briny olives, and creamy feta. Drizzle with tzatziki or a lemon vinaigrette, and you’ve got a meal that’s as nourishing as it is delicious. Perfect for a quick weeknight dinner or meal prep for the week ahead!
Ingredients
For the Chicken Marinade:
-
1½ lbs boneless, skinless chicken breasts
-
2 tbsp olive oil
-
Juice of 1 lemon
-
2 tsp dried oregano
-
2 garlic cloves, minced
-
Salt and pepper, to taste
For the Bowl Base & Toppings:
-
2 cups cooked quinoa
-
1 cup cucumber, diced
-
1 cup cherry tomatoes, halved
-
½ cup kalamata olives, sliced
-
½ cup crumbled feta cheese
-
Optional: red onion, parsley, or dill
For the Dressing (Choose One):
-
Tzatziki Sauce (store-bought or homemade)
-
Simple Lemon Vinaigrette: 2 tbsp olive oil, 1 tbsp lemon juice, pinch of oregano, salt and pepper
Instructions
-
Marinate the Chicken:
In a bowl or zip-top bag, combine olive oil, lemon juice, oregano, garlic, salt, and pepper. Add chicken and coat evenly. Marinate 30 minutes at room temperature or up to 4 hours in the fridge. -
Cook the Chicken:
Heat a grill pan, skillet, or outdoor grill over medium-high. Cook chicken 5–7 minutes per side, until internal temperature reaches 165°F (75°C). Rest 5–10 minutes, then slice. -
Prep the Veggies & Quinoa:
Dice cucumber, halve tomatoes, slice olives, crumble feta, and fluff the quinoa with a fork. -
Assemble the Bowls:
Divide quinoa among 4 bowls. Arrange chicken and vegetables on top. Sprinkle with feta and optional herbs. -
Add Dressing & Serve:
Drizzle with tzatziki or lemon vinaigrette. Serve immediately or store components separately for meal prep.
Notes
-
Chicken Swap: Use thighs for extra juiciness.
-
Grain Options: Couscous, farro, or brown rice work well instead of quinoa.
-
Vegetarian Version: Roast chickpeas with the same marinade for a plant-based protein.
-
Keep It Crisp: Store dressing separately if prepping for later.
-
Flavor Boost: Cook quinoa in chicken broth for added depth.
Nutrition
- Calories: 430Cal Per Bowl
- Fat: 18g
- Carbohydrates: 30g
- Protein: 36g
A Nourishing Bite: The Goodness Inside
Let’s talk about why this bowl is such a powerhouse of nutrition. It’s a perfectly balanced meal designed to keep you full and energized. The chicken and quinoa provide a hefty dose of lean, complete protein, essential for muscle repair and keeping you satisfied. The healthy fats from the olive oil, olives, and feta are great for heart and brain health. And the colorful array of vegetables is packed with fiber, vitamins, and antioxidants.
Each bowl (with the lemon vinaigrette) comes in at approximately 430 calories, with 36g of protein, 30g of carbs, and 18g of fat. It’s naturally gluten-free and follows the principles of the celebrated Mediterranean diet. It’s proof that eating well doesn’t mean sacrificing an ounce of flavor.
Final Thoughts from My Kitchen to Yours
Well, there you have it, my friends—my go-to recipe for a meal that’s as satisfying to make as it is to eat. These Greek Chicken Power Bowls are more than just a recipe; they’re a reminder that healthy, vibrant food can be the most delicious food of all.
I hope this recipe brings as much joy to your table as it has to mine. If you give it a try (and I really hope you do!), tag me on social @feastical with #FeasticalEats. I love seeing your creations! Now, go forth and build some beautiful, delicious bowls. Until next time, happy cooking!
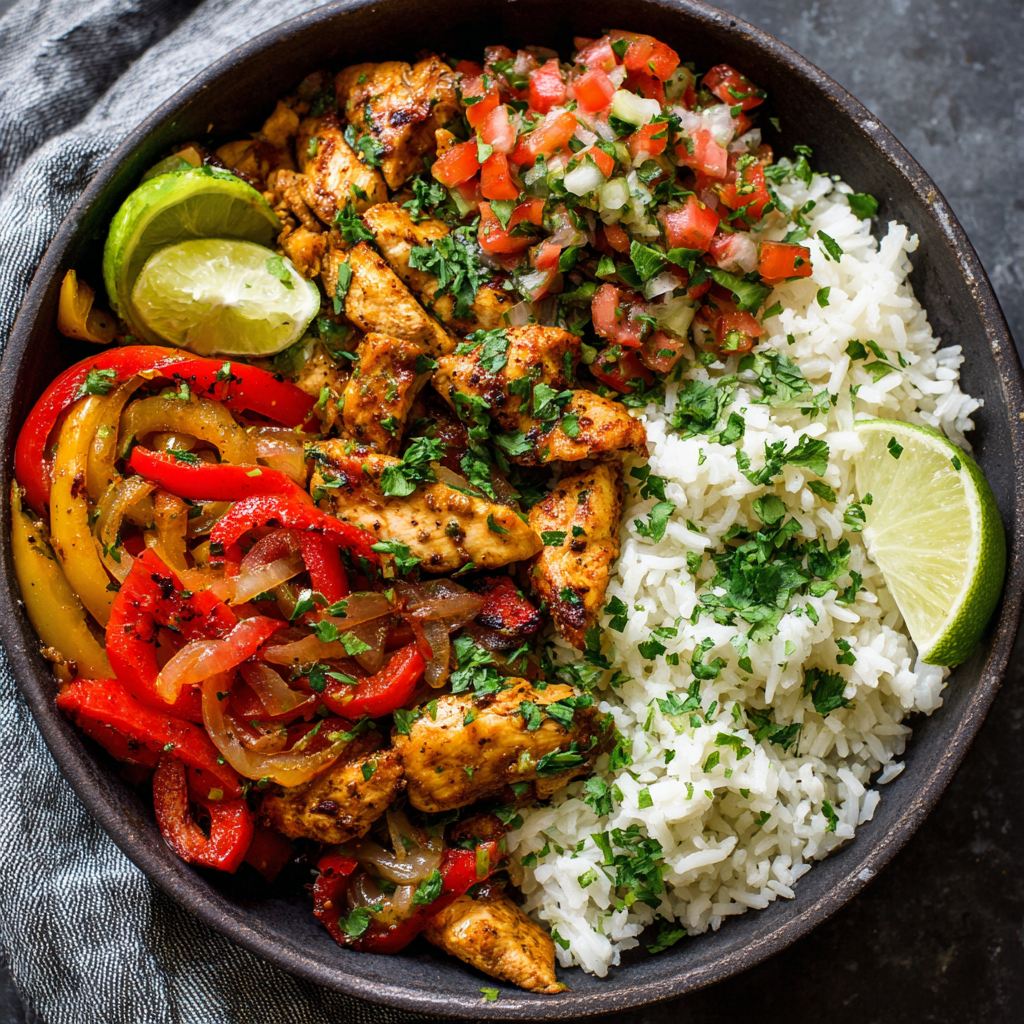
Chicken Fajita Meal Prep Bowls
Your Ticket to a Tastier, Easier Week: Chicken Fajita Meal Prep Bowls
Hey friends, Beau here from Feastical! Let’s be real for a second. How many times have you stared into the fridge at 6 PM on a Wednesday, your brain completely fried, and ended up ordering something you didn’t really want? We’ve all been there. The struggle between wanting to eat something delicious and not having the energy to cook is real. But what if I told you there’s a way to have your cake and eat it too? Or, in this case, have your sizzling, flavor-packed fajitas and eat them all week long?
That’s the magic of meal prep, and these Chicken Fajita Bowls are my absolute go-to. They’re not just a meal; they’re a promise to your future self for a week of vibrant, feel-good eating. Imagine this: tender, spice-rubbed chicken, a rainbow of sweet, charred bell peppers and onions, all piled on a bed of fluffy lime-cilantro rice and topped with a bright, fresh pico de gallo. Every component sings in harmony, and the best part? It all comes together in about 30 minutes.
This isn’t about boring, repetitive food. This is about building a bowl so colorful and satisfying that you’ll actually look forward to lunch. It’s about reclaiming your time and your peace of mind. So, grab your favorite knife and your biggest skillet, and let’s turn your kitchen into a Tex-Mex haven. I promise, by the end of this, you’ll be a meal prep believer.
The Fajita That Started It All
This recipe takes me right back to my first real kitchen job. I was a teenager, wide-eyed and desperately trying to keep up with the dinner rush at this little family-run Tex-Mex joint. The sound I remember most wasn’t the chatter or the music—it was the glorious, deafening *SIZZZZZLE* of the fajita platter being rushed to a table. The server would carry this cast-iron skillet, smoke billowing around them, the aroma of cumin and seared meat trailing behind like a delicious cloud. The entire restaurant would turn and watch. It was pure theatre.
One night, the chef, a guy named Hector who had forearms like a blacksmith, let me make my own after the rush. I remember being so nervous, but he just smiled and said, “It’s not complicated, kid. Good ingredients, a hot pan, and don’t be shy with the spices.” That first bite of chicken I cooked myself, straight from the pan, was a revelation. It was juicy, bursting with flavor, and it felt like I had unlocked a secret. This recipe is my tribute to that moment—to Hector’s wisdom and the simple, powerful joy of a perfectly cooked fajita. We’re bringing that sizzle right into your meal prep containers.
Gathering Your Fiesta Fuel: The Ingredients
Here’s everything you’ll need to create four seriously satisfying bowls. Don’t just think of these as a list; think of them as your flavor-building blocks. I’ve added a little chef’s insight for each one to help you understand the “why” behind the “what.”
For the Chicken Fajitas:
- 1½ lbs boneless, skinless chicken breasts, sliced: I prefer breasts for meal prep as they hold their shape well, but chicken thighs are a fantastic swap for even more juicy, forgiving flavor. Just trim any excess fat.
- 1 tablespoon olive oil: Our cooking workhorse. Avocado oil works great too if you have it, as it has a higher smoke point.
- 1 teaspoon chili powder: This is the base of our spice blend, giving us that warm, earthy depth. Not to be confused with straight cayenne pepper, which is much hotter!
- 1 teaspoon cumin: The soul of Tex-Mex cooking, in my opinion. It’s warm, slightly smoky, and absolutely essential.
- ½ teaspoon garlic powder & ½ teaspoon paprika: Garlic powder for that consistent, mellow garlicky note, and paprika for a touch of sweetness and that beautiful red color. Smoked paprika is a game-changer here if you have it!
- Salt and pepper, to taste: Season every layer! Don’t forget to season your chicken generously.
- 1 red bell pepper, 1 green bell pepper, 1 yellow onion, sliced: The holy trinity of fajitas! Using different colored peppers isn’t just for looks—they each have a slightly different sweetness and flavor profile. The onion gets wonderfully sweet and soft when sautéed.
For the Lime-Cilantro Rice:
- 2 cups cooked white or brown rice: I use white jasmine or basmati rice for its fluffy texture, but brown rice or even cauliflower rice are excellent healthy alternatives. Just cook it according to package directions and let it cool slightly.
- Juice of 1 lime: Fresh is key here! The acid cuts through the richness of the chicken and peppers and makes the whole bowl taste brighter.
- 2 tablespoons chopped fresh cilantro: If you’re one of those folks who thinks cilantro tastes like soap, no worries! Just leave it out or substitute with a little chopped fresh parsley or even a pinch of dried oregano.
- Salt, to taste: A pinch in the rice makes all the difference.
For the Toppings & Assembly:
- 1 cup fresh pico de gallo: You can find decent store-bought versions, but making your own is super easy (diced tomato, onion, cilantro, lime juice, salt) and tastes a million times better. It adds a crucial fresh, juicy element.
- Optional Extras: I love adding individual guacamole cups or a sprinkle of shredded cheese (cotija cheese is my favorite!) on the side. A dollop of sour cream or Greek yogurt is also fantastic.
Let’s Get Cooking: Building Your Bowls, Step-by-Step
Okay, the fun part! We’re going to move efficiently here. I like to get my rice cooking first (if it’s not already done), then prep my veggies and chicken. It’s all about the flow. Ready? Aprons on!
- Spice Up Your Life (and Your Chicken). In a medium bowl, combine your sliced chicken with the olive oil, chili powder, cumin, garlic powder, paprika, salt, and pepper. Now, get your hands in there! Toss everything together until every piece of chicken is evenly coated. This isn’t a shy moment—really massage those spices in. Let it sit for 5-10 minutes while your skillet heats up. This little rest allows the flavors to start penetrating the meat.
- Fire Up the Skillet. Place a large skillet or cast-iron pan over medium-high heat and let it get properly hot. You want to hear a good sizzle when the chicken hits the pan. A hot pan is the secret to getting a nice sear instead of steaming the chicken.
- Sear the Chicken. Add the chicken to the hot skillet in a single layer. Don’t crowd the pan! If you need to, cook it in two batches. Crowding will steam the chicken, and we want that beautiful, flavorful browning. Cook for 5-6 minutes, only stirring once or twice, until the chicken is cooked through and has a nice golden color. Remove the chicken from the skillet and set it aside on a plate.
- Sizzle the Veggies. In the same skillet (with all those delicious chicken drippings and spices!), add your sliced bell peppers and onion. You might need a tiny bit more oil if the pan is dry. Sauté them for 5-7 minutes, stirring occasionally. We’re looking for them to be tender-crisp—they should have a bit of bite but also some lovely charred edges. Chef’s Hack: Try not to stir too often. Let them sit for a minute to get that beautiful caramelization!
- The Grand Reunion. Once the veggies are perfect, add the cooked chicken back into the skillet. Give everything a big, final toss together. This lets the flavors mingle and heats the chicken through. Take it off the heat. Smell that? That’s success.
- Zest Up Your Rice. While your chicken and veggies are cooking, fluff your cooked rice with a fork. Then, stir in the fresh lime juice, chopped cilantro, and a pinch of salt. The fork helps keep the rice fluffy instead of smushing it. This simple step transforms plain rice into a vibrant sidekick.
- The Assembly Line. Get out your four meal prep containers. It’s time to build! Start with a base of the lime-cilantro rice. Then, top it generously with the chicken fajita mixture. Finally, add a healthy scoop of fresh pico de gallo. If you’re using guacamole or cheese, you can either add it now or pack it in a separate small container to add right before eating (this keeps the guac from browning and the cheese from getting soggy).
How to Serve Your Fajita Masterpiece
If you’re eating one right away, fantastic! You’ve earned it. But the real beauty of this recipe is in the reheating. For the best results, I recommend taking the container out of the fridge about 10-15 minutes before you plan to eat. This helps it heat more evenly.
Reheat it in the microwave for 2-3 minutes, stirring halfway through. The steam from the rice and veggies will help rehydrate everything beautifully. If you have an air fryer, you can also reheat the chicken and veggie portion in there for a few minutes to get the edges a little crispy again—it’s a total game-changer!
When you’re ready to eat, give it a final squeeze of fresh lime juice and maybe a few extra cilantro leaves. It wakes all the flavors right up. Serve it with some warm tortilla chips on the side for scooping, and you’ve got a restaurant-quality lunch without ever leaving your desk.
Make It Your Own: Delicious Recipe Variations
The framework of this bowl is your playground. Don’t be afraid to get creative and swap things based on what you have or what you’re craving!
- Protein Swap: Not a chicken person? No problem! Skirt steak or flank steak are classic fajita choices. Shrimp cooks super quickly—just add it after the veggies are almost done. For a vegetarian option, black beans or seasoned, roasted chickpeas are hearty and delicious.
- Grain-Free Goodness: Ditch the grains entirely and use a base of chopped romaine lettuce for a taco salad vibe. Just pack the dressing (a simple lime vinaigrette) separately. Quinoa is another fantastic, protein-packed base.
- Spice Level Adjustment: Like it hot? Add a diced jalapeño or serrano pepper to the veggie mix. A pinch of cayenne pepper or a dash of your favorite hot sauce in the chicken spice rub will also turn up the heat.
- “Fiesta in a Bowl” Upgrade: Add a layer of seasoned black beans or corn and black bean salad between the rice and the chicken. A drizzle of creamy cilantro-lime dressing or a sprinkle of toasted pumpkin seeds (pepitas) for crunch takes it over the top.
Beau’s Chef Notes & Kitchen Stories
This recipe has been a staple in my meal prep rotation for years, and it’s evolved with me. I remember one time I was filming a video for the site and I accidentally used cayenne pepper instead of chili powder. Let’s just say the “spice level” segment of that video was… very authentic! We powered through with a gallon of milk, but it taught me to always double-check my spice jars. A good lesson for us all!
The biggest change I’ve made over time is being less precious about the veggie sizes. They don’t all need to be perfectly julienned. Rustic, uneven slices actually give you a better texture variety in every bite. Cooking should be fun, not stressful. So, if your onion slices are a little wonky, I promise, it’ll taste even better.
Your Fajita Bowl Questions, Answered!
Q: My chicken turned out a little dry. What did I do wrong?
A: The most common culprit is overcooking. Chicken breasts cook quickly! Make sure your pan is nice and hot so you get a sear that locks in juices, and always use a meat thermometer if you have one—you’re aiming for 165°F (74°C) in the thickest part. Slicing it thinly, as we do here, also helps it cook fast and stay tender. If you’re consistently having trouble, try chicken thighs—they’re much more forgiving.
Q: How long do these meal prep bowls last in the fridge?
A: Stored in airtight containers, they’ll stay fresh and delicious for 3-4 days. After that, the quality (especially of the peppers) can start to decline. I don’t recommend freezing the assembled bowls, as the peppers and rice can get mushy upon thawing.
Q: The peppers got a bit soggy when I reheated them. Any tips?
A> This is a great question! To keep your veggies crisp-tender, make sure you don’t overcook them initially. They should still have a little bite. Also, when reheating, try the air fryer method mentioned above, or microwave for shorter bursts and stir well. Packing the pico de gallo separately and adding it cold after reheating also adds a fresh, crisp element.
Q: Can I make this recipe ahead and assemble it the day of?
A> Absolutely! This is a fantastic strategy. Cook the chicken and veggie mixture and the rice up to two days ahead. Store them separately in the fridge. Then, the morning you need them, simply assemble your bowls. This keeps everything super fresh.
Chicken Fajita Meal Prep Bowls
Description
Chicken Fajita Meal Prep Bowls
Your ticket to a week of vibrant, flavor-packed lunches
Makes 4 servings
Ingredients
Chicken & Veggies:
-
1½ lbs boneless, skinless chicken breasts, thinly sliced (or thighs for juicier meat)
-
1 tbsp olive oil (or avocado oil)
-
1 tsp chili powder
-
1 tsp cumin
-
½ tsp garlic powder
-
½ tsp paprika (smoked is optional)
-
Salt & pepper, to taste
-
1 red bell pepper, 1 green bell pepper, 1 yellow onion, sliced
Lime-Cilantro Rice:
-
2 cups cooked rice (white, brown, or cauliflower rice)
-
Juice of 1 lime
-
2 tbsp chopped fresh cilantro
-
Salt, to taste
Toppings (optional):
-
1 cup pico de gallo
-
Guacamole, shredded cheese, sour cream, or Greek yogurt
Instructions
1. Marinate Chicken
-
Toss chicken with olive oil, chili powder, cumin, garlic powder, paprika, salt, and pepper.
-
Let sit 5–10 minutes while heating your skillet.
2. Cook Chicken
-
Heat a skillet over medium-high heat.
-
Cook chicken in a single layer for 5–6 minutes until golden and cooked through. Remove and set aside.
3. Sauté Veggies
-
In the same skillet, sauté peppers and onion 5–7 minutes until tender-crisp with slightly charred edges.
4. Combine
-
Add chicken back to the skillet. Toss everything together to heat and blend flavors.
5. Prepare Rice
-
Fluff cooked rice with a fork. Stir in lime juice, cilantro, and a pinch of salt.
6. Assemble Bowls
-
Layer each container with rice, chicken & veggie mixture, and pico de gallo.
-
Optional: pack guacamole or cheese separately to add before eating.
Notes
-
Protein Swap: Shrimp, skirt/flank steak, black beans, or roasted chickpeas.
-
Grain-Free: Use chopped romaine or quinoa instead of rice.
-
Extra Heat: Add jalapeños, cayenne, or hot sauce.
-
Fiesta Upgrade: Layer black beans, corn, creamy cilantro-lime dressing, or toasted pepitas.
Nutrition
- Calories: 420Cal per bowl,
- Fat: 14g
- Carbohydrates: 35g
- Protein: 35g
Nutritional Info (A Quick Look)
Please remember, I’m a chef, not a registered dietitian! These figures are estimates based on the specific ingredients listed and can vary greatly depending on brands, portion sizes, and optional toppings.
- Prep Time: 15 minutes
- Cook Time: 15 minutes
- Total Time: 30 minutes
- Calories: ~420 per bowl (without optional toppings)
- Protein: 35g | Fat: 14g | Carbs: 35g
This bowl is naturally gluten-free and is an excellent source of lean protein and vitamins from the colorful bell peppers. It’s a balanced meal designed to keep you full and energized throughout your day. To lower the carbs, simply swap the rice for cauliflower rice!
Final Thoughts from My Kitchen to Yours
Well, there you have it! My blueprint for a week of stress-free, delicious eating. These Chicken Fajita Meal Prep Bowls are more than just a recipe; they’re a tool. A tool for saving time, saving money
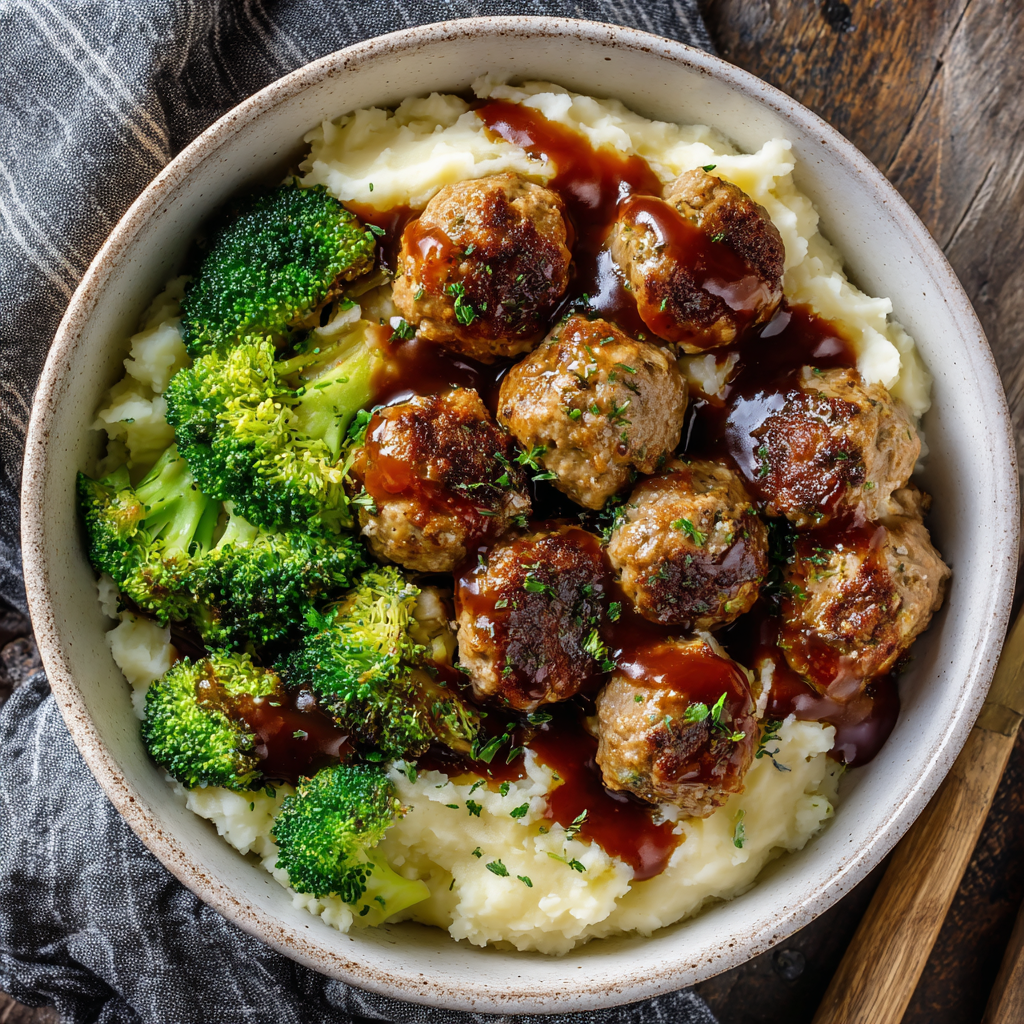
Turkey Meatball Mashed Potato Bowls
Your New Favorite Comfort Food Bowl is Here!
Hey friends, Beau here! Let’s be real for a second. Some days, you just need a meal that feels like a warm, reassuring hug from the inside out. You know the kind I’m talking about. The kind of meal that doesn’t ask you to fuss with fancy techniques or a mountain of dirty dishes. It just needs to be downright delicious, soul-soothing, and hit every single comfort food note you’re craving.
Well, pull up a chair, because I’m about to introduce you to your new kitchen best friend: Turkey Meatball Mashed Potato Bowls. This isn’t just a recipe; it’s a whole mood. Imagine this: juicy, herb-infused turkey meatballs, fresh from the oven, nestled on a cloud of the creamiest mashed potatoes you’ve ever tasted. We’re adding a pop of color and crunch with some simple steamed broccoli, and then bringing it all together with a generous drizzle of rich, savory brown gravy. Are you feeling it yet?
The magic of this bowl is its beautiful simplicity. It takes all the best parts of a classic comfort food feast—the meat, the potatoes, the gravy—and turns it into a simple, streamlined, and incredibly satisfying bowl that’s perfect for a busy weeknight or a genius meal prep session. It’s the culinary equivalent of your favorite cozy sweater. So, grab your favorite mixing bowl and let’s create some kitchen magic that’s guaranteed to make everyone at the table smile.
The Story Behind the Bowl: A Feastical Family Tradition
This recipe has a special place in my heart because it’s a total remix of a meal my grandma used to make. Every Sunday after church, the whole family would crowd into her kitchen. The air would be thick with the smell of roasting chicken and simmering gravy. But my absolute favorite part was always her mashed potatoes. She’d whip them by hand, adding just the right amount of butter and warm milk until they were impossibly smooth.
One hectic Tuesday night, I was craving that exact feeling but didn’t have hours to spend. I had some ground turkey, a bag of potatoes, and a mission. I whipped up some quick meatballs, mashed a few potatoes, and threw some broccoli in a steamer. Throwing it all together in a bowl felt a little rebellious compared to Grandma’s formal plated dinners, but when I took that first bite? It was all there. The comfort, the love, the satisfaction. It was her Sunday best, made for a modern Tuesday. It’s a reminder that the heart of a meal isn’t in the fancy presentation, but in the joy it brings. Now, it’s your turn to make the memory!
Gathering Your Ingredients: A Chef’s Guide
One of the secrets to great cooking is knowing your ingredients. Here’s everything you’ll need to bring these comforting bowls to life. I’ve included some of my favorite tips and swaps to make this recipe work for you!
For the Turkey Meatballs:
- 1 lb ground turkey: I prefer 93% lean for the best balance of flavor and juiciness. If you use 99% lean, just know they might be a tad drier. For a richer flavor, you can absolutely use ground chicken or even lean ground beef.
- ¼ cup breadcrumbs: These are our binder, keeping the meatballs tender. I use plain Panko for a lighter texture, but any breadcrumbs work. For a gluten-free option, almond flour or crushed gluten-free crackers are fantastic.
- 1 large egg: This is the glue that holds our little flavor orbs together! Make sure it’s at room temperature for easier mixing.
- 2 garlic cloves, minced: Fresh is best here! That pungent, aromatic kick is irreplaceable. In a pinch, ½ teaspoon of garlic powder works.
- 1 teaspoon onion powder: This gives us a sweet, savory depth without the texture of fresh onions. It’s my little secret for consistently great flavor.
- 1 teaspoon dried parsley: For that little pop of color and a subtle, fresh herb note. Feel free to use 1 tablespoon of fresh parsley if you have it!
- ½ teaspoon salt & ¼ teaspoon black pepper: The essential flavor starters! Don’t be shy here. Seasoning the meat mixture well is key.
For the Bowls:
- 4 cups mashed potatoes: You can use your favorite homemade recipe (I’ll share my quick method below) or even good-quality store-bought ones to save time. No judgment here!
- 2 cups broccoli florets, steamed: Broccoli is our vibrant, healthy crunch. You can also use green beans, roasted carrots, or even some sautéed kale.
- ½ cup brown gravy or tangy BBQ sauce: This is where you make it your own! Gravy is the classic comfort move, but a smoky BBQ drizzle adds a sweet and tangy twist that’s incredible.
Let’s Get Cooking: Building Your Bowl, Step-by-Step
Okay, team! It’s time to roll up our sleeves and create some comfort. Follow these steps, and you’ll have a restaurant-quality bowl on your table in no time. I’ve packed this section with all my favorite chef hacks to make everything foolproof.
Step 1: Fire up the Oven. First things first, preheat your oven to 400°F (200°C). This ensures it’s nice and hot when our meatballs go in for that perfect cook. While it’s heating, line a baking sheet with parchment paper. This is my number one hack for easy cleanup – no scrubbing baked-on bits later!
Step 2: Mix the Meatballs. In a medium-sized bowl, add your ground turkey, breadcrumbs, egg, minced garlic, onion powder, dried parsley, salt, and pepper. Now, here’s a pro tip: use your hands to mix it! It’s the best way to ensure everything is evenly distributed without overmixing. Overmixing can make the meatballs tough, so just gently combine until you no longer see streaks of breadcrumbs.
Step 3: Form Those Flavor Bombs. Using a small cookie scoop or a tablespoon, portion out the mixture and roll it gently between your palms to form balls. I aim for 16-20 meatballs, about 1-inch in size. Why smaller? They cook faster and more evenly, and you get more meatballs per bowl – win-win! Pro tip: lightly dampen your hands with water to prevent the mixture from sticking.
Step 4: Bake to Perfection. Arrange the meatballs on your prepared baking sheet, giving them a little space so they can brown nicely instead of steaming. Pop them into the preheated oven and bake for 18-20 minutes. You’ll know they’re done when they’re golden brown and have an internal temperature of 165°F (74°C). Trust the thermometer – it’s the key to juicy, safe-to-eat meatballs every single time.
Step 5: Prep the Bowl Base. While the meatballs are working their magic in the oven, it’s time for the sides. Steam your broccoli until it’s bright green and tender-crisp (about 5-7 minutes). For the mashed potatoes, if you’re making them from scratch, boil 2 lbs of peeled, cubed Yukon Gold potatoes until fork-tender. Drain them, then mash with ½ cup warm milk, ¼ cup butter, and salt and pepper to taste. For ultimate creaminess, warm your milk before adding it!
Step 6: The Grand Assembly. This is the fun part! Divide the creamy mashed potatoes between four bowls. Top each with 4-5 of those gorgeous baked turkey meatballs and a hearty portion of steamed broccoli. Finish it all off with a generous drizzle of warm brown gravy or your favorite BBQ sauce. And just like that, you’ve created a masterpiece.
How to Serve It Up: Presentation with Pizzazz
We eat with our eyes first, so let’s make these bowls look as good as they taste! For a real “wow” factor, I like to use a wider, shallow bowl. Start by spreading the mashed potatoes in an even layer as your base. Artfully arrange the meatballs and broccoli on top, rather than just piling them in the center. When you drizzle the gravy, let it cascade over the meatballs and pool into the potatoes. It just looks more inviting!
Want to take it up another notch? A final sprinkle of fresh chopped parsley or a crack of black pepper on top adds a beautiful touch. If you went the BBQ route, a little sprinkle of sliced green onions is fantastic. This is the kind of meal that’s perfect for a casual dinner with friends or a cozy night in with the family. Serve it with a simple side salad or just a big, crusty piece of bread to sop up every last bit of that delicious sauce.
Make It Your Own: Delicious Recipe Twists
The beauty of this bowl is its versatility. Once you’ve mastered the basic formula, the world is your oyster! Here are a few of my favorite ways to mix it up.
- Italian-Inspired: Add ¼ cup of grated Parmesan cheese and 1 teaspoon of Italian seasoning to the meatball mixture. Serve with a quick marinara sauce instead of gravy and swap the broccoli for sautéed spinach.
- Thanksgiving Leftovers Style: Craving holiday flavors? Add a ½ teaspoon of sage and a pinch of thyme to the meatballs. Use sweet potato mash instead of regular mashed potatoes, and top with cranberry sauce alongside the gravy!
- Spicy Buffalo Bowl: For a kick, mix 2 tablespoons of your favorite hot sauce into the meatball mixture. After baking, toss the meatballs in more hot sauce and use a blue cheese or ranch dressing instead of gravy.
- Gluten-Free & Dairy-Free: Easily done! Use almond flour in the meatballs and ensure your gravy is GF. For the potatoes, whip them with olive oil and unsweetened almond milk for a creamy, dairy-free version that’s just as satisfying.
- Cheesy Lover’s Dream: Fold ½ a cup of shredded cheddar cheese into your mashed potatoes. Place the assembled bowls under the broiler for a minute or two until the cheese is bubbly and glorious.
Beau’s Chef Notes: Lessons from My Kitchen
This recipe has been a staple in my kitchen for years, and it’s evolved in the best ways. I remember one time I was filming a video for the site and I completely forgot to add the breadcrumbs to the meatball mixture. Let’s just say I ended up with more of a “turkey meatball scramble” than actual meatballs! It was a hilarious mess, but a great reminder that the breadcrumbs are non-negotiable for structure.
Over time, I’ve learned that letting the meatball mixture rest in the fridge for 15 minutes before rolling helps them hold their shape better. I’ve also become a total convert to using a cookie scoop for portioning – it makes everything so uniform and quick. Most importantly, this recipe is meant to be adaptable. Don’t have an ingredient? Swap it! Want to try a new sauce? Go for it! That’s how the best family recipes are born.
FAQs & Troubleshooting: Your Questions, Answered
Q: Can I make these meatballs ahead of time?
A: Absolutely! You can mix the meatball mixture and keep it covered in the fridge for up to 24 hours before baking. You can also bake the meatballs completely, let them cool, and freeze them in a single layer on a baking sheet before transferring to a freezer bag. They’ll keep for up to 3 months! Reheat from frozen in the oven or microwave.
Q: My meatballs are a bit dry. What happened?
A> The most common culprits are overmixing or overcooking. Remember to mix gently until just combined, and always use a meat thermometer to pull them out of the oven as soon as they hit 165°F. Using a slightly higher fat content turkey (93% vs 99%) can also help with juiciness.
Q: What’s the best way to reheat the bowls for meal prep?
A: For the creamiest results, reheat components separately if you can. If everything is already assembled, add a small splash of milk or water to the mashed potatoes before microwaving. Cover the bowl with a damp paper towel and heat on medium power in 30-second intervals, stirring in between, to avoid the potatoes from becoming gluey.
Q: Can I pan-fry or air-fry the meatballs instead of baking?
A: You sure can! For pan-frying, heat a tablespoon of oil over medium heat and cook, turning occasionally, until browned and cooked through. For air-frying, spray the basket with oil, place meatballs in a single layer (cook in batches if needed), and air-fry at 375°F for 10-12 minutes, shaking the basket halfway through.

Turkey Meatball Mashed Potato Bowls
Description
Turkey Meatball Mashed Potato Bowls
Your new favorite comfort food, ready in under an hour
Makes 4 hearty bowls
Ingredients
Meatballs:
-
1 lb ground turkey (93% lean recommended)
-
¼ cup breadcrumbs (Panko or regular; almond flour for GF)
-
1 large egg
-
2 garlic cloves, minced (or ½ tsp garlic powder)
-
1 tsp onion powder
-
1 tsp dried parsley (or 1 tbsp fresh)
-
½ tsp salt
-
¼ tsp black pepper
Bowls:
-
4 cups mashed potatoes (homemade or store-bought)
-
2 cups broccoli florets, steamed
-
½ cup brown gravy (or BBQ sauce for a twist)
Instructions
1. Prep & Preheat
-
Preheat oven to 400°F (200°C).
-
Line a baking sheet with parchment paper.
2. Mix Meatballs
-
Combine turkey, breadcrumbs, egg, garlic, onion powder, parsley, salt, and pepper.
-
Mix gently until combined (don’t overmix).
3. Shape & Bake
-
Form 16–20 meatballs (~1-inch).
-
Arrange on baking sheet, leaving space between each.
-
Bake 18–20 mins, or until internal temp reaches 165°F (74°C).
4. Prepare Sides
-
Steam broccoli 5–7 mins until bright green and tender-crisp.
-
Mash potatoes (if homemade): boil peeled potatoes until fork-tender, mash with ½ cup warm milk, ¼ cup butter, salt, and pepper.
5. Assemble Bowls
-
Divide mashed potatoes into 4 bowls.
-
Top with 4–5 meatballs and a portion of broccoli.
-
Drizzle with gravy or BBQ sauce.
Notes
-
Italian-Inspired: Add ¼ cup Parmesan and 1 tsp Italian seasoning to meatballs; serve with marinara and sautéed spinach.
-
Thanksgiving Twist: Add ½ tsp sage and pinch of thyme; use sweet potato mash and cranberry sauce.
-
Spicy Buffalo: Mix 2 tbsp hot sauce in meatballs; serve with ranch or blue cheese instead of gravy.
-
Dairy-Free & GF: Use almond flour, dairy-free milk, and olive oil instead of butter.
-
Cheesy Mash: Fold ½ cup shredded cheddar into potatoes and broil briefly.
Nutrition
- Calories: 450Cal per serving
- Fat: 18g
- Carbohydrates: 35g
- Protein: 32g
The Good Stuff: Nutritional Info
I’m all about food that makes you feel good, and this bowl is packed with nourishing ingredients. Here’s a general breakdown per serving (assuming 4 bowls with brown gravy). Remember, these are estimates and can vary based on your specific ingredients.
- Calories: ~450
- Protein: 32g (Fantastic for keeping you full and satisfied!)
- Carbohydrates: 35g (Energy for your day, primarily from the potatoes and broccoli.)
- Fat: 18g (Provides flavor and helps absorb vitamins.)
This meal is a fantastic source of lean protein from the turkey, complex carbs from the potatoes for sustained energy, and vitamins like Vitamin C and K from the broccoli. It’s a balanced, hearty meal that truly fuels your body while comforting your soul. To lower the sodium, you can control the salt added and use a low-sodium gravy.
Final Thoughts: Comfort in a Bowl, Made by You
And there you have it, friends! My go-to recipe for when life calls for a big, hearty, and deeply satisfying meal. These Turkey Meatball Mashed Potato Bowls are more than just dinner; they’re a reminder that the best comfort food doesn’t have to be complicated. It’s about combining simple, wholesome ingredients with a little bit of love to create something truly special.
I hope this recipe becomes a reliable favorite in your home, just like it is in mine. It’s the perfect canvas for your own creativity, so don’t be afraid to play with the flavors. Give one of the variations a try, or invent your own! I’d love to hear how it turns out. Tag me on social @feastical or leave a comment below with your creations.
Now, go forth and create something delicious. Until next time, happy cooking!
– Beau
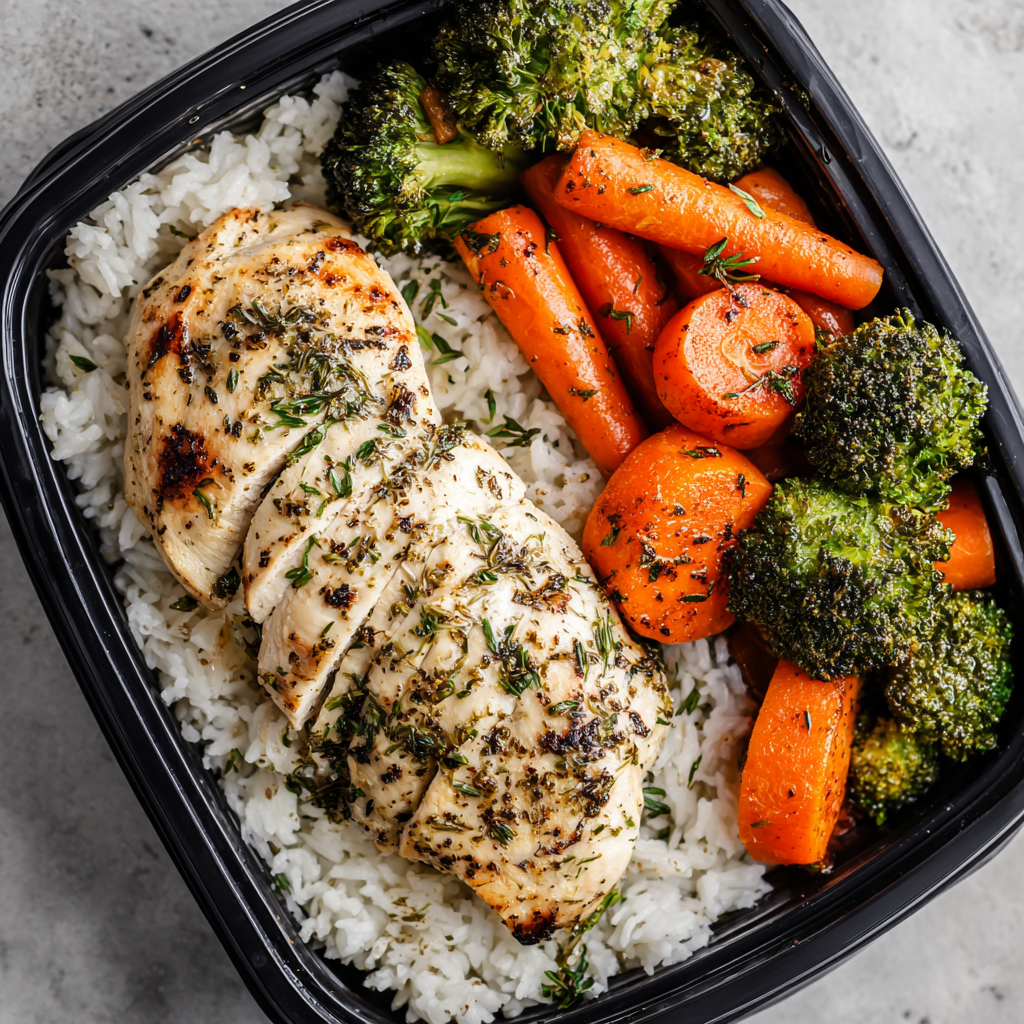
Garlic Herb Chicken Meal Prep
Ditch the Lunchtime Rut with Garlic Herb Chicken Meal Prep
Hey friends, Beau here from Feastical! Let’s have a real chat for a second. How many times have you stared into the fridge at noon on a Tuesday, feeling that familiar dread? You’re hungry, you need something good, but the thought of assembling a decent meal feels like climbing a mountain. Maybe you reach for that sad-looking sandwich or, worse, start browsing takeout apps. Sound familiar? I’ve been there more times than I’d like to admit.
But what if I told you that lunch could be something you actually look forward to? I’m talking about a meal that’s juicy, flavorful, and feels like a warm hug in the middle of a hectic day. That’s the magic of a solid meal prep routine, and it all starts with this superstar recipe: my Garlic Herb Chicken Meal Prep.
This isn’t just about cooking chicken and rice. This is about creating a symphony of textures and tastes that will power you through your week. We’re talking tender, herb-rubbed chicken breasts, fluffy rice soaking up all those delicious juices, crisp-tender broccoli, and sweet, caramelized roasted carrots. It’s a balanced, high-protein plate that’s as beautiful as it is satisfying. And the best part? In about 40 minutes of active time, you’ve got four lunches ready to go, freeing up your future self for more important things—like finally figuring out what that mysterious button on your microwave actually does.
So, grab your favorite cutting board and let’s turn that lunchtime dread into a moment of pure, feel-good deliciousness. You’ve got this!
The “Aha!” Moment That Started It All
This recipe has a special place in my heart because it was born from a genuine kitchen disaster. Picture this: It was my first “real” job after college, and I was determined to be an Adult™ who brought a healthy, homemade lunch every day. On Sunday, I’d cooked a giant batch of unseasoned chicken breast and plain broccoli. By Wednesday, my lunch was so dry and bland that I’d rather have eaten the paper my report was printed on. I was defeated.
That Friday, I went to my grandma’s house, and the smell that hit me when I walked in was incredible. She was roasting a chicken with what she called her “happy little herbs”—a simple mix of thyme, oregano, and a ton of garlic. The chicken was golden, the kitchen was warm, and I realized my mistake instantly. I was treating meal prep like a chore, not an opportunity to create food that genuinely excited me.
I went home that weekend and combined her herb wisdom with my need for efficiency. The result? This very recipe. It taught me that a little bit of love and flavor goes a long, long way. Meal prep shouldn’t be about punishment; it should be about giving your future self a delicious gift.
Gathering Your Flavor Arsenal
One of the secrets to great cooking is understanding your ingredients. This list is simple, but each component plays a crucial role. Here’s the breakdown for 4 perfectly portioned meals.
For the Star of the Show: The Chicken
- 4 Boneless, Skinless Chicken Breasts: Look for breasts that are roughly the same size so they cook evenly. Chef’s Insight: If you have time, brining them in saltwater for 20 minutes before cooking works wonders for juiciness!
- 2 Tablespoons Olive Oil: This helps the herbs stick and creates a beautiful sear. Substitution: Avocado oil works great for high-heat cooking, too.
- 2 Teaspoons Garlic Powder: Yes, we’re using powder! It gives a consistent, mellow garlic flavor that won’t burn like fresh garlic can in the pan. Chef’s Insight: This is my meal prep secret weapon.
- 1 Teaspoon Each of Onion Powder, Dried Thyme, and Dried Oregano: This trio is the flavor foundation. The thyme and oregano bring that warm, earthy, “classic chicken” vibe we all love.
- Salt and Pepper, to taste: Don’t be shy! Salt is essential for bringing out all the other flavors. I use about 1 tsp of kosher salt and ½ tsp of black pepper.
- Juice of ½ Lemon (optional): A bright squeeze at the end cuts through the richness and makes the flavors pop. Highly recommended!
For the Supporting Cast: The Sides
- 2 Cups Cooked White or Brown Rice: White rice is fluffy and quick, while brown rice offers more fiber and a nutty flavor. Pro-Tip: Cook your rice in chicken broth instead of water for an extra flavor boost!
- 2 Cups Broccoli Florets: We want crisp-tender broccoli, not mushy. Look for bright green, tight florets.
- 2 Large Carrots, Sliced: Peel and slice them into coins or batons. Roasting them caramelizes their natural sugars—it’s a game-changer.
- 1 Tablespoon Olive Oil, Salt, and Pepper: Simple seasoning is all these vibrant veggies need.
Let’s Get Cooking: Your Foolproof Guide
Okay, team, apron on! We’re going to multitask like a pro. The goal is to have everything finishing up around the same time. I’ll walk you through it step-by-step.
- Preheat and Prep the Veggies. Fire up your oven to 400°F (200°C). While it’s heating, peel and slice your carrots. Toss them on a baking sheet with that 1 tablespoon of olive oil, a good pinch of salt, and a crack of black pepper. Get your hands in there and make sure every piece is lightly coated. Pop them in the oven for 20-25 minutes. You’ll know they’re done when you can easily pierce them with a fork and the edges are starting to caramelize. Chef’s Hack: Line your baking sheet with parchment paper for zero scrubbing later!
- Cook the Rice. While the carrots are roasting, get your rice cooking according to the package directions. Remember my tip about using broth? Do it! Once it’s cooked, fluff it with a fork and let it hang out, uncovered, so it doesn’t get gummy.
- Conquer the Broccoli. About 10 minutes before the carrots are done, it’s broccoli time. You have two great options here:
- Sauté: Heat a splash of olive oil in a pan over medium-high heat. Toss in the broccoli florets, season with a pinch of salt, and cook for 5-7 minutes, stirring occasionally, until they’re bright green and slightly crisp.
- Steam: Place the broccoli in a steamer basket over boiling water for 4-5 minutes. This is the best method for preserving that vibrant color and crisp-tender bite.
The key is to not overcook it. It will soften a tiny bit more when you reheat it later.
- Create Flavor-Packed Chicken. This is the main event! Pat your chicken breasts dry with a paper towel—this is CRITICAL for getting a golden sear, not a steam. Place them on a plate or in a shallow dish. Drizzle with the 2 tablespoons of olive oil and rub it all over. Now, sprinkle both sides evenly with the garlic powder, onion powder, thyme, oregano, salt, and pepper. Massage those herbs right into the meat. It might feel silly, but you’re building layers of flavor!
- Cook to Perfection. Heat a grill pan, skillet, or actual grill over medium heat. Once hot, add the chicken. Cook for 5-6 minutes on the first side without moving it. You’re looking for a nice golden-brown crust. Flip and cook for another 5-7 minutes on the other side, or until the internal temperature reaches 165°F (74°C) on a meat thermometer. Chef’s Non-Negotiable Tip: PLEASE let the chicken rest for at least 5 minutes after cooking before you slice it. This allows the juices to redistribute throughout the meat, guaranteeing it stays juicy.
- The Grand Finale: Assemble! By now, everything should be ready. Slice the rested chicken against the grain into strips. Grab your four meal prep containers. Evenly divide the fluffy rice, followed by the roasted carrots, the bright green broccoli, and finally, the beautifully sliced garlic herb chicken. If you’re using the lemon juice, give a little squeeze over the chicken in each container before sealing the lid.
Plating Up for Maximum Joy
Even though these are going into containers, I’m a firm believer that we eat with our eyes first! When you’re assembling, think like an artist. Create little sections of color: the white or brown rice, the vibrant orange carrots, the emerald green broccoli, and the golden-brown chicken. It makes opening that container at lunchtime a genuinely happy moment.
If you’re serving this for dinner right away, plate it the same way! A little sprinkle of fresh chopped parsley or a tiny extra drizzle of olive oil right before serving takes it to restaurant-quality levels. This dish pairs wonderfully with a simple side salad or a crusty piece of bread to sop up any lingering juices.
Make It Your Own: Delicious Twists & Swaps
The beauty of this recipe is its versatility. Once you’ve mastered the base, feel free to get creative! Here are a few of my favorite variations:
- Lemon Herb Bliss: Add the zest of one lemon to the herb rub along with the juice. It intensifies the citrus flavor beautifully.
- Spicy Cajun Kick: Swap the thyme and oregano for 2 tablespoons of your favorite Cajun seasoning blend. Serve with a creamy dipping sauce like a yogurt-based ranch.
- Mediterranean Vibe: Replace the sides with quinoa and a chopped Greek salad (cucumber, tomato, red onion, kalamata olives, and a little feta cheese kept on the side).
- Dairy-Free “Creamy” Version: Create a simple sauce by mixing ½ cup of dairy-free yogurt (like unsweetened almond or coconut yogurt) with a minced garlic clove, lemon juice, and chopped dill. Drizzle over the chicken after reheating.
- Sweet Potato Power: Swap the carrots for cubed sweet potatoes. They roast up just as easily and add a different nutritional profile and sweetness.
Beau’s Kitchen Confidential
This recipe has been my lunchtime guardian angel for years, and it’s evolved with me. I once tried to add fresh garlic to the rub instead of powder before pan-searing… let’s just say I learned the hard way that burnt garlic is bitter! The powder is the undisputed champion for this application.
Another funny story: I was so proud of my first successful batch that I took a container to a friend. He texted me later: “Dude, this chicken is amazing. What’s your secret?” I told him it was just dried herbs. He didn’t believe me! It just goes to show that sometimes the simplest techniques, executed well, yield the most impressive results. Don’t overcomplicate it. Good food is about heart, not hassle.
Your Questions, Answered!
Q: My chicken always turns out dry. What am I doing wrong?
A: The most common culprits are overcooking and not resting. A meat thermometer is your best friend—pull the chicken at 165°F. And I can’t stress this enough: let it rest for 5 minutes! Also, if your chicken breasts are very thick, you can pound them to an even ½-inch thickness for more consistent cooking.
Q: How long will these meals last in the fridge?
A: Safely, they’ll last for 3-4 days in airtight containers. Make them on a Sunday, and you’re set through Wednesday or Thursday. If you want to prep for the whole week, freeze a couple of containers on Sunday and move them to the fridge on Tuesday night to thaw for Wednesday and Thursday.
Q: My broccoli gets mushy when I reheat it. Any tips?
A> This is a classic issue! The key is to slightly undercook it initially. Aim for crisp-tender. When reheating, leave the lid of your container slightly ajar or remove it for the last 30 seconds to let excess steam escape. This helps it stay brighter and crisper.
Q: Can I use chicken thighs instead?
A> Absolutely! Boneless, skinless chicken thighs are actually more forgiving and often more flavorful. Just increase the cooking time by a few minutes per side, and always check for an internal temperature of 165°F.

Garlic Herb Chicken Meal Prep
Description
This meal prep recipe is perfect for busy weekdays—juicy herb-rubbed chicken, fluffy rice, crisp-tender broccoli, and caramelized roasted carrots. Makes 4 lunches.
Ingredients
Chicken:
-
4 boneless, skinless chicken breasts (even size for even cooking)
-
2 tbsp olive oil
-
2 tsp garlic powder
-
1 tsp each: onion powder, dried thyme, dried oregano
-
Salt & pepper, to taste
-
Juice of ½ lemon (optional)
Sides:
-
2 cups cooked white or brown rice (cook in chicken broth for extra flavor)
-
2 cups broccoli florets
-
2 large carrots, sliced
-
1 tbsp olive oil, salt, and pepper
Instructions
1. Roast Carrots
-
Preheat oven to 400°F (200°C).
-
Toss carrots with olive oil, salt, and pepper.
-
Roast 20–25 mins until tender and caramelized.
2. Cook Rice
-
Prepare rice according to package directions.
-
Fluff with a fork and let cool slightly.
3. Cook Broccoli
-
Sauté: 5–7 mins in olive oil over medium-high heat.
-
Steam: 4–5 mins over boiling water.
-
Goal: bright green, crisp-tender.
4. Prepare Chicken
-
Pat chicken dry. Rub with olive oil and seasonings.
-
Cook on medium heat: 5–6 mins per side until golden and internal temp 165°F (74°C).
-
Rest 5 mins before slicing.
5. Assemble
-
Slice chicken against the grain.
-
Divide rice, carrots, broccoli, and chicken evenly into 4 containers.
-
Optional: squeeze lemon juice over chicken.
Notes
-
Prevent dry chicken: Use a thermometer and let it rest.
-
Broccoli stay crisp: Slightly undercook; vent container lid when reheating.
-
Storage: 3–4 days in fridge; freeze extras for later.
Nutrition
- Calories: 420 Cal per serving
- Fat: 15g
- Carbohydrates: 32g
- Protein: 36g
The Good Stuff: Fueling Your Body
Let’s talk about why this meal is such a powerhouse. Each container is designed to be a balanced plate, providing sustained energy to keep you full and focused throughout the afternoon.
Per Serving (Approximate):
- Calories: ~420
- Protein: 36g (Essential for muscle repair and keeping you satiated)
- Carbohydrates: 32g (Provides energy from the rice and veggies)
- Fat: 15g (Healthy fats from olive oil for hormone health and vitamin absorption)
This meal is naturally gluten-free and packed with nutrients. The broccoli and carrots deliver a healthy dose of fiber, vitamins A, C, and K, while the chicken provides lean protein. It’s a meal that truly tastes as good as it makes you feel.
You’ve Got This!
And there you have it, my friends—your ticket to a week of stress-free, delicious lunches. This Garlic Herb Chicken Meal Prep is more than just a recipe; it’s a strategy for winning your week. It proves that eating well doesn’t have to be complicated, expensive, or boring.
I hope this guide gives you the confidence to get into the kitchen and take control of your lunchtime. Remember, the Feastical community is all about sharing the joy of food. If you make this, I’d love to see it! Tag me on social @Feastical with your creations.
Now go forth, prep like a pro, and get ready to experience the pure joy of a lunch you actually can’t wait to eat. Happy prepping!
Beau